Page 49 of 530

NOTE:
•After setting the Child Protection Door Lock system,
always test the door from the inside to make certain it
is in the desired position.
•The power sliding side door switches will not open the
power sliding doors if the vehicle is in gear or the
vehicle speed is above 0 mph (0 km/h).
•The power sliding door will operate from the outside
door handle, the RKE transmitter, the switches on the
overhead console, or the switches located on the trim
panel just in front of the power sliding door when the
shift lever is in PARK, regardless of the child lock lever
position.
LIFTGATE
On vehicles equipped with power locks, the liftgate can
be unlocked using the Remote Keyless Entry (RKE)
transmitter button, or by activating the power door lock
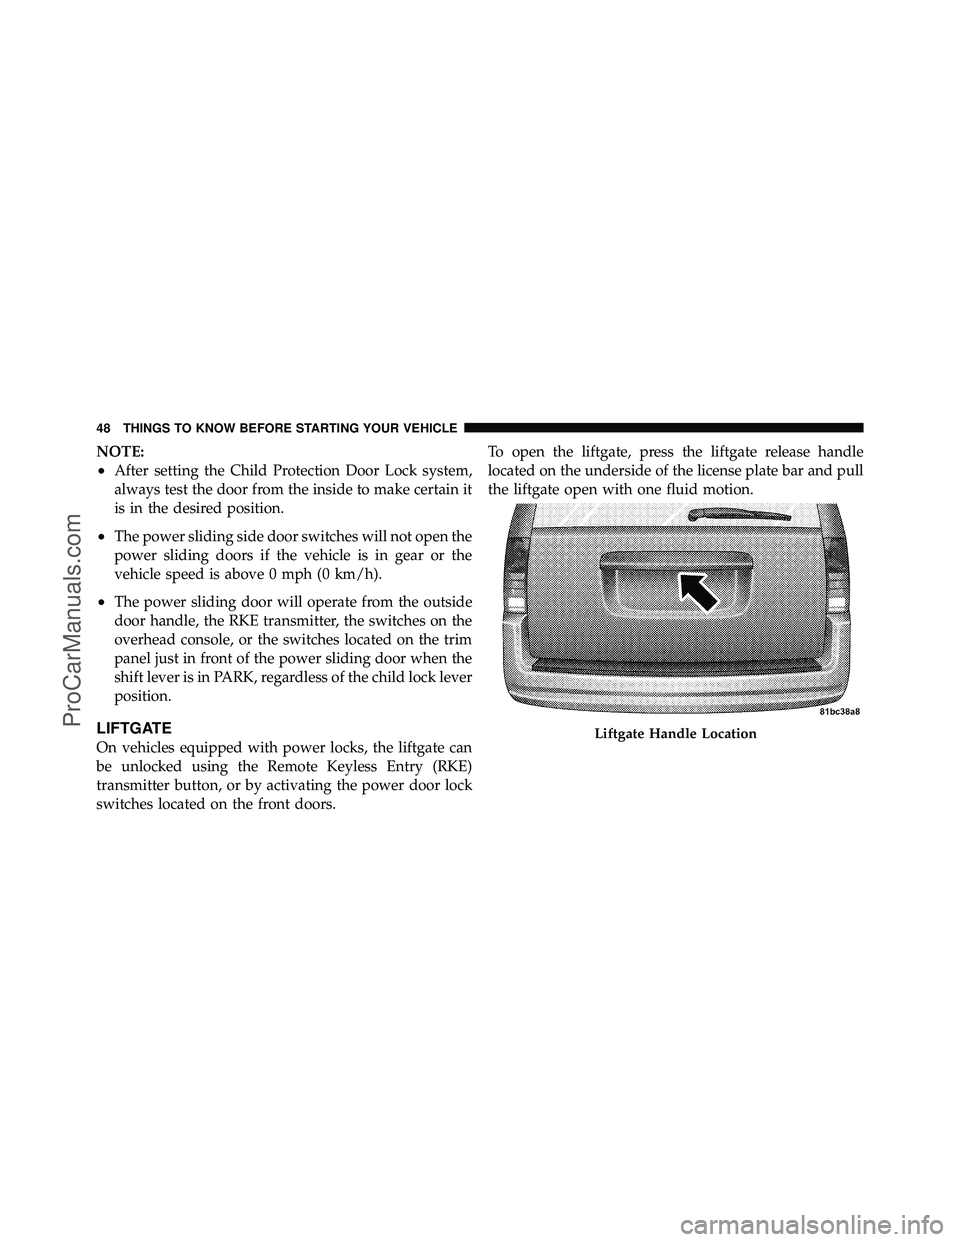
switches located on the front doors.To open the liftgate, press the liftgate release handle
located on the underside of the license plate bar and pull
the liftgate open with one fluid motion.Liftgate Handle Location
48 THINGS TO KNOW BEFORE STARTING YOUR VEHICLE
ProCarManuals.com
Page 50 of 530
If the liftgate is locked and is not equipped with the
power liftgate feature, pressing the button on the RKE
transmitter will result in the liftgate becoming unlocked
for 30 seconds allowing you to manually access the
liftgate area.
Power Liftgate — If Equipped
The power liftgate may be opened manually or by using
the button on the Remote Keyless Entry (RKE) transmit-
ter. Press the button on the transmitter twice within five
seconds, to open the power liftgate. When the liftgate is
fully open, pressing the button twice within five seconds,
a second time, will close the liftgate.
The power liftgate may also be opened and closed by
pressing the button located on the overhead console.
Overhead Console Master Power Switch
1 — Left Door3 — Right Door
2 — Liftgate 4 — Master Lock
2
THINGS TO KNOW BEFORE STARTING YOUR VEHICLE 49
ProCarManuals.com
Page 150 of 530
WARNING!
To avoid serious injury or death, NEVER operate the
vehicle with occupants in the third row seat while in
the tailgate mode.
DRIVER MEMORY SEAT — IF EQUIPPED
The Memory Buttons 1 and 2 on the driver’s door panel
can be programmed to recall the driver’s seat, driver’s
outside mirror, adjustable brake and accelerator pedals,
and radio station preset settings. Your Remote Keyless
Entry (RKE) transmitters can also be programmed to
recall the same positions when the UNLOCK button is
pressed.Your vehicle may have been delivered with two RKE
transmitters. Only one RKE transmitter can be linked to
each of the memory positions.
Driver Memory Switch
3
UNDERSTANDING THE FEATURES OF YOUR VEHICLE 149
ProCarManuals.com
Page 156 of 530
LIGHTS
All of the lights, except the Hazard Warning lights,
headlight high beams and flash-to-pass, are controlled by
switches to the left of the steering column on the instru-
ment panel.
Interior Lighting
Interior lights are turned on when a door or liftgate is
opened, the Remote Keyless Entry (RKE) transmitter is
activated, or when the dimmer control is moved to the
extreme top.
The interior lights will automatically turn off in approxi-
mately 10 minutes for the first activation and 90 seconds
every activation thereafter until the engine is started, if
one of the following occur:
•A door, sliding door or the liftgate is left open
•Any overhead reading light is left on
NOTE: The key must be out of the ignition switch or the
ignition switch must be in the OFF position for this
feature to operate.
Headlight Switch With Halo Control
3
UNDERSTANDING THE FEATURES OF YOUR VEHICLE 155
ProCarManuals.com
Page 185 of 530

Courtesy/Interior Lighting
At the forward end of the console are two courtesy lights
(standard dome light has two buttons). The lights turn on
when a front door, a sliding door or the liftgate is opened.
If your vehicle is equipped with Remote Keyless Entry
(RKE) the lights will also turn on when the UNLOCK
button on the RKE transmitter is pressed.
The courtesy lights also function as reading lights. Press
in on each lens to turn these lights on while inside the
vehicle. Press a second time to turn each light off. You
may adjust the direction of these lights by pressing the
outside ring, which is identified with four directional
arrows (LED lamps only).
The area around the instrument panel cupholders is also
illuminated from a light in the overhead console (pre-
mium console only). This light is turned on when the
headlight switch is on, and will adjust in brightness when
the dimmer control is rotated up or down.
Sunglass Storage (non-sunroof only)
At the rear of the front overhead console, a compartment
is provided for the storage of two pairs of sunglasses.
From the closed position, press the door over-travel latch
to open the compartment. The door will slowly rotate to
the full open position. From this position, the door can be
fully closed or, by rotating upward about 3/4 of the way
and releasing, positioned for conversation mirror use.
From the�conversation mirror� position, the door can
only be closed. To return to the full open position, the
door must first be closed and then opened by pressing
the over-travel latch again to release.
NOTE: The front overhead console supplied with fac-
tory sunroof, incorporates a sunroof switch.
Rear Overhead Consoles — If Equipped
The rear overhead storage system is available in two
versions: with or without sunroof.
184 UNDERSTANDING THE FEATURES OF YOUR VEHICLE
ProCarManuals.com
Page 186 of 530

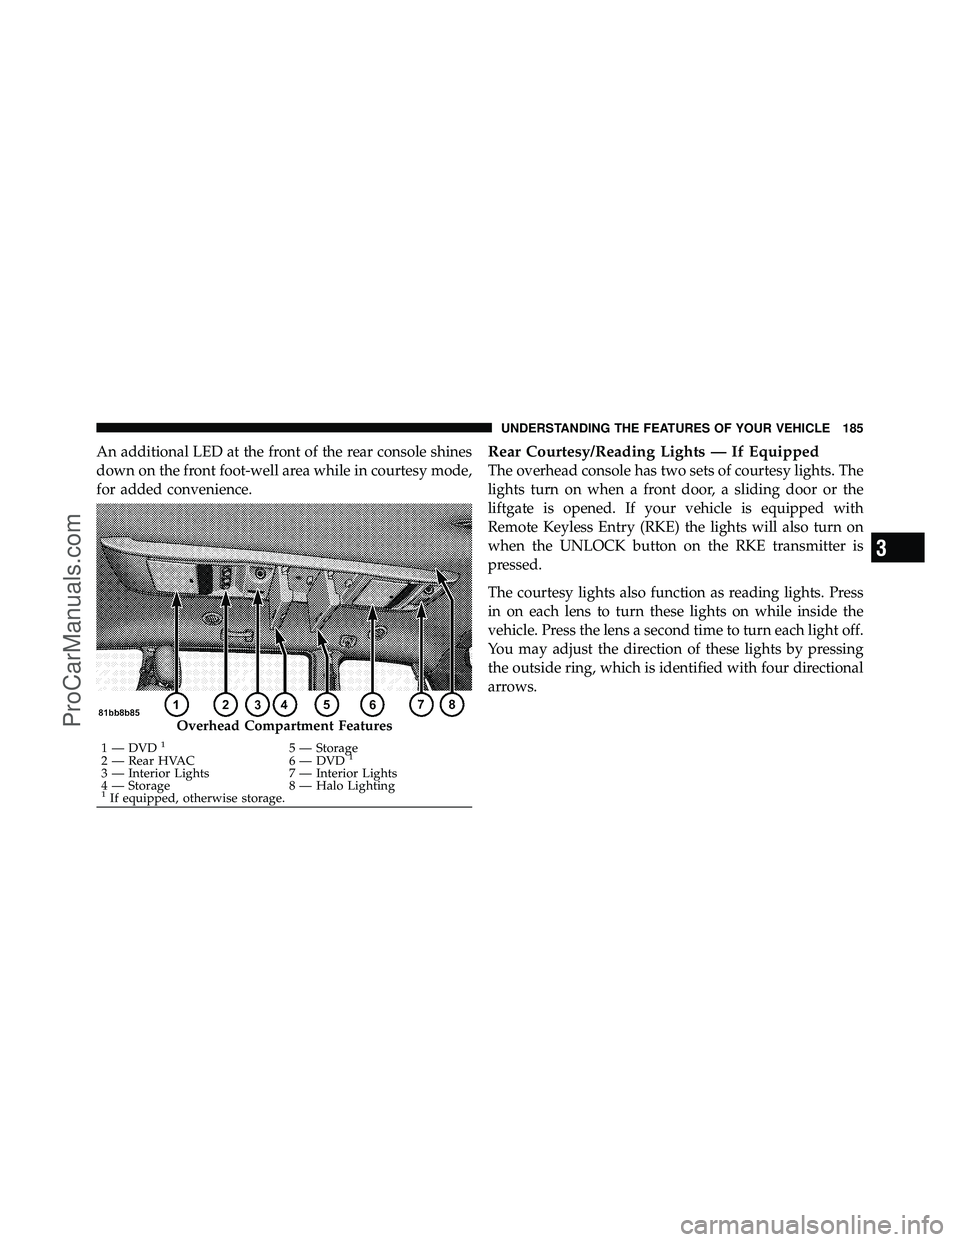
An additional LED at the front of the rear console shines
down on the front foot-well area while in courtesy mode,
for added convenience.Rear Courtesy/Reading Lights — If Equipped
The overhead console has two sets of courtesy lights. The
lights turn on when a front door, a sliding door or the
liftgate is opened. If your vehicle is equipped with
Remote Keyless Entry (RKE) the lights will also turn on
when the UNLOCK button on the RKE transmitter is
pressed.
The courtesy lights also function as reading lights. Press
in on each lens to turn these lights on while inside the
vehicle. Press the lens a second time to turn each light off.
You may adjust the direction of these lights by pressing
the outside ring, which is identified with four directional
arrows.
Overhead Compartment Features
1 — DVD15 — Storage
2 — Rear HVAC 6 — DVD1
3 — Interior Lights 7 — Interior Lights
4 — Storage 8 — Halo Lighting
1If equipped, otherwise storage.
3
UNDERSTANDING THE FEATURES OF YOUR VEHICLE 185
ProCarManuals.com
Page 254 of 530

Use the Step button to display one of the following
choices.
Language
When in this display you may select one of five lan-
guages for all display nomenclature, including the trip
functions and the navigation system (if equipped). Press
the RESET button while in this display to select English,
Spanish (Español), French (Français), Italian (Italiano),
German (Deutsch), and Dutch (Nederlands). Then, as
you continue, the information will display in the selected
language.
Auto Door Locks
When ON is selected, all doors will lock automatically
when the vehicle reaches a speed of 15 mph (24 km/h).
To make your selection, press and release the RESET
button until ON or OFF appears.
Auto UNLK On Exit
When ON is selected, all doors will unlock when the
vehicle is stopped and the transmission is in the PARK or
NEUTRAL position and the driver’s door is opened. To
make your selection, press and release the RESET button
until ON or OFF appears.
RKE Unlock
WhenDriver Door 1st Press is selected, only the driver’s
door will unlock on the first press of the Remote Keyless
Entry (RKE) transmitter UNLOCK button. When Driver
Door 1st Press is selected, you must press the RKE
transmitter UNLOCK button twice, to unlock the passen-
ger’s doors. When All Doors 1st Press is selected, all of
the doors will unlock on the first press of the RKE
transmitter UNLOCK button. To make your selection,
press and release the RESET button until “Driver Door
1st Press” or “All Doors 1st Press” appears.4
UNDERSTANDING YOUR INSTRUMENT PANEL 253
ProCarManuals.com
Page 471 of 530
FUSES/TIPM
Cavity Cartridge
Fuse Mini-Fuse Description
M18 — 15 Amp BlueRight Tail/Park/
Run Lamp
M19 — 25 Amp NaturalAutomatic Shut-
down #1 and #2
M20 — 15 Amp BlueInstrument Cluster
Interior Light,
Switch Bank, Steer-
ing Column Mod-
ule, Switch Steering
Wheel
M21 — 20 Amp YellowAutomatic
Shutdown #3
M22 — 10 Amp RedRight Horn
(HI/LOW)
M23 — 10 Amp RedLeft Horn
(HI/LOW)FUSES/TIPM
Cavity Cartridge
Fuse Mini-Fuse Description
M24 — 25 Amp NaturalRear Wiper
M25 — 20 Amp YellowFuel Pump, Diesel
Lift Pump – Export
Only
M26 — 10 Amp RedPower Mirror
Switch, Driver
Window Switch
M27 — 10 Amp RedIgnition Switch,
Wireless Control
Module, Keyless
Entry Module,
Steering Column
Lock
470 MAINTAINING YOUR VEHICLE
ProCarManuals.com