2010 CHRYSLER TOWN AND COUNTRY remote control
[x] Cancel search: remote controlPage 10 of 92

KEY FOB
Locking And Unlocking The
Doors/Liftgate
• Press the LOCK button once to lock all thedoors and the liftgate. Press the UNLOCK
button once to unlock the driver’s door
only and twice within five seconds to
unlock all the doors and liftgate.
• All doors can be programmed to unlock on the first press of the UNLOCK button.
Refer to Programmable Features in this
guide.
WARNING!
Leaving unattended children in a vehicle is dangerous for a number of reasons. A
child or others could be severely injured or killed. Children should be warned not
to touch the parking brake, brake pedal, or the shift lever. Do not leave the Key Fob
in the ignition. A child could operate power windows, other controls, or move the
vehicle.
Remote Start
• Press the REMOTE START buttonx2twice within five seconds. Pressing the
REMOTE START button a third time shuts the engine off.
• To drive the vehicle, press the UNLOCK button, insert the Key Fob in the ignition and turn to the ON/RUN position.
• With remote start, the engine will only run for 15 minutes (timeout) unless the ignition Key Fob is placed in the ON/RUN position.
• The vehicle must be started with the Key Fob after two consecutive timeouts.
WARNING!
• Do not start or run an engine in a closed garage or confined area. Exhaust gas contains Carbon Monoxide (CO) which is odorless and colorless. Carbon
Monoxide is poisonous and can cause serious injury or death when inhaled.
• Keep Key Fob transmitters away from children. Operation of the Remote Start System, windows, door locks or other controls could cause serious injury or
death.
GETTING STARTED
8
Page 18 of 92

• To program a Key Fob to the memory position, press and release the LOCK buttonwithin 10 seconds on the Key Fob to be programmed.
• Place the ignition switch in the ON position, select Remote Linked to Memory in the Electronic Vehicle Information Center (EVIC) and enter Yes.
• Press 1 or 2 to recall the saved positions, or press UNLOCK on the programmed Key Fo b .
HEATED SEATS
Front Heated Seats
• The controls for front heated seats arelocated on the center instrument panel
area.
• Press the switch once to select High-level heating. Press the switch a second time to
select Low-level heating. Press the switch a
third time to shut the heating elements
Off.
Second Row Heated Seats
• Second row heated seat switches arelocated in the sliding door handle trim
panels.
• Press the switch once to select High-level heating. Press the switch a second time to
select Low-level heating. Press the switch a
third time to shut the heating elements
Off.
GETTING STARTED
16
Page 20 of 92

ADJUSTABLE PEDALS
• Press the switch located on the left side ofthe steering column forward to move the
brake and accelerator pedals away from
the driver and press the switch rearward to
move the pedals closer to the driver.
NOTE: The pedals cannot be adjusted when
the vehicle is in REVERSE or when the
Electronic Speed Control is set.
WARNING!
Do not adjust the pedals while the vehicle is moving. You could lose control and
have an accident. Always adjust the pedals while the vehicle is parked.
CAUTION!
Do not place any article under the adjustable pedals or impede its ability to move,
as it may cause damage to the pedal controls. Pedal travel may become limited if
movement is stopped by an obstruction in the adjustable pedal’s path.
PROGRAMMABLE FEATURES
Electronic Vehicle Information Center (EVIC) – If Equipped
• The EVIC can be used to program the following Personal Settings. Press and release the MENU button
until Personal Settings displays, then press the STEP
button
to scroll through the settings. Press the RESET buttonto change the
setting.
• Language • Rain Sensing Intermittent Wipers
• Auto Door Locks • Key-Off Power Delay
• Auto UNLK On Exit • ILLUMIN. Approach
• RKE Unlock • Blind Spot Alert
• RKE Linked To Memory • Park ASST. System
• Flash Lamp Lock • Display Units of Measure In
• Headlamp Off Delay • Door Alert
• Easy Exit Seat • Automatic High Beams
• Tilt MIRR. In Reverse • Display ECO
• Turn Headlamps On With Remote Key Unlock • Sound Horn With Remote Key Lock
GETTING STARTED
18
Page 44 of 92

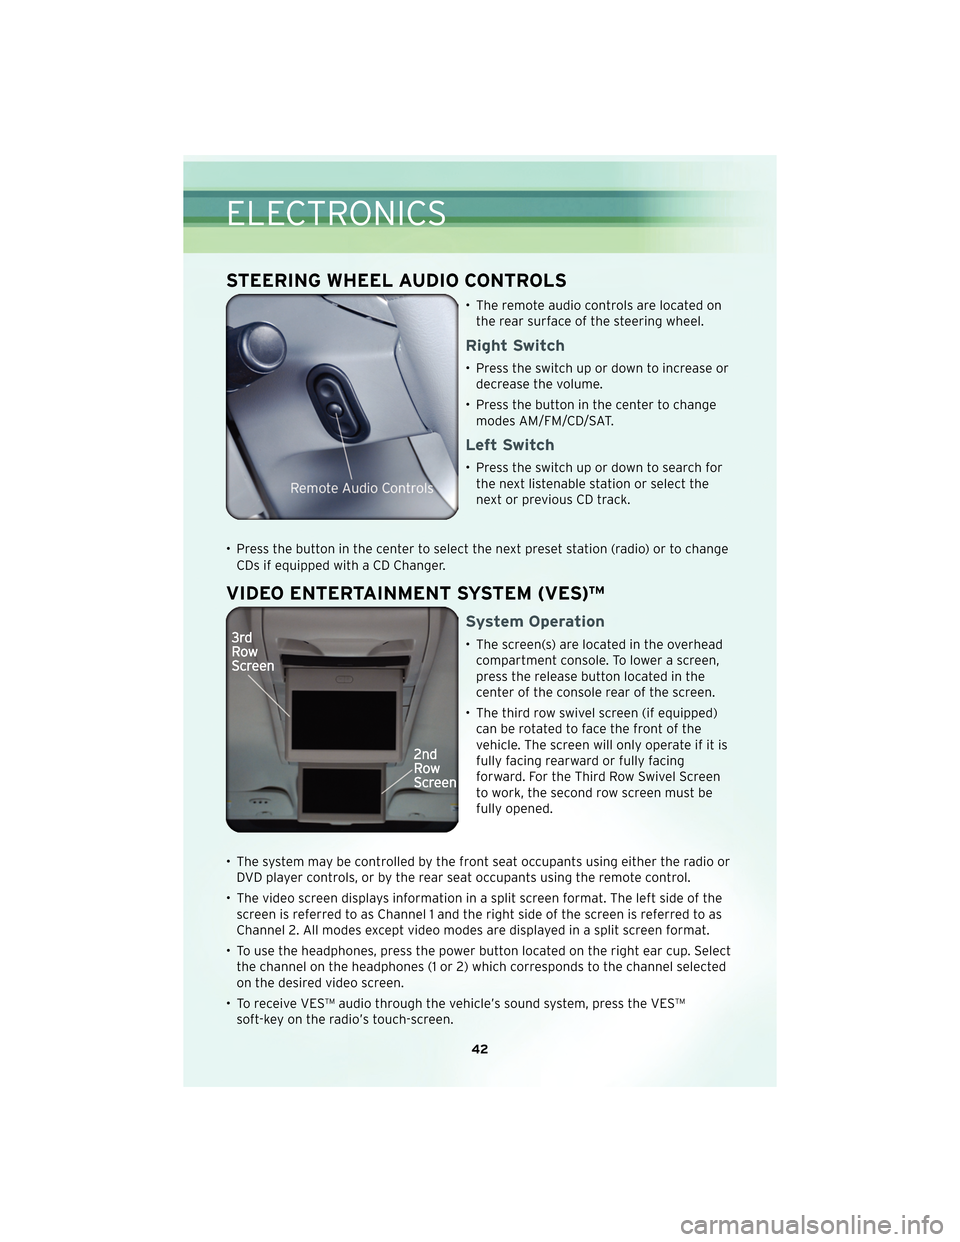
STEERING WHEEL AUDIO CONTROLS
• The remote audio controls are located onthe rear surface of the steering wheel.
Right Switch
• Press the switch up or down to increase ordecrease the volume.
• Press the button in the center to change modes AM/FM/CD/SAT.
Left Switch
• Press the switch up or down to search forthe next listenable station or select the
next or previous CD track.
• Press the button in the center to select the next preset station (radio) or to change CDs if equipped with a CD Changer.
VIDEO ENTERTAINMENT SYSTEM (VES)™
System Operation
• The screen(s) are located in the overheadcompartment console. To lower a screen,
press the release button located in the
center of the console rear of the screen.
• The third row swivel screen (if equipped) can be rotated to face the front of the
vehicle. The screen will only operate if it is
fully facing rearward or fully facing
forward. For the Third Row Swivel Screen
to work, the second row screen must be
fully opened.
• The system may be controlled by the front seat occupants using either the radio or DVD player controls, or by the rear seat occupants using the remote control.
• The video screen displays information in a split screen format. The left side of the screen is referred to as Channel 1 and the right side of the screen is referred to as
Channel 2. All modes except video modes are displayed in a split screen format.
• To use the headphones, press the power button located on the right ear cup. Select the channel on the headphones (1 or 2) which corresponds to the channel selected
on the desired video screen.
• To receive VES™ audio through the vehicle’s sound system, press the VES™ soft-key on the radio’s touch-screen.
ELECTRONICS
42
Page 45 of 92

Operation Of The Touch-Screen Radio/DVD Player
• To view a DVD press the OPEN/CLOSE hard-key on the touch-screen radio andinsert the disc or insert the disc into the optional DVD player. Playback will begin
automatically after the DVD is recognized by the disc drive. If playback does not
begin automatically when the disc is inserted into the DVD player press the PLAY
button. If playback does not begin automatically after the disc is inserted into the
touch-screen radio follow these steps:
• Press the MENU hard-key, then touch the Rear VES™ soft-key. If a chapter list appears on the right side of the screen, touch the HIDE LIST soft-key to display
the Rear VES™ control screen.
• Touch the 1 soft key to select an audio channel, then touch the DISC soft-key in the MEDIA column.
SIRIUS Backseat TV™
• Press the MENU hard-key, then touch the Rear VES™ soft-key. If a chapter listappears on the right side of the screen, touch the HIDE LIST soft key to display the
Rear VES™ Control screen.
• Touch the 1 soft-key to select an audio channel, then touch the TV soft-key in the RADIO column to select SIRIUS Backseat TV™.
• To view SIRIUS Backseat TV™ using the remote, set the remote control channel selector switch to channel 1. Press the MODE button, then using the arrow buttons
select TV and press ENTER.
Operation Of The Remote Control
• The remote control operates similarly to any DVD remote you may have usedbefore and allows the rear seat passengers to change stations, tracks, discs and
audio/video modes.
• The remote control is designed to control either channel by using the selector switch located on the right side of the remote.
• Connect the video game or other external media devises to the AUX jacks following the color coding for the VES™ jacks.
• Pressing the power button will turn the VES™ system On/OFF.
• Pressing the mode button causes the MODE SELECTION menu to appear on the VES™ screen. Use the remote control arrow buttons to scroll through the available
modes, and then press ENTER to select the desired mode.
Auxiliary Audio/Video Input Jacks
•The AUX jacks are located on the drivers side rear trim panel behind the sliding door.
• Connect the video game or other external media devises to the AUX jacks followingthe color coding for the VES™ jacks.
• Using either the touch-screen radio or remote control, select AUX from the REAR VES™ CONTROL or the MODE SELECTION screen.
• Refer to the Uconnect™ Multimedia – Video Entertainment System (VES)™ section in the Uconnect™ User’s Manual on the DVD for further details.
43
ELECTRONICS