2010 CHRYSLER TOWN AND COUNTRY navigation
[x] Cancel search: navigationPage 2 of 92
IMPORTANT: T\fis Us\br Guid\b is int\bnd\bd to familiariz\b you wit\f t\f\b important
f\batur\bs of your v\b\ficl\b. T\f\b DVD \bnclos\bd contains your Own\br’s Manual,
Navigation/M\bdia C\bnt\br Manuals, Warranty Bookl\bts, Tir\b Warranty and 24-Hour
Towing Assistanc\b (n\bw v\b\ficl\bs purc\fas\bd in t\f\b U.S.) or Roadsid\b Assistanc\b
(n\bw v\b\ficl\bs purc\fas\bd in Canada) in \bl\bctronic format. W\b \fop\b you find it
us\bful. If you ar\b t\f\b first r\bgist\br\bd own\br of your v\b\ficl\b, you may obtain a
print\bd copy of t\f\b Own\br’s Manual, Navigation/M\bdia C\bnt\br Manuals or
Warranty Bookl\bt by calling 1-800-247-9753 (U.S.) or 1-800-387-1143 (Canada) or
by contacting your d\bal\br. R\bplac\bm\bnt DVD kits may b\b purc\fas\bd by visiting
www.t\bc\faut\fority.com. Copyrig\ft © 2010 C\frysl\br Group LLC.
Page 40 of 92
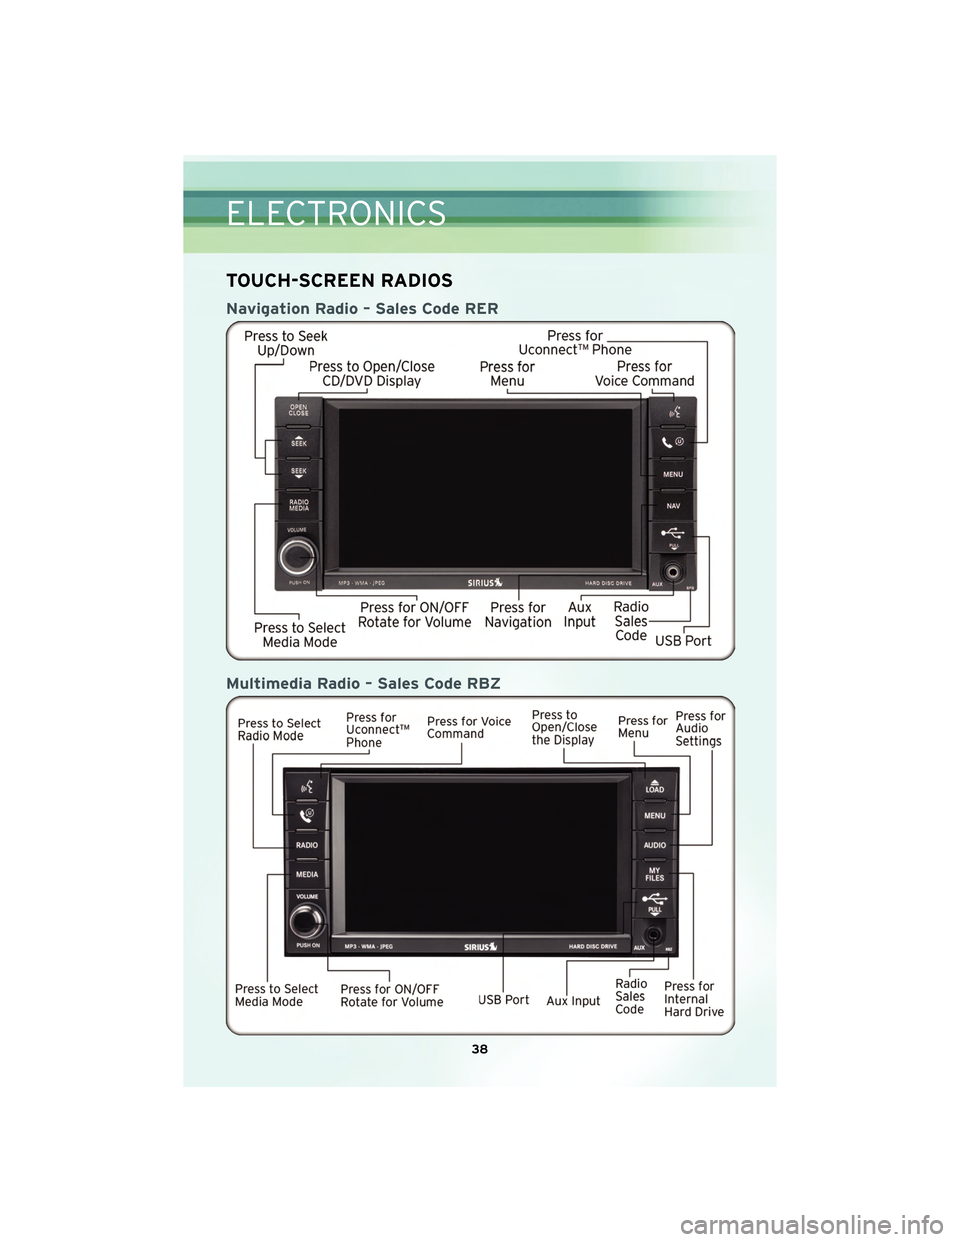
TOUCH-SCREEN RADIOS
Navigation Radio – Sales Code RER
Multimedia Radio – Sales Code RBZ
ELECTRONICS
38
Page 41 of 92
NOTE:Uconnect™ Phone and Voice Command are vehicle options which must be
ordered separately. The buttons on the radio will only be active if the vehicle has
been equipped with the option.
• The radio sales code is located on the lower right side of the radio faceplate.
• Unless otherwise noted, the information provided on the operation and functionality of the radios in this section is common to all touch-screen radios.
Seek Up/Down
• Navigation Radio – Press the SEEK hard-key to seek through radio stations in AM,FM, or SAT bands. Seek through tracks in CD or iPod®modes or through songs in
the HDD playlist.
• Multimedia Radio – Touch the SCAN soft-key to change the currently playing station in AM, FM or SAT bands.
Auxiliary Mode
• The auxiliary (AUX) jack allows a portable device, such as an MP3 player or acassette player, to be plugged into the radio and utilize the vehicle’s audio system
and play through the vehicle speakers.
Clock Setting
• Turn the radio on, then touch the screen where the time is displayed.
• Touch the USER CLOCK soft-key (Navigation radio only).
• To adjust the hours, touch either the HOUR FORWARD or HOUR BACKWARDsoft-key.
• To adjust the minutes, touch either the MINUTE FORWARD or MINUTE BACKWARD soft-key.
• To save the new time setting, touch the screen where the word “Save” is displayed.
Store Radio Presets
• Press the RADIO/MEDIA hard-key repeatedly until AM FM SAT is displayed in the upper left corner of the screen.
• Select the radio band by touching either the AM, FM, or SAT soft-key.
• Find the station to store by either pressing the SEEK UP/DOWN hard-key, or touching the SCAN soft-key, DIRECT TUNE soft-key or the left and right arrows.
• Once the station is found, touch and hold one of the PRESET soft-keys in the list to the right, until you hear a confirmation beep.
Hard Disc Drive Operation
Copy Complete Audio Disc To Hard-Drive
• Press the OPEN/CLOSE hard-key and insert a disc, then press the MENU hard-key.
• Touch the MY FILES soft-key, then select MY MUSIC.
• Touch the IMPORT MUSIC soft-key, then touch the FROM DISC soft-key in the nextscreen to start the process.
39
ELECTRONICS
Page 42 of 92
Copying From USB
• Insert a USB device, then select MY MUSIC.
• Touch the IMPORT MUSIC FILES soft-key, then touch the FROM USB soft-key in thenext screen.
• Select the folders or titles you would like to copy, then touch the DONE soft-key to start the copy process.
Copy Pictures To The Hard-Drive
• Insert either a CD or a USB device containing your pictures.
• Touch the MY FILES soft-key, then go to the MANAGE MY FILES screen.
• Touch the MY PICTURES soft-key to get an overview of the currently stored images.
• Touch one of the ADD PICTURES soft-keys, then select the type of media inserted.
• Use the PAGE soft-keys to page through a list of pictures and press the picture youwould like to import.
• Confirm your selection by touching the YES soft-key. The imported picture is now available in the MANAGE MY PICTURES screen.
• In order to display the imported picture in the radio screen, touch the desired picture soft-key.
• Select this picture by pressing the PICTURE VIEW soft-key. A check mark indicates the currently used picture.
Cleaning Your Touch-Screen Radio
• Do not spray any liquid or caustic chemicals directly on the screen. Use a clean anddry micro fiber lens cleaning cloth in order to clean the touch-screen.
• If necessary, use a lint-free cloth dampened with a cleaning solution such as isopropyl alcohol or an isopropyl alcohol and water solution ratio of 50:50. Be sure
to follow the solvent manufacturer’s precautions and directions.
Navigation
Navigation Radio – RER Only
• Navigation radios require digital data from a navigation database. The data in thenavigation database is licensed from Navigation Technologies®. Not all roads are
digitized.
• For software updates, visit http://www.chrysler.com/en/owners/mygig/ website, visit http://www.navteq.com website, or contact your authorized dealer for the latest
available software.
NOTE: Many features of this radio are speed dependent. For your own safety, it is
not possible to use the touch-screen keyboard to enter a name (e.g., street name)
while the vehicle is in motion. Pull over at a safe location to complete your task.
• The Navigation system receives GPS signals from satellites to display the position of your vehicle.
ELECTRONICS
40
Page 43 of 92
New Destination
• Press the NAV hard-key to access the Navigation Main Menu.
• Touch the NEW DESTINATION soft-key to program a destination, then select thedestination soft-key of your choice.
Program/Storing Home Address
• Press the NAV hard-key to access the Navigation Main Menu.
• Touch the GUIDE ME HOME soft-key, then touch the STREET ADDRESS soft-key.
• Touch the STATE soft-key, then enter your state name into the speller; select yourstate from the list and press the CHANGE soft-key.
• Touch the INPUT STREET NAME soft-key and enter your street name into the speller.
• Touch the CONTINUE soft-key and enter your address into the speller; touch the CONTINUE soft-key again.
• Touch the city name and touch the SAVE soft-key to complete programming.
Change Stored Home Address
• Press the MENU hard-key, then touch the MY FILES soft-key.
• Touch the MY ADDRESS BOOK soft-key, then touch the HOME soft-key.
• In the Home Address Information screen, touch the EDIT CONTACT soft-key, then touch the CHANGE ADDRESS soft-key in the next screen.
• Touch the INPUT STREET NAME soft-key and enter your street name into the speller.
• Touch the CONTINUE soft-key and enter your address into the speller; touch the CONTINUE soft-key again.
• Touch the city name and touch the SAVE soft-key to complete programming.
Guide Me Home
• Press the NAV hard-key to access the Navigation Main Menu.
• Touch the GUIDE ME HOME soft-key to route you back to your home destination from your current location. Touch the GO soft-key to start your trip.
Map
• Press the NAV hard-key to access the Navigation Main Menu.
• Touch the MAP soft-key to display a map of your current position.
41
ELECTRONICS
Page 87 of 92
MOPAR®ACCESSORIES
• The following highlights just some ofthe authentic Chrysler Accessories by
MOPAR®that have been engineered to customize your Chrysler Town & Country.
• To see the full line of acc essories, stop by your Chry sler dealer or visit MOPAR.com.
EXTERIOR:
• Side Window Air Deflectors • Sunroof Air Deflector • Front Air Deflector
• Hitch Receiver • Fog Lights • Molded Splash Guards
• Molded Running Boards • Full Vehicle Cover
INTERIOR:
• Premium Carpet Floor Mats • Door Sill Guards • Rear Floor Liner
• Slush Mats • Ambient Light Kit
ELECTRONICS:
• Portable Navigation Systems • Uconnect™ Web (WiFi) • Rearview Camera
•iPod
®Adapter • Media Center 430 (RBZ
Multimedia Radio) • DVD Rear Seat Video™
• Head Restraint DVD Rear Seat Video™ • Media Center 730 (RER
Navigation Radio) • Remote Start
CARRIERS:
• Hitch-mount Bike Carrier • Roof Mount Bike Carrier • Roof Box Cargo Carrier
• Roof Mount Ski and Snowboard Carrier • Tent Kit
• Roof Mount Canoe
Carrier
iPod
®is a registered trademark of Apple, Inc.
85
MOPAR ACCESSORIES
Page 92 of 92

T\fis guid\b \fas b\b\bn pr\bpar\bd to \f\blp you g\bt quickly acquaint\bd
wit\f your n\bw C\frysl\br and to provid\b a conv\bni\bnt r\bf\br\bnc\b
sourc\b for common qu\bstions. How\bv\br, it is not a substitut\b for
your Own\br’s Manual.
For compl\bt\b op\brational instructions, maint\bnanc\b proc\bdur\bs
and important saf\bty m\bssag\bs, pl\bas\b consult your Own\br’s
Manual, Navigation/M\bdia C\bnt\br Manuals and ot\f\br Warning
Lab\bls in your v\b\ficl\b.
Not all f\batur\bs s\fown in t\fis guid\b may apply to your v\b\ficl\b.
For additional information on acc\bssori\bs to \f\blp p\brsonaliz\b
your v\b\ficl\b, visit www.mopar.com or your local C\frysl\br d\bal\br.
10Y531-926-AA
Town & Country T\fird Printing Us\br Guid\b
CHRYSLER.C OM