Page 60 of 436

Children that are not big enough to wear the vehicle seat
belt properly (see section on Child Restraints) should be
secured in the rear seat in child restraints or belt-
positioning booster seats. Older children who do not use
child restraints or belt-positioning booster seats should
ride properly buckled up in the rear seat. Never allow
children to slide the shoulder belt behind them or under
their arm.
If a child from 1 to 12 years old (not in a rear facing child
seat) must ride in the front passenger seat, move the seat
as far back as possible and use the proper child restraint.
(Refer to information on Child Restraints in this section.)
You should read the instructions provided with your
child restraint to make sure that you are using it properly.
2.All occupants should ALWAYS wear their lap and
shoulder belts properly. 3.
The driver and front passenger seats should be
moved back as far as practical to allow the Advanced
Front Airbags room to inflate.
4. Do not lean against the door. If your vehicle has side
airbags, and deployment occurs, the side airbags will
inflate forcefully into the space between you and the
door.
5. If the airbag system in this vehicle needs to be
modified to accommodate a disabled person, contact
the Customer Center. Phone numbers are provided
under �If You Need Assistance� in Section 9 of this
manual.
60 THINGS TO KNOW BEFORE STARTING YOUR VEHICLE
Page 85 of 436
UNDERSTANDING THE FEATURES OF YOUR VEHICLE
CONTENTS
�Mirrors .............................. 89
▫ Inside Day/Night Mirror ................ 89
▫ Automatic Dimming Mirror — If Equipped . . . 90
▫ Power Mirrors ....................... 90
▫ Adjusting Sideview Mirrors .............. 92
▫ Illuminated Vanity Mirrors — If Equipped . . . 93
� uconnect™ phone — If Equipped ........... 93
� Voice Recognition (VR) System — If Equipped . . 93
� Seats ............................... 94 ▫
Manual Front Seat Adjustment ............ 94
▫ Driver Seat Manual Height Adjuster —
If Equipped ......................... 95
▫ Reclining Bucket Seats .................. 96
▫ Lumbar Support — If Equipped ........... 97
▫ Power Seats — If Equipped .............. 97
▫ Adjusting Active Head Restraints .......... 98
▫ Heated Seats — If Equipped ............ 101
▫ Fold-Flat Passenger Seatback ............ 102
3
Page 93 of 436
Illuminated Vanity Mirrors — If Equipped
An illuminated vanity mirror is on each sun visor. To use
the mirror, lower the sun visor and rotate the mirror
cover upward. The lights will turn on automatically.
Closing the mirror cover turns off the lights.
uconnect™ phone — IF EQUIPPED
Refer to “uconnect™ phone” in the uconnect™ User
Manual located on the DVD for further details.
VOICE RECOGNITION (VR) SYSTEM — IF
EQUIPPED
Refer to “Voice Recognition (VR)” in the uconnect™ User
Manual located on the DVD for further details.
Illuminated Vanity Mirror
3
UNDERSTANDING THE FEATURES OF YOUR VEHICLE 93
Page 131 of 436
CAUTION!
•Many accessories that can be plugged in draw
power from the vehicle’s battery, even when not in
use (i.e., cellular phones, etc.). Eventually, if
plugged in long enough, the vehicle’s battery will
discharge sufficiently to degrade battery life
and/or prevent the engine from starting.
•Accessories that draw higher power (i.e., coolers,
vacuum cleaners, lights, etc.) will degrade the
battery even more quickly. Only use these inter-
mittently and with greater caution.
•After the use of high power draw accessories, or
long periods of the vehicle not being started (with
accessories still plugged in), the vehicle must be
driven a sufficient length of time to allow the
generator to recharge the vehicle’s battery.
CIGAR LIGHTER AND ASH RECEIVER — IF
EQUIPPED
An optional ash receiver is available from your autho-
rized dealer and will fit in the center console front
cupholder.
Ash Receiver
3
UNDERSTANDING THE FEATURES OF YOUR VEHICLE 131
Page 137 of 436
The left latch opens to the top storage area.
The lower bin can be accessed directly, without first
exposing the upper bin, by operating the right latch with
the armrest down.
The first storage bin can be used to hold smaller items.
The lower storage bin includes a molded-in coin holder,
room for CD’s, DVD’s, and a power outlet that allows a
cellular phone to recharge while concealed.
NOTE:
•A notch in the side of the console base under the
armrest will also allow use of cellular phone while still
plugged into the power outlet and with the armrest
latched down.
•The power outlet located inside the console can also
energize the cigar lighter in the available Smoker’s
Package.
Storage Console Detail
1 — Release Top Compartment
2 — Release Bottom Compartment
3 — Top Compartment
4 — Bottom Compartment
3
UNDERSTANDING THE FEATURES OF YOUR VEHICLE 137
Page 142 of 436

▫List Button
(Disc Mode For MP3/WMA Play) ......... 183
▫ Info Button
(Disc Mode For MP3/WMA Play) ......... 183
� Sales Code (RER/REN) — AM/FM/CD/DVD
Radio – If Equipped .................... 186
▫ Operating Instructions — Voice Recognition
System (VR) — If Equipped ............. 186
▫ Operating Instructions — uconnect™ phone
— If Equipped ...................... 186
▫ Clock Setting Procedure ............... 186
� Sales Code RES — AM/FM Stereo Radio With
CD Player (MP3 AUX Jack)............... 188
▫ Operating Instructions — Radio Mode ..... 188▫
Operation Instructions — CD Mode For CD
And MP3 Audio Play ................. 191
▫ Notes On Playing MP3 Files ............ 193
▫ Operation Instructions - Auxiliary Mode .... 196
� Sales Code RES/RSC — AM/FM Stereo Radio
With CD Player (MP3 AUX Jack) And
Sirius Radio .......................... 197
▫ Operating Instructions — Radio Mode ..... 197
▫ Operation Instructions — CD Mode For CD
And MP3 Audio Play ................. 203
▫ Notes On Playing MP3 Files ............ 205
▫ List Button (CD Mode For MP3 Play) ...... 207
▫ Info Button (CD Mode For MP3 Play) ...... 208
142 UNDERSTANDING YOUR INSTRUMENT PANEL
Page 143 of 436

�uconnect™ studios (Satellite Radio)
— If Equipped (REN/REQ/RER/RES
Radios Only) ......................... 209
▫ System Activation .................... 209
▫ Electronic Serial Number/Sirius
Identification Number (ESN/SID) ......... 209
▫
Selecting uconnect™ studios (Satellite) Mode. . 210
▫ Satellite Antenna ..................... 210
▫ Reception Quality .................... 210
▫ Operating Instructions - uconnect™ studios
(Satellite) Mode ..................... 211
▫ Operating Instructions - uconnect™ phone
(If Equipped) ....................... 213
� Video Entertainment System (VES)™
— If Equipped ........................ 213 �
Remote Sound System Controls
— If Equipped ........................ 215
▫ Right-Hand Switch Functions ............ 216
▫ Left-Hand Switch Functions For Radio
Operation .......................... 216
▫ Left-Hand Switch Functions For Media
(i.e., CD) Operation ................... 216
� CD/DVD Maintenance ................. 217
� Radio Operation And Cellular Phones ....... 217
� Climate Controls ...................... 217
▫ Manual Heating And Air Conditioning ..... 218
▫ Automatic Temperature Control (ATC)
— If Equipped ...................... 222
▫ Operating Tips ...................... 2284
UNDERSTANDING YOUR INSTRUMENT PANEL 143
Page 166 of 436

NOTE:Magnetic and battery powered devices, (such as
cell phones, iPod’s, radar detectors, PDA’s and laptops)
should be kept away from the top of the instrument
panel. This is where the compass module is located and
such devices may interfere and cause false compass
readings. 1. Turn the ignition switch to the ON position. Leave the
shift lever in PARK.
2. Press and release the MENU button until “Personal
Settings” displays in the EVIC.
3. Press and release the STEP button until “Compass
Variance” and the current Variance Value displays in the
EVIC.
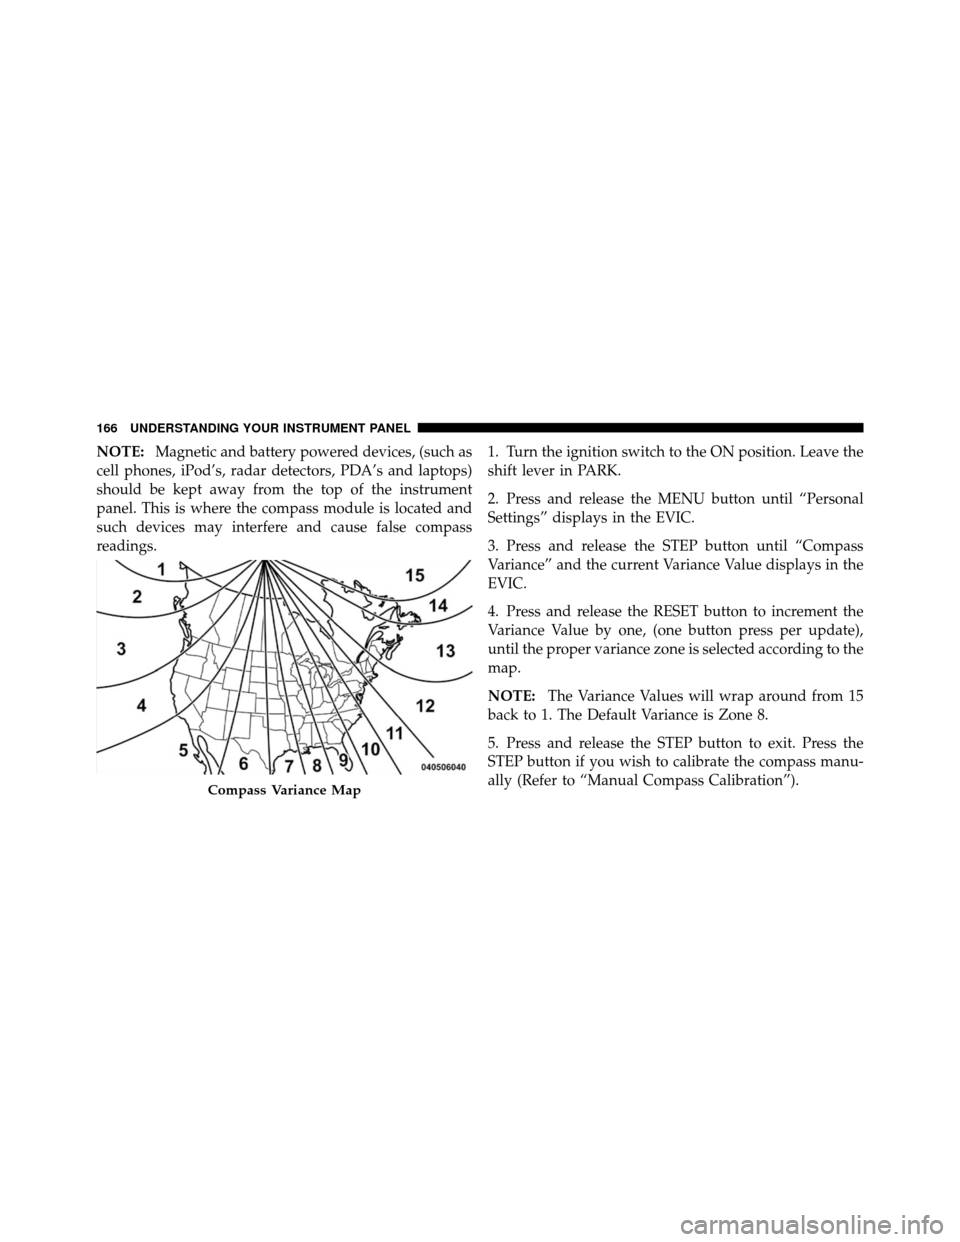
4. Press and release the RESET button to increment the
Variance Value by one, (one button press per update),
until the proper variance zone is selected according to the
map.
NOTE:
The Variance Values will wrap around from 15
back to 1. The Default Variance is Zone 8.
5. Press and release the STEP button to exit. Press the
STEP button if you wish to calibrate the compass manu-
ally (Refer to “Manual Compass Calibration”).
Compass Variance Map
166 UNDERSTANDING YOUR INSTRUMENT PANEL