Page 83 of 436

If you are required to drive with the trunk/liftgate open,
make sure that all windows are closed and the climate
control BLOWER switch is set at high speed. DO NOT
use the recirculation mode.
The best protection against carbon monoxide entry into
the vehicle body is a properly maintained engine exhaust
system.
Whenever a change is noticed in the sound of the exhaust
system, when exhaust fumes can be detected inside the
vehicle, or when the underside or rear of the vehicle is
damaged, have a competent mechanic inspect the com-
plete exhaust system and adjacent body areas for broken,
damaged, deteriorated, or mispositioned parts. Open
seams or loose connections could permit exhaust fumes
to seep into the passenger compartment. In addition,
inspect the exhaust system each time the vehicle is raised
for lubrication or oil change. Replace as required.Safety Checks You Should Make Inside the
Vehicle
Seat Belts
Inspect the belt system periodically, checking for cuts,
frays, and loose parts. Damaged parts must be replaced
immediately. Do not disassemble or modify the system.
Front seat belt assemblies must be replaced after a
collision. Rear seat belt assemblies must be replaced after
a collision if they have been damaged (i.e., bent retractor,
torn webbing, etc.). If there is any question regarding belt
or retractor condition, replace the belt.
Airbag Warning Light
The light should come on and remain on for six to eight
seconds as a bulb check when the ignition switch is first
turned ON. If the light is not lit during starting, see your
authorized dealer. If the light stays on, flickers, or comes
on while driving, have the system checked by an autho-
rized dealer.
2
THINGS TO KNOW BEFORE STARTING YOUR VEHICLE 83
Page 101 of 436

Heated Seats — If Equipped
This feature heats leather or cloth front driver and
passenger seats. The switches for the heated seats are
located in the center console above the climate controls.
After turning the ignition ON, you can choose from High,
Low, or Off heat settings. Amber indicator lights in each
switch indicate the level of heat in use. Two indicator
lights will illuminate for High, one for Low and none for
Off.Press the switch once to select High-level heat-
ing. Press the switch a second time to select
Low-level heating. Press the switch a third time
to shut the heating elements Off.WARNING!
•Persons who are unable to feel pain to the skin
because of advanced age, chronic illness, diabetes,
spinal cord injury, medication, alcohol use, ex-
haustion or other physical condition must exercise
care when using the seat heater. It may cause burns
even at low temperatures, especially if used for
long periods of time.
•Do not place anything on the seat that insulates
against heat, such as a blanket or cushion. This
may cause the seat heater to overheat.
3
UNDERSTANDING THE FEATURES OF YOUR VEHICLE 101
Page 129 of 436

Ignition Off Operation
For vehicles not equipped with the Electronic Vehicle
Information Center (EVIC), the power sunroof switch
will remain active for 45 seconds after the ignition switch
is turned OFF. Opening either front door will cancel this
feature.
For vehicles equipped with the EVIC, the power sunroof
switch will remain active for up to 10 minutes after the
ignition switch is turned OFF. Opening either front door
will cancel this feature. The time is programmable. For
details, refer to “Key-Off Power Delay,” under “Personal
Settings (Customer-Programmable Features)” under
“Electronic Vehicle Information Center (EVIC)” in Sec-
tion 4 of this manual.
ELECTRICAL POWER OUTLETS
There are two 12 Volt electrical power outlets on this
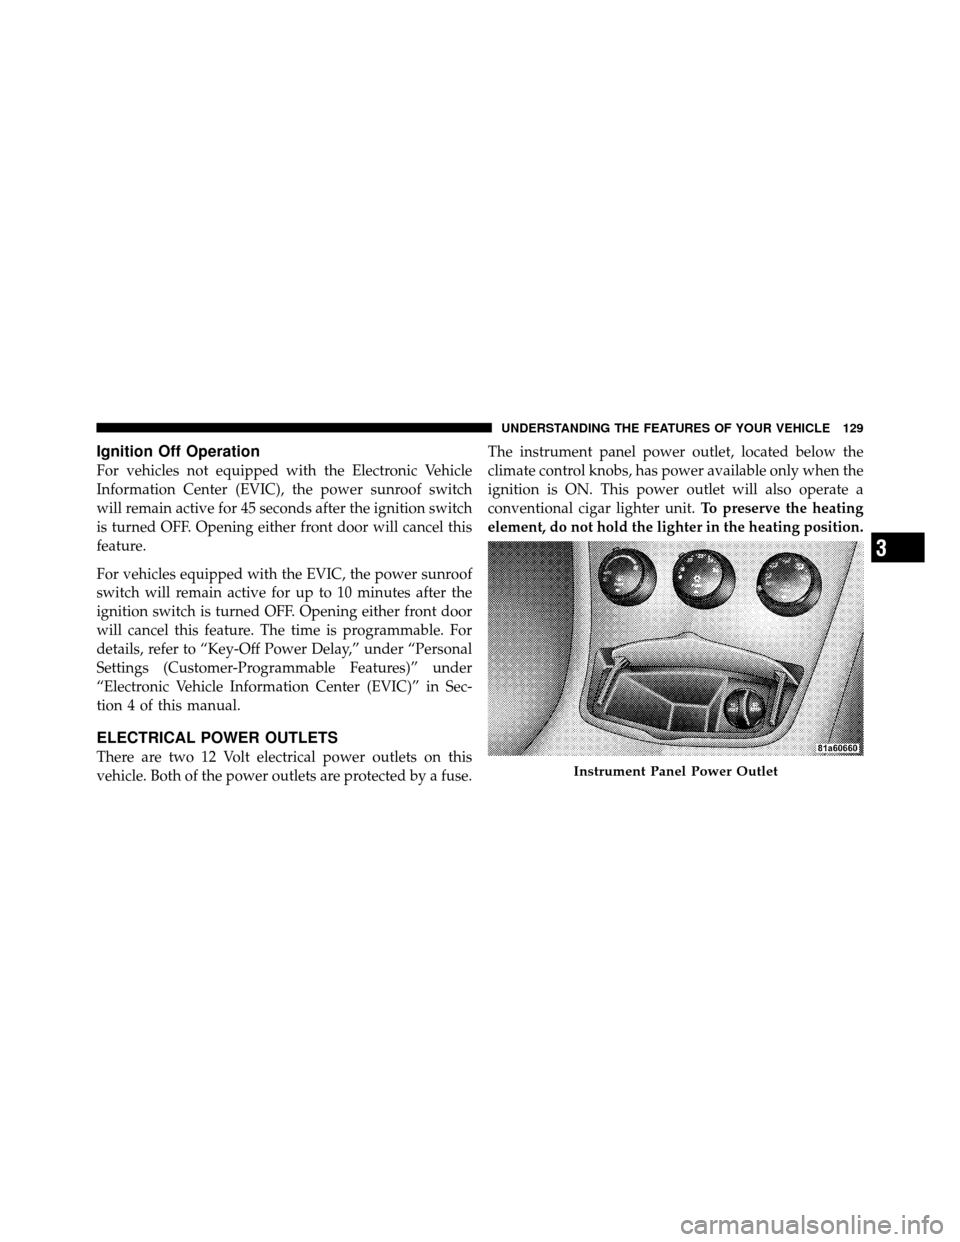
vehicle. Both of the power outlets are protected by a fuse.The instrument panel power outlet, located below the
climate control knobs, has power available only when the
ignition is ON. This power outlet will also operate a
conventional cigar lighter unit.
To preserve the heating
element, do not hold the lighter in the heating position.Instrument Panel Power Outlet
3
UNDERSTANDING THE FEATURES OF YOUR VEHICLE 129
Page 132 of 436
CAUTION!
For vehicles equipped with the heated and cooled
cupholder, locate the cup holder ash receiver in the
forward cupholder.
The optional ash receiver also comes with a cigar lighter.
You may use the power outlet, located in the instrument
panel below the climate control knobs, or in the bottom of
the console compartment, for this cigar lighter.
CUPHOLDERS
Heated/Cooled Cupholder — If Equipped
With this feature the rear cavity of the cupholder can
keep cool beverages cool, and hot beverages hot. The rear
cupholder heats to 140°F (60 °C) or cools to 35°F (1.6 °C).
The switch is located on the front of the center console
and has three positions: Heat, Off and Cool. When the unit is on and the LED is Red, the cupholder is
being heated. When the LED is Blue, the cupholder is
being cooled.
Heated or Cooled Cupholder
132 UNDERSTANDING THE FEATURES OF YOUR VEHICLE
Page 139 of 436

REAR WINDOW FEATURES
Rear Window Defroster
The rear window defroster button is located on the
climate control (Mode) knob. Press this button to
turn on the rear window defroster and the heated outside
mirrors (if equipped). An indicator in the button will
illuminate when the rear window defroster is on. The
rear window defroster automatically turns off after ap-
proximately 10 minutes. For an additional five minutes of
operation, press the button a second time.
NOTE: To prevent excessive battery drain, use the rear
window defroster only when the engine is operating.
CAUTION!
Failure to follow these cautions can cause damage to
the heating elements:
•Use care when washing the inside of the rear
window. Do not use abrasive window cleaners on
the interior surface of the window. Use a soft cloth
and a mild washing solution, wiping parallel to
the heating elements. Labels can be peeled off
after soaking with warm water.
•Do not use scrapers, sharp instruments, or abra-
sive window cleaners on the interior surface of the
window.
•Keep all objects a safe distance from the window.
3
UNDERSTANDING THE FEATURES OF YOUR VEHICLE 139
Page 143 of 436

�uconnect™ studios (Satellite Radio)
— If Equipped (REN/REQ/RER/RES
Radios Only) ......................... 209
▫ System Activation .................... 209
▫ Electronic Serial Number/Sirius
Identification Number (ESN/SID) ......... 209
▫
Selecting uconnect™ studios (Satellite) Mode. . 210
▫ Satellite Antenna ..................... 210
▫ Reception Quality .................... 210
▫ Operating Instructions - uconnect™ studios
(Satellite) Mode ..................... 211
▫ Operating Instructions - uconnect™ phone
(If Equipped) ....................... 213
� Video Entertainment System (VES)™
— If Equipped ........................ 213 �
Remote Sound System Controls
— If Equipped ........................ 215
▫ Right-Hand Switch Functions ............ 216
▫ Left-Hand Switch Functions For Radio
Operation .......................... 216
▫ Left-Hand Switch Functions For Media
(i.e., CD) Operation ................... 216
� CD/DVD Maintenance ................. 217
� Radio Operation And Cellular Phones ....... 217
� Climate Controls ...................... 217
▫ Manual Heating And Air Conditioning ..... 218
▫ Automatic Temperature Control (ATC)
— If Equipped ...................... 222
▫ Operating Tips ...................... 2284
UNDERSTANDING YOUR INSTRUMENT PANEL 143
Page 144 of 436
INSTRUMENT PANEL FEATURES
1 — Air Outlet6 — Radio11 — Storage Compartment
2 — Side Window Demister Outlet 7 — Passenger Airbag 12 — Climate Control
3 — Instrument Cluster 8 — Glove Compartment13 — Trunk Release Button
4 — Ignition Switch 9 — Heated Seat Switch – If Equipped
5 — Analog Clock 10 — Hazard Switch
144 UNDERSTANDING YOUR INSTRUMENT PANEL
Page 160 of 436

The EVIC consists of the following:
•System status
•Vehicle information warning message displays
•Personal Settings (Customer-Programmable Features)
•Compass heading display (N, S, E, W, NE, NW, SE,
SW)
•Outside temperature display (°F or °C)
•Trip computer functions
•Audio mode displays – 12 preset Radio Stations or CD
Title and Track number when playing
•Tire Pressure Monitor System (TPMS) displays (if
equipped)The system allows the driver to select information by
pressing the following buttons on the instrument panel
switch bank located below the climate controls:
Press and release the MENU button to advance
the display to Trip Functions or Personal set-
tings or to return to the default System status
display.
Press and release the STEP button to advance
the display through the various Trip Functions
or Personal settings.
Press and release the COMPASS button to
display the compass heading and the outside
temperature.
MENU Button
STEP
Button
COMPASS Button
160 UNDERSTANDING YOUR INSTRUMENT PANEL