Page 220 of 368
Tire Loading and Tire Pressure
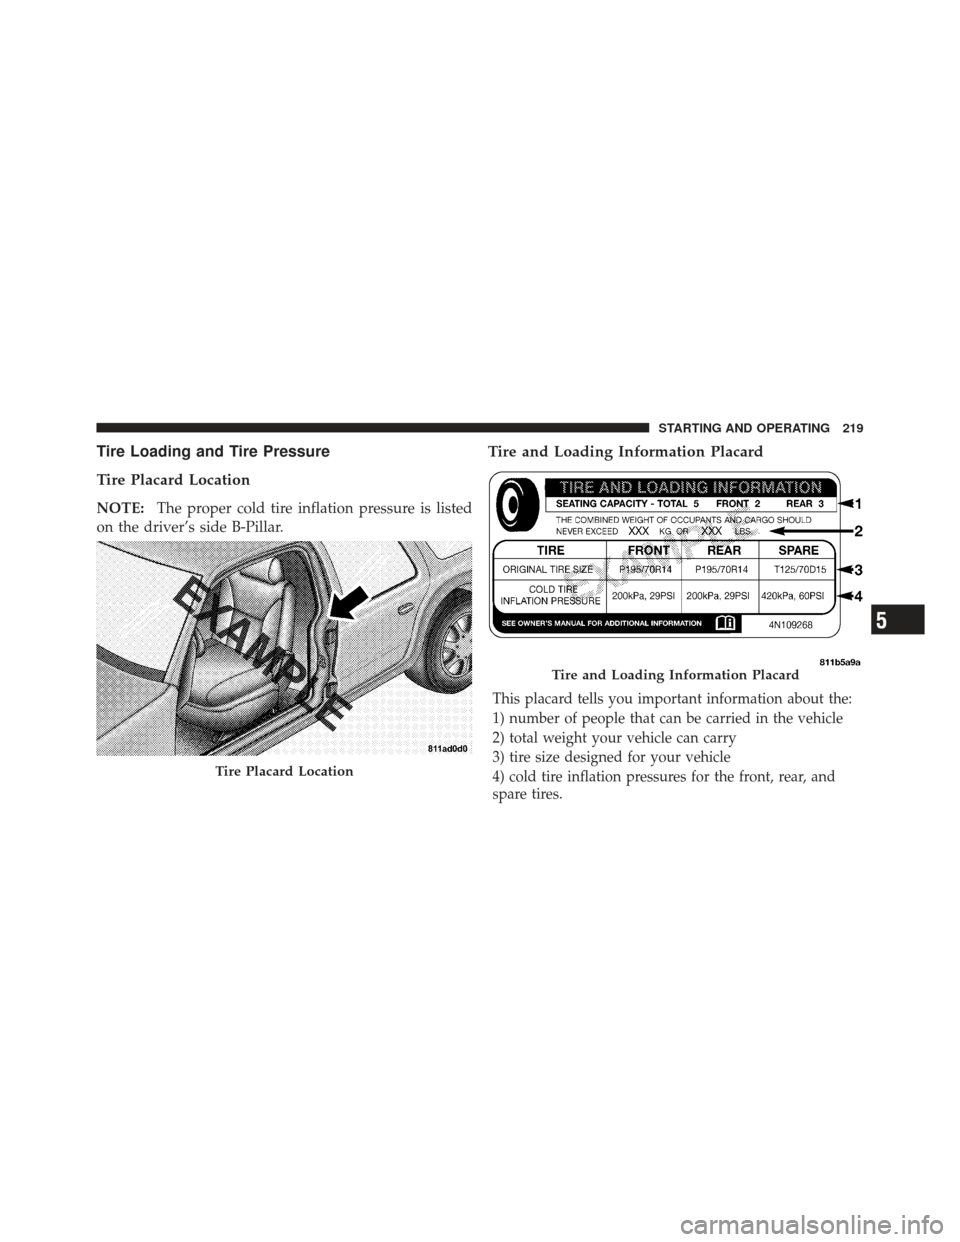
Tire Placard Location
NOTE:The proper cold tire inflation pressure is listed
on the driver’s side B-Pillar.
Tire and Loading Information Placard
This placard tells you important information about the:
1) number of people that can be carried in the vehicle
2) total weight your vehicle can carry
3) tire size designed for your vehicle
4) cold tire inflation pressures for the front, rear, and
spare tires.
Tire Placard Location
Tire and Loading Information Placard
5
STARTING AND OPERATING 219
Page 260 of 368
WHAT TO DO IN EMERGENCIES
CONTENTS
�Hazard Warning Flashers ................ 260
� If Your Engine Overheats ................ 260
� Jacking And Tire Changing ............... 262
▫ Jack Location ....................... 262
▫ Spare Tire Stowage ................... 263
▫ Spare Tire Removal ................... 263
▫ Preparations For Jacking ............... 264
▫ Jacking Instructions ................... 265 �
Jump-Starting ........................ 268
▫ Preparations For Jump-Start ............. 269
▫ Jump-Starting Procedure ............... 270
� Freeing A Stuck Vehicle ................. 272
� Towing A Disabled Vehicle ............... 273
▫ Towing With The Key-In-Ignition ......... 273
▫ Towing Without The Key-In-Ignition ....... 274
6
Page 268 of 368
Do not raise the vehicle until you are sure the jack is
securely engaged.
3. Raise the vehicle by turning the jack screw to the right,
using the swivel wrench. Raise the vehicle only until thetire just clears the surface and enough clearance is
obtained to install the spare tire. Minimum tire lift
provides maximum stability.
WARNING!
Raising the vehicle higher than necessary can make
the vehicle less stable. It could slip off the jack and
hurt someone near it. Raise the vehicle only enough
to remove the tire.
4. Remove the wheel nuts and pull the wheel and wheel
covers where applicable off the hub. Install the spare
wheel and wheel nuts with the cone-shaped end of the
nuts toward the wheel. Lightly tighten the nuts. To avoid
the risk of forcing the vehicle off the jack, do not tighten
the nuts fully until the vehicle has been lowered.
Rear Jacking Location6
WHAT TO DO IN EMERGENCIES 267
Page 269 of 368

WARNING!
To avoid possible personal injury, handle the wheel
covers with care to avoid contact with any sharp
edges.
NOTE: The wheel cover is held on the wheel by the
wheel nuts. When reinstalling original wheel, properly
align the wheel cover to the valve stem, place the wheel
cover onto the wheel, then install the wheel nuts.
5. Lower the vehicle by turning the jack screw to the left.
6. Finish tightening the nuts. Push down on the wrench
while tightening the wheel nuts. Alternate nuts until each
nut has been tightened twice. The correct wheel nut
torque is 100 ft lbs (135 N m). If you doubt that you have
tightened the nuts correctly, have them checked with a
torque wrench by your authorized dealer or at a qualified
service station. 7. Remove the wheel blocks and lower the jack until it is
free. Stow the lug wrench, and jack in their designated
location. Secure all parts using the means provided.
WARNING!
A loose tire or jack thrown forward in a collision or
hard stop could endanger the occupants of the ve-
hicle. Always stow the jack parts and the spare tire in
the places provided. Have the deflated (flat) tire
repaired or replaced immediately.
8. Place the deflated (flat) tire in the cargo area, have the
tire repaired or replaced as soon as possible.
9. Check the tire pressure as soon as possible. The correct
pressure as required.
JUMP-STARTING
If your vehicle has a discharged battery it can be jump-
started using a set of jumper cables and a battery in
268 WHAT TO DO IN EMERGENCIES