2010 CHRYSLER 300 audio
[x] Cancel search: audioPage 3 of 88

INTRODUCTION/WELCOME
WELCOME FROM CHRYSLER
GROUPLLC ................ 2
CONTROLS AT A GLANCE
DRIVER COCKPIT.............4
INSTRUMENT CLUSTER .........6
GETTING STARTED
KEYFOB ..................8
PASSIVEENTRY .............9
KEYLESSGO™ ..............11
THEFT ALARM..............12
SEATBELT ................12
CHILD RESTRAINTS ...........12
FRONTSEATS...............14
REARSEAT ................16
HEATEDSEATS..............17
ADJUSTABLE PEDALS ..........18
TILT / TELESCOPING STEERING
COLUMN ..................19
PROGRAMMABLE FEATURES ..... 20
OPERATING YOUR VEHICLE
TURN SIGNAL/WIPER/WASHER/HIGH
BEAMLEVER ...............22
HEADLIGHT SWITCH...........23
SPEED CONTROL LEVER ........24
MANUAL CLIMATE CONTROLS .....27
AUTOMATIC TEMPERATURE
CONTROLS(ATC)............ 28
POWERSUNROOF ........... 28
WIND BUFFETING ............ 29
ELECTRONICS
NON-TOUCH-SCREEN RADIOS .... 30
TOUCH-SCREEN RADIOS .........32
REMOTE AUDIO CONTROLS .......37
UNIVERSAL CONSUMER
INTERFACE ................37
ELECTRONIC VEHICLE INFORMATION
CENTER (EVIC) ............. 38
UNIVERSAL GARAGE DOOR
OPENER ................. 38
POWER OUTLET ............ 39
UCONNECT™ PHONE .......... 40 VOICE COMMAND
............ 42
UTILITY
TRAILER TOWING WEIGHTS (MAXIMUM
TRAILER WEIGHT RATINGS) ...... 43
RECREATIONAL TOWING (BEHIND
MOTORHOME, ETC.) .......... 44
BRAKE/TRANSMISSION INTERLOCK
MANUAL OVERRIDE .......... 44
WHAT TO DO IN EMERGENCIES
24 HOUR TOWING ASSISTANCE
- U.S. ONLY............... 46
INSTRUMENT CLUSTER WARNING
LIGHTS .................. 46
IF YOUR ENGINE OVERHEATS .... 49
JACKING, TIRE CHANGING AND
TIREFIT TIRE REPAIR ......... 50
JUMP-STARTING ............ 57
TOWING A DISABLED VEHICLE .... 60
FREEING A STUCK VEHICLE .......61
EVENT DATA RECORDER (EDR) . . . 62
MAINTAINING YOUR VEHICLE
OPENING THE HOOD .......... 64
ENGINE COMPARTMENT ....... 65
FLUIDS AND CAPACITIES ....... 69
MAINTENANCE CHART .........72
FUSES ...................74
TIREPRESSURES.............77
WHEEL AND WHEEL TRIM CARE ....78
EXTERIOR BULBS .............78
CONSUMER ASSISTANCE
CHRYSLER GROUP LLC CUSTOMER
CENTER ..................79
CHRYSLER CANADA INC. CUSTOMER
CENTER ..................79
ASSISTANCE FOR THE HEARING
IMPAIRED .................79
PUBLICATIONS ORDERING .......79
REPORTING SAFETY DEFECTS IN
THE 50 UNITED STATES AND
WASHINGTON, D.C. ........... 80
TIREWARRANTY ............ 80
MOPAR ACCESSORIES
MOPAR®ACCESSORIES ........ 83
TABLE OF CONTENTS
Page 33 of 88
NOTE:Uconnect™ Phone and Voice Command are vehicle options which must be
ordered separately. The buttons on the radio will only be active if the vehicle has
been equipped with the option.
• The radio sales code is located on the lower right side of the radio faceplate.
• Unless otherwise noted, the information provided on the operation and functionality of the radios in this section is common to all non-touch-screen radios.
Seek Up/Down Buttons
• Press to seek through radio stations in AM, FM, or SAT bands. Seek through tracksin CD mode.
• Hold either button to bypass stations without stopping.
Audio Settings
• Press the TUNE/SCROLL control knob and BASS, MID, TREBLE, BALANCE and FADE will display. Rotate the TUNE/SCROLL control knob to select the desired setting.
Auxiliary Mode
• The auxiliary (AUX) jack allows a portable device, such as an MP3 player or acassette player, to be plugged into the radio and utilize the vehicle’s audio system
to amplify the source and play through the vehicle speakers.
• Pressing the AUX button will change the mode to auxiliary device if the AUX jack is connected.
• The control of the external device cannot be provided by the radio; use the device controls instead.
Clock Setting
• Press and hold the TIME button until the hours blink; turn the TUNE/SCROLLcontrol knob to set the hours.
• Press the TUNE/SCROLL control knob until the minutes begin to blink; turn the TUNE/SCROLL control knob to set the minutes.
• Press the TUNE/SCROLL control knob to save the time change.
• To exit, press any button/knob or wait five seconds.
Station Presets
• Press the SET/RND button once and SET 1 will show in the display. Then select the button (1–6).
• A second station may be added to each push button. Press the SET/RND button twice and SET 2 will show in the display, then select button (1–6).
31
ELECTRONICS
Page 35 of 88
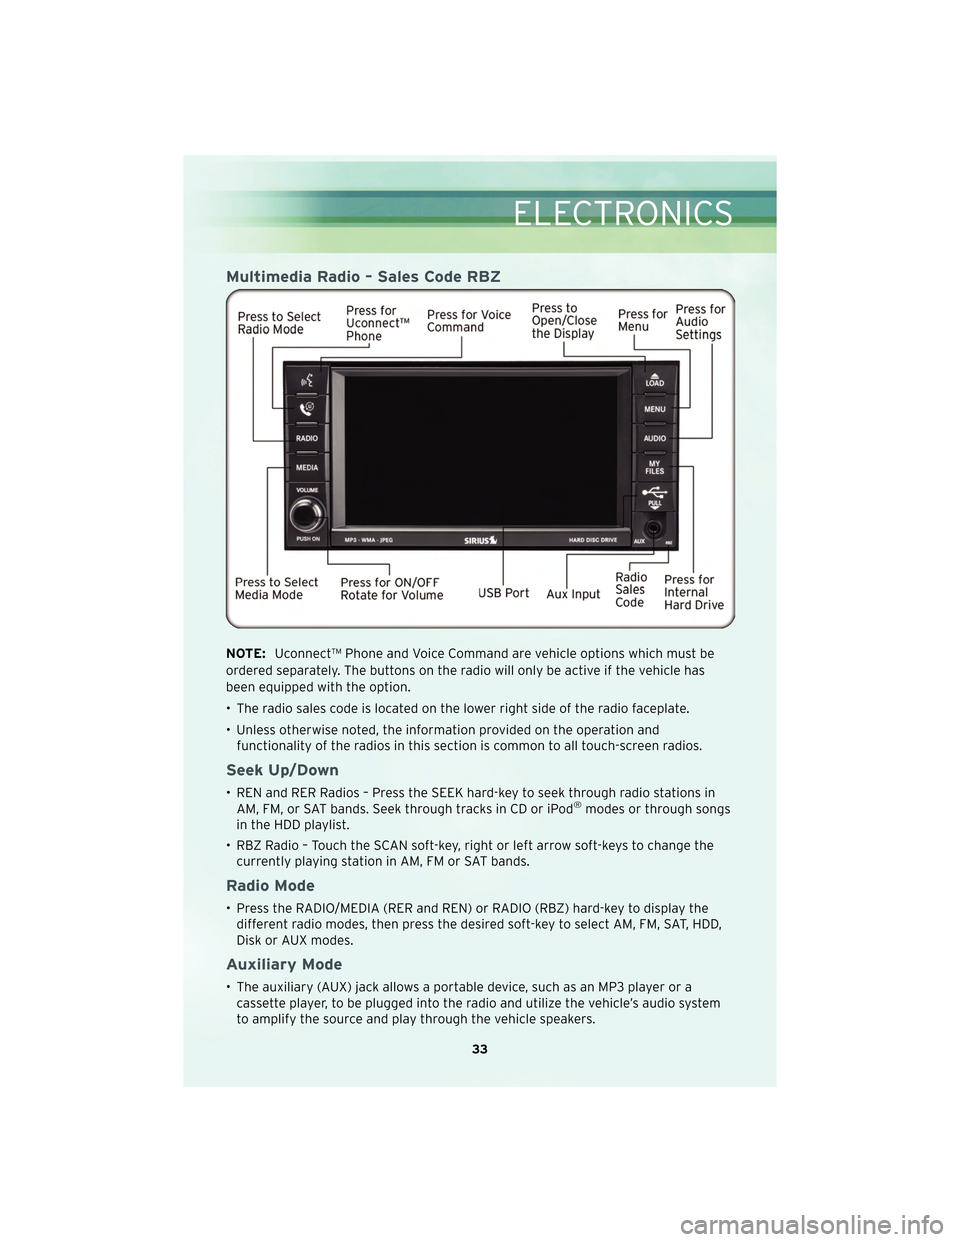
Multimedia Radio – Sales Code RBZ
NOTE:Uconnect™ Phone and Voice Command are vehicle options which must be
ordered separately. The buttons on the radio will only be active if the vehicle has
been equipped with the option.
• The radio sales code is located on the lower right side of the radio faceplate.
• Unless otherwise noted, the information provided on the operation and functionality of the radios in this section is common to all touch-screen radios.
Seek Up/Down
• REN and RER Radios – Press the SEEK hard-key to seek through radio stations inAM, FM, or SAT bands. Seek through tracks in CD or iPod®modes or through songs
in the HDD playlist.
• RBZ Radio – Touch the SCAN soft-key, right or left arrow soft-keys to change the currently playing station in AM, FM or SAT bands.
Radio Mode
• Press the RADIO/MEDIA (RER and REN) or RADIO (RBZ) hard-key to display thedifferent radio modes, then press the desired soft-key to select AM, FM, SAT, HDD,
Disk or AUX modes.
Auxiliary Mode
• The auxiliary (AUX) jack allows a portable device, such as an MP3 player or acassette player, to be plugged into the radio and utilize the vehicle’s audio system
to amplify the source and play through the vehicle speakers.
33
ELECTRONICS
Page 36 of 88
• The display will switch automatically to the AUX mode when a 3.5 mm stereomini-jack cable has been connected.
• To change radio modes while the cable is connected to the unit, press the RADIO/MEDIA (RER and REN) or MEDIA (RBZ) hard-key until the AUX tab is
displayed on the top of the screen. Touch the AUX tab to return to the AUX mode.
• The control of the external device cannot be provided by the radio; use the device controls instead.
Clock Setting
• Turn the radio on, then touch the screen where the time is displayed.
• Touch the USER CLOCK soft-key (Navigation radio only).
• To adjust the hours, touch either the HOUR FORWARD or HOUR BACKWARDsoft-key.
• To adjust the minutes, touch either the MINUTE FORWARD or MINUTE BACKWARD soft-key.
• To save the new time setting, touch the screen where the word “Save” is displayed.
Store Radio Presets
• For REN and RER: Press the RADIO/MEDIA hard-key repeatedly until AM FM SAT is displayed in the upper left corner of the screen.
• For RBZ: Press the RADIO hard-key to display AM FM SAT in the upper left corner of the screen.
• Select the radio band by touching either the AM, FM, or SAT soft-key.
• Find the station to store by either pressing the SEEK UP/DOWN hard-key (REN and RER), touching the right and left arrow soft-keys (RBZ), touching the SCAN
soft-key, or by using the DIRECT TUNE soft-key.
• Once the station is found, touch and hold one of the PRESET soft-keys in the list to the right, until you hear a confirmation beep.
Hard Disc Drive Operation
Copy Complete Audio Disc To Hard-Drive
• Press the OPEN/CLOSE hard-key (REN and RER) or LOAD hard-key (RBZ) andinsert a disc, then press the MENU hard-key.
• Touch the MY FILES soft-key, then select MY MUSIC.
• Touch the IMPORT MUSIC soft-key, then touch the FROM DISC soft-key in the next screen to start the process.
Copying From USB
• Insert a USB device, then select MY MUSIC.
• Touch the IMPORT MUSIC FILES soft-key, then touch the FROM USB soft-key in thenext screen.
ELECTRONICS
34
Page 39 of 88
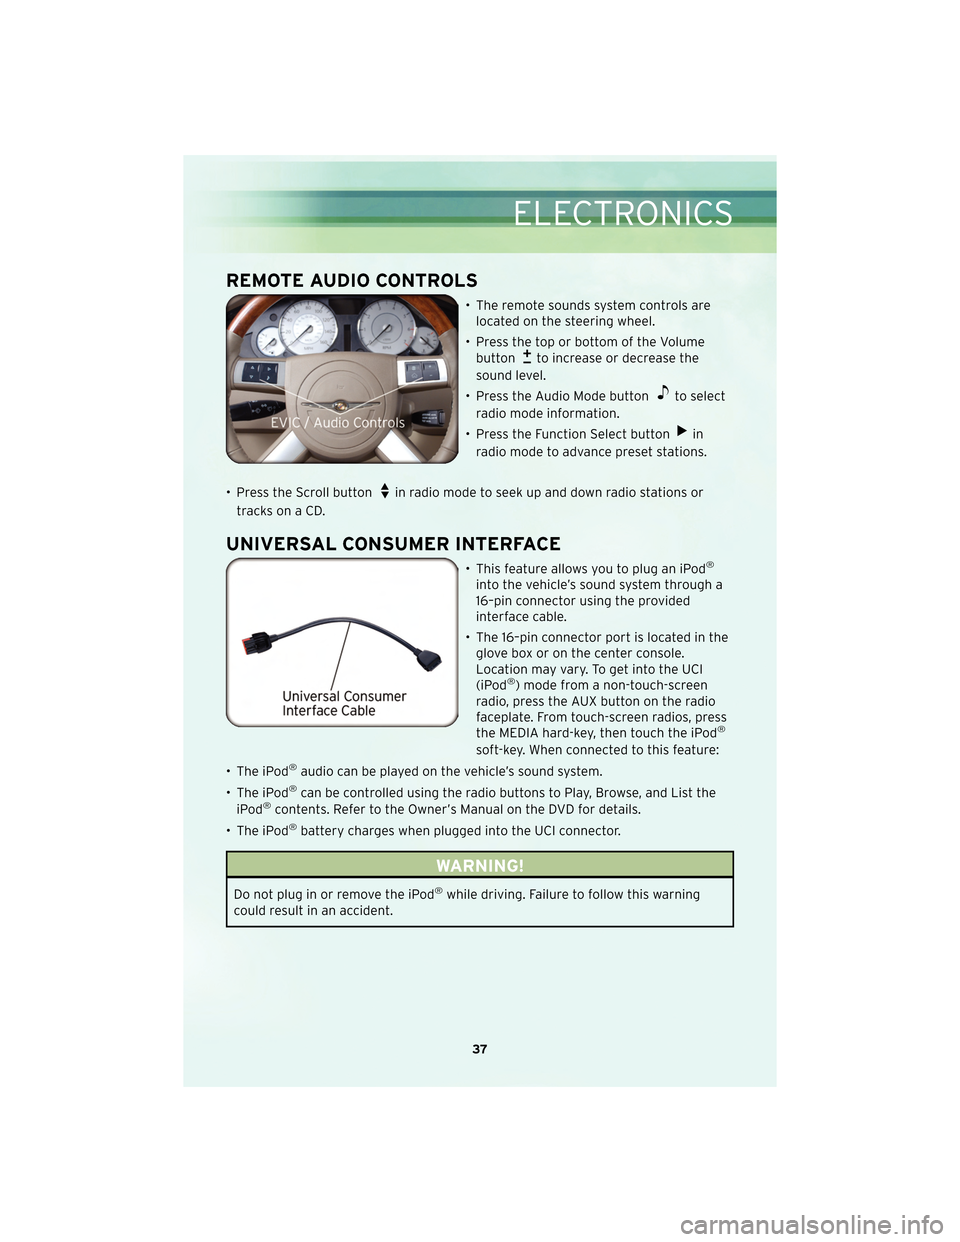
REMOTE AUDIO CONTROLS
• The remote sounds system controls arelocated on the steering wheel.
• Press the top or bottom of the Volume button
to increase or decrease the
sound level.
• Press the Audio Mode button
to select
radio mode information.
• Press the Function Select button
in
radio mode to advance preset stations.
• Press the Scroll button
in radio mode to seek up and down radio stations or
tracks on a CD.
UNIVERSAL CONSUMER INTERFACE
• This feature allows you to plug an iPod®
into the vehicle’s sound system through a
16–pin connector using the provided
interface cable.
• The 16–pin connector port is located in the glove box or on the center console.
Location may vary. To get into the UCI
(iPod
®) mode from a non-touch-screen
radio, press the AUX button on the radio
faceplate. From touch-screen radios, press
the MEDIA hard-key, then touch the iPod
®
soft-key. When connected to this feature:
• The iPod
®audio can be played on the vehicle’s sound system.
• The iPod
®can be controlled using the radio buttons to Play, Browse, and List the
iPod®contents. Refer to the Owner’s Manual on the DVD for details.
• The iPod
®battery charges when plugged into the UCI connector.
WARNING!
Do not plug in or remove the iPod®while driving. Failure to follow this warning
could result in an accident.
37
ELECTRONICS
Page 43 of 88

• You will be asked to create a four-digit PIN which you will later need to enter intoyour phone (typically...settings, Bluetooth®, device, list, new).
• You will then be prompted to give the phone pairing a name (each phone paired should have a unique name).
• Next you will be asked to give this new pairing a priority of 1 thru 7 (up to seven phones may be paired).
Making A Phone Call
• Press the Phone button.
• (After the BEEP), say “dial” (or “call” to a name).
• (After the BEEP), say number (or name).
Phonebook (Uconnect™ local) Edit
• Press the Phone button.
• (After the BEEP), say “phonebook”.
• (After the BEEP), say “new entry” or “list names” or “delete”.
• Follow the prompts.
Receiving A Call – Accept (And End)
• When an incoming call rings/is announced on Uconnect™, press the Phone button
.
• To end a call, press the Phone button
.
Mute (Or Unmute) Microphone During Call
• During a call, press the Voice Command button.
• (After the BEEP), say “mute on” (or “mute off”).
Transfer Ongoing Call Between Handset And Vehicle
• During a call, press the Voice Command button.
• (After the BEEP), say “transfer call”.
Changing The Volume
• Start a dialogue by pressing the Phone button, then adjust the volume during
a normal call.
• Use the radio ON/OFF VOLUME rotary knob to adjust the volume to a comfortable level while the Uconnect™ system is speaking. Please note the volume setting for
Uconnect™ is different than the audio system.
NOTE: To access the tutorial, press the Uconnect™ hard-key. After the BEEP, say
“tutorial”. Press any hard-key or touch the display to cancel the tutorial.
41
ELECTRONICS
Page 44 of 88
VOICE COMMAND
• The Voice Command system allows you to control your AM, FM radio, satellite radio,disc player, and a memo recorder. When you press the Voice Command
button
, you will hear a beep. The beep is your signal to give a command. If
you do not say a command within a few seconds, the system will present you with a
list of options. If you ever wish to interrupt the system while it lists options, press
the Voice Command button
, listen for the BEEP, and say your command.
• For vehicles equipped with Video Entertainment System (VES)™, refer to the Voice Command section of the Uconnect™ User’s Manual on the DVD for further details.
• For vehicles not equipped with VES™, refer to your vehicle Owner’s Manual on the DVD for Voice Command information.
Changing The Volume
• Start a dialogue by pressing the Voice Command button, then say a
command (e.g., “tutorial”).
• Use the radio ON/OFF VOLUME rotary knob to adjust the volume to a comfortable level while the Voice Command system is speaking. Please note the volume setting
for Voice Command is different than the audio system.
WARNING!
Any voice commanded system should be used only in safe driving conditions and
all attention should be kept on the roadway ahead. Failure to do so may result in
an accident causing serious injury or death.
NOTE: To access the tutorial, press the Voice Command button
. After the
BEEP, say “tutorial”. Press any hard-key or touch the display to cancel the tutorial.
ELECTRONICS
42
Page 85 of 88

MOPAR®ACCESSORIES
• The following highlights just some ofthe authentic Chrysler Accessories by
MOPAR®that have been engineered to customize your Chrysler 300.
• To see the full line of acc essories, stop by your Chry sler dealer or visit MOPAR.com.
CHROME:
• 17-Inch Chrome Aluminum Wheel • 18-Inch Chrome
Aluminum Wheel • 20-Inch Chrome
Aluminum Wheel
• Chrome Mesh Grille • Premium Chrome Grille
EXTERIOR:
• Side Window Air Deflectors • Sunroof Air Deflector • Front Air Deflector
• Fog Lights • Front End Cover • Molded Splash Guards
INTERIOR:
• Premium Carpet Floor Mats • Illuminated Door Sill
Guards • Premium Carpet Cargo
Mat
• Slush Mats • Ambient Light Kit • Katzkin Leather Seats
ELECTRONICS:
• Portable Navigation Systems • Uconnect™ Web (WiFi) • Uconnect™ Phone
•iPod
®Adapter • Media Center 430
(REN/RBZ Multimedia
Radio) • DVD Rear Seat Video™
• Kicker
®Sound System • Media Center 730 (RER Navigation Radio) • Head Restraint DVD Rear
Seat Video™
• Remote Start • Heated Seats
CARRIERS:
• Hitch-mount Bike Carrier • Roof Mount Bike Carrier • Roof Box Cargo Carrier
• Roof Mount Ski and Snowboard Carrier • Roof Mount Water
Sports Carrier • Roof Mount Canoe
Carrier
•iPod
®is a registered trademark of Apple, Inc.
• Kicker®is a registered trademark of Stillwater Designs and Audio, Inc.
83
MOPAR ACCESSORIES