2010 CHEVROLET TAHOE oil
[x] Cancel search: oilPage 465 of 608

Overheated Engine Protection
Operating Mode
If an overheated engine condition exists and the
ENGINE POWER IS REDUCED message is displayed,
an overheat protection mode which alternates firing
groups of cylinders helps prevent engine damage. In
this mode, you will notice a loss in power and engine
performance. This operating mode allows the vehicle to
be driven to a safe place in an emergency. Driving
extended miles (km) and/or towing a trailer in the
overheat protection mode should be avoided.
Notice:After driving in the overheated engine
protection operating mode, to avoid engine damage,
allow the engine to cool before attempting any
repair. The engine oil will be severely degraded.
Repair the cause of coolant loss, change the oil
and reset the oil life system. See Engine Oil
on
page 6‑17.
Engine Fan Noise
If the vehicle has a clutched engine cooling fan, when
the clutch is engaged, the fan spins faster to provide
more air to cool the engine. In most everyday driving
conditions, the fan is spinning slower and the clutch is
not fully engaged. This improves fuel economy and
reduces fan noise. Under heavy vehicle loading, trailer
towing, and/or high outside temperatures, the fan speed
increases as the clutch more fully engages, so you may
hear an increase in fan noise. This is normal and should
not be mistaken as the transmission slipping or making
extra shifts. It is merely the cooling system functioning
properly. The fan will slow down when additional cooling
is not required and the clutch disengages.
You may also hear this fan noise when you start the
engine. It will go away as the fan clutch partially
disengages.
If the vehicle has electric cooling fans, you may hear
the fans spinning at low speed during most everyday
driving. The fans may turn off if no cooling is required.
Under heavy vehicle loading, trailer towing, and/or high
outside temperatures, or if you are operating the air
conditioning system, the fans may change to high
speed and you may hear an increase in fan noise.
This is normal and indicates that the cooling system is
functioning properly. The fans will change to low speed
when additional cooling is no longer required.
6-39
Page 469 of 608

Checking Brake Fluid
Check brake fluid by looking at the brake fluid reservoir.
SeeEngine Compartment Overview on page 6‑16.
The fluid level should be
above MIN. If it is not,
have the brake hydraulic
system checked to see if
there is a leak.
After work is done on the brake hydraulic system,
make sure the level is above the MIN but not over the
MAX mark.
What to Add
Use only new DOT 3 brake fluid from a sealed
container. See Recommended Fluids and Lubricantson
page 7‑12. Always clean the brake fluid reservoir cap and the area
around the cap before removing it. This helps keep dirt
from entering the reservoir.
{WARNING:
With the wrong kind of fluid in the brake hydraulic
system, the brakes might not work well. This could
cause a crash. Always use the proper brake fluid.
Notice:
.Using the wrong fluid can badly damage
brake hydraulic system parts. For example,
just a few drops of mineral-based oil, such
as engine oil, in the brake hydraulic system
can damage brake hydraulic system parts
so badly that they will have to be replaced.
Do not let someone put in the wrong kind of
fluid.
.If brake fluid is spilled on the vehicle's
painted surfaces, the paint finish can be
damaged. Be careful not to spill brake
fluid on the vehicle. If you do, wash it off
immediately. See Washing Your Vehicle
on
page 6‑111
.
6-43
Page 495 of 608

Tire Terminology and Definitions
Air Pressure:The amount of air inside the tire
pressing outward on each square inch of the tire.
Air pressure is expressed in pounds per square
inch (psi) or kilopascal (kPa).
Accessory Weight
:This means the combined
weight of optional accessories. Some examples of
optional accessories are, automatic transmission,
power steering, power brakes, power windows,
power seats, and air conditioning.
Aspect Ratio
:The relationship of a tire's height to
its width.
Belt
:A rubber coated layer of cords that is
located between the plies and the tread. Cords
may be made from steel or other reinforcing
materials.
Bead
:The tire bead contains steel wires wrapped
by steel cords that hold the tire onto the rim.
Bias Ply Tire
:A pneumatic tire in which the plies
are laid at alternate angles less than 90 degrees
to the centerline of the tread. Cold Tire Pressure
:The amount of air pressure
in a tire, measured in pounds per square inch (psi)
or kilopascals (kPa) before a tire has built up heat
from driving. See Inflation - Tire Pressure
on
page 6‑72
.
Curb Weight
:The weight of a motor vehicle with
standard and optional equipment including the
maximum capacity of fuel, oil, and coolant, but
without passengers and cargo.
DOT Markings
:A code molded into the sidewall
of a tire signifying that the tire is in compliance
with the U.S. Department of Transportation (DOT)
motor vehicle safety standards. The DOT code
includes the Tire Identification Number (TIN), an
alphanumeric designator which can also identify
the tire manufacturer, production plant, brand, and
date of production.
GVWR
:Gross Vehicle Weight Rating. See
Loading the Vehicle
on page 5‑29.
GAWR FRT
:Gross Axle Weight Rating for the
front axle. See Loading the Vehicle
on page 5‑29.
6-69
Page 525 of 608

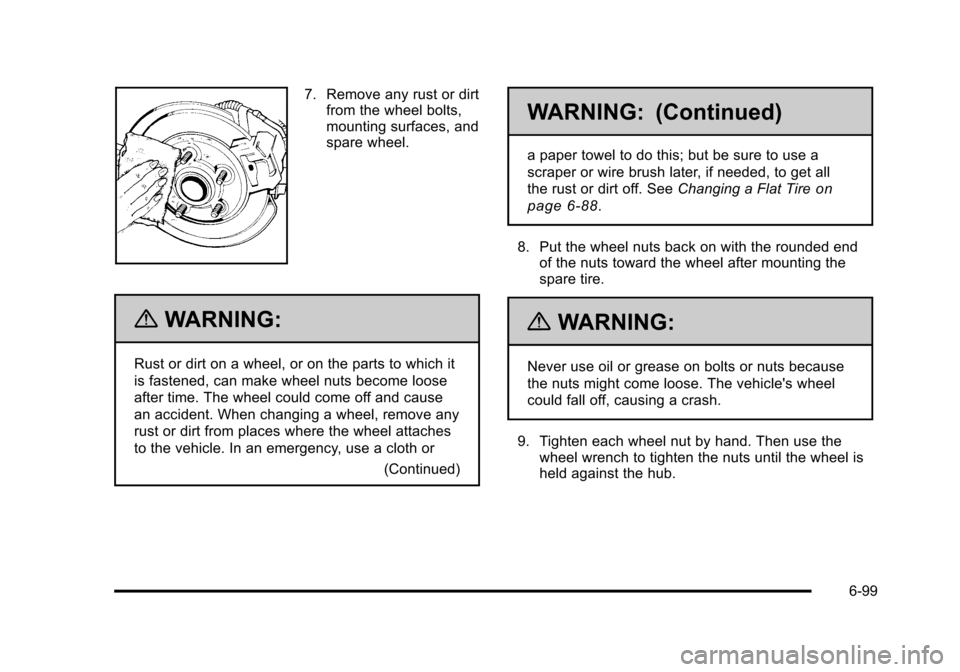
7. Remove any rust or dirtfrom the wheel bolts,
mounting surfaces, and
spare wheel.
{WARNING:
Rust or dirt on a wheel, or on the parts to which it
is fastened, can make wheel nuts become loose
after time. The wheel could come off and cause
an accident. When changing a wheel, remove any
rust or dirt from places where the wheel attaches
to the vehicle. In an emergency, use a cloth or
(Continued)
WARNING: (Continued)
a paper towel to do this; but be sure to use a
scraper or wire brush later, if needed, to get all
the rust or dirt off. SeeChanging a Flat Tire
on
page 6‑88
.
8. Put the wheel nuts back on with the rounded end of the nuts toward the wheel after mounting the
spare tire.
{WARNING:
Never use oil or grease on bolts or nuts because
the nuts might come loose. The vehicle's wheel
could fall off, causing a crash.
9. Tighten each wheel nut by hand. Then use the wheel wrench to tighten the nuts until the wheel is
held against the hub.
6-99
Page 534 of 608

After installing the spare tire on your vehicle, you should
stop as soon as possible and make sure the spare tire
is correctly inflated. Have the damaged or flat road tire
repaired or replaced as soon as you can and installed
back onto your vehicle. This way, the spare tire will be
available in case you need it again.
Do not mix tires and wheels of different sizes, because
they will not fit. Keep your spare tire and its wheel
together. If your vehicle has a spare tire that does not
match your vehicle's original road tires and wheels in
size and type, do not include the spare in the tire
rotation.
Appearance Care
Interior Cleaning
The vehicle's interior will continue to look its best if it is
cleaned often. Although not always visible, dust and dirt
can accumulate on the upholstery. Dirt can damage
carpet, fabric, leather, and plastic surfaces. Regular
vacuuming is recommended to remove particles from
the upholstery. It is important to keep the upholstery
from becoming and remaining heavily soiled. Soils
should be removed as quickly as possible. The
vehicle's interior may experience extremes of heat that
could cause stains to set rapidly.Lighter colored interiors may require more frequent
cleaning. Use care because newspapers and garments
that transfer color to home furnishings may also transfer
color to the vehicle's interior.
When cleaning the vehicle's interior, only use cleaners
specifically designed for the surfaces being cleaned.
Permanent damage may result from using cleaners
on surfaces for which they were not intended. Use
glass cleaner only on glass. Remove any accidental
over-spray from other surfaces immediately. To prevent
over-spray, apply cleaner directly to the cleaning cloth.
Notice:
Using abrasive cleaners when cleaning
glass surfaces on the vehicle, could scratch the
glass and/or cause damage to the rear window
defogger. When cleaning the glass on the vehicle,
use only a soft cloth and glass cleaner.
Many cleaners contain solvents that may become
concentrated in the vehicle's breathing space.
Before using cleaners, read and adhere to all safety
instructions on the label. While cleaning the vehicle's
interior, maintain adequate ventilation by opening the
vehicle's doors and windows.
Dust may be removed from small buttons and knobs
using a small brush with soft bristles.
Products that remove odors from the vehicle's
upholstery and clean the vehicle's glass can be
obtained from your dealer.
6-108
Page 535 of 608

Do not clean the vehicle using:
.A knife or any other sharp object to remove a soil
from any interior surface.
.A stiff brush. It can cause damage to the vehicle's
interior surfaces.
.Heavy pressure or aggressive rubbing with a
cleaning cloth. Use of heavy pressure can damage
the interior and does not improve the effectiveness
of soil removal.
.Laundry detergents or dishwashing soaps with
degreasers can leave residue that streaks and
attracts dirt. For liquid cleaners, about 20 drops per
gallon (3.78 L) of water is a good guide. Use only
mild, neutral-pH soaps.
.Too much cleaner that saturates the upholstery.
.Organic solvents such as naptha, alcohol, etc. that
can damage the vehicle's interior.
Fabric/Carpet
Use a vacuum cleaner with a soft brush attachment
frequently to remove dust and loose dirt. A canister
vacuum with a beater bar in the nozzle may only be
used on floor carpet and carpeted floor mats. For any
soil, always try to remove it first with plain water or club
soda. Before cleaning, gently remove as much of the
soil as possible using one of the following techniques:
.For liquids: gently blot the remaining soil with a
paper towel. Allow the soil to absorb into the paper
towel until no more can be removed.
.For solid dry soils: remove as much as possible
and then vacuum.
To clean: 1. Saturate a lint-free, clean white cloth with water or club soda.
2. Wring the cloth to remove excess moisture.
3. Start on the outside edge of the soil and gently rub toward the center. Continue cleaning, using a clean
area of the cloth each time it becomes soiled.
4. Continue to gently rub the soiled area until the cleaning cloth remains clean.
5. If the soil is not completely removed, use a mild soap solution and repeat the cleaning process that
was used with plain water.
6-109
Page 536 of 608

If any of the soil remains, a commercial fabric cleaner
or spot lifter may be necessary. When a commercial
upholstery cleaner or spot lifter is to be used, test a
small hidden area for colorfastness first. If the locally
cleaned area gives any impression that a ring formation
may result, clean the entire surface.
After the cleaning process has been completed, a paper
towel can be used to blot excess moisture from the
fabric or carpet.
Leather
A soft cloth dampened with water can be used to
remove dust. If a more thorough cleaning is necessary,
a soft cloth dampened with a mild soap solution can
be used. Allow the leather to dry naturally. Do not use
heat to dry. Never use steam to clean leather. Never
use spot lifters or spot removers on leather. Many
commercial leather cleaners and coatings that are sold
to preserve and protect leather may permanently
change the appearance and feel of the leather and are
not recommended. Do not use silicone or wax-based
products, or those containing organic solvents to
clean the vehicle's interior because they can alter the
appearance by increasing the gloss in a non-uniform
manner. Never use shoe polish on leather.
Instrument Panel, Vinyl, and Other
Plastic Surfaces
A soft cloth dampened with water may be used to
remove dust. If a more thorough cleaning is necessary,
a clean soft cloth dampened with a mild soap solution
can be used to gently remove dust and dirt. Never use
spot lifters or removers on plastic surfaces. Many
commercial cleaners and coatings that are sold to
preserve and protect soft plastic surfaces may
permanently change the appearance and feel of the
interior and are not recommended. Do not use silicone
or wax-based products, or those containing organic
solvents to clean the vehicle's interior because they
can alter the appearance by increasing the gloss in a
non-uniform manner.
Some commercial products may increase gloss on the
instrument panel. The increase in gloss may cause
annoying reflections in the windshield and even make it
difficult to see through the windshield under certain
conditions.
6-110
Page 538 of 608

Rinse the vehicle well, before washing and after to
remove all cleaning agents completely. If they are
allowed to dry on the surface, they could stain.
Dry the finish with a soft, clean chamois or an all-cotton
towel to avoid surface scratches and water spotting.
High pressure car washes may cause water to enter the
vehicle. Avoid using high pressure washes closer than
12 inches (30 cm) to the surface of the vehicle. Use of
power washers exceeding 1,200 psi (8 274 kPa) can
result in damage or removal of paint and decals.
Cleaning Exterior Lamps/Lenses
Use only lukewarm or cold water, a soft cloth and a
car washing soap to clean exterior lamps and lenses.
Follow instructions underWashing Your Vehicle
on
page 6‑111.
Finish Care
Occasional waxing or mild polishing of the vehicle by
hand may be necessary to remove residue from the
paint finish. Approved cleaning products can be
obtained from your dealer.
If the vehicle has a basecoat/clearcoat paint finish, the
clearcoat gives more depth and gloss to the colored
basecoat. Always use waxes and polishes that are
non-abrasive and made for a basecoat/clearcoat paint
finish.
Notice: Machine compounding or aggressive
polishing on a basecoat/clearcoat paint finish
may damage it. Use only non-abrasive waxes and
polishes that are made for a basecoat/clearcoat
paint finish on the vehicle.
Foreign materials such as calcium chloride and other
salts, ice melting agents, road oil and tar, tree sap, bird
droppings, chemicals from industrial chimneys, etc., can
damage the vehicle's finish if they remain on painted
surfaces. Wash the vehicle as soon as possible.
If necessary, use non-abrasive cleaners that are
marked safe for painted surfaces to remove foreign
matter.
6-112