2010 CHEVROLET SUBURBAN buttons
[x] Cancel search: buttonsPage 328 of 608
Connecting a USB Storage Device
or iPod®
The USB Port can be used to control an iPod or a USB
storage device.
To connect a USB storage device, connect the device to
the USB port located on the instrument panel or in the
center console.
To connect an iPod, connect one end of the USB cable
that came with the iPod to the iPod’s dock connector
and connect the other end to the USB port located in
the center console. If the vehicle is on and the USB
connection works, “OK to disconnect” and a GM logo
may appear on the iPod and iPod appears on the
radio's display. The iPod music appears on the radio’s
display and begins playing.
The iPod charges while it is connected to the vehicle if
the vehicle is in the ACC/ACCESSORY or ON/RUN
position. When the vehicle is turned off, the iPod
automatically powers off and will not charge or draw
power from the vehicle's battery.
If you have an older iPod model that is not supported, it
can still be used by connecting it to the Auxiliary Input
Jack using a standard 3.5 mm (1/8 in) stereo cable.
See “Using the Auxiliary Input Jack” earlier for more
information.
Using the Radio to Control a USB
Storage Device or iPod
The radio can control a USB storage device or an iPod
using the radio buttons and knobs and display song
information on the radio’s display.
f(Tune): Turn to select files.
©SEEK:Press to go to the start of the track, if more
than ten seconds have played. Press and hold or press
multiple times to continue moving backward through
tracks.
¨SEEK: Press to go to the next track. Press and hold
or press multiple times to continue moving forward
through tracks.
sREV (Reverse): Press and hold to reverse
playback quickly. Sound is heard at a reduced volume.
Release
sREV to resume playing. The elapsed time
of the file displays.
\FWD (Fast Forward): Press and hold to advance
playback quickly. Sound is heard at a reduced volume.
Release
\FWD to resume playing. The elapsed time
of the file displays.
4(Information): Press to display additional information
about the selected track.
4-110
Page 333 of 608
Voice Recognition
The Bluetooth system uses voice recognition to
interpret voice commands to dial phone numbers and
name tags.
Noise:Keep interior noise levels to a minimum. The
system may not recognize voice commands if there is
too much background noise.
When to Speak: A short tone sounds after the system
responds indicating when it is waiting for a voice
command. Wait until the tone and then speak.
How to Speak: Speak clearly in a calm and natural
voice.
Audio System
When using the in‐vehicle Bluetooth system, sound
comes through the vehicle's front audio system
speakers and overrides the audio system. Use the
audio system volume knob, during a call, to change the
volume level. The adjusted volume level remains in
memory for later calls. To prevent missed calls, a
minimum volume level is used if the volume is turned
down too low.
Bluetooth Controls
Use the buttons located on the steering wheel to
operate the in‐vehicle Bluetooth system. See Audio
Steering Wheel Controls
on page 4‑136for more
information.
b g(Push To Talk) : Press to answer incoming calls,
to confirm system information, and to start speech
recognition.
c x(Phone On Hook): Press to end a call, reject a
call, or to cancel an operation.
Pairing
A Bluetooth enabled cell phone must be paired to the
in‐vehicle Bluetooth system first and then connected to
the vehicle before it can be used. See the cell phone
manufacturers user guide for Bluetooth functions
before pairing the cell phone. If a Bluetooth phone
is not connected, calls will be made using OnStar
®
Hands‐Free Calling, if available. Refer to the OnStar
owner's guide for more information.
4-115
Page 348 of 608
Remote Control
To use the remote control, aim it at the transmitter
window at the rear of the overhead console and press
the desired button. Direct sunlight or very bright light
could affect the ability of the RSE transmitter to receive
signals from the remote control. If the remote control
does not seem to be working, the batteries might need
to be replaced. See“Battery Replacement” later in this
section. Objects blocking the line of sight could also
affect the function of the remote control.
If a CD or DVD is in the Radio DVD slot, the remote
control power button can be used to turn on the video
screen display and start the disc. The radio can also
turn on the video screen display. See Radio(s)
on
page 4‑82for more information.
Notice: Storing the remote control in a hot area or
in direct sunlight can damage it, and the repairs will
not be covered by the warranty. Storage in extreme
cold can weaken the batteries. Keep the remote
control stored in a cool, dry place.
Remote Control Buttons
O(Power): Press this button to turn the video screen
on and off.
P(Illumination): Press this button to turn the remote
control backlight on. The backlight automatically turns
off after seven to ten seconds if no other button is
pressed while the backlight is on.
v(Title): Press this button to return the DVD to the
main menu of the DVD. This function may vary for
each disc.
y(Main Menu): Press this button to access the DVD
menu. The DVD menu is different on every DVD. Use
the navigation arrows to move the cursor around the
DVD menu. After making a selection press the enter
button. This button only operates when using a DVD.
n,q,p,o(Menu Navigation Arrows): Use the
arrow buttons to navigate through a menu.
r(Enter): Press this button to select the choice that
is highlighted in any menu.
z(Display Menu): Press this button to adjust the
brightness, screen display mode (normal, full, or zoom),
and display the language menu.
q(Return): Press this button to exit the current
active menu and return to the previous menu. This
button operates only when the display menu or a DVD
menu is active.
c(Stop): Press this button to stop playing, fast
reversing, or fast forwarding a DVD. Press this button
twice to return to the beginning of the DVD.
s(Play/Pause): Press this button to start playing a
DVD. Press this button while a DVD is playing to pause
it. Press it again to continue playing the DVD.
4-130
Page 353 of 608
© ¨(Seek):When listening to FM, AM, or XM™
(if equipped), press the left
©or right¨seek arrow to
go to the previous or to the next station or channel and
stay there. This function is inactive, with some radios,
if the front seat passengers are listening to the radio.
Press and hold the left
©or right¨seek arrow until
the display flashes, to tune to an individual station. The
display stops flashing after the buttons have not been
pushed for more than two seconds. This function is
inactive, with some radios, if the front seat passengers
are listening to the radio.
While listening to a disc, press the left
©seek arrow
to go back to the start of the current track or chapter
(if more than ten seconds have played). Press the
right
¨seek arrow to go to the next track or chapter
on the disc. This function is inactive, with some radios,
if the front seat passengers are listening to the disc.
When a DVD video menu is being displayed, press the
left
©or right¨seek arrow to perform a cursor up or
down on the menu. Hold the left
©or right¨arrow to
perform a cursor left or right on the menu. PROG (Program):
Press this button to go to the next
preset radio station or channel set on the main radio.
This function is inactive, with some radios, if the front
seat passengers are listening to the radio.
When a CD or DVD audio disc is playing, press this
button to go to the beginning of the CD or DVD audio.
This function is inactive, with some radios, if the front
seat passengers are listening to the disc.
When a disc is playing in the CD or DVD changer, press
this button to select the next disc, if multiple discs are
loaded. This function is inactive, with some radios, if the
front seat passengers are listening to the disc.
When a DVD video menu is being displayed, press the
PROG button to perform the menu function, enter.
Theft-Deterrent Feature
THEFTLOCK®is designed to discourage theft of the
vehicle's radio by learning a portion of the Vehicle
Identification Number (VIN). The radio does not operate
if it is stolen or moved to a different vehicle.
4-135
Page 415 of 608
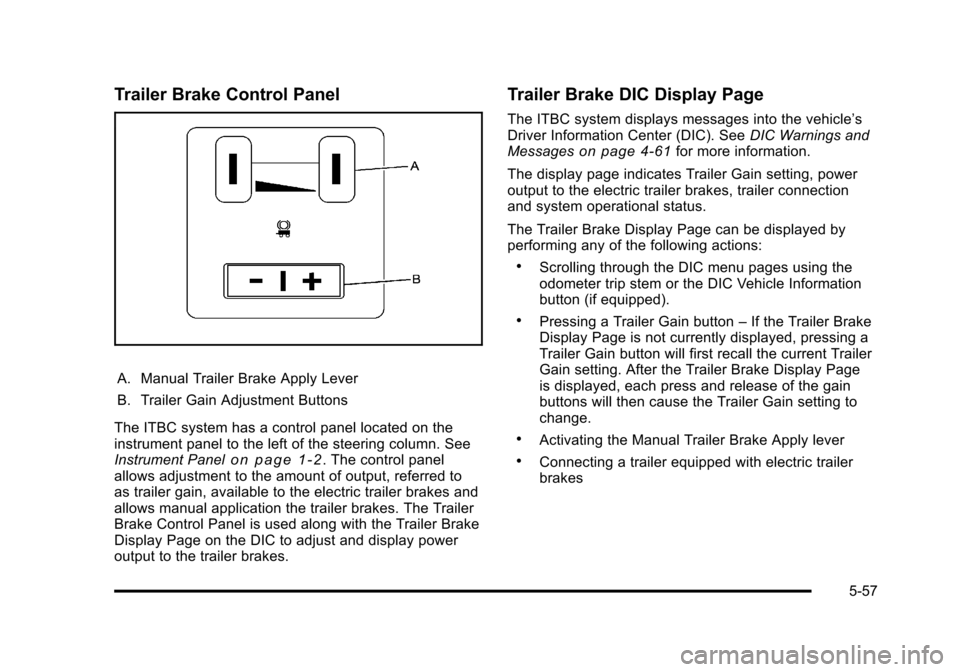
Trailer Brake Control Panel
A. Manual Trailer Brake Apply Lever
B. Trailer Gain Adjustment Buttons
The ITBC system has a control panel located on the
instrument panel to the left of the steering column. See
Instrument Panel
on page 1‑2. The control panel
allows adjustment to the amount of output, referred to
as trailer gain, available to the electric trailer brakes and
allows manual application the trailer brakes. The Trailer
Brake Control Panel is used along with the Trailer Brake
Display Page on the DIC to adjust and display power
output to the trailer brakes.
Trailer Brake DIC Display Page
The ITBC system displays messages into the vehicle’s
Driver Information Center (DIC). See DIC Warnings and
Messages
on page 4‑61for more information.
The display page indicates Trailer Gain setting, power
output to the electric trailer brakes, trailer connection
and system operational status.
The Trailer Brake Display Page can be displayed by
performing any of the following actions:
.Scrolling through the DIC menu pages using the
odometer trip stem or the DIC Vehicle Information
button (if equipped).
.Pressing a Trailer Gain button –If the Trailer Brake
Display Page is not currently displayed, pressing a
Trailer Gain button will first recall the current Trailer
Gain setting. After the Trailer Brake Display Page
is displayed, each press and release of the gain
buttons will then cause the Trailer Gain setting to
change.
.Activating the Manual Trailer Brake Apply lever
.Connecting a trailer equipped with electric trailer
brakes
5-57
Page 416 of 608
All DIC warning and service messages must first be
acknowledged by the driver by pressing the odometer
trip stem or the DIC Vehicle Information button
(if equipped) before the Trailer Brake Display Page
can be displayed and Trailer Gain can be adjusted.
TRAILER GAIN–This setting is displayed anytime the
Trailer Brake Display Page is active. This setting can be
adjusted from 0.0 to 10.0 with either a trailer connected
or disconnected. To adjust the Trailer Gain, press one
of the Trailer Gain adjustment buttons located on the
Trailer Brake Control Panel. Press and hold a gain
button to cause the Trailer Gain to continuously adjust.
To turn the output to the trailer off, adjust the Trailer
Gain setting to 0.0 (zero).
0.0 (zero) gain is the factory default setting. To properly
adjust trailer gain, see the Trailer Gain Adjustment
Procedure later in this section. TRAILER OUTPUT
–This is displayed any time a trailer
with electric brakes is connected. Output to the electric
brakes is based on the amount of vehicle braking
present and relative to the Trailer Gain setting. Output is
displayed from 0 to 10 bars for each gain setting.
The Trailer Output will indicate “- - - - - -“on the Trailer
Brake Display Page whenever the following occur:
.No trailer is connected.
.A trailer without electric brakes is connected
(no DIC message is displayed).
.A trailer with electric brakes has become
disconnected (a CHECK TRAILER WIRING
message will also be displayed on the DIC).
.There is a fault present in the wiring to the electric
trailer brakes (a CHECK TRAILER WIRING
message will also be displayed on the DIC).
.There is a fault in the ITBC system (a SERVICE
TRAILER BRAKE SYSTEM message will also be
displayed in the DIC).
5-58
Page 417 of 608
Manual Trailer Brake Apply
The Manual Trailer Brake Apply Lever is located on the
Trailer Brake Control Panel and is used to apply the
trailer’s electric brakes independent of the vehicle’ s
brakes. This lever is used in the Trailer Gain Adjustment
Procedure to properly adjust the power output to the
trailer brakes. Sliding the lever to the left will apply only
the trailer brakes. The power output to the trailer is
indicated in the Trailer Brake Display Page in the DIC.
If the vehicle’s service brakes are applied while using
the Manual Trailer Brake Apply Lever, the trailer output
power will be the greater of the two.
The trailer and the vehicle's brake lamps will come on
when either vehicle braking or manual trailer brakes are
applied.
Trailer Gain Adjustment Procedure
Trailer Gain should be set for a specific trailering
condition and must be adjusted any time vehicle
loading, trailer loading or road surface conditions
change.
Setting the Trailer Gain properly is needed for the
best trailer stopping performance. A trailer that is
over-gained may result in locked trailer brakes. A trailer
that is under-gained may result in not enough trailer
braking. Both of these conditions may result in poorer
stopping and stability of the vehicle and trailer. Use the following procedure to correctly adjust Trailer
Gain for each towing condition:
1. Make sure the trailer brakes are in proper working condition.
2. Connect a properly loaded trailer to the vehicle and make all necessary mechanical and electrical
connections. See Loading the Vehicle
on
page 5‑29for more information.
3. After the electrical connection is made to a trailer equipped with electric brakes:
.A TRAILER CONNECTED message will be
briefly displayed on the DIC display.
.The Trailer Brake Display Page will appear on
the DIC showing TRAILER GAIN and TRAILER
OUTPUT.
.In the Trailer Output display on the DIC,
“- - - - - -“ will disappear if there is no error
present. Connecting a trailer without electric
brakes will not clear the six dashed lines.
4. Adjust the Trailer Gain by using the gain adjustment (+ / -) buttons on the Trailer Brake
Control Panel.
5-59
Page 446 of 608
Engine Oil Life System
When to Change Engine Oil
This vehicle has a computer system that indicates when
to change the engine oil and filter. This is based on
engine revolutions and engine temperature, and not on
mileage. Based on driving conditions, the mileage at
which an oil change is indicated can vary considerably.
For the oil life system to work properly, the system must
be reset every time the oil is changed.
On some vehicles, when the system has calculated
that oil life has been diminished, a CHANGE ENGINE
OIL SOON message comes on to indicate that an oil
change is necessary. SeeDIC Warnings and Messages
on page 4‑61. Change the oil as soon as possible
within the next 1 000 km (600 miles). It is possible that,
if driving under the best conditions, the oil life system
might not indicate that an oil change is necessary for
over a year. However, the engine oil and filter must
be changed at least once a year and at this time the
system must be reset. For vehicles without the
CHANGE ENGINE OIL SOON message, an oil change
is needed when the OIL LIFE REMAINING percentage
is near 0%. Your dealer has trained service people who
will perform this work using genuine parts and reset the
system. It is also important to check the oil regularly
and keep it at the proper level. If the system is ever reset accidentally, the oil must be
changed at 5 000 km (3,000 miles) since the last oil
change. Remember to reset the oil life system
whenever the oil is changed.
How to Reset the Engine Oil Life
System
The Engine Oil Life System calculates when to
change the engine oil and filter based on vehicle use.
Whenever the oil is changed, reset the system so it can
calculate when the next oil change is required. If a
situation occurs where the oil is changed prior to a
CHANGE ENGINE OIL SOON message coming on,
reset the system.
Always reset the engine oil life to 100% after every oil
change. It will not reset itself. To reset the Engine Oil
Life System on most vehicles:
1. Display the OIL LIFE REMAINING on the DIC. If the vehicle does not have DIC buttons, the
vehicle must be in P (Park) to access this display.
See DIC Operation and Displays (With DIC
Buttons)
on page 4‑47or DIC Operation and
Displays (Without DIC Buttons) on page 4‑55.
2. Press and hold the SET/RESET button on the DIC, or the trip odometer reset stem if the vehicle does
not have DIC buttons, for more than five seconds.
The oil life will change to 100%.
6-20