2010 CHEVROLET SUBURBAN mirror
[x] Cancel search: mirrorPage 199 of 608
Before making a lane change, always check the SBZA
display, check the outside and rearview mirrors, look
over your shoulder for vehicles and hazards, and use
the turn signal.
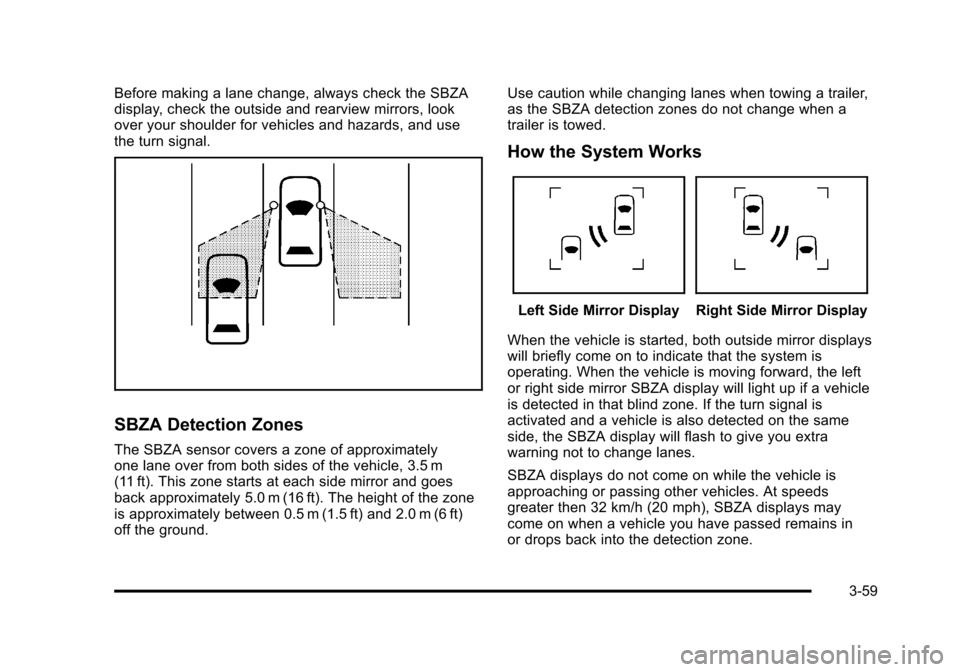
SBZA Detection Zones
The SBZA sensor covers a zone of approximately
one lane over from both sides of the vehicle, 3.5 m
(11 ft). This zone starts at each side mirror and goes
back approximately 5.0 m (16 ft). The height of the zone
is approximately between 0.5 m (1.5 ft) and 2.0 m (6 ft)
off the ground.Use caution while changing lanes when towing a trailer,
as the SBZA detection zones do not change when a
trailer is towed.
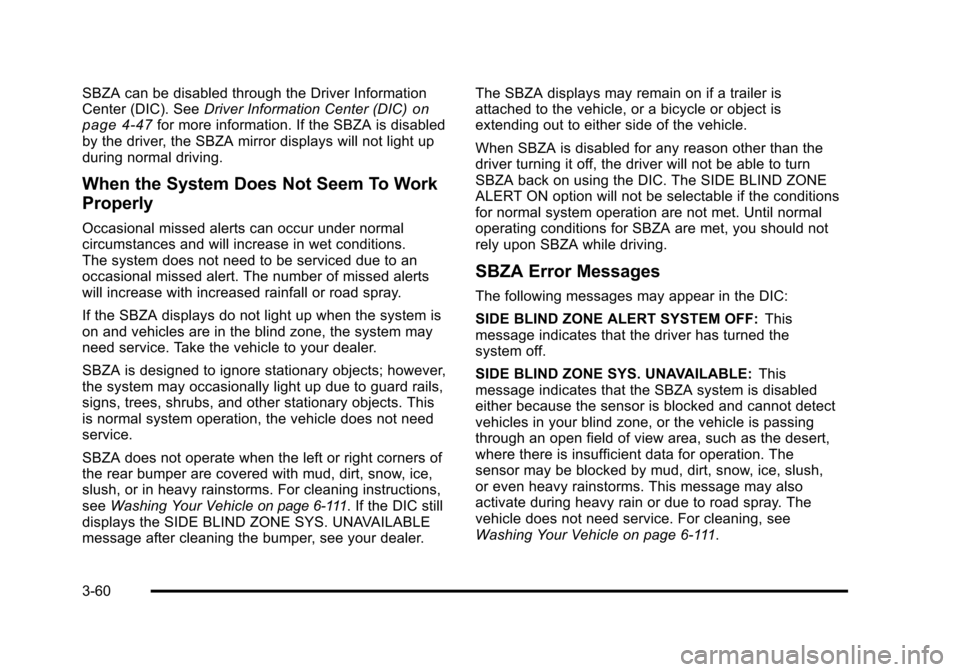
How the System Works
Left Side Mirror DisplayRight Side Mirror Display
When the vehicle is started, both outside mirror displays
will briefly come on to indicate that the system is
operating. When the vehicle is moving forward, the left
or right side mirror SBZA display will light up if a vehicle
is detected in that blind zone. If the turn signal is
activated and a vehicle is also detected on the same
side, the SBZA display will flash to give you extra
warning not to change lanes.
SBZA displays do not come on while the vehicle is
approaching or passing other vehicles. At speeds
greater then 32 km/h (20 mph), SBZA displays may
come on when a vehicle you have passed remains in
or drops back into the detection zone.
3-59
Page 200 of 608
SBZA can be disabled through the Driver Information
Center (DIC). SeeDriver Information Center (DIC)on
page 4‑47for more information. If the SBZA is disabled
by the driver, the SBZA mirror displays will not light up
during normal driving.
When the System Does Not Seem To Work
Properly
Occasional missed alerts can occur under normal
circumstances and will increase in wet conditions.
The system does not need to be serviced due to an
occasional missed alert. The number of missed alerts
will increase with increased rainfall or road spray.
If the SBZA displays do not light up when the system is
on and vehicles are in the blind zone, the system may
need service. Take the vehicle to your dealer.
SBZA is designed to ignore stationary objects; however,
the system may occasionally light up due to guard rails,
signs, trees, shrubs, and other stationary objects. This
is normal system operation, the vehicle does not need
service.
SBZA does not operate when the left or right corners of
the rear bumper are covered with mud, dirt, snow, ice,
slush, or in heavy rainstorms. For cleaning instructions,
see Washing Your Vehicle
on page 6‑111. If the DIC still
displays the SIDE BLIND ZONE SYS. UNAVAILABLE
message after cleaning the bumper, see your dealer. The SBZA displays may remain on if a trailer is
attached to the vehicle, or a bicycle or object is
extending out to either side of the vehicle.
When SBZA is disabled for any reason other than the
driver turning it off, the driver will not be able to turn
SBZA back on using the DIC. The SIDE BLIND ZONE
ALERT ON option will not be selectable if the conditions
for normal system operation are not met. Until normal
operating conditions for SBZA are met, you should not
rely upon SBZA while driving.
SBZA Error Messages
The following messages may appear in the DIC:
SIDE BLIND ZONE ALERT SYSTEM OFF:
This
message indicates that the driver has turned the
system off.
SIDE BLIND ZONE SYS. UNAVAILABLE: This
message indicates that the SBZA system is disabled
either because the sensor is blocked and cannot detect
vehicles in your blind zone, or the vehicle is passing
through an open field of view area, such as the desert,
where there is insufficient data for operation. The
sensor may be blocked by mud, dirt, snow, ice, slush,
or even heavy rainstorms. This message may also
activate during heavy rain or due to road spray. The
vehicle does not need service. For cleaning, see
Washing Your Vehicle on page 6‑111.
3-60
Page 202 of 608

Vehicles Without Navigation System
The rear vision camera system is designed to help
the driver when backing up by displaying a view of
the area behind the vehicle. When the key is in the
ON/RUN position and the driver shifts the vehicle into
R (Reverse), the video image automatically appears on
the inside rear view mirror. Once the driver shifts out of
R (Reverse), the video image automatically disappears
from the inside rear view mirror.
Turning the Rear Vision Camera System
Off or On
To turn off the rear vision camera system, press and
hold
z, located on the inside rearview mirror, until the
left indicator light turns off. The rear camera vision
display is now disabled.
To turn the rear vision camera system on again, press
and hold
zuntil the left indicator light illuminates. The
rear vision camera system display is now enabled and
the display will appear in the mirror normally.
Vehicles With Navigation System
The rear vision camera system is designed to help
the driver when backing up by displaying a view of the
area behind the vehicle. When the driver shifts the
vehicle into R (Reverse), the video image automatically
appears on the navigation screen. Once the driver shifts
out of R (Reverse), the navigation screen will go back to
the last screen that had been displayed, after a delay.
Turning the Rear Vision Camera System
On or Off
To turn the rear vision camera system on or off:
1. Shift into P (Park).
2. Press the MENU button to enter the configure menu options, then press the MENU hard key to
select Display or touch the Display screen button.
3. Select the Rear Camera Options screen button. The Rear Camera Options screen will display.
3-62
Page 206 of 608
The rear vision camera system display in the rearview
mirror may turn off or not appear as expected due to
one of the following conditions. If this occurs the left
indicator light on the mirror will flash.
.A slow flash may indicate a loss of video signal,
or no video signal present during the reverse cycle.
.A fast flash may indicate that the display has
been on for the maximum allowable time during a
reverse cycle, or the display has reached an Over
Temperature limit.
The fast flash conditions are used to protect the
video device from high temperature conditions.
Once conditions return to normal the device will
reset and the green indicator will stop flashing.
During any of these fault conditions, the display will be
blank and the indicator will continue to flash as long as
the vehicle is in R (Reverse) or until the conditions
return to normal.
Pressing and holding
zwhen the left indicator light is
flashing will turn off the video display along with the left
indicator light.
Universal Home Remote
System
See Radio Frequency Statementon page 8‑19for information regarding Part 15 of the Federal
Communications Commission (FCC) Rules and
RSS-210/211 of Industry Canada.
Universal Home Remote System
Operation (With Three Round LED)
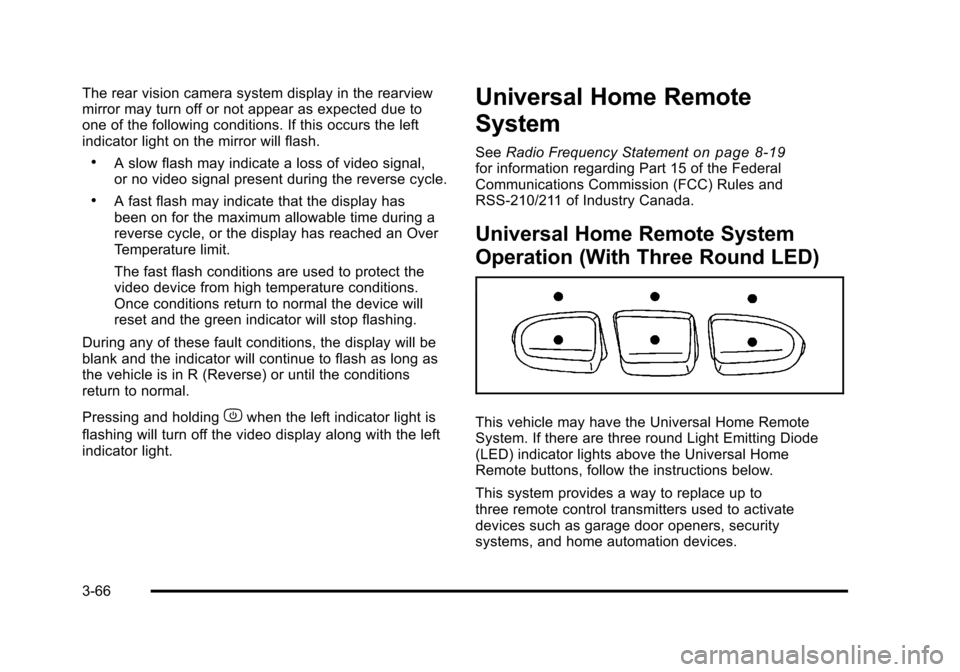
This vehicle may have the Universal Home Remote
System. If there are three round Light Emitting Diode
(LED) indicator lights above the Universal Home
Remote buttons, follow the instructions below.
This system provides a way to replace up to
three remote control transmitters used to activate
devices such as garage door openers, security
systems, and home automation devices.
3-66
Page 238 of 608
Rear Window Defogger
The rear window defogger uses a warming grid to
remove fog from the rear window.
<(Rear Window Defogger):Press this button to
turn the rear window defogger on or off. The system
automatically turns off several minutes after it has been
activated. The defogger can also be turned off by
turning off the engine. Do not drive the vehicle until all
the windows are clear.
For vehicles with heated outside rearview mirrors, the
mirrors will heat to help clear fog or frost from the
surface of the mirror when the rear window defog button
is pressed.
Notice: Do not use anything sharp on the inside of
the rear window. If you do, you could cut or damage
the warming grid, and the repairs would not be
covered by the vehicle warranty. Do not attach a
temporary vehicle license, tape, a decal or anything
similar to the defogger grid.
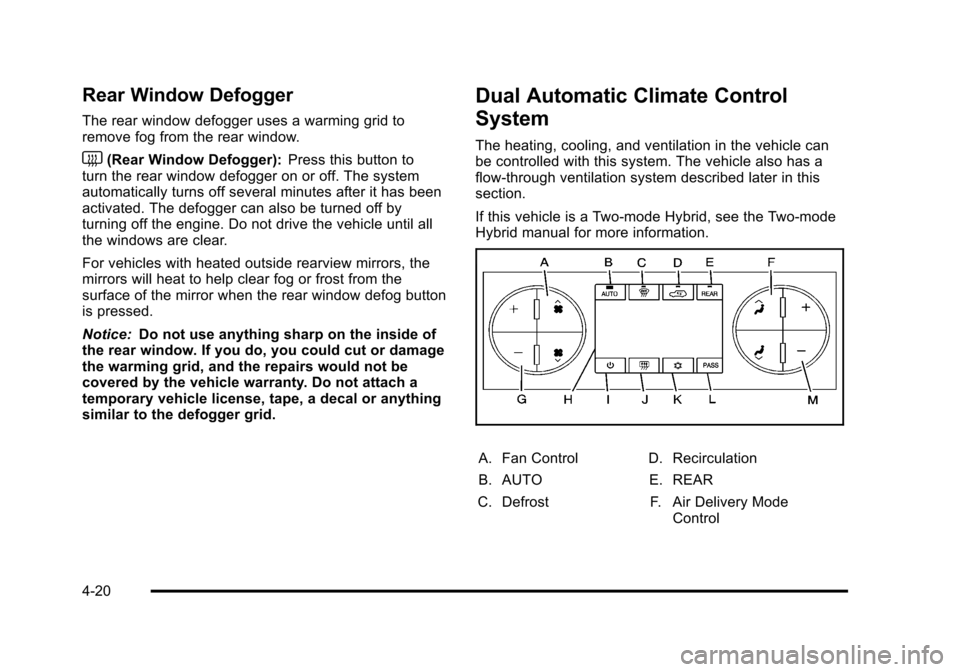
Dual Automatic Climate Control
System
The heating, cooling, and ventilation in the vehicle can
be controlled with this system. The vehicle also has a
flow-through ventilation system described later in this
section.
If this vehicle is a Two-mode Hybrid, see the Two-mode
Hybrid manual for more information.
A. Fan Control
B. AUTO
C. Defrost D. Recirculation
E. REAR F. Air Delivery Mode Control
4-20
Page 243 of 608
Notice:Do not use a razor blade or sharp object
to clear the inside rear window. Do not adhere
anything to the defogger grid lines in the rear glass.
These actions may damage the rear defogger.
Repairs would not be covered by your warranty.
Heated Mirrors: For vehicles with heated outside
rearview mirrors, the mirrors heat to help clear fog or
frost from the surface of the mirror when the rear
window defog button is pressed. See Outside Power
Mirrors on page 3‑53.
Sensors
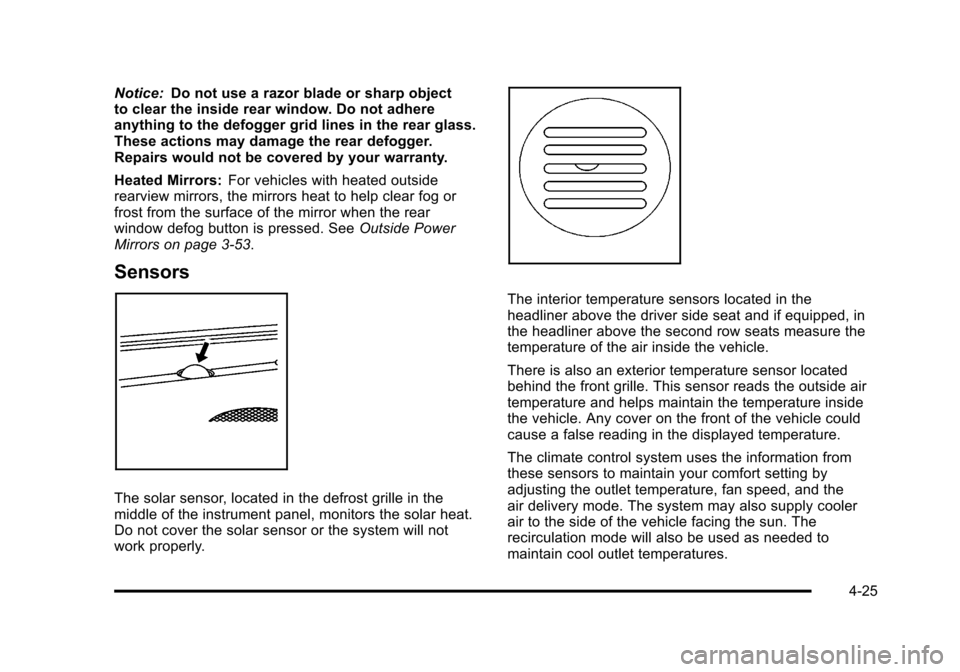
The solar sensor, located in the defrost grille in the
middle of the instrument panel, monitors the solar heat.
Do not cover the solar sensor or the system will not
work properly.
The interior temperature sensors located in the
headliner above the driver side seat and if equipped, in
the headliner above the second row seats measure the
temperature of the air inside the vehicle.
There is also an exterior temperature sensor located
behind the front grille. This sensor reads the outside air
temperature and helps maintain the temperature inside
the vehicle. Any cover on the front of the vehicle could
cause a false reading in the displayed temperature.
The climate control system uses the information from
these sensors to maintain your comfort setting by
adjusting the outlet temperature, fan speed, and the
air delivery mode. The system may also supply cooler
air to the side of the vehicle facing the sun. The
recirculation mode will also be used as needed to
maintain cool outlet temperatures.
4-25
Page 294 of 608
APPROACH LIGHTING
This feature allows you to select whether or not to have
the exterior lights turn on briefly during low light periods
after unlocking the vehicle using the Remote Keyless
Entry (RKE) transmitter.
Press the customization button until APPROACH
LIGHTING appears on the DIC display. Press the
set/reset button once to access the settings for this
feature. Then press the customization button to scroll
through the following settings:
OFF:The exterior lights will not turn on when you
unlock the vehicle with the RKE transmitter.
ON (default): If it is dark enough outside, the exterior
lights will turn on briefly when you unlock the vehicle
with the RKE transmitter.
The lights will remain on for 20 seconds or until the lock
button on the RKE transmitter is pressed, or the vehicle
is no longer off. See Remote Keyless Entry (RKE)
System Operation
on page 3‑4for more information.
NO CHANGE : No change will be made to this feature.
The current setting will remain.
To select a setting, press the set/reset button while the
desired setting is displayed on the DIC.
CHIME VOLUME
This feature allows you to select the volume level of the
chime.
Press the customization button until CHIME VOLUME
appears on the DIC display. Press the set/reset button
once to access the settings for this feature. Then press
the customization button to scroll through the following
settings:
NORMAL: The chime volume will be set to a normal
level.
LOUD: The chime volume will be set to a loud level.
NO CHANGE: No change will be made to this feature.
The current setting will remain.
There is no default for chime volume. The volume will
stay at the last known setting.
To select a setting, press the set/reset button while the
desired setting is displayed on the DIC.
PARK TILT MIRRORS
If your vehicle has this feature, it allows you to select
whether or not the outside mirror(s) will automatically tilt
down when the vehicle is shifted into R (Reverse). See
Park Tilt Mirrors
on page 3‑55for more information.
4-76
Page 295 of 608
Press the customization button until PARK TILT
MIRRORS appears on the DIC display. Press the
set/reset button once to access the settings for this
feature. Then press the customization button to scroll
through the following settings:
OFF (default):Neither outside mirror will be tilted down
when the vehicle is shifted into R (Reverse).
DRIVER MIRROR: The driver's outside mirror will be
tilted down when the vehicle is shifted into R (Reverse).
PASSENGER MIRROR: The passenger's outside
mirror will be tilted down when the vehicle is shifted into
R (Reverse).
BOTH MIRRORS: The driver's and passenger's outside
mirrors will be tilted down when the vehicle is shifted
into R (Reverse).
NO CHANGE: No change will be made to this feature.
The current setting will remain.
To select a setting, press the set/reset button while the
desired setting is displayed on the DIC.
EASY EXIT RECALL
If your vehicle has this feature, it allows you to select
your preference for the automatic easy exit seat feature.
See Memory Seat, Mirrors, and Pedals
on page 2‑10for more information. Press the customization button until EASY EXIT
RECALL appears on the DIC display. Press the
set/reset button once to access the settings for this
feature. Then press the customization button to scroll
through the following settings:
DOOR BUTTON ONLY:
No automatic seat exit recall
will occur. The recall will only occur after pressing the
easy exit seat button.
BUTTON & KEY OUT (default): If the features are
enabled through the EASY EXIT SETUP menu, the
driver's seat will move back when the key is removed
from the ignition or after pressing the easy exit seat
button.
The automatic easy exit seat movement will only occur
one time after the key is removed from the ignition.
If the automatic movement has already occurred, and
you put the key back in the ignition and remove it again,
the seat will stay in the original exit position, unless a
memory recall took place prior to removing the key
again.
NO CHANGE: No change will be made to this feature.
The current setting will remain.
To select a setting, press the set/reset button while the
desired setting is displayed on the DIC.
4-77