2010 CHEVROLET SUBURBAN seat memory
[x] Cancel search: seat memoryPage 170 of 608

Adjustable Throttle and Brake Pedal
On vehicles with this feature, you can change the
position of the throttle and brake pedals.
No adjustment to the pedals can be made when the
vehicle is in R (Reverse) or while using the cruise
control.
The switch used to adjust
the pedals is located on
the instrument panel
below the climate control
system.
Press the arrow at the bottom of the switch to move the
pedals closer to your body. Press the arrow at the top of
the switch to move the pedals away from your body.
Before you start driving, fully press the brake pedal to
confirm the adjustment is right for you. While driving,
make only small adjustments. The vehicle may have a memory function which lets
pedal settings be saved and recalled. See
Memory
Seat, Mirrors, and Pedals
on page 2‑10for more
information.
Engine Coolant Heater
The engine coolant heater can provide easier starting
and better fuel economy during engine warm-up in cold
weather conditions at or below −18°C (0°F). Vehicles
with an engine heater should be plugged in at least
four hours before starting. An internal thermostat in
the plug-end of the cord may exist which will prevent
engine coolant heater operation at temperatures
above −18°C (0°F).
To Use the Engine Coolant Heater
1. Turn off the engine.
2. Open the hood and unwrap the electrical cord.
The cord is secured to the Engine Compartment
Fuse Block with a clip. Carefully remove the wire
tie which secures the electrical cord. Do not cut the
electrical cord.
3. Plug the cord into a normal, grounded 110-volt AC outlet.
3-30
Page 193 of 608
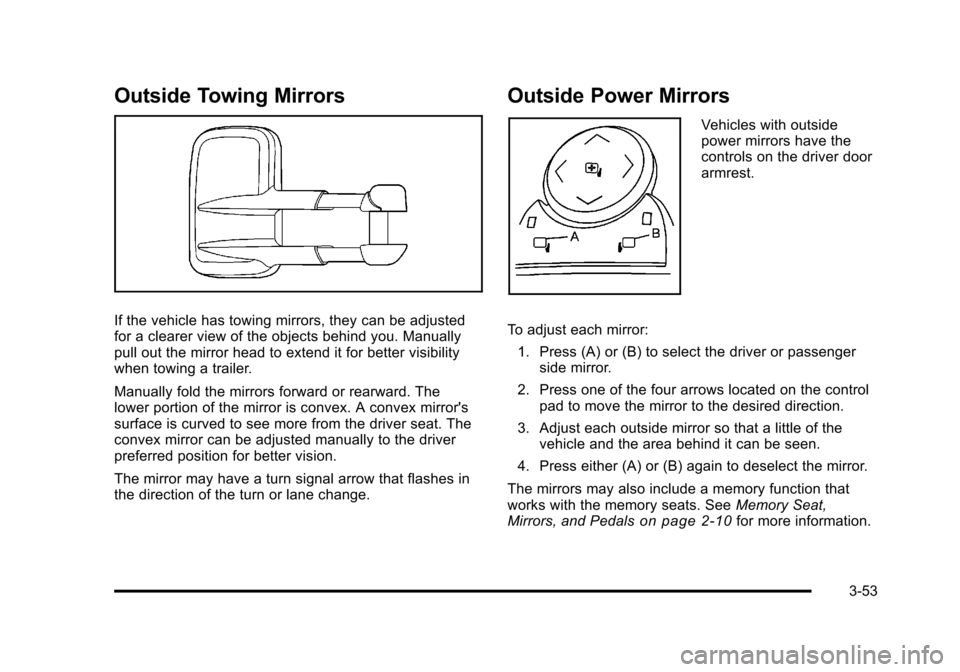
Outside Towing Mirrors
If the vehicle has towing mirrors, they can be adjusted
for a clearer view of the objects behind you. Manually
pull out the mirror head to extend it for better visibility
when towing a trailer.
Manually fold the mirrors forward or rearward. The
lower portion of the mirror is convex. A convex mirror's
surface is curved to see more from the driver seat. The
convex mirror can be adjusted manually to the driver
preferred position for better vision.
The mirror may have a turn signal arrow that flashes in
the direction of the turn or lane change.
Outside Power Mirrors
Vehicles with outside
power mirrors have the
controls on the driver door
armrest.
To adjust each mirror: 1. Press (A) or (B) to select the driver or passenger side mirror.
2. Press one of the four arrows located on the control pad to move the mirror to the desired direction.
3. Adjust each outside mirror so that a little of the vehicle and the area behind it can be seen.
4. Press either (A) or (B) again to deselect the mirror.
The mirrors may also include a memory function that
works with the memory seats. See Memory Seat,
Mirrors, and Pedals
on page 2‑10for more information.
3-53
Page 195 of 608
Outside Automatic Dimming Mirror
Vehicles with this feature have a driver outside mirror
that adjusts for the glare of headlamps behind you. See
Automatic Dimming Rearview Mirror
on page 3‑52for
more information.
Park Tilt Mirrors
Vehicles with the memory package have a passenger
and/or driver mirror that tilts to a preselected position
when the vehicle is in R (Reverse). This feature lets the
driver view the curb when parallel parking. The mirror(s)
return to the original position when the vehicle is shifted
out of R (Reverse), or the ignition is turned off.
Turn this feature on or off through the Driver Information
Center (DIC). See DIC Vehicle Customization (With DIC
Buttons)
on page 4‑71for more information.
Outside Convex Mirror
{WARNING:
A convex mirror can make things, like other
vehicles, look farther away than they really are.
If you cut too sharply into the right lane, you could
hit a vehicle on the right. Check the inside mirror
or glance over your shoulder before changing
lanes.
The passenger side mirror is convex shaped. A convex
mirror's surface is curved so more can be seen from the
driver seat.
3-55
Page 271 of 608

Relearn Remote Key
This display allows you to match Remote Keyless Entry
(RKE) transmitters to your vehicle. This procedure will
erase all previously learned transmitters. Therefore,
they must be relearned as additional transmitters.
To match an RKE transmitter to your vehicle:1. Press the vehicle information button until PRESS
VTO RELEARN REMOTE KEY displays.
2. Press the set/reset button until REMOTE KEY LEARNING ACTIVE is displayed.
3. Press and hold the lock and unlock buttons on the first transmitter at the same time for about
15 seconds.
On vehicles with memory recall seats, the
first transmitter learned will match driver 1 and
the second will match driver 2.
A chime will sound indicating that the transmitter is
matched.
4. To match additional transmitters at this time, repeat Step 3.
Each vehicle can have a maximum of
eight transmitters matched to it.
5. To exit the programming mode, you must cycle the key to LOCK/OFF.
Compass Zone Setting
This display allows for setting the compass zone. See
DIC Compass on page 4‑58
Compass Recalibration
This display allows for calibrating the compass. See
DIC Compass on page 4‑58
Blank Display
This display shows no information.
Trip Odometer Reset Stem Menu Items
Use the trip odometer reset stem to view the odometer
and trip odometer. The Language selection and Engine
Hours display can also be accessed with the trip
odometer reset stem.
Odometer
Press the trip odometer reset stem until ODOMETER
displays. This display shows the distance the vehicle
has been driven in either miles (mi) or kilometers (km).
4-53
Page 276 of 608
To match an RKE transmitter to your vehicle:1. Press the trip odometer reset stem until RELEARN REMOTE KEY displays.
2. Press and hold the trip odometer reset stem for three seconds.
The message REMOTE KEY LEARNING ACTIVE
will display.
3. Press and hold the lock and unlock buttons on the first transmitter at the same time for about
15 seconds.
On vehicles with memory recall seats, the first
transmitter learned will match driver 1 and the
second will match driver 2.
A chime will sound indicating that the transmitter is
matched.
4. To match additional transmitters at this time, repeat Step 3.
Each vehicle can have a maximum of
eight transmitters matched to it.
5. To exit the programming mode, you must cycle the key to LOCK/OFF.DIC Compass
Your vehicle may have a compass in the Driver
Information Center (DIC).
Compass Zone
The zone is set to zone eight upon leaving the factory.
Your dealer will set the correct zone for your location.
Under certain circumstances, such as during a long
distance cross-country trip or moving to a new state or
province, it will be necessary to compensate for
compass variance by resetting the zone through the
DIC if the zone is not set correctly.
Compass variance is the difference between the earth's
magnetic north and true geographic north. If the
compass is not set to the zone where you live, the
compass may give false readings. The compass must
be set to the variance zone in which the vehicle is
traveling.
4-58
Page 295 of 608
Press the customization button until PARK TILT
MIRRORS appears on the DIC display. Press the
set/reset button once to access the settings for this
feature. Then press the customization button to scroll
through the following settings:
OFF (default):Neither outside mirror will be tilted down
when the vehicle is shifted into R (Reverse).
DRIVER MIRROR: The driver's outside mirror will be
tilted down when the vehicle is shifted into R (Reverse).
PASSENGER MIRROR: The passenger's outside
mirror will be tilted down when the vehicle is shifted into
R (Reverse).
BOTH MIRRORS: The driver's and passenger's outside
mirrors will be tilted down when the vehicle is shifted
into R (Reverse).
NO CHANGE: No change will be made to this feature.
The current setting will remain.
To select a setting, press the set/reset button while the
desired setting is displayed on the DIC.
EASY EXIT RECALL
If your vehicle has this feature, it allows you to select
your preference for the automatic easy exit seat feature.
See Memory Seat, Mirrors, and Pedals
on page 2‑10for more information. Press the customization button until EASY EXIT
RECALL appears on the DIC display. Press the
set/reset button once to access the settings for this
feature. Then press the customization button to scroll
through the following settings:
DOOR BUTTON ONLY:
No automatic seat exit recall
will occur. The recall will only occur after pressing the
easy exit seat button.
BUTTON & KEY OUT (default): If the features are
enabled through the EASY EXIT SETUP menu, the
driver's seat will move back when the key is removed
from the ignition or after pressing the easy exit seat
button.
The automatic easy exit seat movement will only occur
one time after the key is removed from the ignition.
If the automatic movement has already occurred, and
you put the key back in the ignition and remove it again,
the seat will stay in the original exit position, unless a
memory recall took place prior to removing the key
again.
NO CHANGE: No change will be made to this feature.
The current setting will remain.
To select a setting, press the set/reset button while the
desired setting is displayed on the DIC.
4-77
Page 296 of 608
EASY EXIT SETUP
If your vehicle has this feature, it allows you to select
which areas will recall with the automatic easy exit seat
feature. It also allows you to turn off the automatic easy
exit feature. SeeMemory Seat, Mirrors, and Pedals
on
page 2‑10and “EASY EXIT RECALL” earlier for more
information.
Press the customization button until EASY EXIT SETUP
appears on the DIC display. Press the set/reset button
once to access the settings for this feature. Then press
the menu up/down button to scroll through the following
settings:
OFF: No automatic seat exit will recall.
SEAT ONLY (Default): The driver's seat will recall.
NO CHANGE: No change will be made to this feature.
The current setting will remain.
To select a setting, press the set/reset button while the
desired setting is displayed on the DIC.
MEMORY SEAT RECALL
If your vehicle has this feature, it allows you to select
your preference for the remote memory seat recall
feature. See Memory Seat, Mirrors, and Pedals
on
page 2‑10for more information. Press the customization button until MEMORY SEAT
RECALL appears on the DIC display. Press the
set/reset button once to access the settings for this
feature. Then press the customization button to scroll
through the following settings:
OFF (default):
No remote memory seat recall will
occur.
ON: The driver's seat and, on some vehicles, the
outside mirrors will automatically move to the stored
driving position when the unlock button on the Remote
Keyless Entry (RKE) transmitter is pressed. On some
vehicles with the adjustable throttle and brake pedal
feature, the pedals will also automatically move. See
“Relearn Remote Key” underDIC Operation and
Displays (With DIC Buttons)
on page 4‑47or DIC
Operation and Displays (Without DIC Buttons)on
page 4‑55for more information on matching
transmitters to driver ID numbers.
NO CHANGE: No change will be made to this feature.
The current setting will remain.
To select a setting, press the set/reset button while the
desired setting is displayed on the DIC.
4-78
Page 601 of 608

Lights (cont.)Passenger Airbag Status Indicator . . . . . . . . . . . . . . . . 4-33
Safety Belt Reminders . . . . . . . . . . . . . . . . . . . . . . . . . . . . 4-31
Security . . . . . . . . . . . . . . . . . . . . . . . . . . . . . . . . . . . . . . . . . . 4-44
StabiliTrak
®Indicator . . . . . . . . . . . . . . . . . . . . . . . . . . . . . 4-37
Tire Pressure . . . . . . . . . . . . . . . . . . . . . . . . . . . . . . . . . . . . . 4-38
Tow/Haul Mode . . . . . . . . . . . . . . . . . . . . . . . . . . . . . . . . . . . 4-45
Loading Your Vehicle . . . . . . . . . . . . . . . . . . . . . . . . . . . . . . 5-29
Locking Rear Axle . . . . . . . . . . . . . . . . . . . . . . . . . . . . . . . . . . .5-8
Locks Delayed Locking . . . . . . . . . . . . . . . . . . . . . . . . . . . . . . . . . . 3-11
Door . . . . . . . . . . . . . . . . . . . . . . . . . . . . . . . . . . . . . . . . . . . . . . 3-10
Lockout Protection . . . . . . . . . . . . . . . . . . . . . . . . . . . . . . . . 3-12
Power Door . . . . . . . . . . . . . . . . . . . . . . . . . . . . . . . . . . . . . . . 3-10
Programmable Automatic Door Locks . . . . . . . . . . . . 3-11
Rear Door Security Locks . . . . . . . . . . . . . . . . . . . . . . . . 3-11
Loss of Control . . . . . . . . . . . . . . . . . . . . . . . . . . . . . . . . . . . . 5-10
Low Fuel Warning Light . . . . . . . . . . . . . . . . . . . . . . . . . . . . 4-46
Lower Anchors and Tethers for Children . . . . . . . . . . . 2-67
Lumbar Manual Controls . . . . . . . . . . . . . . . . . . . . . . . . . . . . . . . . . . . 2-6
Power Controls . . . . . . . . . . . . . . . . . . . . . . . . . . . . . . . . . . . . 2-7
M
Maintenance ScheduleMaintenance Record . . . . . . . . . . . . . . . . . . . . . . . . . . . . . 7-16
Maintenance Replacement Parts . . . . . . . . . . . . . . . . . 7-14
Owner Checks and Services . . . . . . . . . . . . . . . . . . . . . . 7-10
Recommended Fluids and Lubricants . . . . . . . . . . . . 7-12
Scheduled Maintenance . . . . . . . . . . . . . . . . . . . . . . . . . . . 7-3
Malfunction Indicator Lamp . . . . . . . . . . . . . . . . . . . . . . . . 4-39
Manual Lumbar Controls . . . . . . . . . . . . . . . . . . . . . . . . . . . . .2-6
Manual Seats . . . . . . . . . . . . . . . . . . . . . . . . . . . . . . . . . . . . . . . .2-4
Memory Seat, Mirrors, and Pedals . . . . . . . . . . . . . . . . . 2-10
Message DIC Warnings and Messages . . . . . . . . . . . . . . . . . . . . . 4-61
Mirrors Automatic Dimming Rearview . . . . . . . . . . . . . . . . . . . . . 3-52
Manual Rearview . . . . . . . . . . . . . . . . . . . . . . . . . . . . . . . . . 3-52
Outside Automatic Dimming Mirror . . . . . . . . . . . . . . . . 3-55
Outside Convex Mirror . . . . . . . . . . . . . . . . . . . . . . . . . . . . 3-55
Outside Heated Mirrors . . . . . . . . . . . . . . . . . . . . . . . . . . . 3-56
Outside Manual Mirrors . . . . . . . . . . . . . . . . . . . . . . . . . . . 3-52
Outside Power Foldaway Mirrors . . . . . . . . . . . . . . . . . 3-54
Outside Power Mirrors . . . . . . . . . . . . . . . . . . . . . . . . . . . . 3-53
Outside Towing Mirrors . . . . . . . . . . . . . . . . . . . . . . . . . . . 3-53
Park Tilt . . . . . . . . . . . . . . . . . . . . . . . . . . . . . . . . . . . . . . . . . . 3-55
MP3 . . . . . . . . . . . . . . . . . . . . . . . . . . . . . . . . . . . . . . . . 4-99, 4-106
i - 9