2010 CHEVROLET SUBURBAN center console
[x] Cancel search: center consolePage 234 of 608
The battery can be discharged at idle if the electrical
loads are very high. This is true for all vehicles. This is
because the generator (alternator) may not be spinning
fast enough at idle to produce all the power that is
needed for very high electrical loads.
A high electrical load occurs when several of the
following are on, such as: headlamps, high beams, fog
lamps, rear window defogger, climate control fan at high
speed, heated seats, engine cooling fans, trailer loads,
and loads plugged into accessory power outlets.
EPM works to prevent excessive discharge of the
battery. It does this by balancing the generator's output
and the vehicle's electrical needs. It can increase
engine idle speed to generate more power, whenever
needed. It can temporarily reduce the power demands
of some accessories.
Normally, these actions occur in steps or levels, without
being noticeable. In rare cases at the highest levels
of corrective action, this action may be noticeable to
the driver. If so, a Driver Information Center (DIC)
message might be displayed, such as BATTERY
SAVER ACTIVE, BATTERY VOLTAGE LOW, or
LOW BATTERY. If this message is displayed, it is
recommended that the driver reduce the electrical loads
as much as possible. SeeDIC Warnings and Messages
on page 4‑61.
Battery Run-Down Protection
This feature shuts off the dome, and reading lamps if
they are left on for more than 10 minutes when the
ignition is off. This will keep the battery from
running down.
Accessory Power Outlet(s)
Accessory power outlets can be used to connect
auxiliary electrical equipment, such as a cellular
telephone.
There are two under the climate controls, one inside the
center floor console, one on the rear of the center floor
console and one accessory power outlet in the rear
cargo area on the passenger side.
To use an accessory power outlet, remove the
protective cap. When not in use, always cover the
accessory power outlet with the protective cap.
The accessory power outlets are powered, even with
the ignition off. Continuing to use accessory power
outlets while the ignition is in LOCK/OFF may cause
the vehicle's battery to run down.
Notice:If electrical devices are left plugged into a
power outlet, the battery may drain causing the
vehicle not to start or damage to the battery. This
would not be covered by the vehicle warranty.
Always unplug all electrical devices when turning
off the vehicle.
4-16
Page 235 of 608
Certain accessory plugs may not be compatible to the
accessory power outlet and could result in blown
adapter or vehicle fuses. If you experience a problem,
see your dealer for additional information on the
accessory power plugs.
Notice:Adding any electrical equipment to the
vehicle can damage it or keep other components
from working as they should. The repairs would not
be covered by the vehicle warranty. Do not use
equipment exceeding maximum amperage rating of
20 amperes. Check with your dealer before adding
electrical equipment.
When adding electrical equipment, be sure to follow
the proper installation instructions included with the
equipment. Do not use equipment exceeding the
maximum amperage rating of 20 amperes.
Notice: Improper use of the power outlet can cause
damage not covered by the vehicle warranty. Do not
hang any type of accessory or accessory bracket
from the plug because the power outlets are
designed for accessory power plugs only.Ashtray(s) and Cigarette Lighter
The front ashtray is located near the center of the
instrument panel or on the front console, if equipped.
Pull on the ashtray door to open it.
Notice: If papers, pins, or other flammable items are
put in the ashtray, hot cigarettes or other smoking
materials could ignite them and possibly damage
the vehicle. Never put flammable items in the
ashtray.
To remove the front ashtray pull the ashtray up.
To use the cigarette lighter, push it in all the way, and let
go. When it is ready, it will pop back out by itself.
Notice: Holding a cigarette lighter in while it is
heating does not let the lighter back away from the
heating element when it is hot. Damage from
overheating can occur to the lighter or heating
element, or a fuse could be blown. Do not hold a
cigarette lighter in while it is heating.
4-17
Page 246 of 608
Rear Air Conditioning and Heating
System and Electronic Climate
Controls
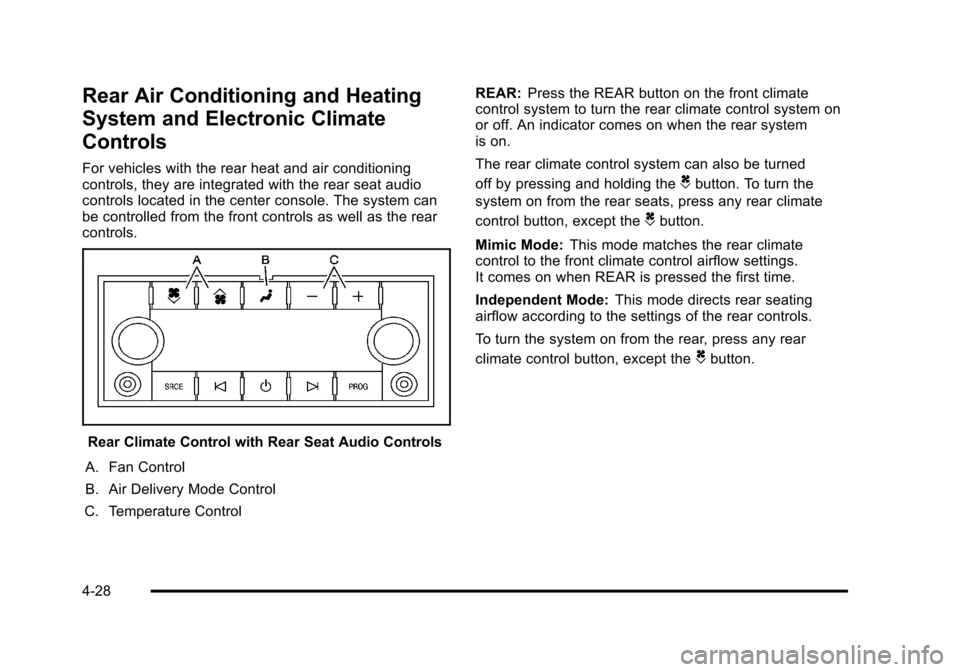
For vehicles with the rear heat and air conditioning
controls, they are integrated with the rear seat audio
controls located in the center console. The system can
be controlled from the front controls as well as the rear
controls.
Rear Climate Control with Rear Seat Audio Controls
A. Fan Control
B. Air Delivery Mode Control
C. Temperature Control REAR:
Press the REAR button on the front climate
control system to turn the rear climate control system on
or off. An indicator comes on when the rear system
is on.
The rear climate control system can also be turned
off by pressing and holding the
Cbutton. To turn the
system on from the rear seats, press any rear climate
control button, except the
Cbutton.
Mimic Mode: This mode matches the rear climate
control to the front climate control airflow settings.
It comes on when REAR is pressed the first time.
Independent Mode: This mode directs rear seating
airflow according to the settings of the rear controls.
To turn the system on from the rear, press any rear
climate control button, except the
Cbutton.
4-28
Page 251 of 608
{WARNING:
If the airbag readiness light stays on after the
vehicle is started or comes on while driving, it
means the airbag system might not be working
properly. The airbags in the vehicle might not
inflate in a crash, or they could even inflate
without a crash. To help avoid injury, have the
vehicle serviced right away.
If there is a problem with the airbag system, an airbag
Driver Information Center (DIC) message can also
come on. See DIC Warnings and Messages
on
page 4‑61for more information.
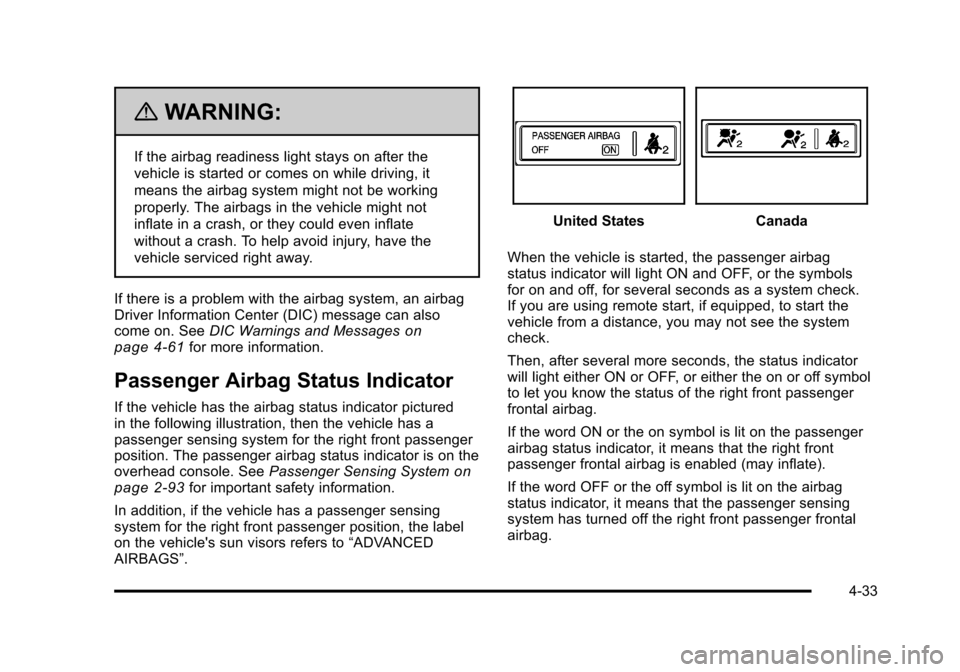
Passenger Airbag Status Indicator
If the vehicle has the airbag status indicator pictured
in the following illustration, then the vehicle has a
passenger sensing system for the right front passenger
position. The passenger airbag status indicator is on the
overhead console. See Passenger Sensing System
on
page 2‑93for important safety information.
In addition, if the vehicle has a passenger sensing
system for the right front passenger position, the label
on the vehicle's sun visors refers to “ADVANCED
AIRBAGS”.
United StatesCanada
When the vehicle is started, the passenger airbag
status indicator will light ON and OFF, or the symbols
for on and off, for several seconds as a system check.
If you are using remote start, if equipped, to start the
vehicle from a distance, you may not see the system
check.
Then, after several more seconds, the status indicator
will light either ON or OFF, or either the on or off symbol
to let you know the status of the right front passenger
frontal airbag.
If the word ON or the on symbol is lit on the passenger
airbag status indicator, it means that the right front
passenger frontal airbag is enabled (may inflate).
If the word OFF or the off symbol is lit on the airbag
status indicator, it means that the passenger sensing
system has turned off the right front passenger frontal
airbag.
4-33
Page 316 of 608
DVD/CD AUX (CD/Auxiliary):Press this button to cycle
through DVD, CD, or Auxiliary when listening to the
radio. The DVD/CD text label and a message showing
track or chapter number displays when a disc is in
either slot. Press this button again and the system
automatically searches for an auxiliary input device,
such as a portable audio player. If a portable audio
player is not connected, “No Aux Input Device”displays.
If a disc is in both the DVD slot and the CD slot the
DVD/CD AUX button cycles between the two sources
and does not indicate “No Aux Input Device”. If a front
auxiliary device is connected, the DVD/CD AUX button
cycles through all available options, such as: DVD slot,
CD slot, Front Auxiliary, and Rear Auxiliary (if available).
See “Using the Auxiliary Input Jack(s)” later in this
section, or “Audio/Video (A/V) Jacks” under,Rear Seat
Entertainment (RSE) System
on page 4‑125for more
information.
Using the USB Port
Radios with a USB port can control a USB storage
device or an iPod®using the radio buttons and
knobs. See Using an MP3 (Radios with CD)on
page 4‑99or Using an MP3 (Radios with CD and DVD)on page 4‑106for information about how to connect and
control a USB storage device or an iPod.
USB Support
The USB connector is located on the instrument
panel or in the center console, and uses the
USB 2.0 standard.
USB Supported Devices
.USB Flash Drives
.Portable USB Hard Drives
.Fifth generation or later iPod
.iPod nanos
.iPod touch
.iPod classic
Not all iPods and USB Drives are compatible with the
USB port.
Make sure the iPod has the latest firmware from
Apple
®for proper operation. iPod firmware can
be updated using the latest iTunes®application.
See www.apple.com/itunes.
For help with identifying your iPod, go to
www.apple.com/support.
4-98
Page 320 of 608
To listen to files by another artist, press the softkey
located below either arrow tab. The disc goes to the
next or previous artist in alphabetical order. Continue
pressing either softkey below the arrow tab until the
desired artist displays.
To change from playback by artist to playback by
album:1. Press the softkey located below the Sort By tab.
2. Press one of the softkeys below the album tab from the sort screen.
3. Press the softkey below the back tab to return to the main music navigator screen.
The album name displays on the second line between
the arrows and songs from the current album begin to
play. Once all songs from that album have played, the
player moves to the next album in alphabetical order on
the CD and begins playing MP3 files from that album.
To exit music navigator mode, press the softkey below
the Back tab to return to normal MP3 playback.Connecting a USB Storage Device
or iPod®
The USB Port can be used to control an iPod or a USB
storage device.
To connect a USB storage device, connect the device to
the USB port located on the instrument panel or in the
center console.
To connect an iPod, connect one end of the USB cable
that came with the iPod to the iPod’ s dock connector
and connect the other end to the USB port located in
the center console. If the vehicle is on and the USB
connection works, “OK to disconnect” and a GM logo
may appear on the iPod and iPod appears on the
radio's display. The iPod music appears on the radio’s
display and begins playing.
The iPod charges while it is connected to the vehicle if
the vehicle is in the ACC/ACCESSORY or ON/RUN
position. When the vehicle is turned off, the iPod
automatically powers off and will not charge or draw
power from the vehicle's battery.
If you have an older iPod model that is not supported, it
can still be used by connecting it to the Auxiliary Input
Jack using a standard 3.5 mm (1/8 in) stereo cable. See
“Using the Auxiliary Input Jack” earlier for more
information.
4-102
Page 328 of 608
Connecting a USB Storage Device
or iPod®
The USB Port can be used to control an iPod or a USB
storage device.
To connect a USB storage device, connect the device to
the USB port located on the instrument panel or in the
center console.
To connect an iPod, connect one end of the USB cable
that came with the iPod to the iPod’s dock connector
and connect the other end to the USB port located in
the center console. If the vehicle is on and the USB
connection works, “OK to disconnect” and a GM logo
may appear on the iPod and iPod appears on the
radio's display. The iPod music appears on the radio’s
display and begins playing.
The iPod charges while it is connected to the vehicle if
the vehicle is in the ACC/ACCESSORY or ON/RUN
position. When the vehicle is turned off, the iPod
automatically powers off and will not charge or draw
power from the vehicle's battery.
If you have an older iPod model that is not supported, it
can still be used by connecting it to the Auxiliary Input
Jack using a standard 3.5 mm (1/8 in) stereo cable.
See “Using the Auxiliary Input Jack” earlier for more
information.
Using the Radio to Control a USB
Storage Device or iPod
The radio can control a USB storage device or an iPod
using the radio buttons and knobs and display song
information on the radio’s display.
f(Tune): Turn to select files.
©SEEK:Press to go to the start of the track, if more
than ten seconds have played. Press and hold or press
multiple times to continue moving backward through
tracks.
¨SEEK: Press to go to the next track. Press and hold
or press multiple times to continue moving forward
through tracks.
sREV (Reverse): Press and hold to reverse
playback quickly. Sound is heard at a reduced volume.
Release
sREV to resume playing. The elapsed time
of the file displays.
\FWD (Fast Forward): Press and hold to advance
playback quickly. Sound is heard at a reduced volume.
Release
\FWD to resume playing. The elapsed time
of the file displays.
4(Information): Press to display additional information
about the selected track.
4-110
Page 595 of 608

C
Calibration . . . . . . . . . . . . . . . . . . . . . . . . . . . . . . . . . . . . . . . . . 4-58
CaliforniaPerchlorate Materials Requirements . . . . . . . . . . . . . . . 6-5
Warning . . . . . . . . . . . . . . . . . . . . . . . . . . . . . . . . . . . . . . . . . . . 6-5
California Fuel . . . . . . . . . . . . . . . . . . . . . . . . . . . . . . . . . . . . . . .6-8
Camera, Rear Vision . . . . . . . . . . . . . . . . . . . . . . . . . . . . . . 3-61
Canadian Owners . . . . . . . . . . . . . . . . . . . . . . . . . . . . . . . . . . . . iii
Capacities and Specifications . . . . . . . . . . . . . . . . . . . . . 6-125
Carbon Monoxide . . . . . . . . . . . . . . . . . . . . . . . . . . . . 3-12, 3-14 Engine Exhaust . . . . . . . . . . . . . . . . . . . . . . . . . . . . . . . . . . . 3-50
Winter Driving . . . . . . . . . . . . . . . . . . . . . . . . . . . . . . . . . . . . 5-25
Care of Safety Belts . . . . . . . . . . . . . . . . . . . . . . . . . . . . . . . . . . . . . 6-111
Cargo Cover . . . . . . . . . . . . . . . . . . . . . . . . . . . . . . . . . . . . . . . 3-76
CD, MP3 . . . . . . . . . . . . . . . . . . . . . . . . . . . . . . . . . . . 4-99, 4-106
Center Console Storage . . . . . . . . . . . . . . . . . . . . . . . . . . . 3-74
Center Seat . . . . . . . . . . . . . . . . . . . . . . . . . . . . . . . . . . . . . . . 2-15
Chains, Tire . . . . . . . . . . . . . . . . . . . . . . . . . . . . . . . . . . . . . . . 6-86
Charging System Light . . . . . . . . . . . . . . . . . . . . . . . . . . . . 4-34
Check Engine Light . . . . . . . . . . . . . . . . . . . . . . . . . . . . . . . . . . . . . . 4-39
Checking Things Under the Hood . . . . . . . . . . . . . . . . . . 6-14
Chemical Paint Spotting . . . . . . . . . . . . . . . . . . . . . . . . . . 6-115 Child Restraints
Infants and Young Children . . . . . . . . . . . . . . . . . . . . . . . 2-59
Lower Anchors and Tethers for Children . . . . . . . . . . 2-67
Older Children . . . . . . . . . . . . . . . . . . . . . . . . . . . . . . . . . . . . 2-55
Securing a Child Restraint in a Rear Seat
Position . . . . . . . . . . . . . . . . . . . . . . . . . . . . . . . . . . . . . . . . . 2-75
Securing a Child Restraint in the Center Front
Seat Position . . . . . . . . . . . . . . . . . . . . . . . . . . . . . . . . . . . . 2-79
Securing a Child Restraint in the Right Front Seat Position . . . . . . . . . . . . . . . . . . . . . . . . . . . . . . . . . . . . 2-80
Systems . . . . . . . . . . . . . . . . . . . . . . . . . . . . . . . . . . . . . . . . . . 2-63
Where to Put the Restraint . . . . . . . . . . . . . . . . . . . . . . . 2-66
Cigarette Lighter . . . . . . . . . . . . . . . . . . . . . . . . . . . . . . . . . . . 4-17
Circuit Breakers . . . . . . . . . . . . . . . . . . . . . . . . . . . . . . . . . . 6-118
Cleaning Aluminum or Chrome-Plated Wheels . . . . . . . . . . . . 6-114
Exterior Lamps/Lenses . . . . . . . . . . . . . . . . . . . . . . . . . . 6-112
Fabric/Carpet . . . . . . . . . . . . . . . . . . . . . . . . . . . . . . . . . . . .6-109
Finish Care . . . . . . . . . . . . . . . . . . . . . . . . . . . . . . . . . . . . . . 6-112
Instrument Panel, Vinyl, and Other PlasticSurfaces . . . . . . . . . . . . . . . . . . . . . . . . . . . . . . . . . . . . . . . 6-110
Interior . . . . . . . . . . . . . . . . . . . . . . . . . . . . . . . . . . . . . . . . . . .6-108
Leather . . . . . . . . . . . . . . . . . . . . . . . . . . . . . . . . . . . . . . . . . . 6-110
Tires . . . . . . . . . . . . . . . . . . . . . . . . . . . . . . . . . . . . . . . . . . . . . 6-115
i - 3