2010 CHEVROLET SILVERADO change time
[x] Cancel search: change timePage 340 of 626

Bluetooth Controls
Use the buttons located on the steering wheel to
operate the in‐vehicle Bluetooth system. SeeAudio
Steering Wheel Controls
on page 4‑143for more
information.
b g(Push To Talk) : Press to answer incoming calls,
to confirm system information, and to start speech
recognition.
c x(Phone On Hook): Press to end a call, reject a
call, or to cancel an operation.
Pairing
A Bluetooth enabled cell phone must be paired to the
in‐vehicle Bluetooth system first and then connected to
the vehicle before it can be used. See the cell phone
manufacturers user guide for Bluetooth functions before
pairing the cell phone. If a Bluetooth phone is not
connected, calls will be made using OnStar
®
Hands‐Free Calling, if available. Refer to the OnStar
owner's guide for more information. Pairing Information:
.Up to five cell phones can be paired to the
in‐vehicle Bluetooth system.
.The pairing process is disabled when the vehicle is
moving.
.The in‐vehicle Bluetooth system automatically links
with the first available paired cell phone in the
order the phone was paired.
.Only one paired cell phone can be connected to
the in‐vehicle Bluetooth system at a time.
.Pairing should only need to be completed once,
unless changes to the pairing information have
been made or the phone is deleted.
To link to a different paired phone, see Linking to a
Different Phone later in this section.
4-122
Page 352 of 626
Battery Replacement
To change the batteries on the headphones, do the
following:1. Turn the screw to loosen the battery door located on the left side of the headphones. Slide the
battery door open.
2. Replace the two batteries in the compartment. Make sure that they are installed correctly, using
the diagram on the inside of the battery
compartment.
3. Replace the battery door and tighten the door screw.
If the headphones are to be stored for a long period of
time, remove the batteries and keep them in a cool, dry
place.
Audio/Video (A/V) Jacks
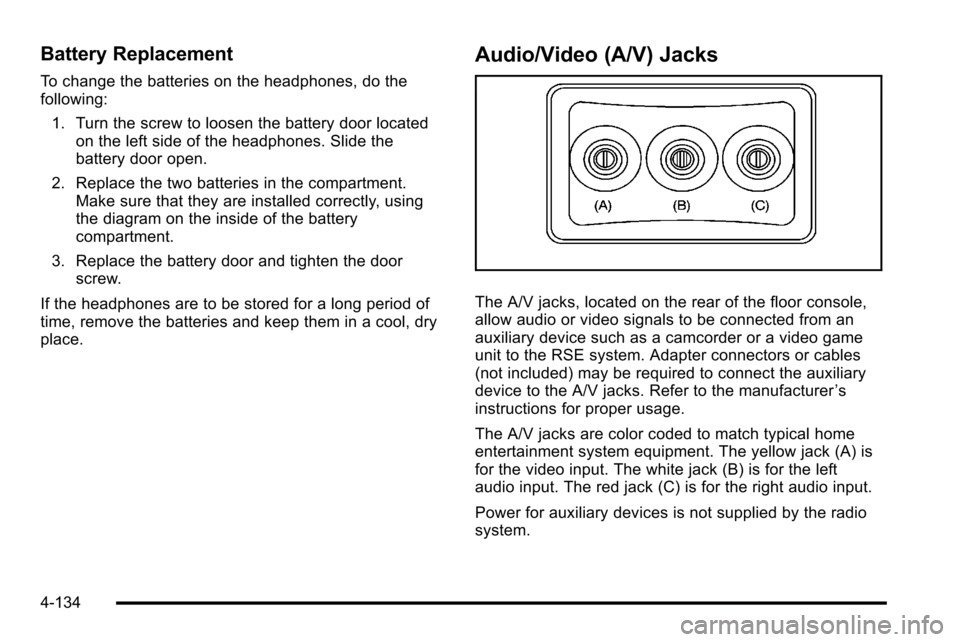
The A/V jacks, located on the rear of the floor console,
allow audio or video signals to be connected from an
auxiliary device such as a camcorder or a video game
unit to the RSE system. Adapter connectors or cables
(not included) may be required to connect the auxiliary
device to the A/V jacks. Refer to the manufacturer ’s
instructions for proper usage.
The A/V jacks are color coded to match typical home
entertainment system equipment. The yellow jack (A) is
for the video input. The white jack (B) is for the left
audio input. The red jack (C) is for the right audio input.
Power for auxiliary devices is not supplied by the radio
system.
4-134
Page 357 of 626
Battery Replacement
To change the remote control batteries, do the following:1. Slide the rear cover back on the remote control.
2. Replace the two batteries in the compartment. Make sure they are installed correctly using the
diagram on the inside of the remote control.
3. Replace the battery cover.
If the remote control is to be stored for a long period of
time, remove the batteries and keep them in a cool, dry
place.
Tips and Troubleshooting Chart
Problem Recommended Action
No power. The ignition might not be
turned ON/RUN or in ACC/
ACCESSORY.
The picture does not fill the
screen. There are black
borders on the top and
bottom or on both sides or
it looks stretched out. Check the display mode
settings in the setup menu
by pressing the display
menu button on the remote
control.
In auxiliary mode, the
picture moves or scrolls. Check the auxiliary input
connections at both
devices.
Tips and Troubleshooting Chart (cont'd)
Problem
Recommended Action
The remote control does
not work. Check to make sure there
is no obstruction between
the remote control and the
transmitter window.
Check the batteries to
make sure they are not
dead or installed
incorrectly.
After stopping the player,
I push Play but sometimes
the DVD starts where I left
off and sometimes at the
beginning. If the stop button was
pressed one time, the DVD
player resumes playing
where the DVD was
stopped. If the stop button
was pressed two times the
DVD player begins to play
from the beginning of
the DVD.
The auxiliary source is
running but there is no
picture or sound. Check that the RSE video
screen is in the auxiliary
source mode.
Check the auxiliary input
connections at both
devices.
4-139
Page 359 of 626
Cleaning the RSE Overhead Console
When cleaning the RSE overhead console surface, use
only a clean cloth dampened with clean water.
Cleaning the Video Screen
When cleaning the video screen, use only a clean cloth
dampened with clean water. Use care when directly
touching or cleaning the screen, as damage could
result.
Rear Seat Audio (RSA)
Vehicles with this feature allow the rear seat
passengers to listen to and control any of the music
sources: radio, CDs, DVDs, or other auxiliary sources.
However, the rear seat passengers can only control the
music sources the front seat passengers are not
listening to (except on some radios where dual control
is allowed). For example, rear seat passengers can
control and listen to a CD through the headphones,
while the driver listens to the radio through the front
speakers. The rear seat passengers have control of the
volume for each set of headphones.The radio functionality is controlled by both the RSA
and the front radio. Only one band can be tuned to at
one time. Changing the band on the RSA or the front
radio will change the band on the other system, if they
are both sourced to the radio.
The RSA functions can be used even while the main
radio is off. The front audio system will display the
headphone icon when the RSA is on, and will disappear
from the display when it is off.
Audio can be heard through wired headphones (not
included) plugged into the jacks on the RSA. If the
vehicle has this feature, audio can also be heard on
Channel 2 of the wireless headphones.
Depending on the audio system, the rear speakers may
continue to play when the RSA audio is active through
the headphones.
To listen to an iPod or portable audio device through the
RSA, attach the iPod or portable audio device to the
front auxiliary input (if available), located on the front
audio system. Turn the iPod on, then choose the front
auxiliary input with the RSA SRCE button.
4-141
Page 371 of 626
Let us say the road is wet and you are driving safely.
Suddenly, an animal jumps out in front of you. You slam
on the brakes and continue braking. Here is what
happens with ABS:
A computer senses that the wheels are slowing down.
If one of the wheels is about to stop rolling, the
computer will separately work the brakes at each front
wheel and at both rear wheels.
ABS can change the brake pressure to each wheel, as
required, faster than any driver could. This can help the
driver steer around the obstacle while braking hard.
As the brakes are applied, the computer keeps
receiving updates on wheel speed and controls braking
pressure accordingly.
Remember: ABS does not change the time needed to
get a foot up to the brake pedal or always decrease
stopping distance. If you get too close to the vehicle in
front of you, there will not be enough time to apply the
brakes if that vehicle suddenly slows or stops. Always
leave enough room up ahead to stop, even with ABS.
Using ABS
Do not pump the brakes. Just hold the brake pedal
down firmly and let antilock work. The brakes might
vibrate or some noise might be heard, but this is
normal.
Braking in Emergencies
ABS allows the driver to steer and brake at the same
time. In many emergencies, steering can help more
than even the very best braking.
Brake Assist (Except With 4.3L V6 Engine)
If this vehicle has StabiliTrak®, it also has a Brake
Assist feature designed to assist the driver in stopping
or decreasing vehicle speed in emergency driving
conditions. This feature uses the stability system
hydraulic brake control module to supplement the power
brake system under conditions where the driver has
quickly and forcefully applied the brake pedal in an
attempt to quickly stop or slow down the vehicle. The
stability system hydraulic brake control module
increases brake pressure at each corner of the vehicle
until the ABS activates. Minor brake pedal pulsations or
pedal movement during this time is normal and the
driver should continue to apply the brake pedal as the
driving situation dictates The Brake Assist feature will
automatically disengage when the brake pedal is
released or brake pedal pressure is quickly decreased.
5-5
Page 377 of 626
Skidding
In a skid, a driver can lose control of the vehicle.
Defensive drivers avoid most skids by taking
reasonable care suited to existing conditions, and by
not overdriving those conditions. But skids are always
possible.
The three types of skids correspond to the vehicle's
three control systems. In the braking skid, the wheels
are not rolling. In the steering or cornering skid, too
much speed or steering in a curve causes tires to slip
and lose cornering force. And in the acceleration skid,
too much throttle causes the driving wheels to spin.
Remember: StabiliTrak
®helps avoid only the
acceleration skid. See StabiliTrak®Systemon
page 5‑6. If the StabiliTrak®System is off, then an
acceleration skid is best handled by easing your foot off
the accelerator pedal.
If the vehicle starts to slide, ease your foot off the
accelerator pedal and quickly steer the way you want
the vehicle to go. If you start steering quickly enough,
the vehicle may straighten out. Always be ready for a
second skid if it occurs.
Of course, traction is reduced when water, snow, ice,
gravel, or other material is on the road. For safety, slow
down and adjust your driving to these conditions. It is
important to slow down on slippery surfaces because
stopping distance will be longer and vehicle control
more limited. While driving on a surface with reduced traction, try
your best to avoid sudden steering, acceleration,
or braking, including reducing vehicle speed by shifting
to a lower gear. Any sudden changes could cause the
tires to slide. You may not realize the surface is slippery
until the vehicle is skidding. Learn to recognize warning
clues
—such as enough water, ice, or packed snow on
the road to make a mirrored surface —and slow down
when you have any doubt.
Remember: Antilock brakes help avoid only the
braking skid.
Off-Road Driving
Vehicles with four-wheel drive can be used for off-road
driving. Vehicles without four-wheel drive and vehicles
with 20‐inch tire/wheel assemblies should not be driven
off-road except on a level, solid surface.
The airbag system is designed to work properly under a
wide range of conditions, including off‐road usage.
Always wear your safety belt and observe safe driving
speeds, especially on rough terrain.
Drinking and driving can be very dangerous on any
road and this is certainly true for off-road driving. At the
very time you need special alertness and driving skills,
your reflexes, perceptions, and judgment can be
affected by even a small amount of alcohol. You could
have a serious —or even fatal —accident if you drink
and drive or ride with a driver who has been drinking.
5-11
Page 380 of 626
.Take extreme care with open fires (where
permitted), camp stoves, and lanterns.
.Never park your vehicle over dry grass or other
combustible materials that could catch fire from the
heat of the vehicle's exhaust system.
Traveling to Remote Areas
It makes sense to plan your trip, especially when going
to a remote area. Know the terrain and plan your route.
Get accurate maps of trails and terrain. Check to see if
there are any blocked or closed roads.
It is also a good idea to travel with at least one other
vehicle in case something happens to one of them.
For vehicles with a winch, be sure to read the winch
instructions. In a remote area, a winch can be handy if
you get stuck but you will want to know how to use it
properly.
Getting Familiar with Off-Road Driving
It is a good idea to practice in an area that is safe and
close to home before you go into the wilderness.
Off-roading requires some new and different skills.
Tune your senses to different kinds of signals. Your
eyes need to constantly sweep the terrain for
unexpected obstacles. Your ears need to listen for
unusual tire or engine sounds. Use your arms, hands,
feet, and body to respond to vibrations and vehicle
bounce.Controlling the vehicle is the key to successful off-road
driving. One of the best ways to control the vehicle is to
control the speed. At higher speeds:
.You approach things faster and have less time to
react.
.There is less time to scan the terrain for obstacles.
.The vehicle has more bounce when driving over
obstacles.
.More braking distance is needed, especially on an
unpaved surface.
{WARNING:
When you are driving off-road, bouncing and
quick changes in direction can easily throw you
out of position. This could cause you to lose
control and crash. So, whether you are driving on
or off the road, you and your passengers should
wear safety belts.
Scanning the Terrain
Off-road driving can take you over many different kinds
of terrain. Be familiar with the terrain and its many
different features.
5-14
Page 417 of 626
Towing a Trailer
If the vehicle has a diesel engine, see the DURAMAX®
Diesel manual for more information.
If the vehicle has a two–mode hybrid engine, see the
Two–mode Hybrid manual for more information.
Do not tow a trailer during break‐in. SeeNew Vehicle
Break-In
on page 3‑21for more information.
{WARNING:
The driver can lose control when pulling a trailer if
the correct equipment is not used or the vehicle is
not driven properly. For example, if the trailer is
too heavy, the brakes may not work well or even
at all. The driver and passengers could be
seriously injured. The vehicle may also be
damaged; the resulting repairs would not be
covered by the vehicle warranty. Pull a trailer only
if all the steps in this section have been followed.
Ask your dealer for advice and information about
towing a trailer with the vehicle. Notice:
Pulling a trailer improperly can damage the
vehicle and result in costly repairs not covered by
the vehicle warranty. To pull a trailer correctly,
follow the advice in this section and see your dealer
for important information about towing a trailer with
the vehicle.
To identify the trailering capacity of the vehicle, read the
information in “Weight of the Trailer” that appears later
in this section.
Trailering is different than just driving the vehicle by
itself. Trailering means changes in handling,
acceleration, braking, durability and fuel economy.
Successful, safe trailering takes correct equipment, and
it has to be used properly.
The following information has many time-tested,
important trailering tips and safety rules. Many of these
are important for your safety and that of your
passengers. So please read this section carefully before
pulling a trailer.
5-51