2010 CHEVROLET IMPALA spare wheel
[x] Cancel search: spare wheelPage 349 of 432
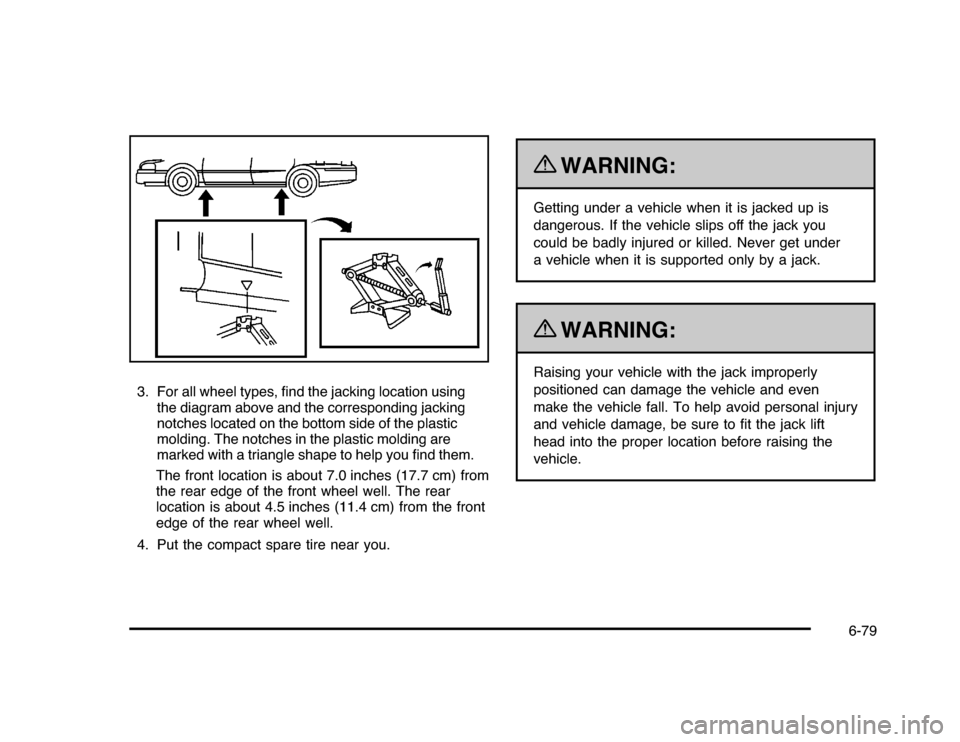
3. For all wheel types, find the jacking location using
the diagram above and the corresponding jacking
notches located on the bottom side of the plastic
molding. The notches in the plastic molding are
marked with a triangle shape to help you find them.
The front location is about 7.0 inches (17.7 cm) from
the rear edge of the front wheel well. The rear
location is about 4.5 inches (11.4 cm) from the front
edge of the rear wheel well.
4. Put the compact spare tire near you.
{
WARNING:
Getting under a vehicle when it is jacked up is
dangerous. If the vehicle slips off the jack you
could be badly injured or killed. Never get under
a vehicle when it is supported only by a jack.{
WARNING:
Raising your vehicle with the jack improperly
positioned can damage the vehicle and even
make the vehicle fall. To help avoid personal injury
and vehicle damage, be sure to fit the jack lift
head into the proper location before raising the
vehicle.
6-79
Page 350 of 432
{
WARNING:
Lifting a vehicle and getting under it to do
maintenance or repairs is dangerous without the
appropriate safety equipment and training. If a jack
is provided with the vehicle, it is designed only for
changing a flat tire. If it is used for anything else,
you or others could be badly injured or killed if the
vehicle slips off the jack. If a jack is provided with
the vehicle, only use it for changing a flat tire.
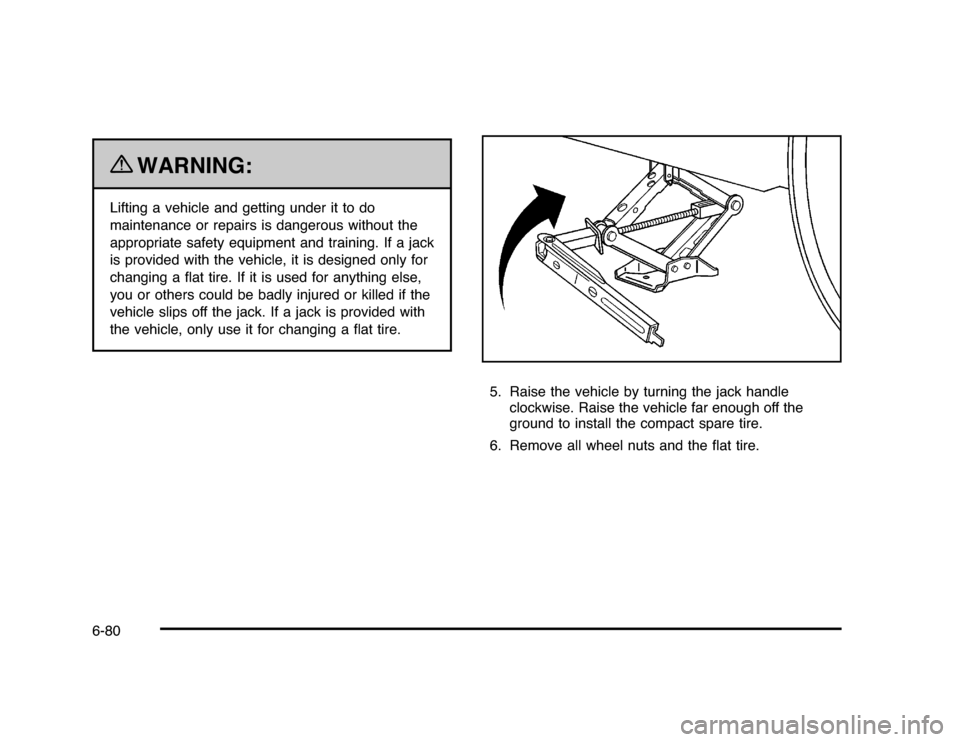
5. Raise the vehicle by turning the jack handle
clockwise. Raise the vehicle far enough off the
ground to install the compact spare tire.
6. Remove all wheel nuts and the flat tire.
6-80
Page 351 of 432
{
WARNING:
Rust or dirt on a wheel, or on the parts to which it is
fastened, can make wheel nuts become loose after
time. The wheel could come off and cause an
accident. When changing a wheel, remove any rust
or dirt from places where the wheel attaches to the
vehicle. In an emergency, use a cloth or a paper
towel to do this; but be sure to use a scraper or wire
brush later, if needed, to get all the rust or dirt off.
SeeChanging a Flat Tire on page 6-75.
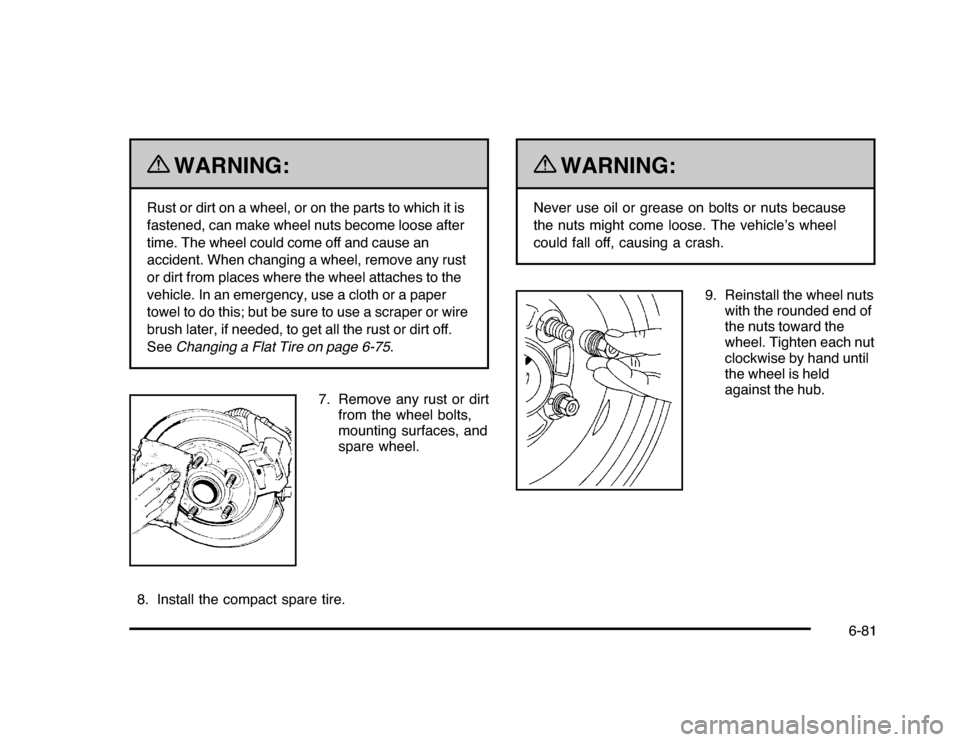
7. Remove any rust or dirt
from the wheel bolts,
mounting surfaces, and
spare wheel.
8. Install the compact spare tire.
{
WARNING:
Never use oil or grease on bolts or nuts because
the nuts might come loose. The vehicle’s wheel
could fall off, causing a crash.
9. Reinstall the wheel nuts
with the rounded end of
the nuts toward the
wheel. Tighten each nut
clockwise by hand until
the wheel is held
against the hub.
6-81
Page 353 of 432
Notice:Wheel covers will not fit on your vehicle’s
compact spare. If you try to put a wheel cover
on the compact spare, the cover or the spare could
be damaged.Storing a Flat or Spare Tire and
Tools
{
WARNING:
Storing a jack, a tire, or other equipment in the
passenger compartment of the vehicle could
cause injury. In a sudden stop or collision, loose
equipment could strike someone. Store all these in
the proper place.After the compact spare tire has been installed on the
vehicle, store the flat tire in the trunk.
When storing a full-size tire, use the extension with the
extension protector, located in the foam holder, to
help avoid wheel surface damage.
To store a full-size tire:
1. Install the tools in their original location in the trunk
area and secure.
2. Place the tire valve stem facing down and the
protector/guide placed through a wheel bolt hole
and threaded onto the bolt screw.
3. Remove the protector and attach the retainer
securely
4. Store the cover as far forward as possible.
When storing a compact spare tire in the trunk, put the
protector back in the foam holder.
The compact spare is for temporary use only. Replace
the compact spare tire with a full-size tire as soon as you
can. SeeCompact Spare Tire on page 6-86. Use this as
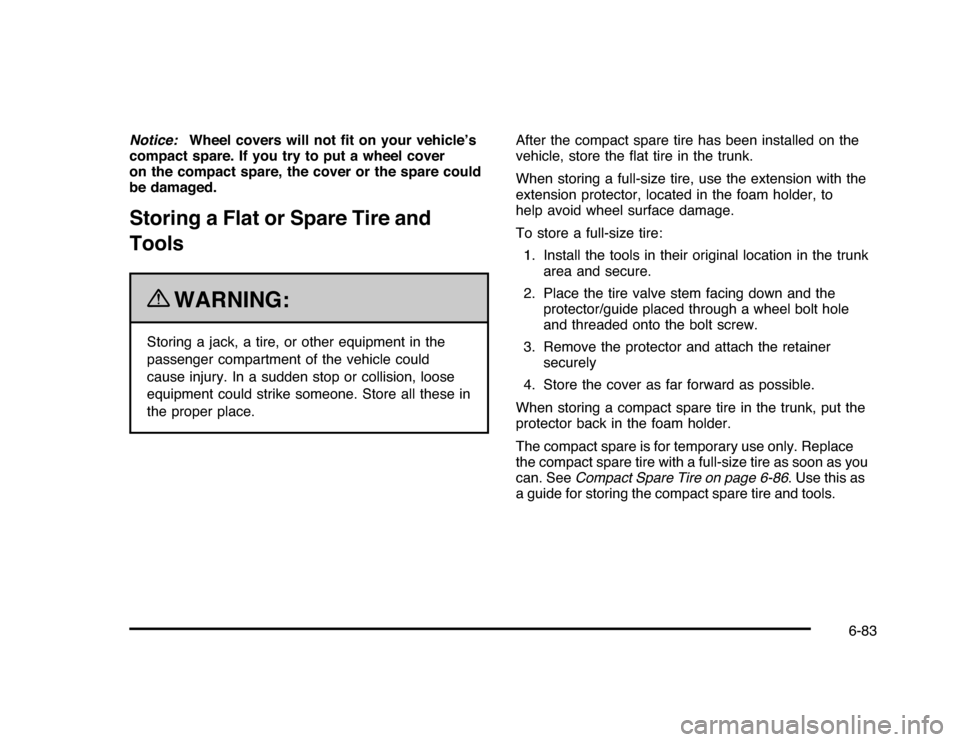
a guide for storing the compact spare tire and tools.
6-83
Page 354 of 432

A. Cover
B. Retainer
C. Compact Spare Tire
D. Wing Nut
E. Jack
F. Wheel Wrench
G. Extension Protector
H. Foam Holder
I. Bolt Screw
Compact Spare Tire
6-84
Page 356 of 432
Compact Spare Tire
{
WARNING:
Driving with more than one compact spare tire at a
time could result in loss of braking and handling.
This could lead to a crash and you or others could
be injured. Use only one compact spare tire at
a time.
Although the compact spare tire was fully inflated when
the vehicle was new, it can lose air after a time.
Check the inflation pressure regularly. It should be
60 psi (420 kPa).
After installing the compact spare on the vehicle, you
should stop as soon as possible and make sure the spare
tire is correctly inflated. The compact spare is made to
perform well at speeds up to 65 mph (105 km/h) for
distances up to 3,000 miles (5 000 km), so you can finish
your trip and have the full-size tire repaired or replacedwhere you want. You must calibrate the tire inflation
monitor system after installing or removing the compact
spare. SeeTire Pressure Monitor System on page 6-60.
The system may not work correctly when the compact
spare is installed on the vehicle. Of course, it’s best to
replace the spare with a full-size tire as soon as you can.
The spare will last longer and be in good shape in case
you need it again.
Notice:When the compact spare is installed, do
not take the vehicle through an automatic car wash
with guide rails. The compact spare can get
caught on the rails which can damage the tire,
wheel and other parts of the vehicle.
Do not use the compact spare on other vehicles.
And do not mix the compact spare tire or wheel with
other wheels or tires. They will not fit. Keep the
spare tire and its wheel together.
Notice:Tire chains will not fit the compact spare.
Using them can damage the vehicle and can damage
the chains too. Do not use tire chains on the
compact spare.
6-86
Page 411 of 432

Charging System Light....................................4-26
Check
Engine Lamp..............................................4-31
Checking Things Under the Hood......................6-12
Chemical Paint Spotting . . .................................6-94
Child Restraints
Infants and Young Children...........................2-35
Lower Anchors and Tethers for Children..........2-43
Older Children.............................................2-32
Securing a Child Restraint in a Rear Seat
Position..................................................2-49
Securing a Child Restraint in the Center
Front Seat Position . . . . . ..............................2-52
Securing a Child Restraint in the Right
Front Seat Position . . . . . ..............................2-52
Systems.....................................................2-39
Where to Put the Restraint...........................2-42
Cigarette Lighter.............................................4-16
Circuit Breakers..............................................6-96
Cleaning
Aluminum Wheels........................................6-93
Exterior Lamps/Lenses . ................................6-91
Fabric/Carpet..............................................6-88
Finish Care . . ...............................................6-92
Instrument Panel, Vinyl, and Other Plastic
Surfaces.................................................6-90
Interior . . .....................................................6-87Cleaning (cont.)
Leather......................................................6-89
Tires..........................................................6-93
Underbody Maintenance . . . . . ..........................6-94
Washing Your Vehicle . . . . ...............................6-91
Weatherstrips..............................................6-90
Windshield and Wiper Blades........................6-92
Climate Control System . . .................................4-16
Outlet Adjustment........................................4-20
Climate Controls.............................................1-14
Clock, Setting.................................................4-58
Collision Damage Repair..................................8-13
Compact Spare Tire........................................6-86
Compass.......................................................4-42
Content Theft-Deterrent....................................3-17
Control of a Vehicle.......................................... 5-3
Convenience Net............................................3-42
Coolant
Engine.......................................................6-25
Engine Temperature Gage............................4-30
Engine Temperature Warning Light.................4-30
Cooling System..............................................6-24
Courtesy Lamps.............................................4-11
Courtesy Transportation Program . . ....................8-11
Cruise Control.................................................. 4-6
Light..........................................................4-35
Cupholders....................................................3-42
3
Page 420 of 432

Split Folding Rear Seat....................................2-10
StabiliTrak Control Indicator Light, Electronic.......4-29
Start Vehicle, Remote....................................... 3-7
Starting the Engine.........................................3-21
Steering.......................................................... 5-9
Steering Wheel Controls, Audio.........................4-84
Steering Wheel, Tilt Wheel................................. 4-3
Storage Areas
Center Console...........................................3-42
Convenience Net.........................................3-42
Cupholders . . . . . . ...........................................3-42
Glove Box . . . . . . . . . . ........................................3-42
Rear . . . . . . . ...................................................3-42
Rear Seat Armrest.......................................3-42
Sunglasses Storage Compartment..................3-42
Stuck in Sand, Mud, Ice, or Snow.....................5-19
Sun Visors .....................................................3-16
Sunroof . . . . . ....................................................3-43
T
Tachometer ....................................................4-23
Taillamps
Turn Signal, Sidemarker, Stoplamps, and
Back-Up Lamps.......................................6-47
Text Telephone (TTY) Users............................... 8-6Theft-Deterrent Feature....................................4-84
Theft-Deterrent Systems...................................3-16
Content Theft-Deterrent................................3-17
PASS-Key
®
III+ Electronic Immobilizer............3-18
PASS-Key
®
III+ Electronic Immobilizer
Operation................................................3-18
Tilt Wheel........................................................ 4-3
Time, Setting..................................................4-58
Tires . . ...........................................................6-51
Aluminum Wheels, Cleaning..........................6-93
Buying New Tires........................................6-68
Chains.......................................................6-73
Changing a Flat Tire....................................6-75
Cleaning....................................................6-93
Compact Spare...........................................6-86
Different Size . . ............................................6-69
If a Tire Goes Flat.......................................6-74
Inflation - Tire Pressure................................6-59
Inspection and Rotation................................6-65
Installing the Spare Tire................................6-77
Pressure Light.............................................4-31
Pressure Monitor Operation ...........................6-62
Pressure Monitor System..............................6-60
Removing the Flat Tire.................................6-77
Removing the Spare Tire and Tools...............6-76
Sidewall Labeling.........................................6-52
12