2010 CHEVROLET HHR manual transmission
[x] Cancel search: manual transmissionPage 9 of 480

A.Outlet Adjustment on page 4‑21.
B. Cruise Control
on page 4‑8(If Equipped).
C. Turn Signal/Multifunction Lever on page 4‑4.
D. Instrument Panel Cluster on page 4‑24.
E. Windshield Wipers
on page 4‑5and Windshield
Washer on page 4‑6.
F. Instrument Panel Storage on page 3‑47.
G. Traction Control System (TCS)
on page 5‑9(If Equipped). Electronic Stability Control (ESC).
See Electronic Stability Control (ESC)on
page 5‑6.
H. Passenger Airbag Status Indicator on page 4‑28.
I. Rear Side Cargo Door
on page 3‑12(If Equipped).
J. Hood Release on page 6‑15.
K. Driver Information Center (DIC) Buttons. See Driver Information Center (DIC)
on page 4‑46Buttons. L.
Horn on page 4‑3.
M. Audio Steering Wheel Controls
on page 4‑92(If Equipped).
N. Instrument Panel Brightness on page 4‑14.
O. Audio System(s) on page 4‑60.
P. Climate Control System on page 4‑18.
Q. Rear Window Wiper/Washer on page 4‑7.
R. Shift Lever (Manual Shown). See Manual
Transmission Operation
on page 3‑31and
Automatic Transmission Operation on page 3‑28.
S. Accessory Power Outlet(s).
on page 4‑16(If Equipped) and Cigarette Lighter (If Equipped).
See Ashtray(s) and Cigarette Lighteron
page 4‑18.
T. Fog Lamps
on page 4‑13(If Equipped).
U. Hazard Warning Flashers on page 4‑3.
V. Glove Box on page 3‑47.
1-3
Page 19 of 480
P:This position is the momentary Off/On switch for the
Automatic Headlamp System. In Canada, this only
works when the vehicles with an automatic transmission
are in P (Park) and vehicles with a manual transmission
have the parking brake set and the vehicle is not
moving.
For more information, see:
.Headlamps on page 4‑11.
.Fog Lamps on page 4‑13.
.Daytime Running Lamps (DRL) on page 4‑12.
.Automatic Headlamp System on page 4‑12.
Windshield Wiper/Washer
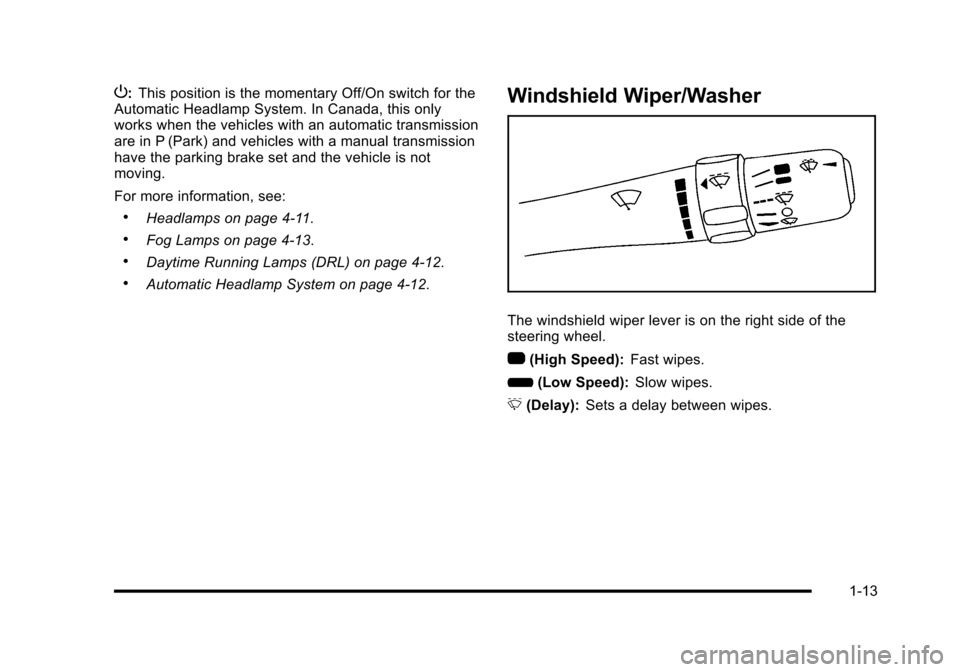
The windshield wiper lever is on the right side of the
steering wheel.
1 (High Speed): Fast wipes.
6 (Low Speed): Slow wipes.
& (Delay): Sets a delay between wipes.
1-13
Page 113 of 480
Section 3 Features and Controls
Keys. . . . . . . . . . . . . . . . . . . . . . . . . . . . . . . . . . . . . . . . . . . . . . . . 3-3
Remote Keyless Entry (RKE) System . . . . . . . . . . . 3-4
Remote Keyless Entry (RKE) System Operation . . . . . . . . . . . . . . . . . . . . . . . . . . . . . . . . . . . . . 3-4
Remote Vehicle Start . . . . . . . . . . . . . . . . . . . . . . . . . . . 3-7
Doors and Locks . . . . . . . . . . . . . . . . . . . . . . . . . . . . . . . . . . 3-9
Door Locks . . . . . . . . . . . . . . . . . . . . . . . . . . . . . . . . . . . . . 3-9
Power Door Locks . . . . . . . . . . . . . . . . . . . . . . . . . . . . . 3-10
Delayed Locking . . . . . . . . . . . . . . . . . . . . . . . . . . . . . . . 3-10
Automatic Door Lock . . . . . . . . . . . . . . . . . . . . . . . . . . . 3-11
Programmable Automatic Door Unlock . . . . . . . . . 3-11
Rear Door Security Locks . . . . . . . . . . . . . . . . . . . . . . 3-11
Lockout Protection . . . . . . . . . . . . . . . . . . . . . . . . . . . . . 3-12
Rear Side Cargo Door . . . . . . . . . . . . . . . . . . . . . . . . . 3-12
Liftgate . . . . . . . . . . . . . . . . . . . . . . . . . . . . . . . . . . . . . . . . 3-13
Windows . . . . . . . . . . . . . . . . . . . . . . . . . . . . . . . . . . . . . . . . . . 3-16
Power Windows . . . . . . . . . . . . . . . . . . . . . . . . . . . . . . . 3-17
Sun Visors . . . . . . . . . . . . . . . . . . . . . . . . . . . . . . . . . . . . . 3-18
Theft-Deterrent Systems . . . . . . . . . . . . . . . . . . . . . . . . . 3-18
Content Theft-Deterrent . . . . . . . . . . . . . . . . . . . . . . . . 3-19
PASS-Key
®III+ Electronic Immobilizer . . . . . . . . . 3-20
PASS-Key®III+ Electronic Immobilizer
Operation . . . . . . . . . . . . . . . . . . . . . . . . . . . . . . . . . . . . 3-20 Starting and Operating Your Vehicle
. . . . . . . . . . . . 3-22
New Vehicle Break-In . . . . . . . . . . . . . . . . . . . . . . . . . . 3-22
Ignition Positions . . . . . . . . . . . . . . . . . . . . . . . . . . . . . . 3-23
Retained Accessory Power (RAP) . . . . . . . . . . . . . 3-25
Starting the Engine . . . . . . . . . . . . . . . . . . . . . . . . . . . . 3-25
Engine Coolant Heater . . . . . . . . . . . . . . . . . . . . . . . . . 3-27
Automatic Transmission Operation . . . . . . . . . . . . . 3-28
Manual Transmission Operation . . . . . . . . . . . . . . . 3-31
Parking Brake . . . . . . . . . . . . . . . . . . . . . . . . . . . . . . . . . 3-34
Shifting Into Park (Automatic Transmission) . . . 3-36
Shifting Out of Park (Automatic Transmission) . . . . . . . . . . . . . . . . . . . 3-37
Parking the Vehicle (Manual Transmission) . . . . . . . . . . . . . . . . . . . . . . 3-38
Parking Over Things That Burn . . . . . . . . . . . . . . . . 3-38
Engine Exhaust . . . . . . . . . . . . . . . . . . . . . . . . . . . . . . . . 3-39
Running the Vehicle While Parked . . . . . . . . . . . . . 3-40
Mirrors . . . . . . . . . . . . . . . . . . . . . . . . . . . . . . . . . . . . . . . . . . . . 3-41
Manual Rearview Mirror . . . . . . . . . . . . . . . . . . . . . . . . 3-41
Automatic Dimming Rearview Mirror . . . . . . . . . . . 3-41
Compass . . . . . . . . . . . . . . . . . . . . . . . . . . . . . . . . . . . . . . 3-41
Outside Power Mirrors . . . . . . . . . . . . . . . . . . . . . . . . . 3-43
Outside Convex Mirror . . . . . . . . . . . . . . . . . . . . . . . . . 3-43
3-1
Page 123 of 480
Automatic Door Lock
On vehicles with power door locks, the doors
automatically lock when the shift lever is moved out
of (P) Park for a vehicle with an automatic transmission.
For a vehicle with a manual transmission, the speed
must be greater than 5 mph (8 km/h).
The automatic door locking feature cannot be disabled.
Programmable Automatic Door
Unlock
Your vehicle will automatically unlock all doors when the
shift lever is moved into (P) Park for a vehicle with an
automatic transmission, and when the ignition is turned
off for a vehicle with a manual transmission.
If your vehicle has a Driver Information Center (DIC),
the doors can be programmed to automatically
unlock several ways for vehicles with an automatic
transmission. SeeDIC Vehicle Personalization
on
page 4‑54for more information.
Rear Door Security Locks
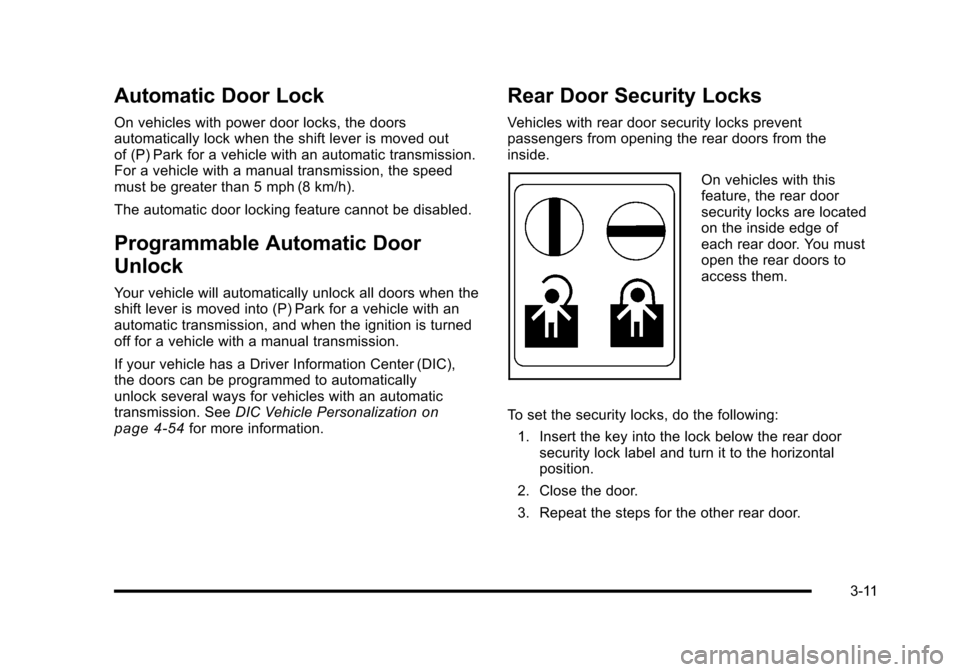
Vehicles with rear door security locks prevent
passengers from opening the rear doors from the
inside.
On vehicles with this
feature, the rear door
security locks are located
on the inside edge of
each rear door. You must
open the rear doors to
access them.
To set the security locks, do the following: 1. Insert the key into the lock below the rear door security lock label and turn it to the horizontal
position.
2. Close the door.
3. Repeat the steps for the other rear door.
3-11
Page 134 of 480
Starting and Operating Your
Vehicle
New Vehicle Break-In
Notice:The vehicle does not need an elaborate
break-in. But it will perform better in the long run
if you follow these guidelines:
.Do not drive at any one constant speed,
fast or slow, for the first 500 miles (805 km).
Do not make full-throttle starts. Avoid
downshifting to brake or slow the vehicle.
.Avoid making hard stops for the first
200 miles (322 km) or so. During this time
the new brake linings are not yet broken in.
Hard stops with new linings can mean
premature wear and earlier replacement.
Follow this breaking-in guideline every time
you get new brake linings.
.Do not tow a trailer during break-in. See
Towing a Trailer (Automatic Transmission)
on page 5‑32or Towing a Trailer (Manual
Transmission)
on page 5‑40for the trailer
towing capabilities of your vehicle and more
information.
Following break‐in, engine speed and load can be
gradually increased.
3-22
Page 135 of 480
Ignition Positions
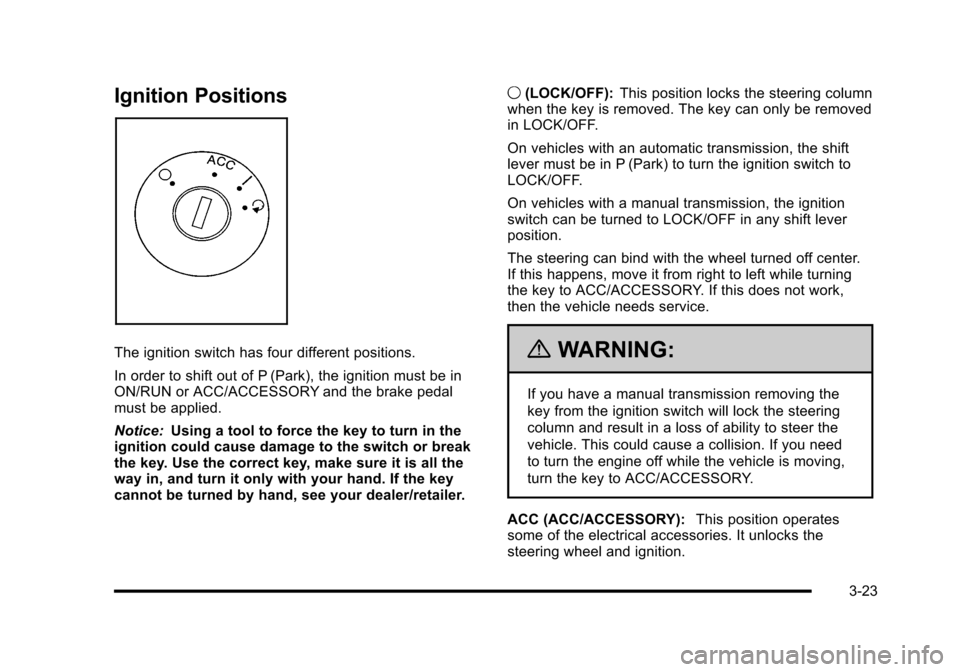
The ignition switch has four different positions.
In order to shift out of P (Park), the ignition must be in
ON/RUN or ACC/ACCESSORY and the brake pedal
must be applied.
Notice:Using a tool to force the key to turn in the
ignition could cause damage to the switch or break
the key. Use the correct key, make sure it is all the
way in, and turn it only with your hand. If the key
cannot be turned by hand, see your dealer/retailer. 9
(LOCK/OFF): This position locks the steering column
when the key is removed. The key can only be removed
in LOCK/OFF.
On vehicles with an automatic transmission, the shift
lever must be in P (Park) to turn the ignition switch to
LOCK/OFF.
On vehicles with a manual transmission, the ignition
switch can be turned to LOCK/OFF in any shift lever
position.
The steering can bind with the wheel turned off center.
If this happens, move it from right to left while turning
the key to ACC/ACCESSORY. If this does not work,
then the vehicle needs service.{WARNING:
If you have a manual transmission removing the
key from the ignition switch will lock the steering
column and result in a loss of ability to steer the
vehicle. This could cause a collision. If you need
to turn the engine off while the vehicle is moving,
turn the key to ACC/ACCESSORY.
ACC (ACC/ACCESSORY): This position operates
some of the electrical accessories. It unlocks the
steering wheel and ignition.
3-23
Page 138 of 480
Manual Transmission
The shift lever should be in N (Neutral) and the parking
brake engaged. Hold the clutch pedal down to the floor
and start the engine. The vehicle will not start if the
clutch pedal is not all the way down.
Starting Procedure
1. With your foot off the accelerator pedal, turn theignition key to START. When the engine starts, let
go of the key. The idle speed will go down as the
engine warms. Do not race the engine immediately
after starting it. Operate the engine and
transmission gently to allow the oil to warm up and
lubricate all moving parts.
The vehicle has a Computer-Controlled Cranking
System. This feature assists in starting the engine
and protects components. If the ignition key is
turned to the START position, and then released
when the engine begins cranking, the engine will
continue cranking for a few seconds or until the
vehicle starts. If the engine does not start and the
key is held in START for many seconds, cranking
will be stopped after 15 seconds to prevent
cranking motor damage. To prevent gear damage,
this system also prevents cranking if the engine is
already running. Engine cranking can be stopped
by turning the ignition switch to ACC/ACCESSORY
or LOCK/OFF. Notice:
Cranking the engine for long periods of
time, by returning the key to the START position
immediately after cranking has ended, can overheat
and damage the cranking motor, and drain the
battery. Wait at least 15 seconds between each try,
to let the cranking motor cool down.
2. If the engine does not start after 5‐10 seconds, especially in very cold weather (below 0°F or
−18°C), it could be flooded with too much gasoline.
Push the accelerator pedal all the way to the floor
and holding it there as you hold the key in START
for a maximum of 15 seconds. Wait at least
15 seconds between each try, to allow the cranking
motor to cool. When the engine starts, let go of the
key and accelerator. If the vehicle starts briefly but
then stops again, repeat the procedure. This clears
the extra gasoline from the engine. Do not race the
engine immediately after starting it. Operate the
engine and transmission gently until the oil warms
up and lubricates all moving parts.
Notice: The engine is designed to work with the
electronics in the vehicle. If you add electrical parts
or accessories, you could change the way the
engine operates. Before adding electrical
equipment, check with your dealer/retailer. If you
do not, the engine might not perform properly.
Any resulting damage would not be covered by the
vehicle warranty.
3-26
Page 140 of 480
Automatic Transmission Operation
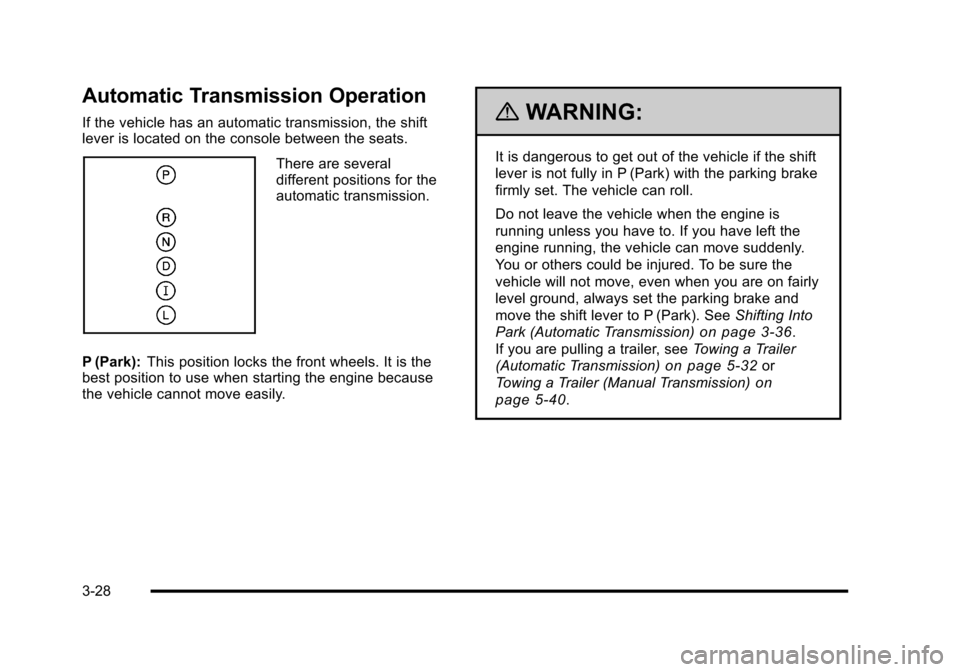
If the vehicle has an automatic transmission, the shift
lever is located on the console between the seats.
There are several
different positions for the
automatic transmission.
P (Park): This position locks the front wheels. It is the
best position to use when starting the engine because
the vehicle cannot move easily.
{WARNING:
It is dangerous to get out of the vehicle if the shift
lever is not fully in P (Park) with the parking brake
firmly set. The vehicle can roll.
Do not leave the vehicle when the engine is
running unless you have to. If you have left the
engine running, the vehicle can move suddenly.
You or others could be injured. To be sure the
vehicle will not move, even when you are on fairly
level ground, always set the parking brake and
move the shift lever to P (Park). See Shifting Into
Park (Automatic Transmission)
on page 3‑36.
If you are pulling a trailer, see Towing a Trailer
(Automatic Transmission)
on page 5‑32or
Towing a Trailer (Manual Transmission)
on
page 5‑40
.
3-28