2010 CHEVROLET HHR fuses
[x] Cancel search: fusesPage 5 of 480

Vehicle Symbol Chart
Here are some additional symbols that may be found on
the vehicle and what they mean. For more information
on the symbol, refer to the index.
9:Airbag Readiness Light
#:Air Conditioning
!:Antilock Brake System (ABS)
g:Audio Steering Wheel Controls or OnStar®
$: Brake System Warning Light
":Charging System
I:Cruise Control
B: Engine Coolant Temperature
O:Exterior Lamps
#:Fog Lamps
.: Fuel Gauge
+:Fuses
i: Headlamp High/Low-Beam Changer
j:LATCH System Child Restraints
*: Malfunction Indicator Lamp
::Oil Pressure
}:Power
/:Remote Vehicle Start
>:Safety Belt Reminders
7:Tire Pressure Monitor
F:Traction Control
M:Windshield Washer Fluid
v
Page 133 of 480

If the engine still does not start, and the key appears to
be undamaged, try another ignition key. At this time,
you may also want to check the fuse, seeFuses and
Circuit Breakers
on page 6‑119. If the engine still does
not start with the other key, your vehicle needs service.
If your vehicle does start, the first key may be faulty.
See your dealer/retailer who can service the
PASS-Key
®III+ to have a new key made. In an
emergency, contact Roadside Assistance. See
Roadside Assistance Program
on page 8‑6, for
more information.
It may be possible for the PASS-Key
®III+ decoder to
“learn” the transponder value of a new or replacement
key. Up to 10 keys may be programmed for the vehicle.
The following procedure is for programming additional
keys only. If all the currently programmed keys are lost
or do not operate, you must see your dealer/retailer or a
locksmith who can service PASS-Key
®III+ to have keys
made and programmed to the system.
See your dealer/retailer or a locksmith who can service
PASS-Key
®III+ to get a new key blank that is cut
exactly as the ignition key that operates the system. To program the new key:
1. Verify that the new key has a
1stamped on it.
2. Insert the already programmed key in the ignition and start the engine. If the engine will not start,
see your dealer/retailer for service.
3. After the engine has started, turn the key to LOCK/OFF, and remove the key.
4. Insert the key to be programmed and turn it to the ON/RUN position within five seconds of the original
key being turned to the LOCK/OFF position.
The security light will turn off once the key has
been programmed.
5. Repeat Steps 1 through 4 if additional keys are to be programmed.
If you are ever driving and the security light comes on
and stays on, you may be able to restart your engine
if you turn it off. Your PASS-Key
®III+ system, however,
is not working properly and must be serviced by your
dealer/retailer. Your vehicle is not protected by the
PASS-Key
®III+ system at this time.
If you lose or damage your PASS-Key
®III+ key, see
your dealer/retailer or a locksmith who can service
PASS-Key
®III+ to have a new key made.
Do not leave the key or device that disarms or
deactivates the theft deterrent system in the vehicle.
3-21
Page 170 of 480
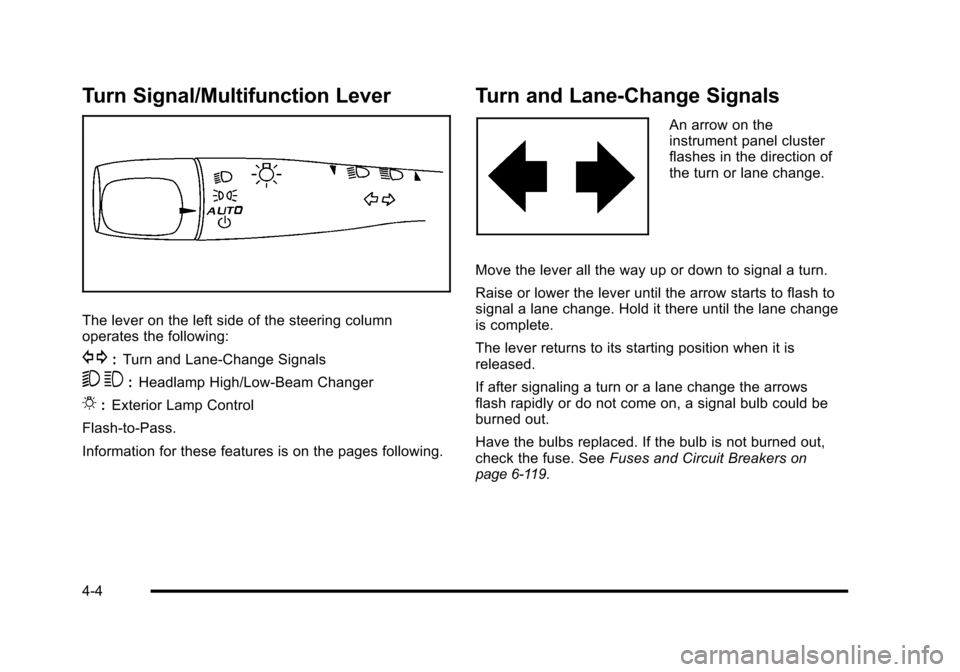
Turn Signal/Multifunction Lever
The lever on the left side of the steering column
operates the following:
G:Turn and Lane-Change Signals
5 3:Headlamp High/Low-Beam Changer
O:Exterior Lamp Control
Flash-to-Pass.
Information for these features is on the pages following.
Turn and Lane-Change Signals
An arrow on the
instrument panel cluster
flashes in the direction of
the turn or lane change.
Move the lever all the way up or down to signal a turn.
Raise or lower the lever until the arrow starts to flash to
signal a lane change. Hold it there until the lane change
is complete.
The lever returns to its starting position when it is
released.
If after signaling a turn or a lane change the arrows
flash rapidly or do not come on, a signal bulb could be
burned out.
Have the bulbs replaced. If the bulb is not burned out,
check the fuse. See Fuses and Circuit Breakers
on
page 6‑119.
4-4
Page 182 of 480
Accessory Power Outlet(s)
Accessory power outlets can be used to connect
electrical equipment, such as a cellular phone.
The accessory power outlets are located on the
instrument panel below the climate controls and at the
rear of the center console. There may be an outlet in
the rear cargo area on the passenger side.
To use the outlet, remove the cover. While not in use,
always cover the outlet with the protective cap.
Notice:Leaving electrical equipment plugged in for
an extended period of time while the vehicle is off
will drain the battery. Power is always supplied to
the outlets. Always unplug electrical equipment
when not in use and do not plug in equipment that
exceeds the maximum 20 ampere rating. Certain electrical accessories may not be compatible
with the accessory power outlet and could result in
blown vehicle or adapter fuses. If you experience a
problem, see your dealer/retailer for additional
information on the accessory power outlet.
Notice:
Adding any electrical equipment to the
vehicle can damage it or keep other components
from working as they should. The repairs would not
be covered by the vehicle warranty. Do not use
equipment exceeding maximum amperage rating of
20 amperes. Check with your dealer/retailer before
adding electrical equipment.
When adding electrical equipment, be sure to follow the
installation instructions included with the equipment.
Notice: Improper use of the power outlet can cause
damage not covered by the vehicle warranty. Do not
hang any type of accessory or accessory bracket
from the plug because the power outlets are
designed for accessory power plugs only.
4-16
Page 304 of 480

Section 6 Service and Appearance Care
When It Is Time for New Tires . . . . . . . . . . . . . . . . . 6-71
Buying New Tires . . . . . . . . . . . . . . . . . . . . . . . . . . . . . . 6-72
Different Size Tires and Wheels . . . . . . . . . . . . . . . 6-74
Uniform Tire Quality Grading . . . . . . . . . . . . . . . . . . . 6-74
Wheel Alignment and Tire Balance . . . . . . . . . . . . 6-76
Wheel Replacement . . . . . . . . . . . . . . . . . . . . . . . . . . . 6-76
Tire Chains . . . . . . . . . . . . . . . . . . . . . . . . . . . . . . . . . . . . 6-77
If a Tire Goes Flat . . . . . . . . . . . . . . . . . . . . . . . . . . . . . 6-77
Tire Sealant and Compressor Kit . . . . . . . . . . . . . . 6-78
Tire Sealant and Compressor Kit Storage . . . . . . 6-87
Changing a Flat Tire . . . . . . . . . . . . . . . . . . . . . . . . . . . 6-88
Removing the Spare Tire and Tools . . . . . . . . . . . . 6-89
Removing the Flat Tire and Installing the SpareTire (All Models Except SS) . . . . . . . . . . . . . . . . . 6-92
Removing the Flat Tire and Installing the Spare Tire (SS Model) . . . . . . . . . . . . . . . . . . . . . . . . . . . . . . 6-96
Storing a Flat or Spare Tire and Tools . . . . . . . . 6-106
Compact Spare Tire . . . . . . . . . . . . . . . . . . . . . . . . . . 6-110
Appearance Care . . . . . . . . . . . . . . . . . . . . . . . . . . . . . . . . 6-111
Interior Cleaning . . . . . . . . . . . . . . . . . . . . . . . . . . . . . 6-111
Fabric/Carpet . . . . . . . . . . . . . . . . . . . . . . . . . . . . . . . . . 6-112
Leather . . . . . . . . . . . . . . . . . . . . . . . . . . . . . . . . . . . . . . . 6-113
Instrument Panel, Vinyl, and Other Plastic Surfaces . . . . . . . . . . . . . . . . . . . . . . . . . . . . . . . . . . . . 6-113
Care of Safety Belts . . . . . . . . . . . . . . . . . . . . . . . . . . 6-113 Weatherstrips . . . . . . . . . . . . . . . . . . . . . . . . . . . . . . . . . 6-114
Washing Your Vehicle . . . . . . . . . . . . . . . . . . . . . . . . 6-114
Cleaning Exterior Lamps/Lenses . . . . . . . . . . . . . 6-114
Finish Care . . . . . . . . . . . . . . . . . . . . . . . . . . . . . . . . . . . 6-114
Windshield and Wiper Blades . . . . . . . . . . . . . . . . . 6-115
Aluminum or Chrome-Plated Wheels
and Trim . . . . . . . . . . . . . . . . . . . . . . . . . . . . . . . . . . . . 6-116
Tires . . . . . . . . . . . . . . . . . . . . . . . . . . . . . . . . . . . . . . . . . . 6-117
Sheet Metal Damage . . . . . . . . . . . . . . . . . . . . . . . . . 6-117
Finish Damage . . . . . . . . . . . . . . . . . . . . . . . . . . . . . . . 6-117
Underbody Maintenance . . . . . . . . . . . . . . . . . . . . . . 6-117
Chemical Paint Spotting . . . . . . . . . . . . . . . . . . . . . . 6-117
Vehicle Identification . . . . . . . . . . . . . . . . . . . . . . . . . . . . 6-118
Vehicle Identification Number (VIN) . . . . . . . . . . . 6-118
Service Parts Identification Label . . . . . . . . . . . . . 6-118
Electrical System . . . . . . . . . . . . . . . . . . . . . . . . . . . . . . . . 6-118
Add-On Electrical Equipment . . . . . . . . . . . . . . . . . 6-118
Headlamp Wiring . . . . . . . . . . . . . . . . . . . . . . . . . . . . . 6-119
Windshield Wiper Fuses . . . . . . . . . . . . . . . . . . . . . . 6-119
Power Windows and Other Power Options . . . 6-119
Fuses and Circuit Breakers . . . . . . . . . . . . . . . . . . . 6-119
Floor Console Fuse Block . . . . . . . . . . . . . . . . . . . . 6-120
Engine Compartment Fuse Block . . . . . . . . . . . . . 6-122
Capacities and Specifications . . . . . . . . . . . . . . . . . . 6-125
6-2
Page 421 of 480
The vehicle has an airbag system. Before attempting to
add anything electrical to the vehicle, seeServicing
Your Airbag-Equipped Vehicle
on page 2‑76and
Adding Equipment to Your Airbag-Equipped Vehicleon
page 2‑77.
Headlamp Wiring
The headlamp wiring is protected by fuses in the fuse
block. An electrical overload will cause the lamps to turn
off. If this happens, have the headlamp wiring checked
right away.
Windshield Wiper Fuses
The windshield wiper motor is protected by a circuit
breaker and a fuse. If the motor overheats due to heavy
snow, etc., the wiper will stop until the motor cools.
If the overload is caused by some electrical problem,
have it fixed.
Power Windows and Other Power
Options
Fuses in the fuse block protect the power windows.
When the current load is too heavy, the fuse opens
protecting the circuit until the problem is fixed.
Fuses and Circuit Breakers
The wiring circuits in the vehicle are protected from
short circuits by a combination of fuses, circuit breakers
and fusible thermal links. This greatly reduces the
chance of damage caused by electrical problems.
Look at the silver-colored band inside the fuse. If the
band is broken or melted, replace the fuse. Be sure you
replace a bad fuse with a new one of the identical size
and rating.
If you ever have a problem on the road and do not have
a spare fuse, you can “borrow”one that has the
same amperage. Just pick some feature of the vehicle
that you can get along without —like the radio or
cigarette lighter —and use its fuse if it is the
correct amperage. Replace it as soon as you can.
There are two fuse blocks in the vehicle: the floor
console fuse block and the engine compartment fuse
block.
There are also one or two fuses located at the back of
the vehicle near the battery.
6-119
Page 422 of 480
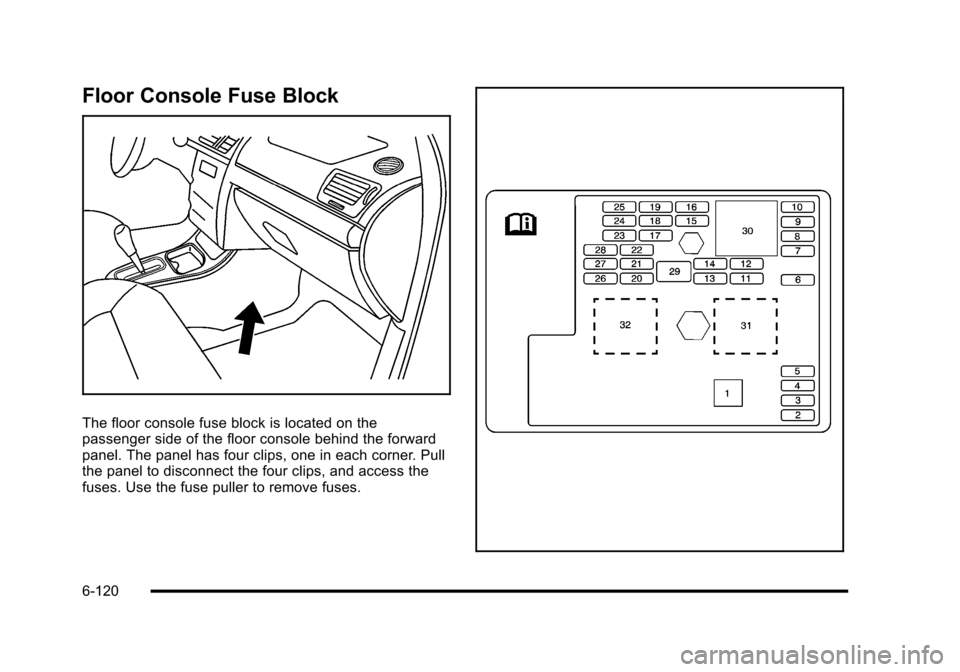
Floor Console Fuse Block
The floor console fuse block is located on the
passenger side of the floor console behind the forward
panel. The panel has four clips, one in each corner. Pull
the panel to disconnect the four clips, and access the
fuses. Use the fuse puller to remove fuses.
6-120
Page 423 of 480
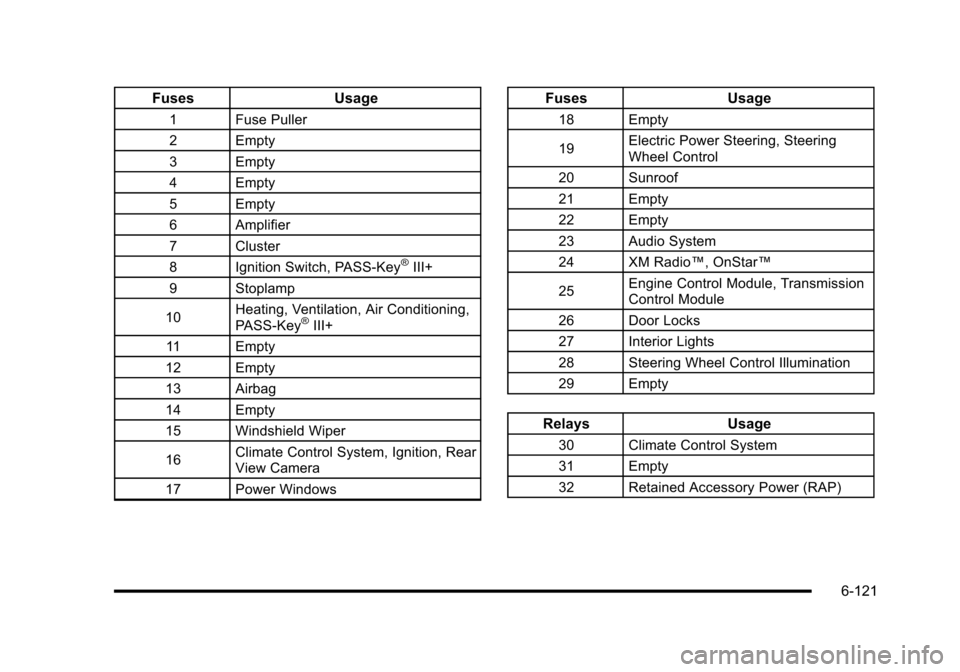
FusesUsage
1 Fuse Puller
2 Empty
3 Empty
4 Empty
5 Empty
6 Amplifier
7 Cluster
8 Ignition Switch, PASS-Key
®III+
9 Stoplamp
10 Heating, Ventilation, Air Conditioning,
PASS-Key
®III+
11 Empty
12 Empty
13 Airbag
14 Empty
15 Windshield Wiper
16 Climate Control System, Ignition, Rear
View Camera
17 Power Windows
Fuses Usage
18 Empty
19Electric Power Steering, Steering
Wheel Control
20 Sunroof
21 Empty
22 Empty
23 Audio System
24 XM Radio™, OnStar™
25 Engine Control Module, Transmission
Control Module
26 Door Locks
27 Interior Lights
28 Steering Wheel Control Illumination
29 Empty
Relays Usage
30 Climate Control System
31 Empty
32 Retained Accessory Power (RAP)
6-121