2010 CHEVROLET CAMARO change time
[x] Cancel search: change timePage 30 of 378

Black plate (6,1)Chevrolet Camaro Owner Manual - 2010
2-6 Seats and Restraints
Heated Front Seats
{WARNING
If you cannot feel temperature
change or pain to the skin, the
seat heater may cause burns
even at low temperatures.
To reduce the risk of burns,
people with such a condition
should use care when using the
seat heater, especially for long
periods of time. Do not place
anything on the seat that
insulates against heat, such as
a blanket, cushion, cover or
similar item. This may cause
the seat heater to overheat.
An overheated seat heater may
cause a burn or may damage
the seat.On vehicles with heated front seats,
the controls are on the center
console. The engine must be
running.L(Heated Seat):
Press to turn on
the heated seat.
A light indicates that the feature
is working. The number of lights
shows the level of heat selected:
one or two for a low or high setting.
Press the button to cycle through
the temperature settings and to turn
the heated seat feature off.
Rear Seats
The rear seat has two designated
seating positions and can be folded
for more cargo space. Fold only
when the vehicle is parked.
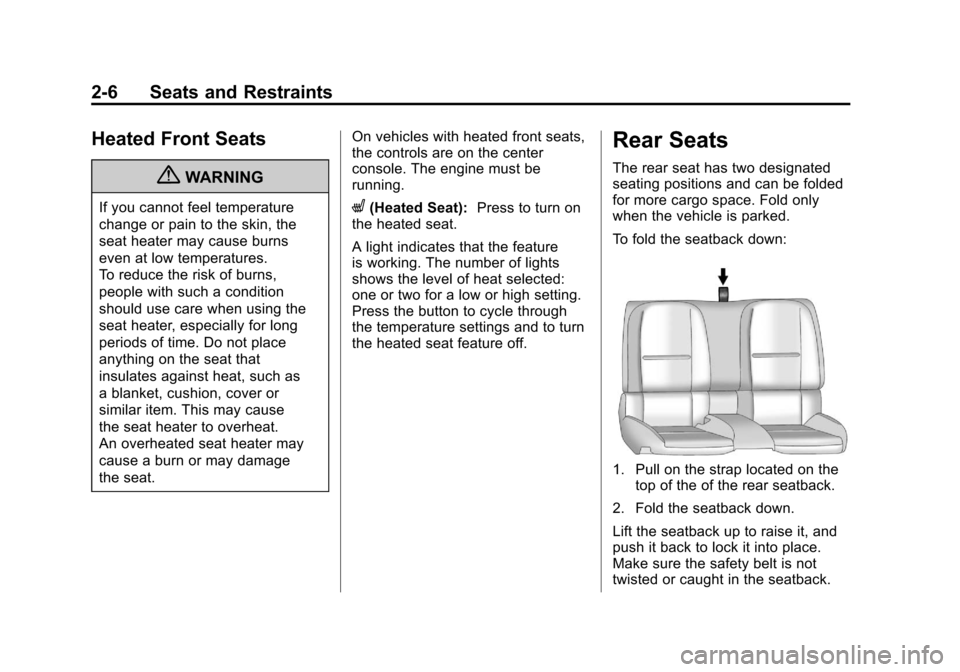
To fold the seatback down:
1. Pull on the strap located on the
top of the of the rear seatback.
2. Fold the seatback down.
Lift the seatback up to raise it, and
push it back to lock it into place.
Make sure the safety belt is not
twisted or caught in the seatback.
Page 63 of 378

Black plate (39,1)Chevrolet Camaro Owner Manual - 2010
Seats and Restraints 2-39
Infants and Young
Children
Everyone in a vehicle needs
protection! This includes infants
and all other children. Neither the
distance traveled nor the age and
size of the traveler changes the
need, for everyone, to use safety
restraints. In fact, the law in every
state in the United States and in
every Canadian province says
children up to some age must be
restrained while in a vehicle.
{WARNING
Children can be seriously injured
or strangled if a shoulder belt is
wrapped around their neck and
the safety belt continues to
tighten. Never leave children
unattended in a vehicle and
never allow children to play
with the safety belts.Airbags plus lap‐shoulder belts offer
protection for adults and older
children, but not for young children
and infants. Neither the vehicle's
safety belt system nor its airbag
system is designed for them. Every
time infants and young children ride
in vehicles, they should have the
protection provided by appropriate
child restraints.
Children who are not restrained
properly can strike other people,
or can be thrown out of the vehicle.
{WARNING
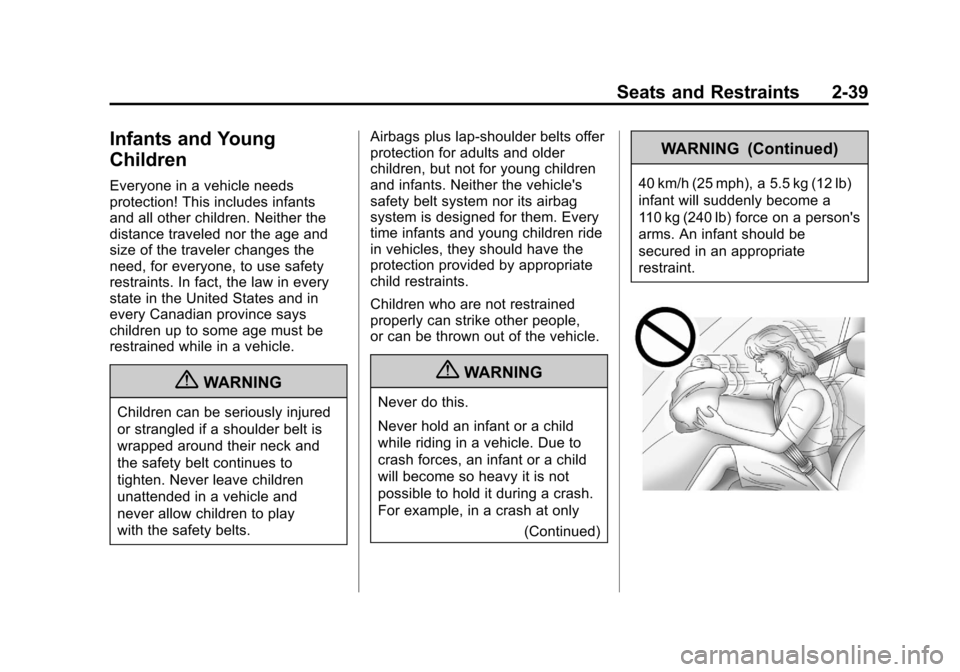
Never do this.
Never hold an infant or a child
while riding in a vehicle. Due to
crash forces, an infant or a child
will become so heavy it is not
possible to hold it during a crash.
For example, in a crash at only
(Continued)
WARNING (Continued)
40 km/h (25 mph), a 5.5 kg (12 lb)
infant will suddenly become a
110 kg (240 lb) force on a person's
arms. An infant should be
secured in an appropriate
restraint.
Page 112 of 378

Black plate (30,1)Chevrolet Camaro Owner Manual - 2010
4-30 Instruments and Controls
Unit
Move the thumbwheel up or down to
switch between US or Metric when
the Unit display is active. Press SET
to confirm the setting. This will
change the displays on the cluster
and DIC to either English (US) or
metric measurements.
Tire Pressure
The display will show a vehicle with
the approximate pressures of all
four tires. Tire pressure is displayed
in either pounds per square
inch (psi) or in kilopascal (kPa).
SeeTire Pressure Monitor System
on page 9‑58andTire Pressure
Monitor Operationon page 9‑60for more information.
Remaining Oil Life
This display shows an estimate
of the oil's remaining useful life.
If Remaining Oil Life 99% is
displayed, that means 99% of
the current oil life remains. When the remaining oil life is low,
the CHANGE ENGINE OIL SOON
message will appear on the display.
See
Engine Oil Messages
on
page 4‑33. The oil should changed
as soon as possible. See Engine Oil
on page 9‑10. In addition to the
engine oil life system monitoring
the oil life, additional maintenance
is recommended in the Maintenance
Schedule in this manual. See
Scheduled Maintenance
on
page 10‑2for more information.
Remember, the Oil Life display
must be reset after each oil change.
It will not reset itself. Also, be
careful not to reset the Oil Life
display accidentally at any time
other than when the oil has just
been changed. It cannot be reset
accurately until the next oil change.
To reset the engine oil life system
press the SET button while the Oil
Life display is active. See Engine
Oil Life System
on page 9‑13. Coolant Temperature
This display shows the temperature
of the engine cooling system fluid in
either degrees Fahrenheit (°F) or
degrees Celsius (°C).
Battery Voltage
This display, available on some
vehicles, shows the current battery
voltage. If the voltage is in the
normal range, the value will display.
For example, the display may
read Battery Voltage 15.0 Volts.
The vehicle's charging system
regulates voltage based on the
state of the battery. The battery
voltage can fluctuate while viewing
this information on the DIC. This is
normal. See
Charging System Light
on page 4‑20for more information.
If there is a problem with the battery
charging system, the DIC will
display a message. See Battery
Voltage and Charging Messages
on
page 4‑31.
Page 127 of 378

Black plate (45,1)Chevrolet Camaro Owner Manual - 2010
Instruments and Controls 4-45
Keep the original hand-held
transmitter for use in other vehicles
as well as for future Universal Home
Remote programming. It is also
recommended that upon the sale
of the vehicle, the programmed
Universal Home Remote buttons
should be erased for security
purposes. See“Erasing Universal
Home Remote Buttons” later in this
section.
When programming a garage door,
park outside of the garage. Park
directly in line with and facing the
garage door opener motor-head
or gate motor-head. Be sure that
people and objects are clear of the
garage door or gate that is being
programmed.
It is recommended that a new
battery be installed in your
hand-held transmitter for quicker
and more accurate transmission
of the radio-frequency signal.Programming the Universal
Home Remote System
For questions or help programming
the Universal Home Remote
System, call 1‐800‐355‐3515
or go to www.homelink.com.
Programming a garage door opener
involves time-sensitive actions, so
read the entire procedure before
starting. Otherwise, the device will
time out and the procedure will have
to be repeated.
To program up to three devices:
1. Hold the end of your hand-held transmitter about 3 to 8 cm
(1 to 3 inches) away from the
Universal Home Remote buttons
while keeping the indicator
light in view. The hand-held
transmitter was supplied by
the manufacturer of your
garage door opener receiver
(motor-head unit). 2. At the same time, press and
hold both the hand-held
transmitter button and one
of the three Universal Home
Remote buttons to be used to
operate the garage door. Do not
release the Universal Home
Remote button or the hand-held
transmitter button until the
indicator light changes from a
slow to a rapidly flashing light.
You now may release both
buttons.
Some entry gates and garage
door openers may require
substitution of Step 2 with the
procedure noted in “Gate
Operator and Canadian
Programming” later in this
section.
Page 131 of 378

Black plate (1,1)Chevrolet Camaro Owner Manual - 2010
Lighting 5-1
Lighting
Exterior Lighting
Exterior Lamp Controls . . . . . . . . 5-1
Headlamp High/Low-BeamChanger . . . . . . . . . . . . . . . . . . . . . 5-3
Flash-to-Pass . . . . . . . . . . . . . . . . . 5-3
Daytime Running Lamps (DRL) . . . . . . . . . . . . . . . . 5-3
Automatic Headlamp System . . . . . . . . . . . . . . . . . . . . . . 5-4
Hazard Warning Flashers . . . . . 5-4
Turn and Lane-Change Signals . . . . . . . . . . . . . . . . . . . . . . 5-5
Front Fog Lamps . . . . . . . . . . . . . . 5-5
Interior Lighting
Instrument Panel Illumination Control . . . . . . . . . . . . . . . . . . . . . . 5-6
Dome Lamps . . . . . . . . . . . . . . . . . 5-6
Lighting Features
Entry Lighting . . . . . . . . . . . . . . . . . 5-6
Theater Dimming . . . . . . . . . . . . . . 5-6
Battery Load Management . . . . 5-6
Battery Power Protection . . . . . . 5-7
Exterior Lighting
Exterior Lamp Controls
The exterior lamps control is located
on the instrument panel, on the
outboard side of the steering wheel. It controls the following systems:
.Headlamps
.Sidemarker Lamps
.Parking Lamps
.Taillamps
.License Plate Lamps
.Instrument Panel Lights
.Fog Lamps
.Daytime Running Lamps (DRL)
The exterior lamps control has four
positions:
9(Off): Briefly turn to this position
to turn the automatic light control
off or on again. When released,
the control returns to the AUTO
position.
Page 133 of 378

Black plate (3,1)Chevrolet Camaro Owner Manual - 2010
Lighting 5-3
Headlamp High/
Low-Beam Changer
2 3
Headlamp High/Low Beam
Changer: Push the turn signal/lane
change lever away from you to turn
the high beams on.
Pull the lever towards you to return
to low beams.
This indicator light turns on in the
instrument panel cluster when the
high beam headlamps are on.
Flash-to-Pass
The flash‐to‐pass feature works with
the low‐beams or Daytime Running
Lamps (DRL) on or off.
To flash the high beams, pull the
turn signal/lane change lever all the
way towards you. Then release it.
Daytime Running
Lamps (DRL)
Daytime Running Lamps (DRL) can
make it easier for others to see the
front of your vehicle during the day.
Fully functional daytime running
lamps are required on all vehicles
first sold in Canada.
A light sensor on top of the
instrument panel makes the DRL
work, so be sure it is not covered.
The DRL system will make the
low‐beam headlamps come on at a
reduced brightness or for vehicles
with High Intensity Discharge (HID)
headlamps, the dedicated DRL
lights will come on when the
following conditions are met:
.The ignition is in the ON/RUN
position.
.The exterior lamps control is
in AUTO, or has been briefly
turned to OFF to turn the
automatic light control on again.
.The engine is running. When the DRL are on, the
headlamps, taillamps, sidemarker,
instrument panel and other lamps
will not be on.
The headlamps automatically
change from DRL to the regular
headlamps depending on the
darkness of the surroundings.
The other lamps that come on with
the headlamps will also come on.
When it is bright enough outside,
the headlamps will go off and the
DRL will come on.
To turn the DRL lamps off or on
again, turn the exterior lamps
control to the off position and then
release. For vehicles first sold in
Canada, the DRL lamps cannot be
turned off.
The regular headlamp system
should be turned on when needed.
Page 134 of 378

Black plate (4,1)Chevrolet Camaro Owner Manual - 2010
5-4 Lighting
Automatic Headlamp
System
When it is dark enough outside and
the headlamp switch is in AUTO,
the automatic headlamp system will
turn on the headlamps at the normal
brightness along with other lamps
such as the taillamps, sidemarker,
parking lamps, license plate lamps,
and the instrument panel lights.
The radio lights will also be dim.
To turn off the automatic headlamp
system, turn the exterior lamps
switch to the off position and then
release. For vehicles first sold in
Canada, the transmission must be
in the P (Park) position, before the
automatic headlamp system can be
turned off.The vehicle has a light sensor
located on the top of the instrument
panel. Do not cover this sensor or
the system will come on whenever
the ignition is on.
The system may also turn on the
headlamps when driving through a
parking garage, heavy overcast
weather, or a tunnel. This is normal.
There is a delay in the transition
between the daytime and nighttime
operation of the Daytime Running
Lamps (DRL) and the automatic
headlamp systems so that driving
under bridges or bright overhead
street lights does not affect the
system. The DRL and automatic
headlamp system will only be
affected when the light sensor sees
a change in lighting lasting longer
than the delay.If the vehicle is started in a dark
garage, the automatic headlamp
system comes on immediately. If it
is light outside when the vehicle
leaves the garage, there will be a
slight delay before the automatic
headlamp system changes to
the DRL. During that delay, the
instrument panel cluster may not be
as bright as usual. Make sure the
instrument panel brightness control
is in the full bright position. See
Instrument Panel Illumination
Control on page 5‑6.
Hazard Warning Flashers
|
Hazard Warning Flasher:
Press this button located on the
instrument panel near the audio
system, to make the front and rear
turn signal lamps flash on and off.
This warns others that you are
having trouble. Press again to turn
the flashers off.
Page 135 of 378

Black plate (5,1)Chevrolet Camaro Owner Manual - 2010
Lighting 5-5
Turn and Lane-Change
Signals
An arrow on the instrument panel
cluster flashes in the direction of the
turn or lane change.
Move the lever all the way up or
down to signal a turn.
Raise or lower the lever until the
arrow starts to flash to signal a lane
change. Hold it there until the lane
change is completed. If the lever is
briefly pressed and released, the
turn signal flashes three times.The lever returns to its starting
position whenever it is released.
If after signaling a turn or lane
change the arrow flashes rapidly or
does not come on, a signal bulb
might be burned out.
Have the bulbs replaced. If the bulb
is not burned out, check the fuse.
See
Electrical System Overload
on
page 9‑41.
Front Fog Lamps
For vehicles with front fog lamps,
the button is located on the exterior
lamp control, on the outboard side
of the steering wheel.
The ignition must be turned to
ON/RUN to turn on the fog lamps.
#: Press to turn the fog lamps
on or off. An indicator light on the
instrument panel cluster comes on
when the fog lamps are on. The fog lamps come on together
with the parking and sidemarker
lamps.
If the high‐beam headlamps are
turned on, the fog lamps will turn off.
If the high‐beam headlamps are
turned off, the fog lamps will turn
back on again.
For vehicles with High Intensity
Discharge (HID) headlamps, the
Daytime Running Lamps (DRL)
replace the fog lamps.
Some localities have laws that
require the headlamps to be on
along with the fog lamps.