Page 276 of 378
Black plate (44,1)Chevrolet Camaro Owner Manual - 2010
9-44 Vehicle Care
Mini Fuses Usage1 Air Conditioning
Compressor Clutch
2 Transmission
Control Module
5 Engine Control
Module Main
7 Pre-Catalytic
Converter Oxygen
Sensor
8 Post-Catalytic
Converter Oxygen
Sensor
9 Fuel
Injectors
–Even Mini Fuses Usage
10 Fuel Injectors –Odd
11 Cooling Fan Relay
14 Manifold Air Flow/
Chassis Control
15 Ignition
16 Run/Crank IP
17 Sensing Diagnostic
Module/Ignition
18 Run/Crank Body
19 Transmission
Control Module/
Ignition
20 Engine Control
Module/Ignition Mini Fuses Usage
31 Outside Rear View
Mirror
32 Canister Vent
Solenoid
33 Body Control
Module #6
34 Sunroof
35 Front Heated Seats
38 Washer Pump Front
40 Antilock Brake
System Valves
46 HID Headlamp
–
Left Front
Page 280 of 378
Black plate (48,1)Chevrolet Camaro Owner Manual - 2010
9-48 Vehicle Care
FusesUsage
F1 Universal Garage
Door Opener/
Ultra–sonic Reverse
Parking Aid
F2 Amplifier
F3 Radio
F4 Spare Fuses
Usage
F5 Convertible Top 1
F6 Convertible Top 2
F7 Spare
F8 Spare
F9 Spare
F10 Spare Fuses
Usage
F11 Spare
F12 Spare
F13 Engine Control
Module/Battery
F14 Regulated Voltage
Control
F15 Fuel System Control
Module
F16 Spare
Page 284 of 378

Black plate (52,1)Chevrolet Camaro Owner Manual - 2010
9-52 Vehicle Care
(D) Maximum Cold Inflation
Load Limit
:Maximum load
that can be carried and the
maximum pressure needed
to support that load.
(E) Tire Inflation
:The
temporary use tire or compact
spare tire should be inflated
to 420 kPa (60 psi). For more
information on tire pressure and
inflation see Tire Pressure
on
page 9‑56
.
(F) Tire Size
:A combination of
letters and numbers define a
tire's width, height, aspect ratio,
construction type, and service
description. The letter T as the
first character in the tire size
means the tire is for temporary
use only.
(G) TPC Spec (Tire
Performance Criteria
Specification)
:Original
equipment tires designed to
GM's specific tire performance criteria have a TPC specification
code molded onto the sidewall.
GM's TPC specifications meet
or exceed all federal safety
guidelines.
Tire Designations
Tire Size
The following illustration
shows an example of a typical
passenger vehicle tire size.
(A) Passenger (P‐Metric) Tire:
The United States version of a
metric tire sizing system. The
letter P as the first character in
the tire size means a passenger
vehicle tire engineered to
standards set by the U.S.
Tire and Rim Association.(B) Tire Width
:The three‐digit
number indicates the tire section
width in millimeters from
sidewall to sidewall.
(C) Aspect Ratio
:A two‐digit
number that indicates the tire
height‐to‐width measurements.
For example, if the tire size
aspect ratio is 60, as shown in
item C of the illustration, it would
mean that the tire's sidewall is
60 percent as high as it is wide.
(D) Construction Code
:A
letter code is used to indicate
the type of ply construction in
the tire. The letter R means
radial ply construction; the
letter D means diagonal or
bias ply construction; and the
letter B means belted‐bias ply
construction.
(E) Rim Diameter
:Diameter of
the wheel in inches.
Page 294 of 378

Black plate (62,1)Chevrolet Camaro Owner Manual - 2010
9-62 Vehicle Care
.Operating electronic devices or
being near facilities using radio
wave frequencies similar to the
TPMS could cause the TPMS
sensors to malfunction.
If the TPMS is not functioning it
cannot detect or signal a low tire
condition. See your dealer for
service if the TPMS malfunction
light and DIC message comes on
and stays on.
TPMS Sensor Matching
Process
Each TPMS sensor has a unique
identification code. Any time you
replace one or more of the TPMS
sensors or rotate your vehicle's
tires, the identification codes need
to be matched to the new tire/wheel
position. The sensors are matched
to the tire/wheel positions in the
following order: driver side front tire,
passenger side front tire, passenger
side rear tire, and driver side rear
tire using a TPMS diagnostic tool.
See your dealer for service. The TPMS sensors can also be
matched to each tire/wheel position
by increasing or decreasing the
tire's air pressure. If increasing the
tire's air pressure, do not exceed
the maximum inflation pressure
indicated on the tire's sidewall.
To decrease the tire's air-pressure
use the pointed end of the valve
cap, a pencil-style air pressure
gauge, or a key.
You have two minutes to match
the first tire/wheel position, and
five minutes overall, to match all
four tire/wheel positions. If it takes
longer than two minutes, to match
the first tire and wheel, or more than
five minutes to match all four tire
and wheel positions, the matching
process stops and you need to
start over.
The TPMS matching process is
outlined below:
1. Set the parking brake.
2. Turn the ignition switch to
ON/RUN with the engine off. 3. Go to the TPM vehicle
information screen on the DIC.
See Driver Information Center
(DIC)
on page 4‑28. Press set
to relearn the sensors. The horn
sounds twice to signal the
receiver is in relearn mode and
Tire Learning Active message
displays on the DIC screen.
4. Start with the driver side front tire.
5. Remove the valve cap from the valve stem. Activate the
TPMS sensor by increasing or
decreasing the tire's air pressure
for 10 seconds, or until a horn
chirp sounds. The horn chirp,
which can take up to 30 seconds
to sound, confirms that the
TPMS sensor identification code
has been matched to this tire
position.
6. Proceed to the passenger side front tire, and repeat the
procedure in Step 5.
Page 304 of 378

Black plate (72,1)Chevrolet Camaro Owner Manual - 2010
9-72 Vehicle Care
If a tire goes flat, avoid further tire
and wheel damage by driving slowly
to a level place. Turn on the hazard
warning flashers. SeeHazard
Warning Flashers on page 5‑4.
{WARNING
Changing a tire can be
dangerous. The vehicle can
slip off the jack and roll over
or fall on you or other people.
You and they could be badly
injured or even killed. Find a level
place to change your tire. To help
prevent the vehicle from moving:
1. Set the parking brake firmly.
2. Put an automatic transmission shift lever in
P (Park), or shift a manual
transmission to 1 (First) or
R (Reverse).
(Continued)
WARNING (Continued)
3. Turn off the engine and donot restart while the vehicle
is raised.
4. Do not allow passengers to remain in the vehicle.
To be certain the vehicle will
not move, put blocks at the front
and rear of the tire farthest away
from the one being changed.
That would be the tire on the
other side, at the opposite end
of the vehicle.
This vehicle may come with a jack
and spare tire or a tire sealant and
compressor kit. To use the jacking
equipment to change a spare tire
safely, follow the instructions below.
Then see Tire Changing
on
page 9‑79. To use the tire sealant
and compressor kit, see Tire
Sealant and Compressor Kit
on
page 9‑73. When the vehicle has a flat tire (B),
use the following example as a
guide to assist you in the placement
of wheel blocks (A).
A. Wheel Block
B. Flat Tire
The following information explains
how to repair or change a tire.
Page 305 of 378

Black plate (73,1)Chevrolet Camaro Owner Manual - 2010
Vehicle Care 9-73
Tire Sealant and
Compressor Kit
{WARNING
Idling a vehicle in an enclosed
area with poor ventilation is
dangerous. Engine exhaust may
enter the vehicle. Engine exhaust
contains Carbon Monoxide (CO)
which cannot be seen or smelled.
It can cause unconsciousness
and even death. Never run the
engine in an enclosed area
that has no fresh air ventilation.
For more information, seeEngine
Exhaust on page 8‑25.
{WARNING
Over-inflating a tire could
cause the tire to rupture and
you or others could be injured.
Be sure to read and follow the
tire sealant and compressor kit
instructions and inflate the tire
to its recommended pressure.
Do not exceed the recommended
pressure.
{WARNING
Storing the tire sealant and
compressor kit or other
equipment in the passenger
compartment of the vehicle could
cause injury. In a sudden stop or
collision, loose equipment could
strike someone. Store the tire
sealant and compressor kit in its
original location. If this vehicle has a tire sealant and
compressor kit, there may not be a
spare tire, tire changing equipment,
and on some vehicles there may not
be a place to store a tire.
The tire sealant and compressor
can be used to temporarily seal
punctures up to 6 mm (¼ inch) in
the tread area of the tire. It can
also be used to inflate an under
inflated tire.
If the tire has been separated from
the wheel, has damaged sidewalls,
or has a large puncture, the tire is
too severely damaged for the tire
sealant and compressor kit to be
effective. See
Roadside Assistance
Program on page 12‑6.
Read and follow all of the tire
sealant and compressor kit
instructions.
Page 319 of 378

Black plate (87,1)Chevrolet Camaro Owner Manual - 2010
Vehicle Care 9-87
The jump start positive (A) and
negative (B) posts are located in the
engine compartment on the driver
side of the vehicle.
These posts are used instead of a
direct connection to the battery.The positive jump start connection
is covered by a red cap. Remove to
expose the terminal.
1. Check the other vehicle. It must
have a 12-volt battery with a
negative ground system. Notice:
If the other vehicle's
system is not a 12-volt system
with a negative ground, both
vehicles can be damaged. Only
use vehicles with 12-volt systems
with negative grounds to jump
start your vehicle.
2. Position the two vehicles so that they are not touching.
3. Set the parking brake firmly and put the shift lever in P (Park).
See Shifting Into Park
on
page 8‑22.
Notice: If you leave the radio or
other accessories on during the
jump starting procedure, they
could be damaged. The repairs
would not be covered by the
warranty. Always turn off the
radio and other accessories
when jump starting the vehicle.
4. Turn the ignition to LOCK/OFF and switch off all lights and
accessories in both vehicles,
except the hazard warning
flashers if needed.
Page 320 of 378

Black plate (88,1)Chevrolet Camaro Owner Manual - 2010
9-88 Vehicle Care
{WARNING
An electric fan can start up even
when the engine is not running
and can injure you. Keep hands,
clothing and tools away from any
underhood electric fan.
{WARNING
Using a match near a battery can
cause battery gas to explode.
People have been hurt doing this,
and some have been blinded.
Use a flashlight if you need more
light.
Be sure the battery has enough
water. You do not need to add
water to the battery installed in
your new vehicle. But if a battery
has filler caps, be sure the right(Continued)
WARNING (Continued)
amount of fluid is there. If it is low,
add water to take care of that
first. If you don't, explosive gas
could be present.
Battery fluid contains acid that
can burn you. Do not get it on
you. If you accidentally get it in
your eyes or on your skin, flush
the place with water and get
medical help immediately.
{WARNING
Fans or other moving engine
parts can injure you badly. Keep
your hands away from moving
parts once the engine is running.
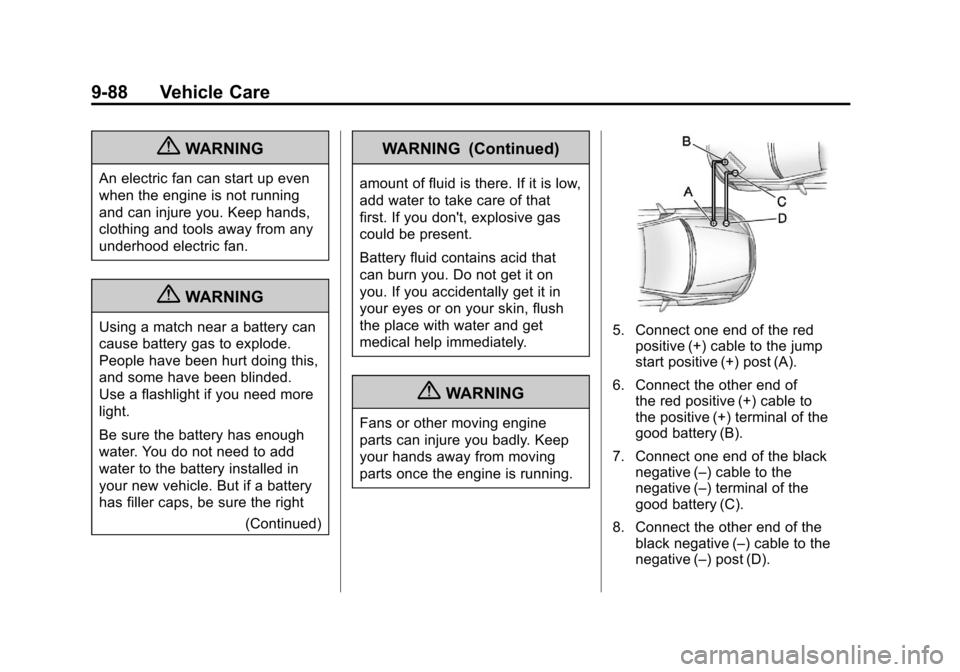
5. Connect one end of the redpositive (+) cable to the jump
start positive (+) post (A).
6. Connect the other end of the red positive (+) cable to
the positive (+) terminal of the
good battery (B).
7. Connect one end of the black negative (–) cable to the
negative (–) terminal of the
good battery (C).
8. Connect the other end of the black negative (–) cable to the
negative (–) post (D).