2010 CADILLAC ESCALADE ESV lights
[x] Cancel search: lightsPage 311 of 620

Black plate (9,1)Cadillac Escalade/Escalade ESV Owner Manual - 2010
7. Select the state/province screen button, if needed,
to change the current state or province. A list of all
of the available states and provinces appear.
Select the state or province.
8. Once a state or province has been selected the
City name category is automatically selected for
entry.
If five or less names are available, a list displays.
If more than five are available, the List screen
button displays a number. This number represents
the number of available cities. Select this button to
view the list and select a city.
9. Once a city has been selected the Street name
category is automatically selected for entry.
If five or less streets are available for the selected
city, the system displays the list of streets. If more
than five streets are available the system displays
the alpha keyboard. Start entering the street name.
If five or less names are available, a list displays.
If more than five are available, the List screen
button displays a number. This button represents
the number of available streets. Select this button
to view the list and select a street.
10. Once a street has been selected, select the
House # screen button to enter the house number.
The system displays the house number range that
is available for the street. 11. Select the Go screen button. A map screen, with
the destination marked appears.
12. Select the route preference (Fastest, Shortest,
or Other). The system calculates and highlights the
route.
13. Select the Start Guidance screen button. You are
now ready to start your route.
See “ Address Entry ” under Destination
on page 5 ‑ 24
for more information.
Entering a Point of Interest (POI) To set a destination by entering a Point of Interest
(POI), do the following:
1. If the radio is already on with a map disc inserted,
skip to Step 5.
2. Press
O to turn the system on.
3. Insert the DVD map disc. See “ Installing the Map
DVD ” under Maps on page 5 ‑ 14 for more
information.
4. A caution may appear. Touch the OK screen button
to proceed.
5. Press the DEST hard key.
6. Press the
i Point of Interest screen button.
5-9
Page 312 of 620

Black plate (10,1)Cadillac Escalade/Escalade ESV Owner Manual - 2010
7. Select the state/province screen button, if needed,
to change the current state or province. A list of all
of the available states and provinces appear.
Select the state or province.
8. Enter the specific title of the POI in the POI name
space (e.g. Washington Monument).
If five or less names are available, a list displays.
If more than five are available, the List screen
button displays a number. This button represents
the number of available POIs. Select this button to
view the list.
9. Select the Go screen button next to the POI.
A map screen, with the destination marked
appears.
10. Select the route preference (Fastest, Shortest,
or Other). The system calculates and highlights the
route.
11. Select the Start Guidance screen button. The route
is now ready to be started.
See “ Point of Interest (POI) ” under Destination
on
page 5 ‑ 24 for more information.
Storing Preset Destinations 1. If the radio is already on with a map disc inserted,
skip to Step 5.
2. Press
O to turn the system on. 3. Insert the DVD map disc. See “ Installing the Map
DVD ” under Maps
on page 5 ‑ 14 for more
information.
4. A caution may appear. Touch the OK screen button
to proceed.
5. Press the DEST hard key.
Enter a destination. See Destination on page 5 ‑ 24
for more information on how to enter a destination.
6. Press the DEST hard key, the Route screen
displays. Press the Final Destination or Stopover
screen button. The information screen displays for
that location. Press the Add to Address Book
screen button. The address book screen appears.
7. Select the Name screen button. An alpha-keyboard
displays. Enter the name. Select the Back screen
button.
8. Press and hold one of the screen buttons at the
bottom of the screen until the name appears in the
screen button on the display.
The name appears in that preset destination
screen button and is now available to select from
the Destination Entry screen. See “ Using Your
Stored Preset Destinations ” next in this section to
select it as a destination.
See “ Adding or Changing Preset Destinations ”
under Destination
on page 5 ‑ 24 for more
information on how to add preset destinations.
5-10
Page 313 of 620

Black plate (11,1)Cadillac Escalade/Escalade ESV Owner Manual - 2010
Using Your Stored Preset Destinations These destinations are available for selection while
driving.
1. If the radio is already on with a map disc inserted,
skip to Step 5.
2. Press
O to turn the system on.
3. Insert the DVD map disc. See “ Installing the Map
DVD ” under Maps on page 5 ‑ 14 for more
information.
4. A caution may appear. Touch the OK screen button
to proceed.
5. Press the DEST hard key.
6. Select one of the available preset destination
screen buttons. A map screen, with the destination
marked appears.
7. Select the route preference (Fastest, Shortest,
or Other). The system calculates and highlights the
route.
8. Select the Start Guidance screen button. The route
is now ready to be started.
See “ Preset Destination ” under Destination
on
page 5 ‑ 24
for more information. Canceling Guidance Guidance is canceled once the final destination is
reached. To cancel guidance prior to arrival at the final
destination:
1. Press the DEST hard key.
2. Press the Cancel Guidance screen button.
3. Press OK to confirm.
Guidance Volume Adjust the volume of voice guidance prompts:
1. Press the CONFIG hard key to enter the menu
options, then press the CONFIG key repeatedly
until Nav is selected or touch the Nav screen
button.
2. Press the Voice Prompt screen button.
3. Press the + (plus) or – (minus) screen buttons to
increase or to decrease the volume of the voice
prompts. The system responds with the adjusted
voice level.
See “ Voice Prompt ” under Configure Menu on
page 5 ‑ 42
for more information.
Cleaning the Display Use a soft clean cotton cloth dampened with clean
water.
5-11
Page 316 of 620

Black plate (14,1)Cadillac Escalade/Escalade ESV Owner Manual - 2010
U (Space): Select to enter a space between
characters or the words of a name.
Backspace: Select if an incorrect character has been
entered.
To make name entries easier, the system only highlights
the characters that can follow the last one entered. For
example, if a Z is entered, a T may not be available for
selection.
If a name does not display after entry, it may need to be
entered differently or the map DVD disc may not contain
that information. See Database Coverage Explanations
on page 5 ‑ 59 for more information.
Maps This section includes basic information that you need to
know about the map database.
The maps are stored on a DVD. The United States,
Canada, and Puerto Rico are contained on one disc. Detailed Areas Road network attributes are contained in the map
database for detailed areas. Attributes include
information such as street names, street address, turn
restrictions, etc. A detailed area includes all major
highways, service roads, and residential roads. The
detailed areas include points of interest (POI) such
as: restaurants, airports, banks, hospitals, police
stations, gas stations, tourist attractions, historical
monuments, etc. The map database may not include
data for newly constructed areas or map database
corrections that are completed after the production of
the disc. The navigation system provides full route
guidance in the detailed map areas.
Limited Guidance Areas Any area that is not classified as detailed, is a limited
guidance area. Limited guidance streets are displayed
on the map but route guidance may not be given on
these streets. Some POI categories, such as the city
center POI category, and some street addresses are
included in the limited guidance areas.
The navigation system informs through voice prompts
when you are traveling into a limited guidance area
where route guidance is not available. The street maps
and the directional arrow displayed on the navigation
system can then be used to determine the remaining
route to your destination.
5-14
Page 327 of 620
Black plate (25,1)Cadillac Escalade/Escalade ESV Owner Manual - 2010
4. Once a state or province has been selected the
City name category is automatically selected for
entry.
Enter the City Name or touch the Last 5 Cities
screen button.
The Last 5 Cities screen displays a list of the last
five city names that had been entered. Select a city
from the list and it appears in the City name area.
If using the alpha keyboard, finish entering the city
name. If five or less names are available, a list
displays. If more than five are available, the List
screen button displays a number. This number
represents the number of available cities. Select
this button to view the list and select a city.
5. Once a city has been selected the Street name
category is automatically selected for entry.
Start entering the street name. If five or less names
are available, a list displays. If more than five are
available, the List screen button displays a
number. This number represents the number of
available streets. Select this button to view the list.
6. Once a street has been selected, press the
House # screen button to enter the house number.
The system displays the house number range that
is available for the street.
7. Select the Go screen button. The map screen, with
the destination marked displays. 8. Select the route preference (Fastest, Shortest,
or Other). The system calculates and highlights the
route.
9. Select the Start Guidance screen button. The route
is now ready to be started.
See “ Getting Started on Your Route ” later in this
section for more information.
To enter a destination by entering the street name first:
1. Press the DEST hard key.
2. Select the
2 screen button.
3. Select the state/province screen button, if needed,
to change the current state or province. A list of all
of the available states and provinces appear.
Select the state or province.
4. Select the Street screen button and start entering
the street name or touch the Last 5 Streets screen
button.
If the street name is common, the city might need
to be entered first.
The Last 5 Streets screen displays a list of the last
five street names that had been entered. Select a
street from the list and it appears in the Street
name area.
5-25
Page 328 of 620
Black plate (26,1)Cadillac Escalade/Escalade ESV Owner Manual - 2010
If using the alpha keyboard, finish entering the
street name. If five or less names are available, a
list displays. If more than five are available, the List
screen button displays a number. This number
represents the number of available streets. Select
this button to view the list and select a street.
5. Once a street has been selected, select the House
# screen button to enter the house number. The
system displays the house number range that is
available for the street.
6. Once the house number is selected, the city name
automatically populates. If there is more than one
city available for selection, a list of cities display.
Select the city.
7. Select the Go screen button. The map screen, with
the destination marked displays.
8. Select the route preference (Fastest, Shortest,
or Other). The system calculates and highlights the
route.
9. Select the Start Guidance screen button. The route
is now ready to be started.
See “ Getting Started on Your Route ” later in this
section for more information. To enter a destination by entering a cross street:
1. Press the DEST hard key.
2. Select the
2 screen button.
3. Select the state/province screen button, if needed,
to change the current state or province. A list of all
of the available states and provinces appear.
Select the state or province.
4. Select the Street screen button and start entering
the street name or touch the Last 5 Streets screen
button.
If the street name is common, the city might need
to be entered first.
The Last 5 Streets screen displays a list of the last
five street names that had been entered. Select a
street from the list and it appears in the Street
name area.
If using the alpha keyboard, finish entering the
street name. If five or less names are available, a
list displays. If more than five are available, the List
screen button displays a number. This number
represents the number of available streets. Select
this button to view the list and select a street.
5-26
Page 329 of 620
Black plate (27,1)Cadillac Escalade/Escalade ESV Owner Manual - 2010
5. Once a street has been selected, select the Cross
Street screen button and start entering the cross
street name. If five or less names are available, a
list displays. If more than five are available, the List
screen button displays a number. This number
represents the number of available streets. Select
this button to view the list and select a street.
6. Select the Go screen button. The map screen, with
the destination marked displays.
7. Select the route preference (Fastest, Shortest,
or Other). The system calculates and highlights the
route.
8. Select the Start Guidance screen button. The route
is now ready to be started.
See “ Getting Started on Your Route ” later in this
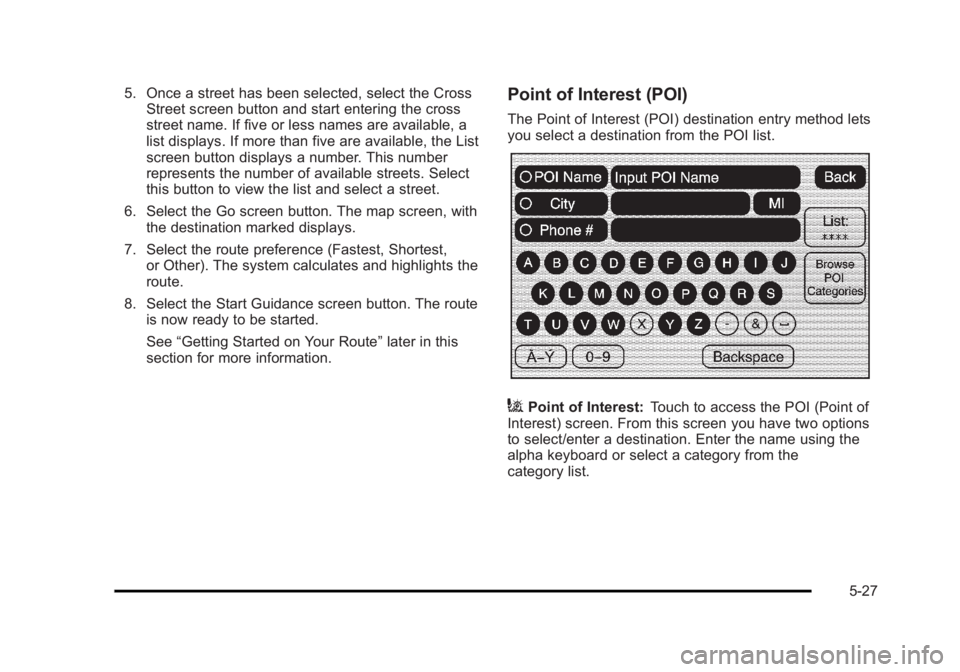
section for more information. Point of Interest (POI) The Point of Interest (POI) destination entry method lets
you select a destination from the POI list.
i Point of Interest: Touch to access the POI (Point of
Interest) screen. From this screen you have two options
to select/enter a destination. Enter the name using the
alpha keyboard or select a category from the
category list.
5-27
Page 330 of 620
Black plate (28,1)Cadillac Escalade/Escalade ESV Owner Manual - 2010
To use the point of interest destination entry method by
entering the name:
1. Press the DEST hard key.
2. Select the
i screen button.
3. Select the state/province screen button, if needed,
to change the current state or province. A list of all
of the available states and provinces appear.
Select the state or province.
4. Enter the POI name.
If five or less names are available, a list displays.
If more than five are available, the List screen
button displays a number. This number represents
the number of available POIs. Select this button to
view the list.
5. Select the Go screen button next to the POI. The
map screen, with the destination marked displays.
6. Select the route preference (Fastest, Shortest,
or Other). The system calculates and highlights the
route.
7. Select the Start Guidance screen button. The route
is now ready to be started.
See “ Getting Started on Your Route ” later in this
section for more information. To use the point of interest destination entry method by
selecting a category:
1. Press the DEST hard key.
2. Select the
i screen button.
3. Select the Browse POI Categories screen button to
view the list of POI categories.
4. Select a category.
The system displays available POI names in the
selected category.
5. Select the Go screen button next to the POI. The
map screen, with the destination marked displays.
6. Select the route preference (Fastest, Shortest,
or Other). The system calculates and highlights the
route.
7. Select the Start Guidance screen button. The route
is now ready to be started.
See “ Getting Started on Your Route ” later in this
section for more information.
5-28