2010 BMW Z4 SDRIVE30I instrument cluster
[x] Cancel search: instrument clusterPage 73 of 254

Controls
71Reference
At a glance
Driving tips
Communications
Navigation
Entertainment
Mobility
Entering deadlines for legally required
inspections*
Make sure the date on the Control Display is set
correctly, refer to page72; otherwise, the effec-
tiveness of CBS Condition Based Service is not
ensured.
1."Vehicle Info"
2."Vehicle status"
3."Service required"
4."§ Vehicle inspection"
5.Open the menu for entering the deadline.
6."Date:"
7.Create the settings.
8.Press the controller to apply the setting.
The year is highlighted.
9.Turn the controller to make the adjustment.
10.Press the controller to apply the setting.
The date entry is stored.
To exit from the menu:
Move the controller to the left.
More information on the BMW Maintenance
System can be found on page206.
Clock
Setting the time
In the instrument cluster
To set the 12h/24h mode, refer to Setting the
time format below.
1.Push button 1 in the turn indicator lever up
or down repeatedly until the appropriate
symbol appears in the display, accompa-
nied by the time and the word "SET".
2.Press button 2.
3.Use button 1 to set the hours.
4.Press button 2 to confirm the entry.
5.Use button 1 to set the minutes.
6.Press button 2 to confirm the entry.
7.Press button 2.
The system accepts the new time.
Via iDrive
1. Press the button.
The main menu is displayed.
Page 74 of 254

Controls overview
72 2."Settings"
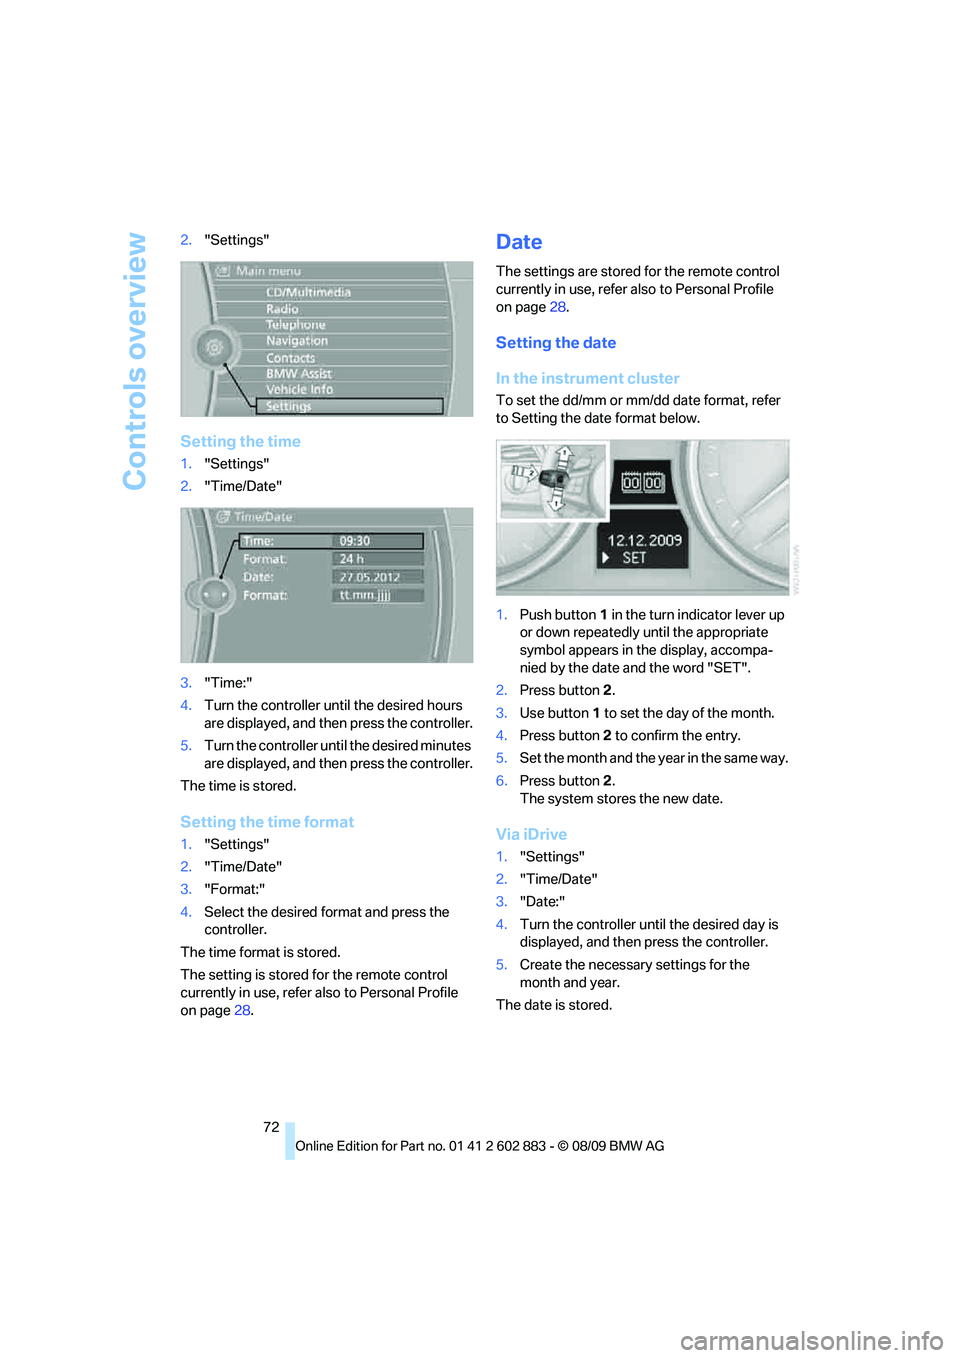
Setting the time
1."Settings"
2."Time/Date"
3."Time:"
4.Turn the controller until the desired hours
are displayed, and then press the controller.
5.Turn the controller until the desired minutes
are displayed, and then press the controller.
The time is stored.
Setting the time format
1."Settings"
2."Time/Date"
3."Format:"
4.Select the desired format and press the
controller.
The time format is stored.
The setting is stored for the remote control
currently in use, refer also to Personal Profile
on page28.
Date
The settings are stored for the remote control
currently in use, refer also to Personal Profile
on page28.
Setting the date
In the instrument cluster
To set the dd/mm or mm/dd date format, refer
to Setting the date format below.
1.Push button 1 in the turn indicator lever up
or down repeatedly until the appropriate
symbol appears in the display, accompa-
nied by the date and the word "SET".
2.Press button 2.
3.Use button 1 to set the day of the month.
4.Press button 2 to confirm the entry.
5.Set the month and the yea r i n t he s a m e w a y .
6.Press button 2.
The system stores the new date.
Via iDrive
1."Settings"
2."Time/Date"
3."Date:"
4.Turn the controller until the desired day is
displayed, and then press the controller.
5.Create the necessary settings for the
month and year.
The date is stored.
Page 75 of 254

Controls
73Reference
At a glance
Driving tips
Communications
Navigation
Entertainment
Mobility
Setting the date format
1."Settings"
2."Time/Date"
3."Format:"
4.Select the desired format.
The date format is stored.
Check Control
The concept
The Check Control monitors vehicle functions
and alerts you to any malfunctions in the sys-
tems monitored. A Check Control message
encompasses indicator and warning lamps in
the instrument cluster and may include an
acoustic signal and text messages on the Con-
trol Display.
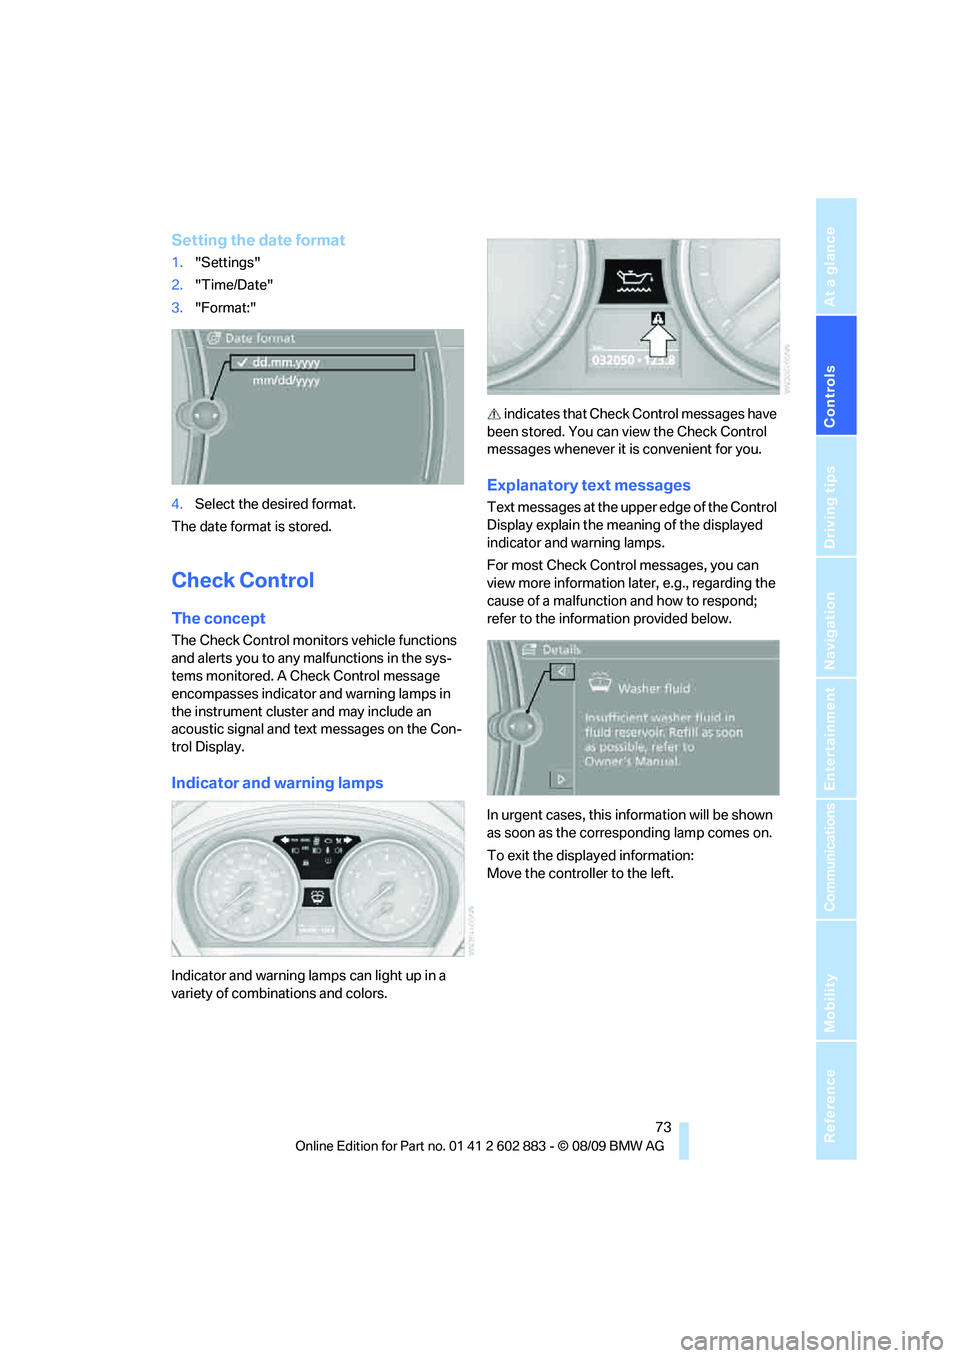
Indicator and warning lamps
Indicator and warning lamps can light up in a
variety of combinations and colors. indicates that Check Control messages have
been stored. You can view the Check Control
messages whenever it is convenient for you.
Explanatory text messages
Text messages at the upper edge of the Control
Display explain the meaning of the displayed
indicator and warning lamps.
For most Check Control messages, you can
view more information later, e.g., regarding the
cause of a malfunction and how to respond;
refer to the information provided below.
In urgent cases, this information will be shown
as soon as the corresponding lamp comes on.
To exit the displayed information:
Move the controller to the left.
Page 79 of 254

Controls
77Reference
At a glance
Driving tips
Communications
Navigation
Entertainment
Mobility
Technology for driving comfort and safety
Park Distance Control PDC*
The concept
The PDC assists you with maneuvering in tight
parking spaces. Acoustic signals and a visual
indicator
warn you of the presence of an object
in front of
* or behind your vehicle. To measure
the distance, there are four ultrasonic sensors
in either bumper.
These sensors have a range of approx. 6.5 ft/
2 m. However, an acoustic warning does not
sound until an object is approx. 24 in/60 cm
from the corner sensors, or approx. 5 ft/1.50 m
from the center sensors.
PDC is a parking aid that can indicate
objects when they are approached
slowly, as is usually the case when parking.
Avoid approaching an objec t a t h i g h s p e e d ; o t h -
erwise, physical circumstances may lead to the
system warning being issued too late.<
Switching on automatically
With the engine running or the ignition switched
on, the system is activated after approx. 1 sec-
ond when you engage reverse gear or move the
automatic transmission selector lever to
position R. Wait this short period before driving.
Switching off automatically
After approx. 165 ft/50 m of driving or above
approx. 20 mph or 30 km/h, the system
switches off and the LED goes out.
Signal tones
When nearing an object, its position is indicated
correspondingly by an interval tone. As the dis-
tance between vehicle and object decreases,
the intervals between the tones become
shorter. If the distance to the nearest object
falls to below roughly 1 ft/30 cm, then a contin-
uous tone sounds.
An interval tone is interrupted after approx.
3seconds>If you remain in front of an object that has
been detected by only one of the corner
sensors
>If you are driving parallel to a wall.
Malfunction
The indicator lamp in the instrument
cluster comes on. PDC is malfunc-
tioning. A message appears on the
Control Display.Have the system checked.
To avoid this problem, keep the sensors clean
and free of ice or snow in order to ensure that
they will continue to operate effectively. When
using a high-pressure cleaner, do not spray the
sensors for extended periods of time and only
from a distance of at least 12 in/30 cm.
PDC with visual warning
The approach of the vehicle to an object is
shown on the Control Display. Objects that are
farther away are displayed on the Control Dis-
play before a signal tone sounds. The display
appears on the Control Display as soon as PDC
is activated.
System limitations
Even with PDC, final responsibility for
estimating the distance between the
vehicle and any obstructions always remains
with the driver. Even when sensors are pro-
vided, there is a blind spot in which objects can
no longer be detected. The system is also sub-
ject to the physical limits that apply to all forms
of ultrasonic measurement, such as those
encountered with trailer towbars and hitches,
thin or wedge-shaped objects, etc. Low objects
that have already been displayed, e.g., curbs,
can disappear again from the detection area of
the sensors before or after a continuous tone
sounds. Higher, protruding objects, e.g.,
ledges, cannot be detected. Therefore, always
drive cautiously; otherwise, there is a risk of
personal injury or property damage.
Page 81 of 254

Controls
79Reference
At a glance
Driving tips
Communications
Navigation
Entertainment
Mobility
Dynamic Driving Control
The concept
Dynamic Driving Control can be used to adjust
the driving dynamics of the vehicle.
Several programs are available for this purpose;
they can be activated using the two Dynamic
Driving Control buttons.
The following characteristics are adapted,
depending on which program was selected:
>Engine response.
>Shift times of the automatic transmission
*.
>Power steering support
*.
>Changes in the suspension characteristics
through damping control
*.
>Vehicle stabilization through DSC Dynamic
Stability Control.
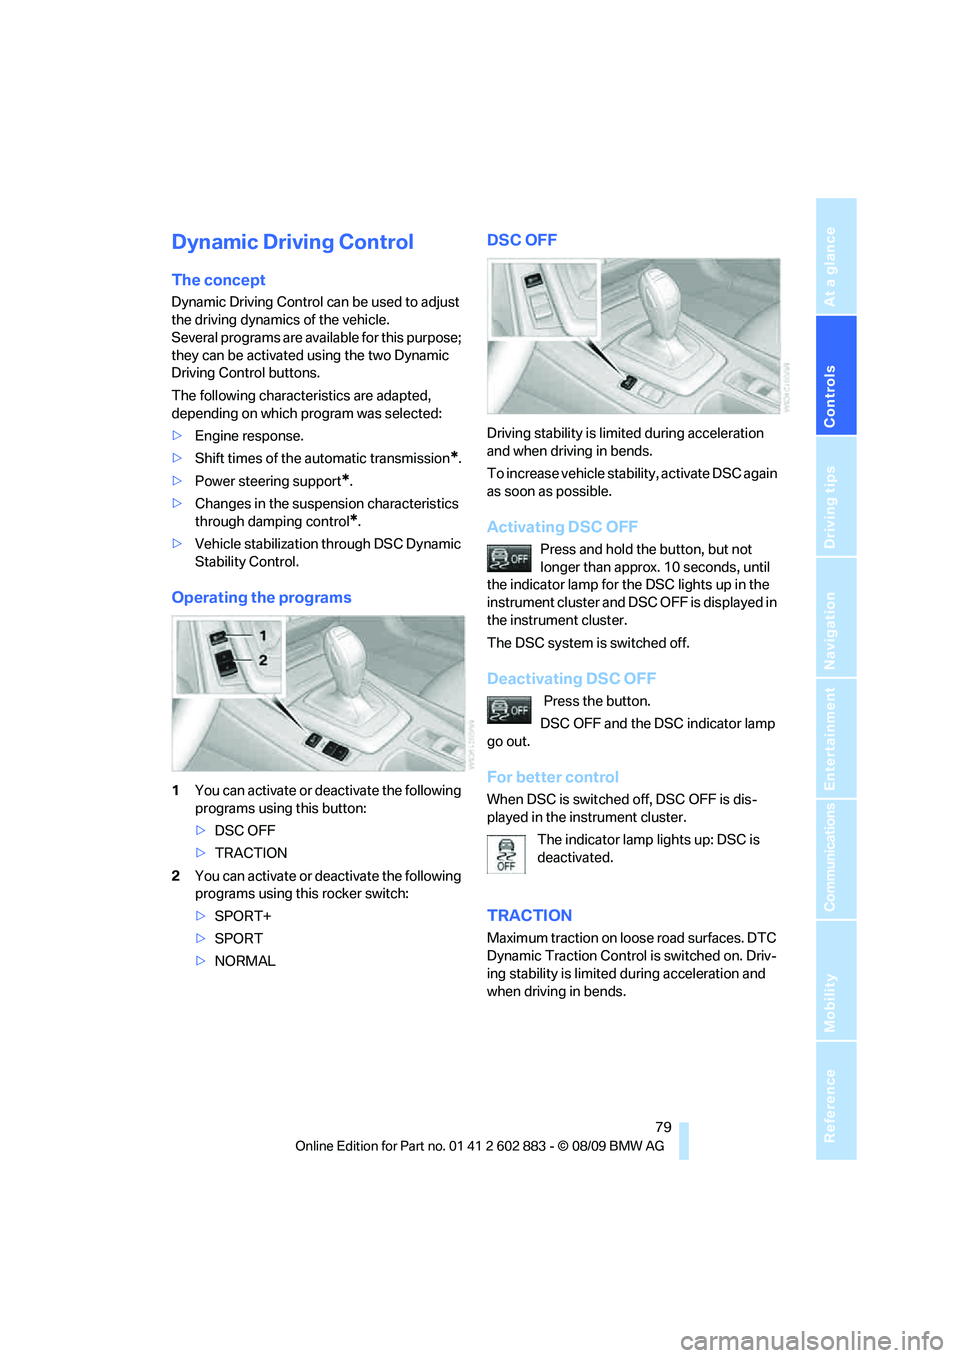
Operating the programs
1You can activate or deactivate the following
programs using this button:
>DSC OFF
>TRACTION
2You can activate or deactivate the following
programs using this rocker switch:
>SPORT+
>SPORT
>NORMAL
DSC OFF
Driving stability is limited during acceleration
and when driving in bends.
To increase vehicle stability, activate DSC again
as soon as possible.
Activating DSC OFF
Press and hold the button, but not
longer than approx. 10 seconds, until
the indicator lamp for the DSC lights up in the
instrument cluster and DSC OFF is displayed in
the instrument cluster.
The DSC system is switched off.
Deactivating DSC OFF
Press the button.
DSC OFF and the DSC indicator lamp
go out.
For better control
When DSC is switched off, DSC OFF is dis-
played in the instrument cluster.
The indicator lamp lights up: DSC is
deactivated.
TRACTION
Maximum traction on loose road surfaces. DTC
Dynamic Traction Control is switched on. Driv-
ing stability is limited during acceleration and
when driving in bends.
Page 82 of 254

Technology for driving comfort and safety
80
Activating TRACTION
Press the button.
TRACTION is displayed in the instru-
ment cluster.
The DSC indicator lamp in the instrument clus-
ter lights up.
Deactivating TRACTION
Press the button again.
TRACTION and the DSC indicator
lamp go out.
For better control
When DTC is switched on, TRACTION is dis-
played in the instrument cluster.
The indicator lamp lights up: DTC
Dynamic Traction Control is activated.
SPORT+
Sporty driving with a tight suspension and lim-
ited driving stabilization.
Dynamic Traction Control is switched on.
The driver handles several of the stabilization
tasks.
Activating SPORT+
Press the button repeatedly until
SPORT+ appears in the instrument
cluster and the DSC indicator lamp lights up.
For better control
SPORT+ is displayed in the instrument cluster.
The indicator lamp lights up: DTC
Dynamic Traction Control is activated.
SPORT
Consistently sporty tuning of the suspension
for greater driving agility with maximum driving
stabilization.
Activating SPORT
Press the button repeatedly until
SPORT+ appears in the instrument
cluster.
NORMAL
For a balanced tuning with maximum driving
stabilization.
Activating NORMAL
Press the button repeatedly until the
program display disappears in the
instrument cluster.
Displays in the instrument cluster
The selected program is displayed in the instru-
ment cluster.
Drive-off assistant
The drive-off assistant enables you to drive off
smoothly on uphill gradients. The parking brake
is not required.
1.Hold the car in place by depressing the
brake.
2.Release the brake and drive off without
delay.
The drive-off assistant holds the car in
place for approx. 2 seconds after the
brake is released. Drive off without delay after
releasing the brake. Because the drive-off
Page 92 of 254

Lamps
90
High beams/roadside parking
lamps
1High beams
2Headlamp flasher
3Roadside parking lamps
*
Roadside parking lamps, left or right*
There is an additional option of switching on the
lamps on the side of the car facing the road
when parked.
Switching on
After parking the vehicle, press the lever up or
down beyond the pressure point for a longer
period, arrow 3.
The roadside parking lamps drain the bat-
tery. Therefore, do not leave them on for
unduly long periods of time; otherwise, the bat-
tery might not have enough power to start the
engine.<
Switching off
Press the lever in the opposite direction to the
pressure point, arrow 3.
High-Beam Assistant*
The concept
This system automatically switches the high
beams on and off. The procedure is controlled
by a sensor on the front of the interior rearview
mirror. The assistant ensures that the high
beams are switched on whenever the traffic sit-uation allows. It handles this task for you and
gives you the benefit of the best possible view.
You can intervene at any time and switch the
high beams on and off as usual.
Activating the system
1.Turn the light switch to position3, refer
to page88.
2.With the low beams switched on, briefly
push the turn indicator lever in the direction
of the high beam.
The indicator lamp in the instrument
cluster lights up when the high beams
are activated. The system automati-
cally switches from high beams to low beams
and vice versa in response to oncoming traffic,
traffic ahead of you, and adequate ambient
lighting, e.g., on city streets.
Switching the high beams on and off
manually
Whenever you wish, or when the situation
requires, you can intervene:
>If the high-beam assistant switches on the
high beams, but you would like to drive with
the low beams, simply switch off the high
beams using the turn indicator lever. This
deactivates the high-beam assistant.
To reactivate the system, briefly push the
turn indicator lever toward the high beams
again.
>If the high-beam assistant switches on the
low beams, but you would like to drive with
the high beams, switch on the high beams
as usual. This deactivates the system and
the high beams need to be switched off
manually, if necessary.
To reactivate the system, briefly push the
turn indicator lever toward the high beams
again.
>Use the headlamp flasher as usual with the
low beams switched on.
Page 204 of 254

Under the hood
202
Important parts of the engine compartment
1Expansion tank for coolant, refer
to page204
2Jump-starting connection, negative termi-
nal, refer to page219
3Vehicle identification number4Washer fluid filler neck for headlamp clean-
ing system and window washer system,
refer to page61
5Fluid filler neck for engine oil, refer
to page204
6Jump-starting connection, positive termi-
nal, refer to page219
Engine oil
The engine oil consumption is dependent on
driving style and driving conditions.
Checking engine oil level
Your car is equipped with an electronic oil-level
monitor.
For the oil level to be measured and displayed
correctly, it is necessary that the engine be at
operating temperature, i.e., after uninterrupted
driving for at least approx. 6.2 miles/10 km. You
can have the oil level displayed while you are
driving, or while the vehicle is at a standstill on a
level surface and the engine is running.
Display in the instrument cluster
1.Push button 1 in the turn indicator lever up
or down repeatedly until the appropriate
symbol is shown in the display, accompa-
nied by the word "OIL".