2010 BMW Z4 SDRIVE30I rear entertainment
[x] Cancel search: rear entertainmentPage 99 of 254
Controls
97Reference
At a glance
Driving tips
Communications
Navigation
Entertainment
Mobility
Switching the cooling function on
and off
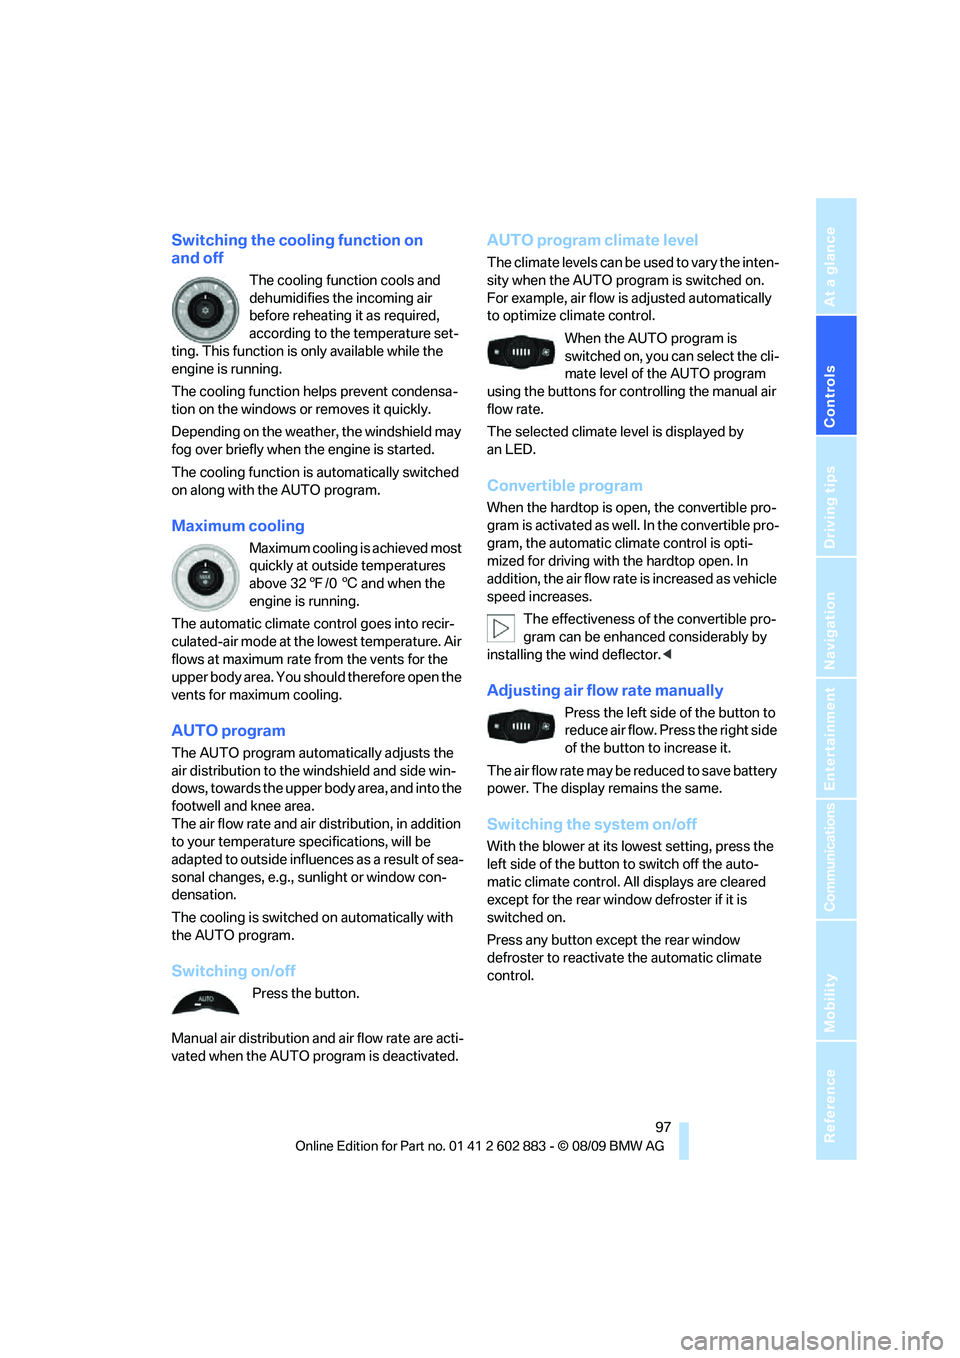
The cooling function cools and
dehumidifies the incoming air
before reheating it as required,
according to the temperature set-
ting. This function is only available while the
engine is running.
The cooling function helps prevent condensa-
tion on the windows or removes it quickly.
Depending on the weather, the windshield may
fog over briefly when the engine is started.
The cooling function is automatically switched
on along with the AUTO program.
Maximum cooling
Maximum cooling is achieved most
quickly at outside temperatures
above 327/06 and when the
engine is running.
The automatic climate control goes into recir-
culated-air mode at the lowest temperature. Air
flows at maximum rate from the vents for the
upper body area. You should therefore open the
vents for maximum cooling.
AUTO program
The AUTO program automatically adjusts the
air distribution to the windshield and side win-
dows, towards the upper body area, and into the
footwell and knee area.
The air flow rate and air distribution, in addition
to your temperature specifications, will be
adapted to outside influences as a result of sea-
sonal changes, e.g., sunlight or window con-
densation.
The cooling is switched on automatically with
the AUTO program.
Switching on/off
Press the button.
Manual air distribution and air flow rate are acti-
vated when the AUTO program is deactivated.
AUTO program climate level
The climate levels can be used to vary the inten-
sity when the AUTO program is switched on.
For example, air flow is adjusted automatically
to optimize climate control.
When the AUTO program is
switched on, you can select the cli-
mate level of the AUTO program
using the buttons for controlling the manual air
flow rate.
The selected climate level is displayed by
an LED.
Convertible program
When the hardtop is open, the convertible pro-
gram is activated as well. In the convertible pro-
gram, the automatic climate control is opti-
mized for driving with the hardtop open. In
addition, the air flow rate is increased as vehicle
speed increases.
The effectiveness of the convertible pro-
gram can be enhanced considerably by
installing the wind deflector.<
Adjusting air flow rate manually
Press the left side of the button to
reduce air flow. Press the right side
of the button to increase it.
The air flow rate may be reduced to save battery
power. The display remains the same.
Switching the system on/off
With the blower at its lowest setting, press the
left side of the button to switch off the auto-
matic climate control. All displays are cleared
except for the rear window defroster if it is
switched on.
Press any button except the rear window
defroster to reactivate the automatic climate
control.
Page 115 of 254
Driving tips
113Reference
At a glance
Controls
Communications
Navigation
Entertainment
Mobility
Drive defensively
Avoid unnecessary acceleration and braking
maneuvers. To do so, keep an adequate
distance to the forward vehicle. A defensive
and smooth driving style keeps fuel consump-
tion down.
Avoid high engine speeds
Only use first gear when setting off. In second
and higher gears, accelerate without hesitation
or pauses. When accelerating, shift up before
reaching high engine speeds.
When you reach the desired speed, shift into
the highest applicable gear and drive with the
engine speed as low as possible and at a con-
stant speed.
As a rule: driving at low engine speeds lowers
fuel consumption and reduces wear.
Coasting
When approaching a red light, take your foot off
the accelerator and coast to a stop in the high-
est applicable gear.
On a downhill slope, take your foot off the accel-
erator and coast in a suitable gear.
The fuel supply is interrupted when coasting.
Switch off the engine during lengthy
stops
Switch off the engine when stopping for lengthy
periods, e.g., at traffic lights, railroad crossings
or in traffic congestion. You achieve fuel sav-
ings even if standing time is as short as approx.
4 seconds.
Switch off functions you do not need at
the moment
Functions such as the air conditioner and the
seat or rear window heating draw large amounts
of power and consume additional fuel. Espe-
cially in city traffic and in stop-and-go driving
they have a considerable impact. Therefore,
switch these functions off when they are not
really needed.
Have the vehicle serviced
Have the vehicle serviced regularly to achieve
good economy and a long vehicle life. BMW
recommends having the vehicle serviced at a
BMW center. Also note the BMW service sys-
tem, refer to page206.
General driving notes
Close the luggage compartment lid
Operate the vehicle only when the lug-
gage compartment lid is closed. Other-
wise, exhaust fumes could enter the interior of
the vehicle.<
If the vehicle must be driven with the luggage
compartment lid open:
1.Close all windows.
2.Greatly increase the air volume of the
automatic climate control system, refer
to page97.
Hot exhaust system
In all vehicles, extremely high tempera-
tures are generated in the exhaust sys-
tem. Do not remove the heat shields installed
adjacent to various sections of the exhaust sys-
tem, and never apply undercoating to them.
When driving, standing at idle and while park-
ing, take care to avoid possible contact
between the hot exhaust system and any highly
flammable materials such as hay, leaves, grass,
etc. Such contact could lead to a fire, with the
risk of serious personal injuries and property
damage. Do not touch hot exhaust tail pipes.
Otherwise, there is a risk of burns.<
Hydroplaning
When driving on wet or slushy roads,
reduce road speed. If you do not, a wedge
of water can form between tires and road sur-
face. This situation, known as hydroplaning,
means that the tire can completely lose contact
with the road surface, so that neither the car can
be steered nor the brake be properly applied.<
Page 131 of 254
Navigation
Driving tips
129Reference
At a glance
Controls
Communications
Entertainment
Mobility
3.Enter the letters.
4."OK"
The trip is stored in the trip list under the
entered name.
Starting a stored trip
1."Navigation"
2."Stored trips"
3.Select the desired trip.
4."Start guidance"
Changing trips
Changing the trip direction
Intermediate destinations can be displayed in
reverse order after destination guidance is
started.
1."Map"
2."Guidance"
3.Open "Options".
4."Reverse order of trip dest."
Rearranging the intermediate
destinations
1."Map"
2."Guidance"
3."Display all trip dest."
4.Select an intermediate destination.
5."Reposition dest. in the trip"
Deleting an intermediate destination
1."Map"
2."Guidance"
3."Display all trip dest."
4.Select an intermediate destination.
5."Delete dest. in the trip"
Deleting a trip
1."Navigation"
2."Stored trips"
3.Select the desired trip.
4.Open "Options".
5."Delete all trips" or "Delete trip".
Word-matching principle
The system's word-matching principle makes it
easier for you to enter the names of towns or
streets. The system runs ongoing checks, com-
paring your destination entries with the data
stored in the vehicle as the basis for instant
response. The benefits for you include:
>Names of towns entered may differ from the
official versions if you are using a spelling
that is customary in another country.
Example:
Instead of the German spelling "München"
you can also enter the English spelling
"Munich" or the Italian spelling "Monaco".
>When you are entering the names of towns
and streets the system will complete them
automatically as soon as enough letters are
available to ensure unambiguous identifi-
cation.
>The system offers only those letters for
selection of name entries that are stored in
the vehicle. Thus, entry of erroneous or
unregistered names is impossible.
Page 143 of 254
Navigation
Entertainment
Driving tips
141Reference
At a glance
Controls
Communications
Mobility
Treble, bass, balance, fader
>"Balance": left/right volume distribution
>"Fader": front/rear volume distribution
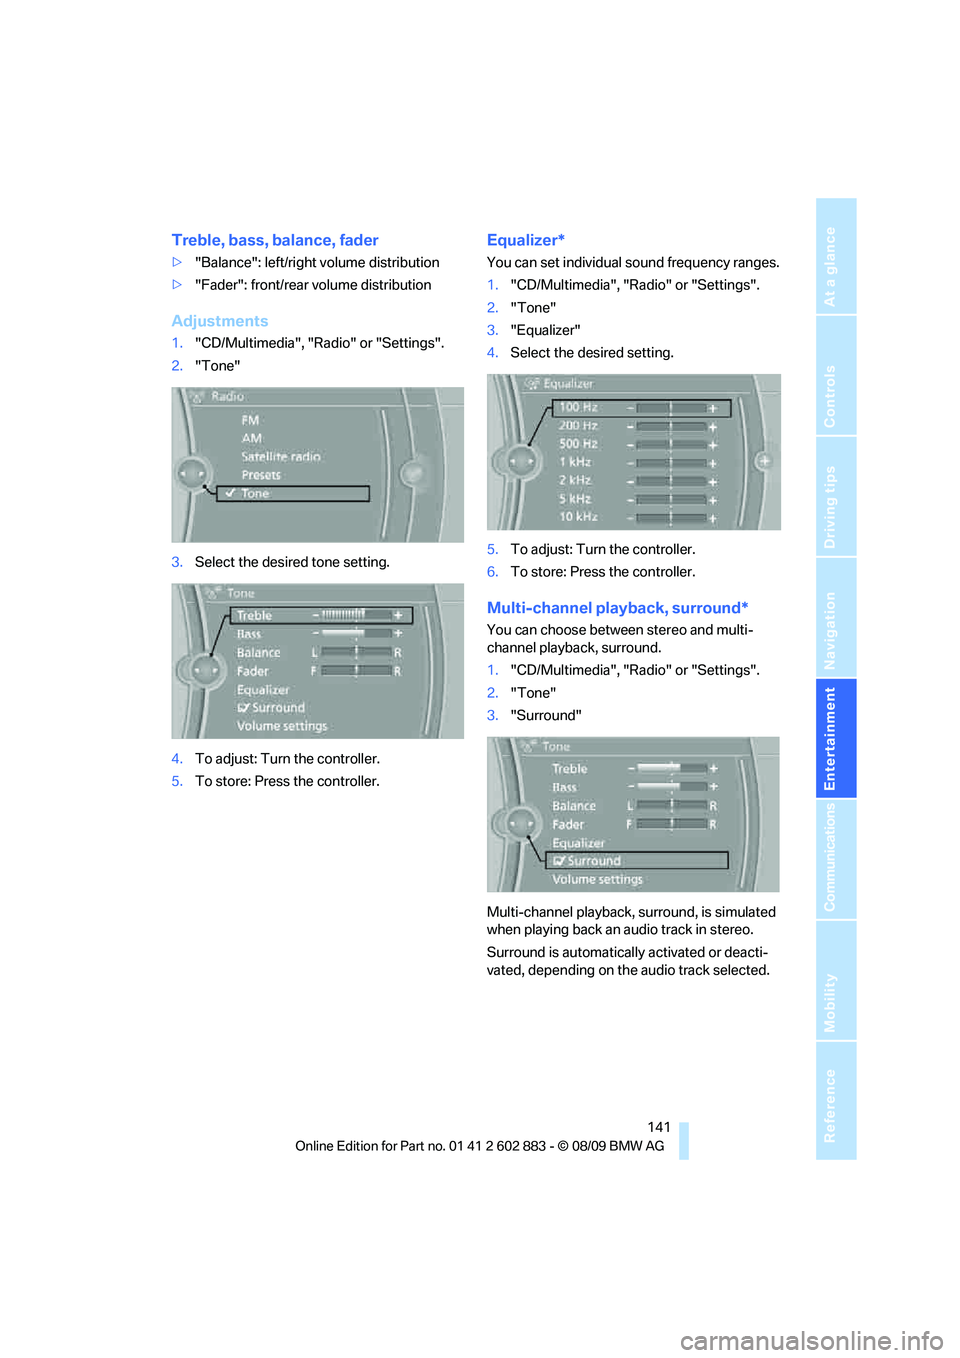
Adjustments
1."CD/Multimedia", "Radio" or "Settings".
2."Tone"
3.Select the desired tone setting.
4.To adjust: Turn the controller.
5.To store: Press the controller.
Equalizer*
You can set individual sound frequency ranges.
1."CD/Multimedia", "Radio" or "Settings".
2."Tone"
3."Equalizer"
4.Select the desired setting.
5.To adjust: Turn the controller.
6.To store: Press the controller.
Multi-channel playback, surround*
You can choose between stereo and multi-
channel playback, surround.
1."CD/Multimedia", "Radio" or "Settings".
2."Tone"
3."Surround"
Multi-channel playback, surround, is simulated
when playing back an audio track in stereo.
Surround is automatically activated or deacti-
vated, depending on the audio track selected.
Page 197 of 254
Mobility
195Reference
At a glance
Controls
Driving tips
Communications
Navigation
Entertainment
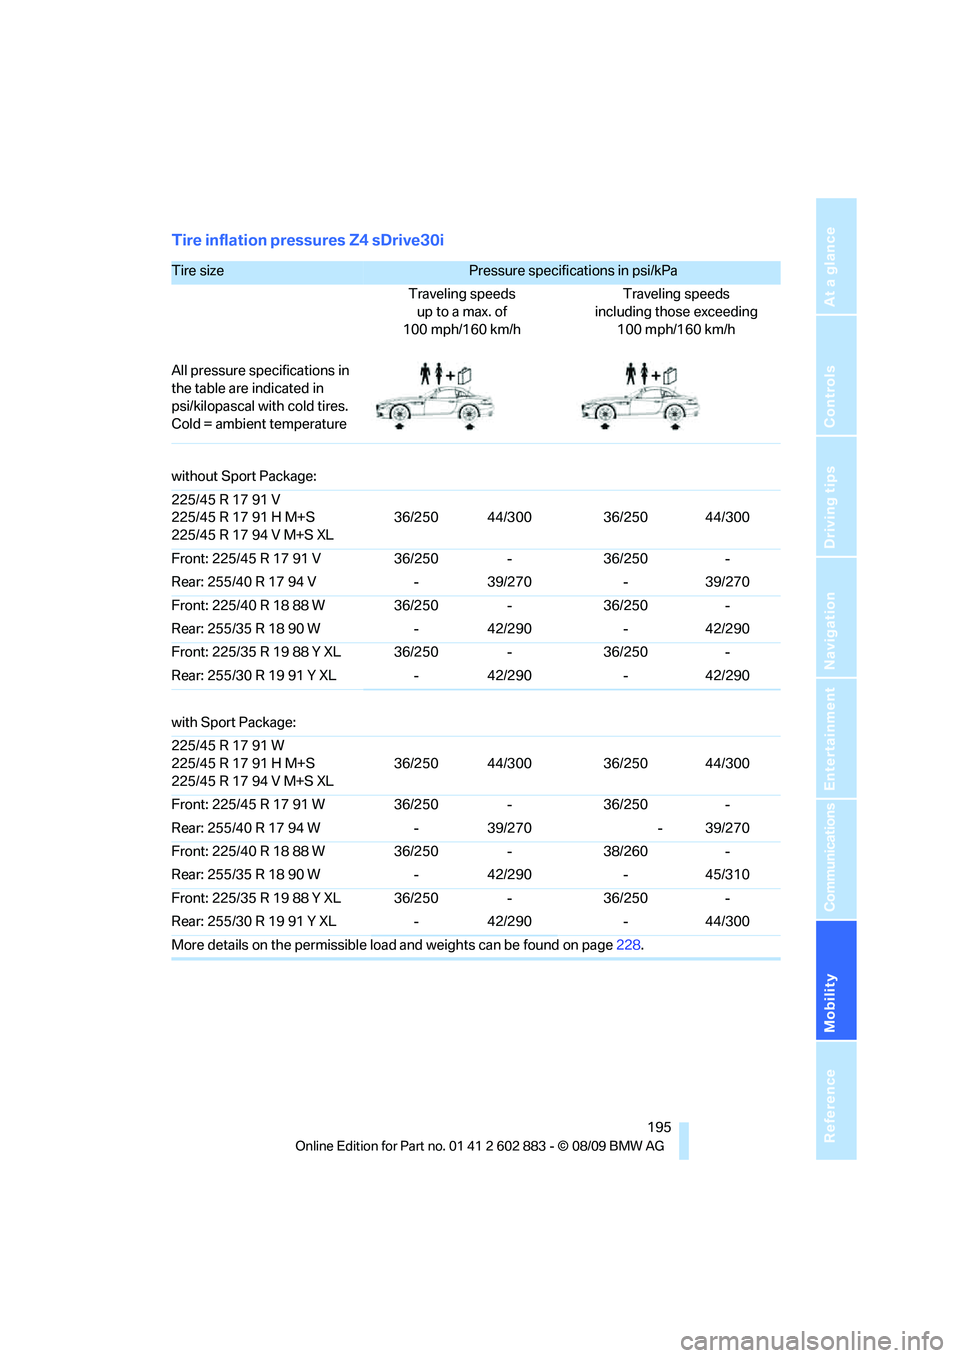
Tire inflation pressures Z4 sDrive30i
Tire size Pressure specifications in psi/kPa
Traveling speeds
up to a max. of
100 mph/160 km/hTraveling speeds
including those exceeding
100 mph/160 km/h
All pressure specifications in
the table are indicated in
psi/kilopascal with cold tires.
Cold = ambient temperature
without Sport Package:
225/45 R 17 91 V
225/45 R 17 91 H M+S
225/45 R 17 94 V M+S XL36/250 44/300 36/250 44/300
Front: 225/45 R 17 91 V 36/250 - 36/250 -
Rear: 255/40 R 17 94 V - 39/270 - 39/270
Front: 225/40 R 18 88 W 36/250 - 36/250 -
Rear: 255/35 R 18 90 W - 42/290 - 42/290
Front: 225/35 R 19 88 Y XL 36/250 - 36/250 -
Rear: 255/30 R 19 91 Y XL - 42/290 - 42/290
with Sport Package:
225/45 R 17 91 W
225/45 R 17 91 H M+S
225/45 R 17 94 V M+S XL36/250 44/300 36/250 44/300
Front: 225/45 R 17 91 W 36/250 - 36/250 -
Rear: 255/40 R 17 94 W - 39/270 - 39/270
Front: 225/40 R 18 88 W 36/250 - 38/260 -
Rear: 255/35 R 18 90 W - 42/290 - 45/310
Front: 225/35 R 19 88 Y XL 36/250 - 36/250 -
Rear: 255/30 R 19 91 Y XL - 42/290 - 44/300
More details on the permissible load and weights can be found on page228.
Page 211 of 254

Mobility
209Reference
At a glance
Controls
Driving tips
Communications
Navigation
Entertainment
7-gear sport automatic transmission
with dual clutch
Before driving into an automatic car wash, per-
form the following steps to ensure that the vehi-
cle can roll:
1.Insert the remote control, even with Com-
fort Access, into the ignition lock.
2.Engage transmission position N.
3.Release the parking brake.
4.Switch off the engine.
5.Leave the remote control in the ignition lock
so that the vehicle can roll.
Transmission position P is engaged:
>Automatically after approx. 30 minutes
>When you take the remote control out of the
ignition lock
Steam jets / high-pressure washers
When using steam jets or high-pressure
washers, ensure that you maintain suffi-
cient clearance to the vehicle and do not exceed
a temperature of 1407/606.
Insufficient clearance or excessive pressure or
temperature can lead to component damage or
water penetration. Follow the operating instruc-
tions of the high-pressure washer.<
When using high-pressure washers, do
not spray against the seals of the retract-
able hardtop, the sensors and the cameras, e.g.,
of the Park Distance Control or Rear View Cam-
era, for an extended period and maintain a dis-
tance of at least 12 in/30 cm.<
Manual car wash
When washing the vehicle by hand, use large
quantities of water and car shampoo if neces-
sary. Clean the vehicle with a sponge or wash-
ing brush, applying light pressure only.
Before cleaning the windshield, deacti-
vate the rain sensor or switch off the igni-
tion to prevent unintentional activation of the
wipers.<
Observe local regulations pertaining to
washing vehicles by hand.<
Headlamps
Do not rub them dry and do not use abrasive or
corrosive cleaning agents.
Loosen dirt, e.g., insects, with shampoo or
insect remover and wash away with copious
quantities of water.
Thaw ice with a windshield deicer and do not
use an ice scraper.
Windows
Clean the inside and outside surfaces of the
windows and the mirrors with window cleaner.
Do not clean the mirrors with cleaners
containing quartz.<
Retractable hardtop
Proceed as you would in a normal car wash.
When you open a wet hardtop, water
drops may run into the cargo area. If nec-
essary, remove items from the cargo area
beforehand to avoid water stains or soiling.<
Paintwork care
Regular care contributes to value retention and
protects the paintwork against the long-term
effects of damaging substances.
Region-specific environmental influences can
damage the vehicle paintwork. Therefore, it is
important to adapt the frequency and scope of
car care accordingly.
Immediately remove aggressive materials such
as spilled fuel, oil, grease, brake fluid, tree sap
or bird droppings to prevent damage to the
paintwork.
Repairing paintwork damage
Immediately repair scratches or similar
damage, such as that caused by stones
hitting the vehicle, where necessary to prevent
rusting.<
BMW recommends having paintwork damage
repaired by a professional paint repair work-
shop according to BMW specifications using
original BMW paint materials.
Page 217 of 254

Mobility
215Reference
At a glance
Controls
Driving tips
Communications
Navigation
Entertainment
2.Pull out the bulb holder, see arrow, and
change the bulb.
3.Attach the bulb holder.
4.Reattach the cover.
License plate lamp, rear lamp, center
brake lamp and turn signal
These lamps use LED technology for operation.
In the event of a malfunction, please contact
your BMW center or a workshop that works
according to BMW repair procedures with cor-
respondingly trained personnel.
Changing wheels
Your BMW is equipped with run-flat tires as
standard. This removes the need to change a
wheel immediately in the event of a puncture.
For information on continuing to drive with a
damaged tire, refer to Indication of a flat tire
on page81.
The symbol identifying run-flat tires is a circle
with the letters RSC on the sidewall, refer to
Run-flat tires, page199.
When mounting new tires or changing over
from summer to winter tires and vice versa,
mount run-flat tires for your own safety. In the
event of a flat, no spare wheel is available. Your
BMW center will be glad to advise you. Refer
also to New wheels and tires, page199.
The tools for changing wheels are avail-
able as optional accessories from your
BMW center.<
Jack mounting points
The jacking points are at the positions shown in
the illustration.
Lug bolt lock*
1Lug bolt for adapter
2Adapter, in onboard vehicle tool kit
Removing the wind deflector
1.Remove the adapter 2 from the onboard
vehicle tool kit and insert it in the lug bolt.
2.Unscrew the lug bolt1.
Remove the adapter after screwing the lug bolt
back on.
The code number is stamped on the front of the
adapter. Please note down this number and
keep it in a safe place in case the adapter should
get lost.
Page 223 of 254

Mobility
221Reference
At a glance
Controls
Driving tips
Communications
Navigation
Entertainment
Rear
Release the cover panel in the bumper:
Press on the recess at the bottom center in the
cover panel.
Being towed
Make sure that the ignition is switched on,
refer to page50; otherwise, the low-beam
headlamps, tail lamps, turn signal indicators and
windshield wipers may be unavailable.
If the electrical system fails, do not tow-start or
tow the vehicle. The electrical steering wheel
lock cannot be released and the vehicle cannot
be steered. Jump-starting, refer to page219.
Power steering assistance is not available when
the engine is not running. Thus, braking and
steering will require increased effort.<
Manual transmission
Gearshift lever in neutral position.
Automatic transmission
Selector lever in position N.
Changing selector lever positions, refer
to page54.
Do not exceed a towing speed of 31 mph
or 50 km/h and a towing distance of
31 miles/50 km; otherwise, the automatic
transmission may be damaged.<
7-gear sport automatic transmission
with dual clutch
Ensure that transmission lock P is not
engaged as the rear wheels will otherwise
be blocked.
When using the car wash function, refer to
page209, note that the parking lock P is
engaged automatically after approx. 30 min-
utes, blocking the rear wheels.
If an electrical malfunction occurs or if towing
takes longer than approx. 20 minutes, manually
release the parking lock, refer to page58.<
Do not exceed a towing speed of 31 mph
or 50 km/h and a towing distance of
31 miles/50 km; otherwise, the 7-gear sport
automatic transmission may be damaged.<
Towing methods
Do not lift the vehicle by a tow fitting or
body and chassis parts; otherwise, dam-
age may result.<
With a tow bar
The towing vehicle must not be lighter
than the towed vehicle; otherwise, it may
be impossible to maintain control.<
The tow fittings used should be on the same
side on both vehicles. Should it prove impossi-
ble to avoid mounting the tow bar at an angle,
please observe the following:
>Clearance and maneuvering capability will
be sharply limited during cornering.
>The tow bar will generate lateral forces if it is
attached offset.
Attach the tow bar to the tow fittings only,
as attaching it to other parts of the vehicle
could result in damage.<