2010 BMW Z4 ROADSTER SDRIVE35I fold seats
[x] Cancel search: fold seatsPage 42 of 254
Opening and closing
40
Installation
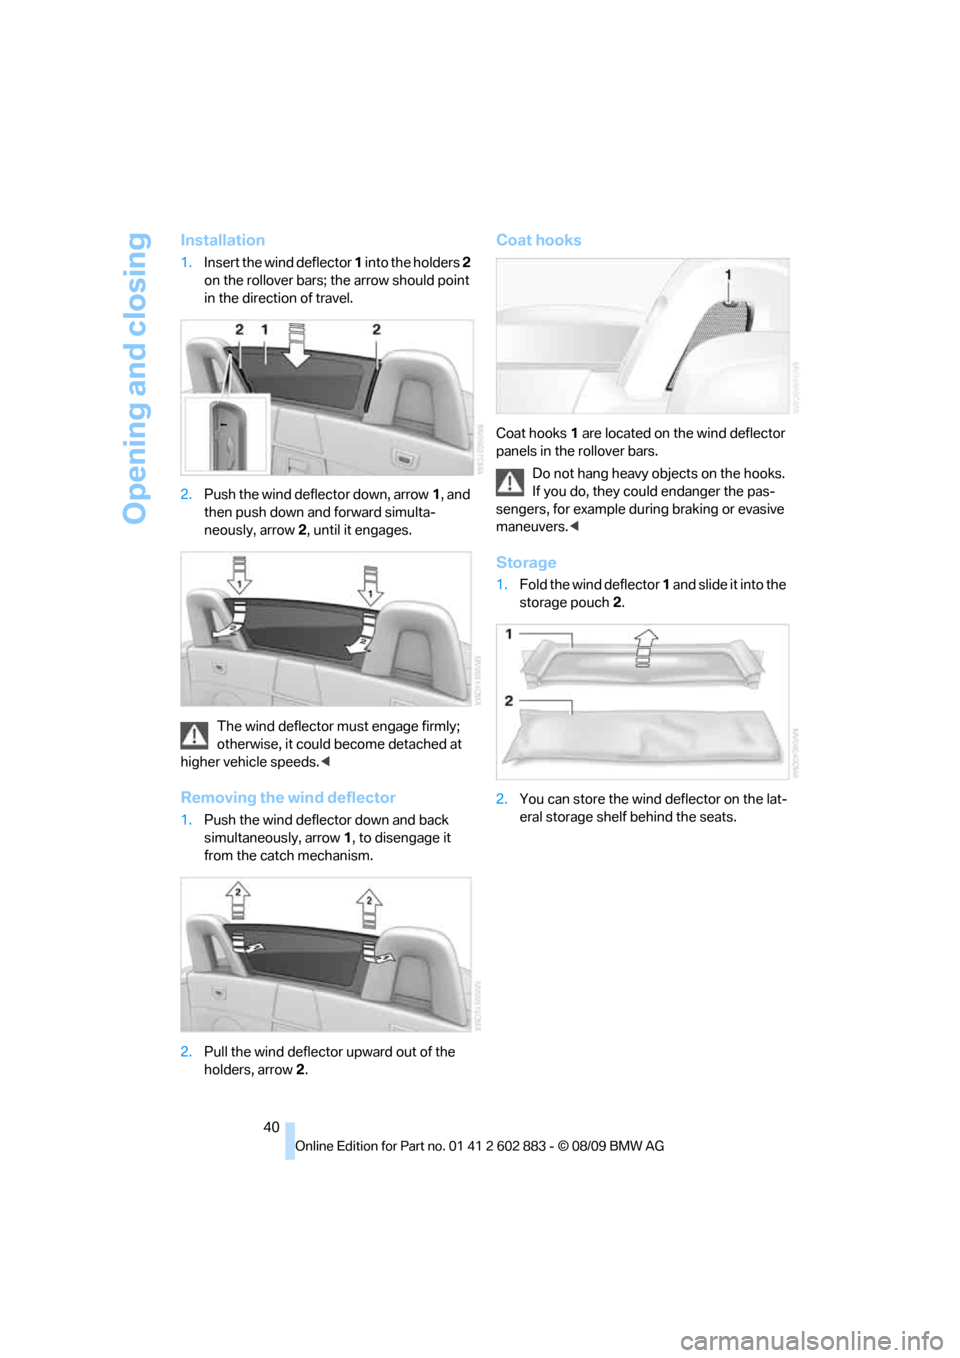
1.Insert the wind deflector 1 into the holders 2
on the rollover bars; the arrow should point
in the direction of travel.
2.Push the wind deflector down, arrow1, and
then push down and forward simulta-
neously, arrow 2, until it engages.
The wind deflector must engage firmly;
otherwise, it could become detached at
higher vehicle speeds.<
Removing the wind deflector
1.Push the wind deflector down and back
simultaneously, arrow 1, to disengage it
from the catch mechanism.
2.Pull the wind deflector upward out of the
holders, arrow 2.
Coat hooks
Coat hooks1 are located on the wind deflector
panels in the rollover bars.
Do not hang heavy objects on the hooks.
If you do, they could endanger the pas-
sengers, for example during braking or evasive
maneuvers.<
Storage
1.Fold the wind deflector 1 and slide it into the
storage pouch 2.
2.You can store the wind deflector on the lat-
eral storage shelf behind the seats.
Page 107 of 254
Controls
105Reference
At a glance
Driving tips
Communications
Navigation
Entertainment
Mobility
Removing the storage compartment
The storage compartment can be removed
completely to be able to use other inserts, for
example.
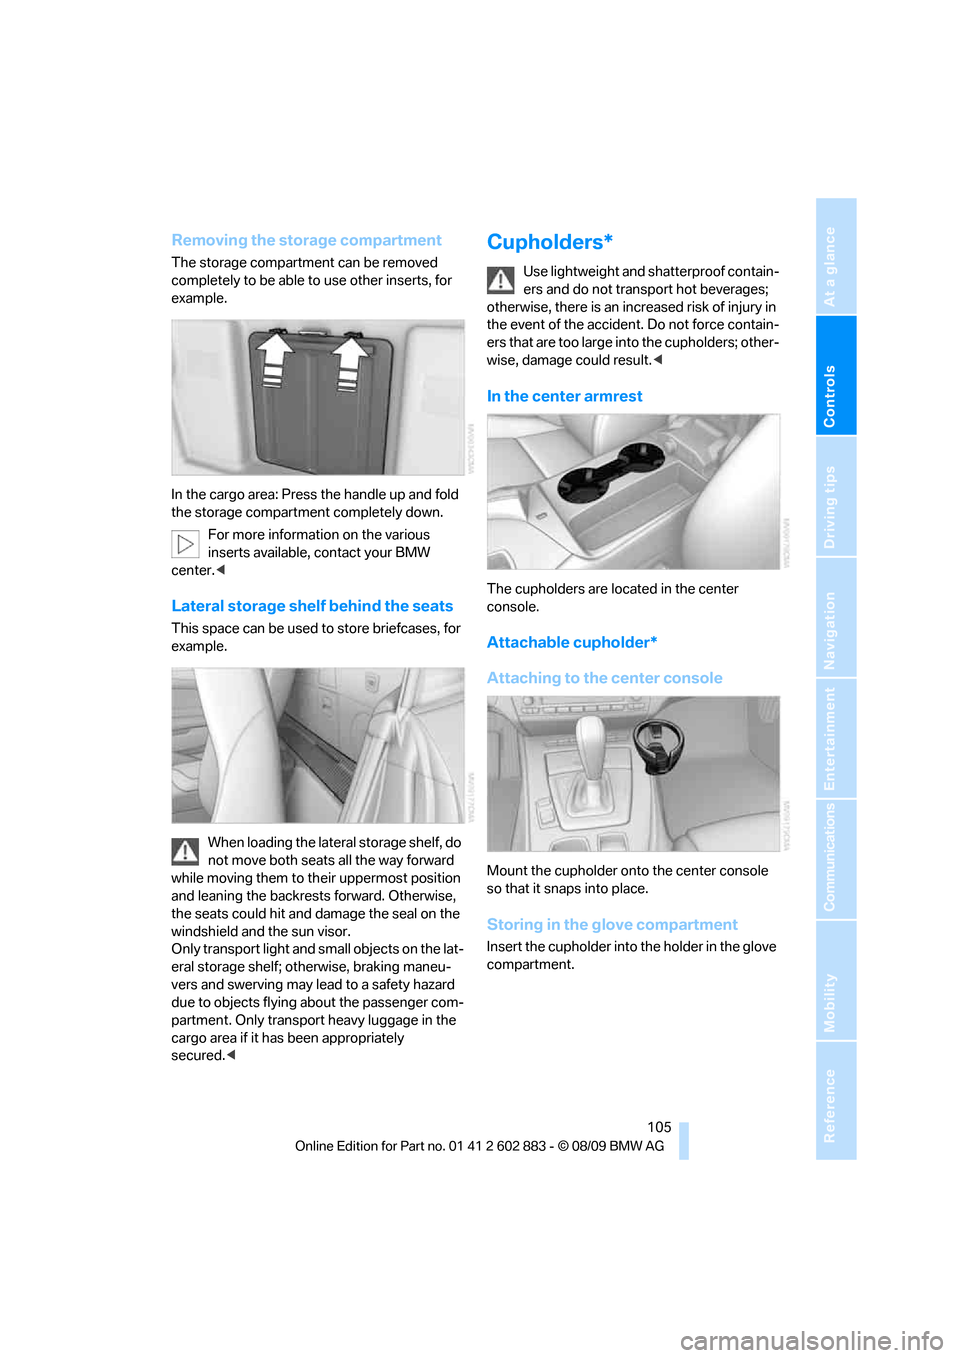
In the cargo area: Press the handle up and fold
the storage compartment completely down.
For more information on the various
inserts available, contact your BMW
center.<
Lateral storage shelf behind the seats
This space can be used to store briefcases, for
example.
When loading the lateral storage shelf, do
not move both seats all the way forward
while moving them to their uppermost position
and leaning the backrests forward. Otherwise,
the seats could hit and damage the seal on the
windshield and the sun visor.
Only transport light and small objects on the lat-
eral storage shelf; otherwise, braking maneu-
vers and swerving may lead to a safety hazard
due to objects flying about the passenger com-
partment. Only transport heavy luggage in the
cargo area if it has been appropriately
secured.<
Cupholders*
Use lightweight and shatterproof contain-
ers and do not transport hot beverages;
otherwise, there is an increased risk of injury in
the event of the accident. Do not force contain-
ers that are too large into the cupholders; other-
wise, damage could result.<
In the center armrest
The cupholders are located in the center
console.
Attachable cupholder*
Attaching to the center console
Mount the cupholder onto the center console
so that it snaps into place.
Storing in the glove compartment
Insert the cupholder into the holder in the glove
compartment.
Page 109 of 254
Controls
107Reference
At a glance
Driving tips
Communications
Navigation
Entertainment
Mobility
Loading
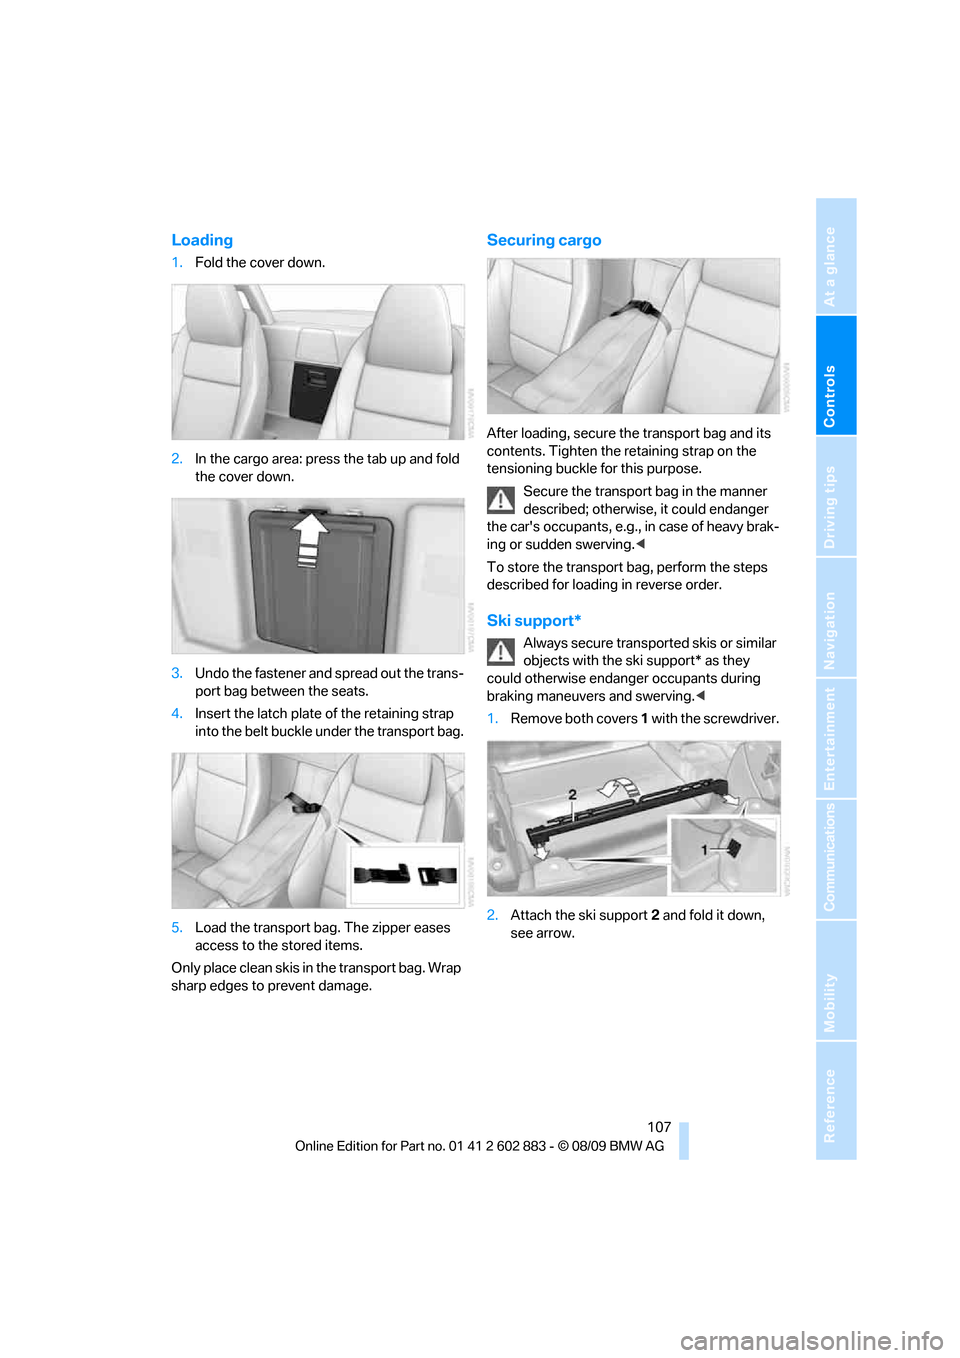
1.Fold the cover down.
2.In the cargo area: press the tab up and fold
the cover down.
3.Undo the fastener and spread out the trans-
port bag between the seats.
4.Insert the latch plate of the retaining strap
into the belt buckle under the transport bag.
5.Load the transport bag. The zipper eases
access to the stored items.
Only place clean skis in the transport bag. Wrap
sharp edges to prevent damage.
Securing cargo
After loading, secure the transport bag and its
contents. Tighten the retaining strap on the
tensioning buckle for this purpose.
Secure the transport bag in the manner
described; otherwise, it could endanger
the car's occupants, e.g., in case of heavy brak-
ing or sudden swerving.<
To store the transport bag, perform the steps
described for loading in reverse order.
Ski support*
Always secure transported skis or similar
objects with the ski support* as they
could otherwise endanger occupants during
braking maneuvers and swerving.<
1.Remove both covers 1 with the screwdriver.
2.Attach the ski support2 and fold it down,
see arrow.
Page 118 of 254
Things to remember when driving
116
Load
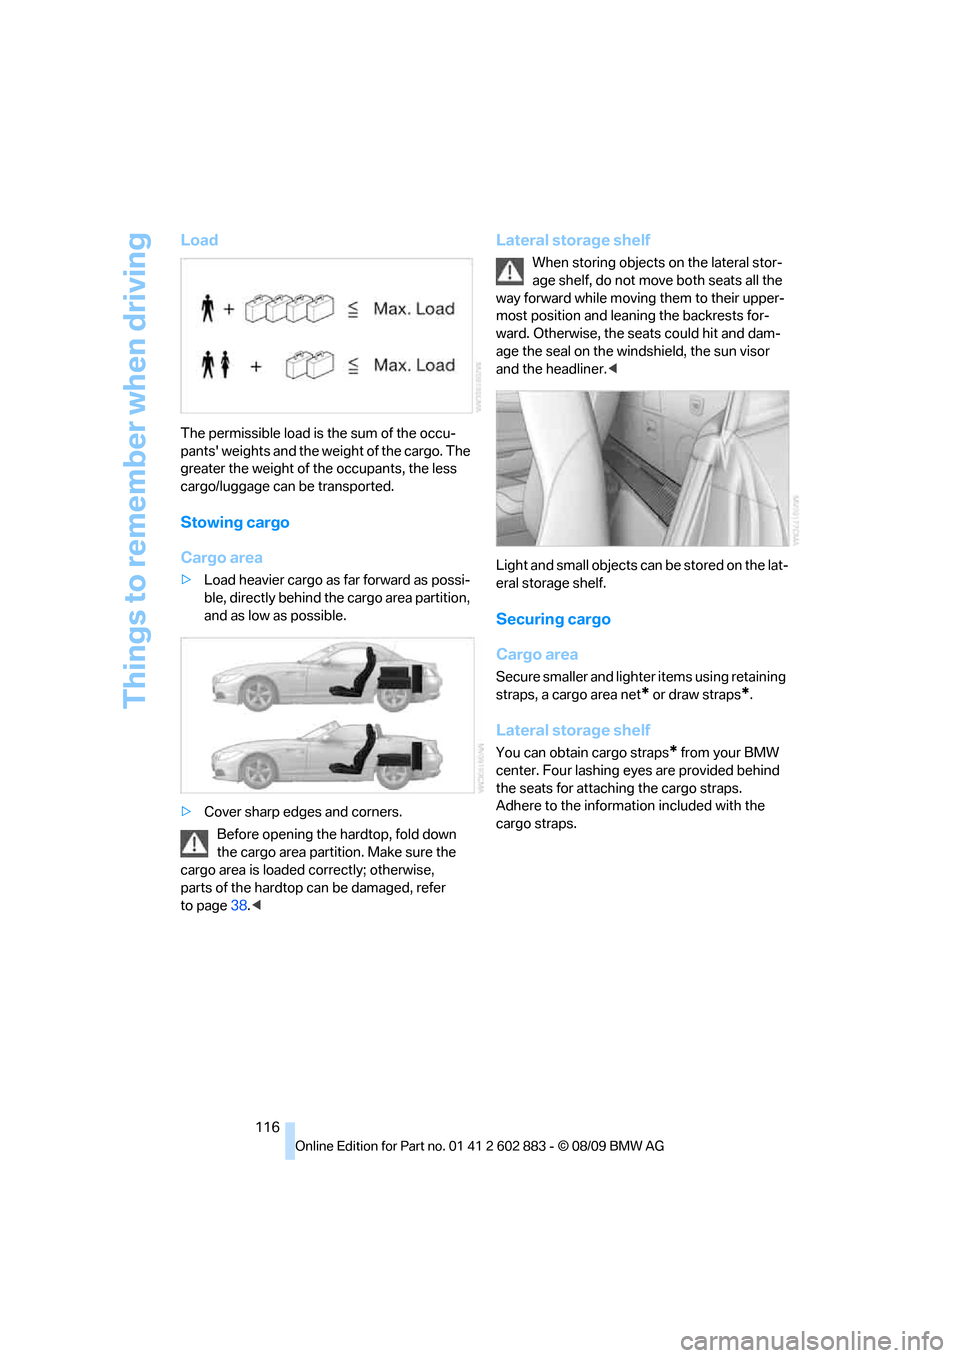
The permissible load is the sum of the occu-
pants' weights and the weight of the cargo. The
greater the weight of the occupants, the less
cargo/luggage can be transported.
Stowing cargo
Cargo area
>Load heavier cargo as far forward as possi-
ble, directly behind the cargo area partition,
and as low as possible.
>Cover sharp edges and corners.
Before opening the hardtop, fold down
the cargo area partition. Make sure the
cargo area is loaded correctly; otherwise,
parts of the hardtop can be damaged, refer
to page38.<
Lateral storage shelf
When storing objects on the lateral stor-
age shelf, do not move both seats all the
way forward while moving them to their upper-
most position and leaning the backrests for-
ward. Otherwise, the seats could hit and dam-
age the seal on the windshield, the sun visor
and the headliner.<
Light and small objects can be stored on the lat-
eral storage shelf.
Securing cargo
Cargo area
Secure smaller and lighter items using retaining
straps, a cargo area net
* or draw straps*.
Lateral storage shelf
You can obtain cargo straps* from your BMW
center. Four lashing eyes are provided behind
the seats for attaching the cargo straps.
Adhere to the information included with the
cargo straps.
Page 212 of 254
Care
210
Preservation
A preservation treatment is necessary when
water no longer beads off the clean paintwork
surface. Only use products for paintwork pres-
ervation that contain carnauba or synthetic
waxes.
Rubber seals
Treat only with water or rubber care products.
Do not use silicon-containing care prod-
ucts on rubber seals; otherwise, noise
and damage could occur.<
Chrome parts
Carefully clean vehicle parts, such as the radia-
tor grill, door handles or window frames, with
copious quantities of water and a shampoo
additive. For additional treatment, use a chrome
polish.
Light-alloy wheels
For technical reasons, dust is generated during
braking that is deposited on the light-alloy
wheels. Remove the dust regularly using acid-
free rim cleaner.
Do not use aggressive, acidic, strongly
alkaline and abrasive cleaning agents or
steam jets over 1407/606; otherwise, dam-
age may occur.<
Outside sensors / cameras
Keep the sensors and cameras on the
outside of the vehicle, e.g., those of Park
Distance Control, clean and free of ice to ensure
that they remain fully functional.<
Interior care
Upholstery fabrics/cloth trims/
Alcantara fabrics
Vacuum regularly with a vacuum cleaner to
remove superficial dirt.
To remove severe spots such as stains from
beverages, use a soft sponge or lint-free
microfiber cloth and suitable interior cleaners.
Follow the instructions on the packaging.Clean the upholstery down to the seams
using a sweeping motion. Avoid strong
rubbing.<
Opened Velcro fasteners, etc., on pants
or other articles of clothing can damage
the seat covers. Ensure that Velcro fasteners
are closed.<
Leather/leather trim
The leather used by BMW is a high quality
natural product. Slight irregularities in the
leather are a typical characteristic of natural
leather.<
Dust and road grit in the pores and folds of the
leather have an abrasive effect, leading to
increased wear and causing the leather surface
to become brittle prematurely. Therefore, regu-
larly dust the leather with a cloth, for example.
Clean light-colored leather more frequently as
dust and dirt are more noticeable.
Treat the leather at least once every two
months using a leather lotion as dirt and grease
will gradually attack the leather's protective
layer.
Rivets, etc., on pants or other articles of
clothing can damage the seat covers.<
Carpets / cargo area
You can vacuum the carpets and floor mats or
clean them with interior cleaner if heavily soiled.
The floor mats can be removed for cleaning.
When replacing the mats, ensure that the seat
rails do not extend over the floor mats, as this
may damage the mats.
Lint on the floor mats occurs for technical rea-
sons and can be removed by vacuuming
repeatedly.
When cleaning the interior, do not move
both seats all the way forward while mov-
ing them to their uppermost position and lean-
ing the backrests forward. Otherwise, the seats
could hit and damage the seal on the wind-
shield, the sun visor or the headliner.<
Page 243 of 254

Reference 241
At a glance
Controls
Driving tips
Communications
Navigation
Entertainment
Mobility
Exhaust system, refer to Hot
exhaust system113
Exterior mirrors45
– adjusting45
– automatic dimming
feature46
– automatic heating46
– folding in and out45
External audio device104
Eyes
– for tow-starting and towing
away220
– for tying down loads116
F
Failure messages, refer to
Check Control73
Failure of an electrical
consumer216
False alarm
– avoiding unintentional
alarm34
– switching off an alarm34
Fastening safety belts, refer to
Safety belts44
Fastest route for
navigation130
Fast forward
– CD changer153
– CD player153
Fault
– parking brake53
Filter
– refer to Microfilter/activated-
charcoal filter for automatic
climate control98
– refer to Microfilter for air
conditioner95
First aid pouch219
Fixture for remote control,
refer to Ignition lock50
Flash when locking/
unlocking31
Flat tire
– run-flat tires199
– Tire Pressure Monitor
TPM82Flat Tire Monitor FTM81
– indicating a flat tire81
– indicator/warning lamp81
– initializing the system81
– snow chains81,200
– system limits81
Flat tires, refer to Tire
condition198
Fluid reservoir, refer to
Washer fluid reservoir61
FM, waveband143
Folding in the mirrors, before
driving into a car wash45
Footbrake, refer to Braking
safely114
Footwell lamps, refer to
Interior lamps92
Forward gear, engaging, refer
to Transmission
positions56
For your own safety5
Free memory capacity, music
collection161
Front airbags85
FTM, refer to Flat Tire
Monitor81
Fuel193
– average consumption66
– gauge65
– high-quality brands193
– quality193
– specifications
193
– tank contents, refer to
Capacities228
Fuel clock, refer to Fuel
gauge65
Fuel display, refer to Fuel
gauge65
Fuel filler flap192
– releasing in the event of
electrical malfunction192
Fuses216
G
Garage door opener, refer to
Integrated universal remote
control100Gasoline
– refer to Average
consumption66
Gasoline, refer to Required
fuel193
Gasoline display, refer to Fuel
gauge65
Gas station
recommendations131
Gear display, refer to Displays
in the instrument cluster56
Gear indicator, automatic
transmission with
Steptronic53
Gears, changing57
Gearshift lever
– automatic transmission with
Steptronic54
– manual transmission53
Gearshifts
– automatic transmission with
Steptronic54
– manual transmission53
General driving notes113
Glove compartment103
GPS navigation, refer to
Navigation system120
Grills, refer to Air vents93
Gross vehicle weight, refer to
Weights228
H
Handbrake, refer to Parking
brake52
Hands-free system14
Hazard warning flashers14
HD Radio144
Head airbags85
Headlamp control,
automatic88
Headlamp flasher59
– indicator lamp11,13
Heated
– mirrors46
– rear window95,98
– seats43