2010 BMW Z4 ROADSTER SDRIVE35I belt
[x] Cancel search: beltPage 43 of 254

Controls
41Reference
At a glance
Driving tips
Communications
Navigation
Entertainment
Mobility
Adjustments
Sitting safely
The ideal sitting position can make a vital con-
tribution to relaxed, fatigue-free driving. In con-
junction with the safety belts, the head
restraints and the airbags, the seated position
has a major influence on your safety in the event
of an accident. To ensure that the safety sys-
tems operate with optimal efficiency, we
strongly urge you to observe the instructions
contained in the following section.
For additional information on transporting chil-
dren safely, refer to page48.
Airbags
Always maintain an adequate distance
between yourself and the airbags. Always
grip the steering wheel on the rim, with your
hands in the 3 o'clock and 9 o'clock positions,
to minimize the risk of injury to the hands or
arms in the event of the airbag being triggered
off. No one and nothing should come between
the airbags and the seat occupant.
Do not use the cover of the front airbag on the
passenger side as a storage area. Make sure
that the passenger is sitting correctly, e.g.,
keeping his or her feet or legs in the footwell
and not on the dashboard; otherwise, leg inju-
ries can occur if the front airbag deploys.
Make sure that passengers do not lean their
heads against the side airbag; otherwise, seri-
ous injuries could result if the airbag suddenly
deployed.<
Even if you follow all the instructions, injuries
resulting from contact with airbags cannot be
fully excluded, depending on the circum-
stances. The ignition and inflation noise may
provoke a mild hearing loss in extremely sensi-
tive individuals. This effect is usually only tem-
porary.
For airbag locations and additional information
on airbags, refer to page85.
Safety belt
Before every drive, make sure that all occupants
wear their safety belts. Airbags complement the
safety belt as an additional safety device, but
they do not represent a substitute.
Your vehicle has two seats, each of which is
equipped with a safety belt.
Never allow more than one person to
wear a single safety belt. Never allow
infants or small children to ride in a passenger's
lap. Make sure that the belt in the lap area sits
low across the hips and does not press against
the abdomen.
The safety belt must not rest against the throat,
run across sharp edges, pass over hard or frag-
ile objects or be pinched. Fasten the safety belt
so that it sits as snugly as possible against the
lap and shoulder without being twisted. Other-
wise, the belt could slide over your hips and
injure your abdomen in the event of a frontal
collision.
Avoid wearing bulky clothing and regularly pull
the belt in the upper-body area taut; otherwise,
its restraining effect could be impaired.<
Safety belts, refer to page44.
Seats
Note before adjusting
Never attempt to adjust your seat while
the vehicle is moving. The seat could
respond with unexpected movement, and the
ensuing loss of vehicle control could lead to an
accident.
On the passenger seat as well, do not incline
the backrest too far to the rear while the vehicle
is being driven; otherwise, there is a danger in
the event of an accident of sliding under the
safety belt, eliminating the protection normally
provided by the belt.<
Note the information on safety belt damage
on page 45.
Page 46 of 254
Adjustments
44
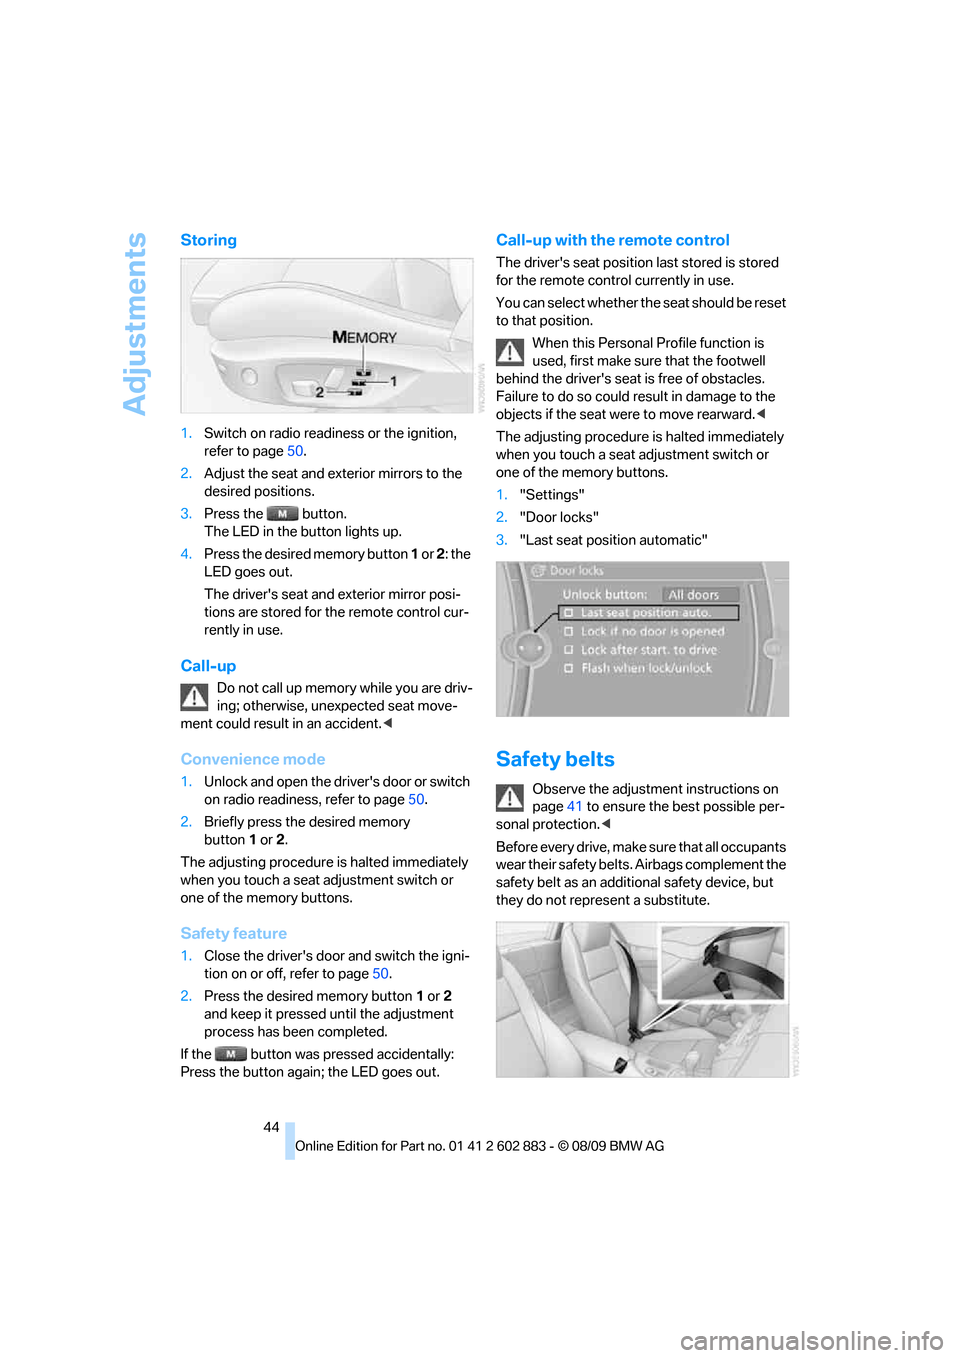
Storing
1.Switch on radio readiness or the ignition,
refer to page50.
2.Adjust the seat and exterior mirrors to the
desired positions.
3.Press the button.
The LED in the button lights up.
4.Press the desired memory button 1 or 2: the
LED goes out.
The driver's seat and exterior mirror posi-
tions are stored for the remote control cur-
rently in use.
Call-up
Do not call up memory while you are driv-
ing; otherwise, unexpected seat move-
ment could result in an accident.<
Convenience mode
1.Unlock and open the driver's door or switch
on radio readiness, refer to page50.
2.Briefly press the desired memory
button1or 2.
The adjusting procedure is halted immediately
when you touch a seat adjustment switch or
one of the memory buttons.
Safety feature
1.Close the driver's door and switch the igni-
tion on or off, refer to page50.
2.Press the desired memory button1 or2
and keep it pressed until the adjustment
process has been completed.
If the button was pressed accidentally:
Press the button again; the LED goes out.
Call-up with the remote control
The driver's seat position last stored is stored
for the remote control currently in use.
You can select whether the seat should be reset
to that position.
When this Personal Profile function is
used, first make sure that the footwell
behind the driver's seat is free of obstacles.
Failure to do so could result in damage to the
objects if the seat were to move rearward.<
The adjusting procedure is halted immediately
when you touch a seat adjustment switch or
one of the memory buttons.
1."Settings"
2."Door locks"
3."Last seat position automatic"
Safety belts
Observe the adjustment instructions on
page41 to ensure the best possible per-
sonal protection.<
Before every drive, make sure that all occupants
wear their safety belts. Airbags complement the
safety belt as an additional safety device, but
they do not represent a substitute.
Page 47 of 254

Controls
45Reference
At a glance
Driving tips
Communications
Navigation
Entertainment
Mobility
Closing
Make sure you hear the latch plate engage in
the belt buckle.
The upper belt anchor is suitable for adults of
any stature as long as the seat is adjusted prop-
erly, refer to page41.
Opening
1.Grasp the belt firmly.
2.Press the red button in the buckle.
3.Guide the belt into its reel.
'Fasten safety belts' reminder for driver
and passenger*
The indicator lamp comes on and an
acoustic signal sounds. In addition, a
message appears on the Control Dis-
play. Check whether the safety belt
has been fastened correctly.
The 'Fasten safety belts' reminder is issued as
long as the driver's safety belt has not been fas-
tened. In some country-specific versions, the
'Fasten safety belts' reminder is also activated
at road speeds above approx. 5 mph or 8 km/h if
the passenger safety belt is not fastened, if
objects are placed on the passenger seat, or if
driver or passenger unfasten their safety belts.
Damage to safety belts
If the safety belts are damaged or
stressed in an accident: have the belt sys-
tem, including any belt tensioners or child
restraint systems, replaced and the belt
anchors checked. Have this work done only by
your BMW center or at a workshop that works
according to BMW repair procedures with cor-
respondingly trained personnel. Otherwise, it is
not guaranteed that the safety devices will func-
tion properly.<
Mirrors
Exterior mirrors
The passenger's mirror is more convex
than the driver's mirror. The objects seen
in the mirror are closer than they appear. Do not
gauge your distance from traffic behind you on
the basis of what you see in the mirror; other-
wise, there is an increased risk of an accident.<
1Adjustments
2Folding mirrors in and out
*
3Switching to the other mirror or automatic
curb monitor
*
The setting for the exterior mirrors is stored for
the remote control currently in use
*. The stored
position is called up automatically when the
vehicle is unlocked.
Manual adjustment
The mirrors can also be adjusted manually:
press the edge of the glass.
Folding mirrors in and out*
At driving speeds up to approx. 12 mph/
20 km/h, you can fold the mirrors in and out by
pressing button2. This can be beneficial in nar-
row streets, for example, or for moving mirrors
that were folded in by hand back out into their
correct positions. Mirrors that were folded in are
folded out automatically at a speed of approx.
25 mph/40 km/h.
Before entering an automatic car wash,
fold in the exterior mirrors by hand or with
button2 to prevent them from being damaged
due to the width of the vehicle.<
Page 50 of 254
Transporting children safely
48
Transporting children safely
The right place for children
Do not leave children unattended in the
vehicle; otherwise, they could endanger
themselves and/or other persons by opening
the doors, for example.<
Children on the passenger seat
Always transport children under the age
of 13 or smaller than 5 ft/150 cm in a child
restraint system suitable for their age, weight
and size, and with the passenger airbag deacti-
vated. Otherwise, there is an increased risk of
injury in the event of an accident or if the airbags
deploy.<
Children 13 years of age or older must be buck-
led in with a safety belt as soon as there no
longer is any child restraint system that is
appropriate for their age, size and weight.
For more information on automatic deactivation
of the passenger airbags refer to page86.
Installing child restraint
systems
After installing a child restraint system on
the passenger seat, make sure that the
front and side airbags for the passenger are
deactivated; otherwise, there is an increased
risk of injury if the airbags deploy.
Observe the child restraint system manufac-
turer's instructions when selecting, installing
and using child restraint systems. Otherwise,
the protective effect may be diminished.<
Standard child restraint systems are designed
to be secured with a lap belt or with the lap-belt
section of a lap-and-shoulder belt. Incorrectly
or improperly installed child restraint systems
can increase the risk of injury to children.
Always follow the installation instructions for
the system with the greatest care.
On the passenger seat
After installing a child restraint system on
the passenger seat, make sure that the
front and side airbags for the passenger are
deactivated; otherwise, there is an increased
risk of injury if the airbags deploy.<
Seat position
Before installing a child restraint system, move
the passenger seat as far back and up
* as pos-
sible to obtain the best possible position for
the belt.
Backrest width*
The backrest width of the passenger seat
must be at its widest possible setting. Do
not change the setting after installing the child
seat. Otherwise, the child seat's stability on the
passenger seat is limited.<
1.Adjust the backrest width to its widest set-
ting, refer to page43.
2.Install the child seat.
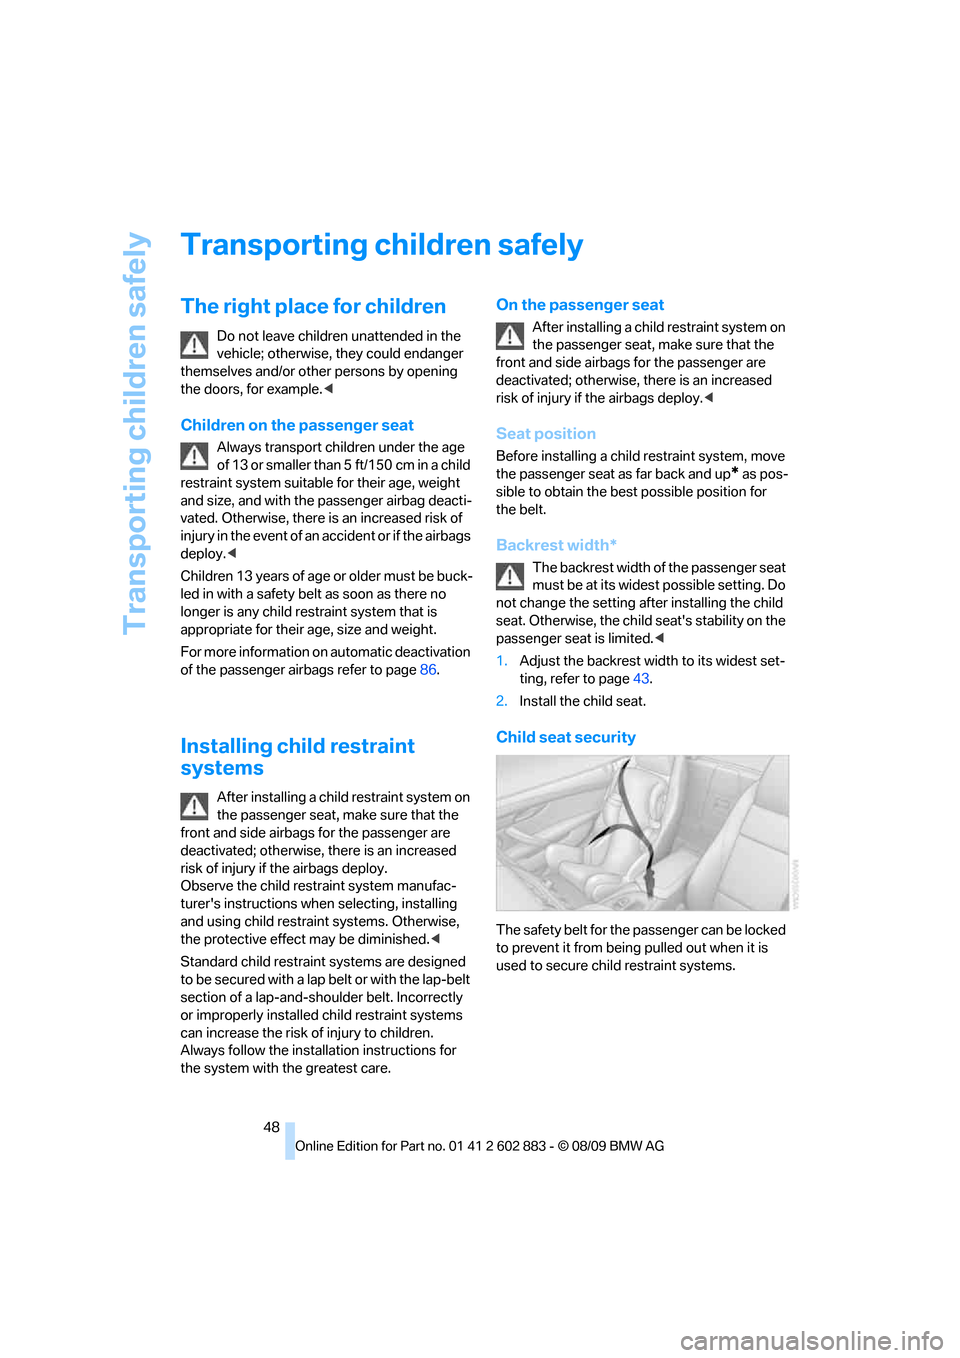
Child seat security
The safety belt for the passenger can be locked
to prevent it from being pulled out when it is
used to secure child restraint systems.
Page 51 of 254
Controls
49Reference
At a glance
Driving tips
Communications
Navigation
Entertainment
Mobility
To lock the safety belt
1.Secure the child restraint system with
the belt.
2.Pull the belt strap all the way out.
3.Allow the belt strap to retract and pull it taut
against the child restraint system.
The safety belt is locked.
To unlock the safety belt
1.Open the belt buckle.
2.Remove the child restraint system.
3.Allow the safety belt strap to retract all
the way.
Upper LATCH retaining strap
For Canadian Customers only
The following statement is required by Trans-
port Canada
This vehicle is not equipped with user-ready
tether anchorages. As such neither a child
restraint system, nor a booster cushion, requir-
ing the use of a tether strap can be properly
secured in the vehicle.
Page 59 of 254
Controls
57Reference
At a glance
Driving tips
Communications
Navigation
Entertainment
Mobility
P Park
The rear wheels are locked.
P is engaged automatically when the following
conditions are met:
>The driver's door is opened while the
engine is running, your safety belt is not fas-
tened and neither the brake pedal nor the
accelerator are activated.
>The engine is switched off unless N is
engaged and the remote control is in the
ignition lock.
>The remote control is removed from the
ignition lock.
Kickdown
T o a cc ele ra te ra pidly, e.g., when passing, press
the accelerator down past the resistance point.
This provides maximum acceleration.
Activating the Sport program and
manual mode M/S
Move the selector lever from position D toward
the left:
The Sport program is activated.
Sport program
S1 through S7 is displayed in the instrument
cluster. This position is recommended for a
performance-oriented driving style.
Manual mode:
When you press the selector lever forward or
backward, or when you press the shift paddles,
manual mode is activated and the gear is
changed.
M1 through M7 are displayed in the instrument
cluster.The transmission provides assistance in the fol-
lowing situations:
>Upshifts and downshifts are executed only
when they will result in a plausible combina-
tion of engine and vehicle speed; thus, for
example, a downshift that would cause the
engine to overrev will not be executed by
the system.
>When the vehicle stops, the transmission
automatically shifts down to first gear.
>Shortly before the vehicle slows down to
below the minimum speed of the gear cur-
rently engaged, the transmission automati-
cally shifts down without requiring your
intervention.
Rapid downshifting: in manual mode, you can
skip several gears to achieve optimal accelera-
tion. Do so by pressing the accelerator past the
resistance point.
Changing to drive mode
Push the selector lever to the right.
Shifting gears via the selector lever
In manual mode:
>To shift up, pull back the selector lever.
>To shift down, push it forward.
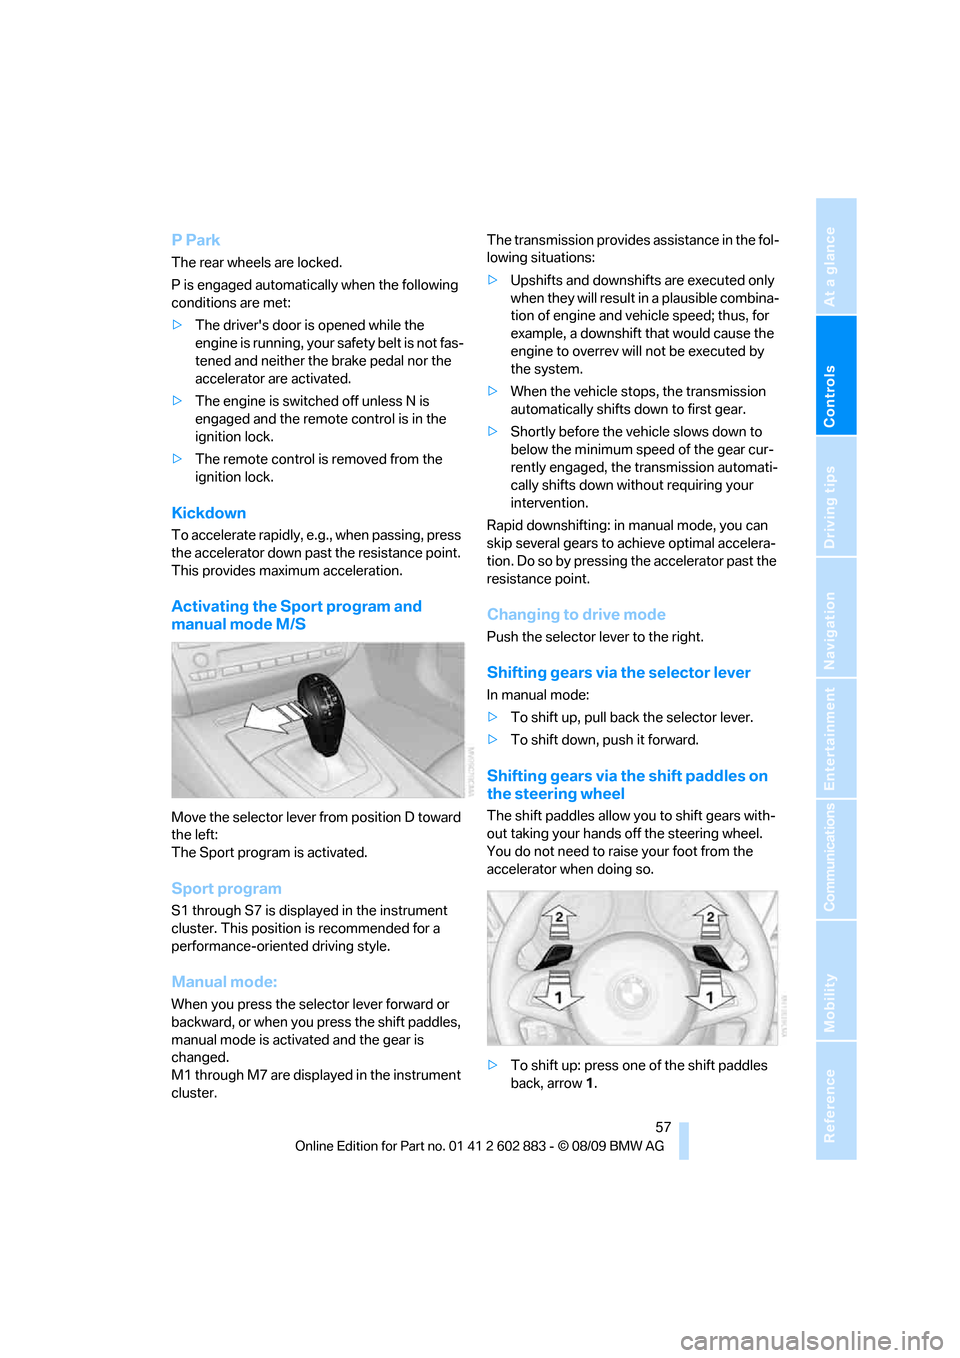
Shifting gears via the shift paddles on
the steering wheel
The shift paddles allow you to shift gears with-
out taking your hands off the steering wheel.
You do not need to raise your foot from the
accelerator when doing so.
>To shift up: press one of the shift paddles
back, arrow1.
Page 78 of 254
Controls overview
76
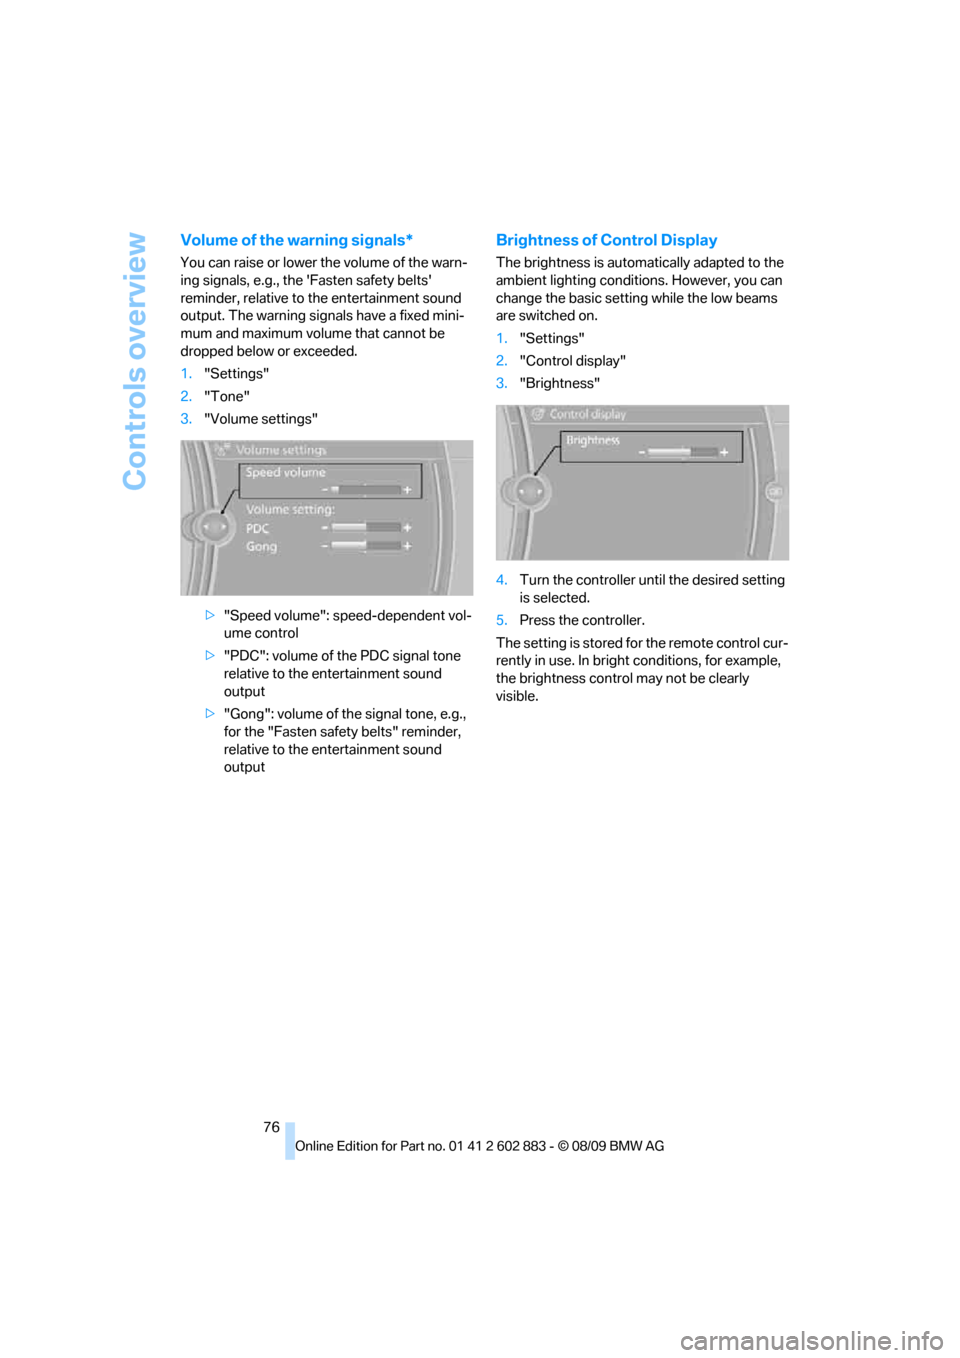
Volume of the warning signals*
You can raise or lower the volume of the warn-
ing signals, e.g., the 'Fasten safety belts'
reminder, relative to the entertainment sound
output. The warning signals have a fixed mini-
mum and maximum volume that cannot be
dropped below or exceeded.
1."Settings"
2."Tone"
3."Volume settings"
>"Speed volume": speed-dependent vol-
ume control
>"PDC": volume of the PDC signal tone
relative to the entertainment sound
output
>"Gong": volume of the signal tone, e.g.,
for the "Fasten safety belts" reminder,
relative to the entertainment sound
output
Brightness of Control Display
The brightness is automatically adapted to the
ambient lighting conditions. However, you can
change the basic setting while the low beams
are switched on.
1."Settings"
2."Control display"
3."Brightness"
4.Turn the controller until the desired setting
is selected.
5.Press the controller.
The setting is stored for the remote control cur-
rently in use. In bright conditions, for example,
the brightness control may not be clearly
visible.
Page 87 of 254
Controls
85Reference
At a glance
Driving tips
Communications
Navigation
Entertainment
Mobility
able to detect or signal low tire pressure as
intended. TPMS malfunctions may occur for a
variety of reasons, including the installation of
replacement or alternate tires or wheels on the
vehicle that prevent the TPMS from functioning
properly. Always check the TPMS malfunction
telltale after replacing one or more tires or
wheels on your vehicle to ensure that the
replacement or alternate tires and wheels allow
the TPMS to continue to function properly.
Servotronic*
The concept
The Servotronic varies the steering force
required to turn the wheels depending on the
speed at which you are driving. When you are
driving at low speeds, power steering provides
more support, i. e. little effort is needed to turn
the wheels. Power steering support lessens as
your speed increases.
The system works automatically.
Malfunction
Malfunctions are displayed via Check Control.
Dynamic brake lamps*
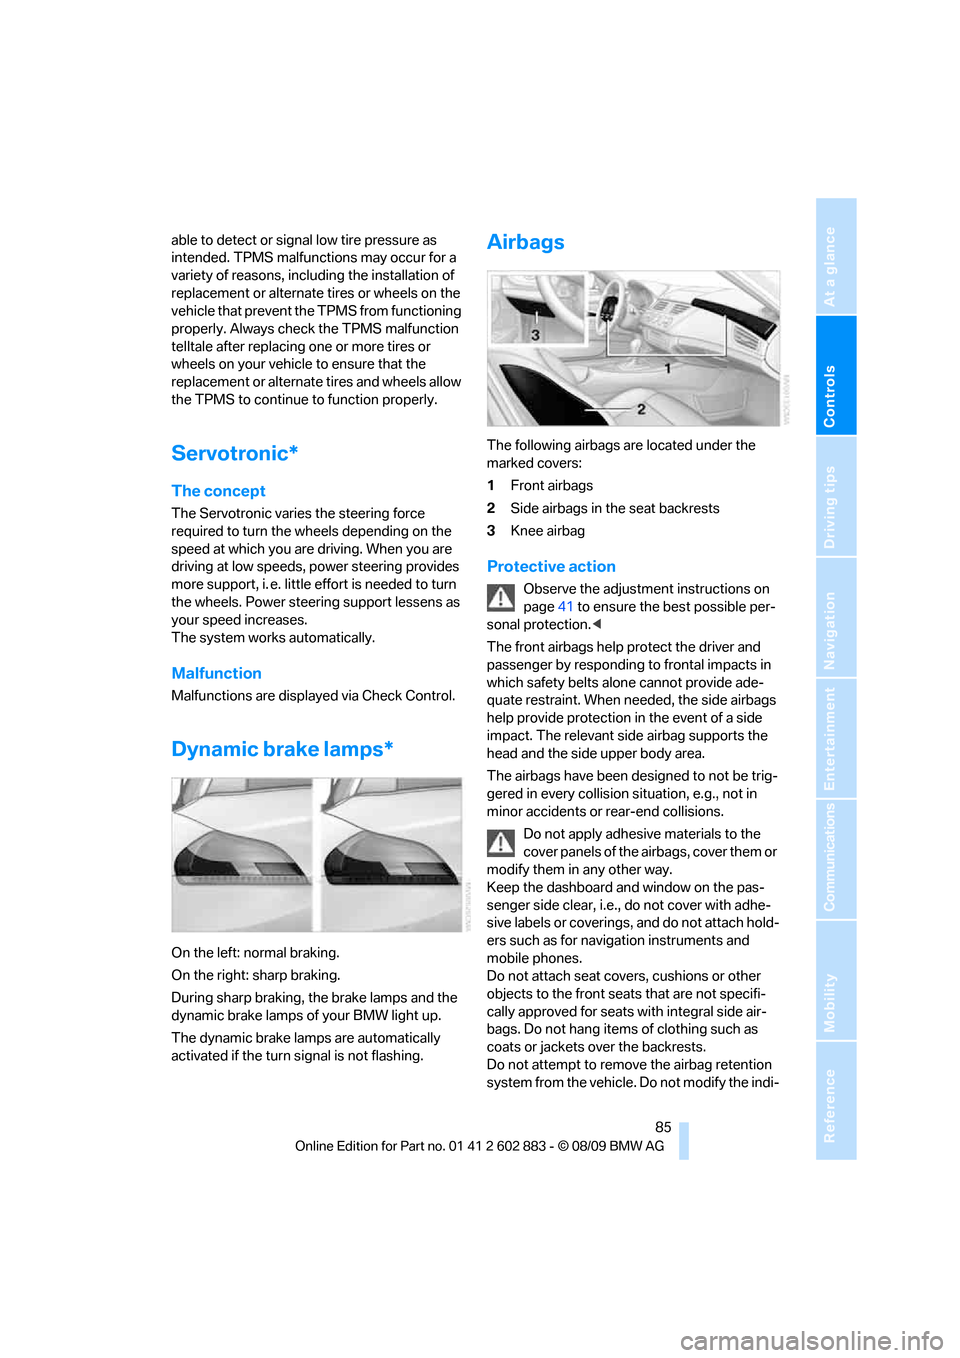
On the left: normal braking.
On the right: sharp braking.
During sharp braking, the brake lamps and the
dynamic brake lamps of your BMW light up.
The dynamic brake lamps are automatically
activated if the turn signal is not flashing.
Airbags
The following airbags are located under the
marked covers:
1Front airbags
2Side airbags in the seat backrests
3Knee airbag
Protective action
Observe the adjustment instructions on
page41 to ensure the best possible per-
sonal protection.<
The front airbags help protect the driver and
passenger by responding to frontal impacts in
which safety belts alone cannot provide ade-
quate restraint. When needed, the side airbags
help provide protection in the event of a side
impact. The relevant side airbag supports the
head and the side upper body area.
The airbags have been designed to not be trig-
gered in every collision situation, e.g., not in
minor accidents or rear-end collisions.
Do not apply adhesive materials to the
cover panels of the airbags, cover them or
modify them in any other way.
Keep the dashboard and window on the pas-
senger side clear, i.e., do not cover with adhe-
sive labels or coverings, and do not attach hold-
ers such as for navigation instruments and
mobile phones.
Do not attach seat covers, cushions or other
objects to the front seats that are not specifi-
cally approved for seats with integral side air-
bags. Do not hang items of clothing such as
coats or jackets over the backrests.
Do not attempt to remove the airbag retention
system from the vehicle. Do not modify the indi-