2010 BMW Z4 ROADSTER SDRIVE35I media
[x] Cancel search: mediaPage 163 of 254

Navigation
Entertainment
Driving tips
161Reference
At a glance
Controls
Communications
Mobility
Depending on the album, the tracks or the
subdirectories of the album are displayed.
The first track is played automatically, if
possible.
4.To select tracks, change directories if
needed. To go up one level in the directory,
move the controller to the left.
Random play sequence
All tracks of the selection are played back in
random order.
1."CD/Multimedia"
2."Music collection"
3.Open "Options".
4."Random"
Managing music
Albums
Renaming an album
The name of the album, if available, is automat-
ically entered when the album is stored. If the
name is unknown, it can be changed later.
An album cannot be renamed while a track from
that album is being played.
1."CD/Multimedia"
2."Music collection"
3.Highlight the album.
4.Open "Options".5."Rename album"
6.Select the letters individually.
Deleting an album
An album cannot be deleted while a track from
that album is being played.
1."CD/Multimedia"
2."Music collection"
3.Highlight the album.
4.Open "Options".
5."Delete album"
Deleting a track and directory
A track cannot be deleted while it is being
played back.
A directory cannot be deleted while a track from
that directory is being played back.
1."CD/Multimedia"
2."Music collection"
3.Highlight the directory or track.
4.Open "Options".
5."Delete folder" or "Delete track".
Free memory capacity
Display the free memory capacity in the music
collection.
1."CD/Multimedia"
2."Music collection"
3.Open "Options".
4."Free memory"
Page 164 of 254
Music collection
162
Music collection
Backing up the music collection
The entire music collection can be stored on a
USB medium. Make sure there is enough free
memory capacity on the USB device.
Depending on the number of tracks, backing up
the music collection may take several hours.
Therefore, it is best to perform the backup dur-
ing a long trip.
1.Start the engine.
2.Connect the USB device to the USB inter-
face in the glove compartment.
3."CD/Multimedia"
4."Music collection"
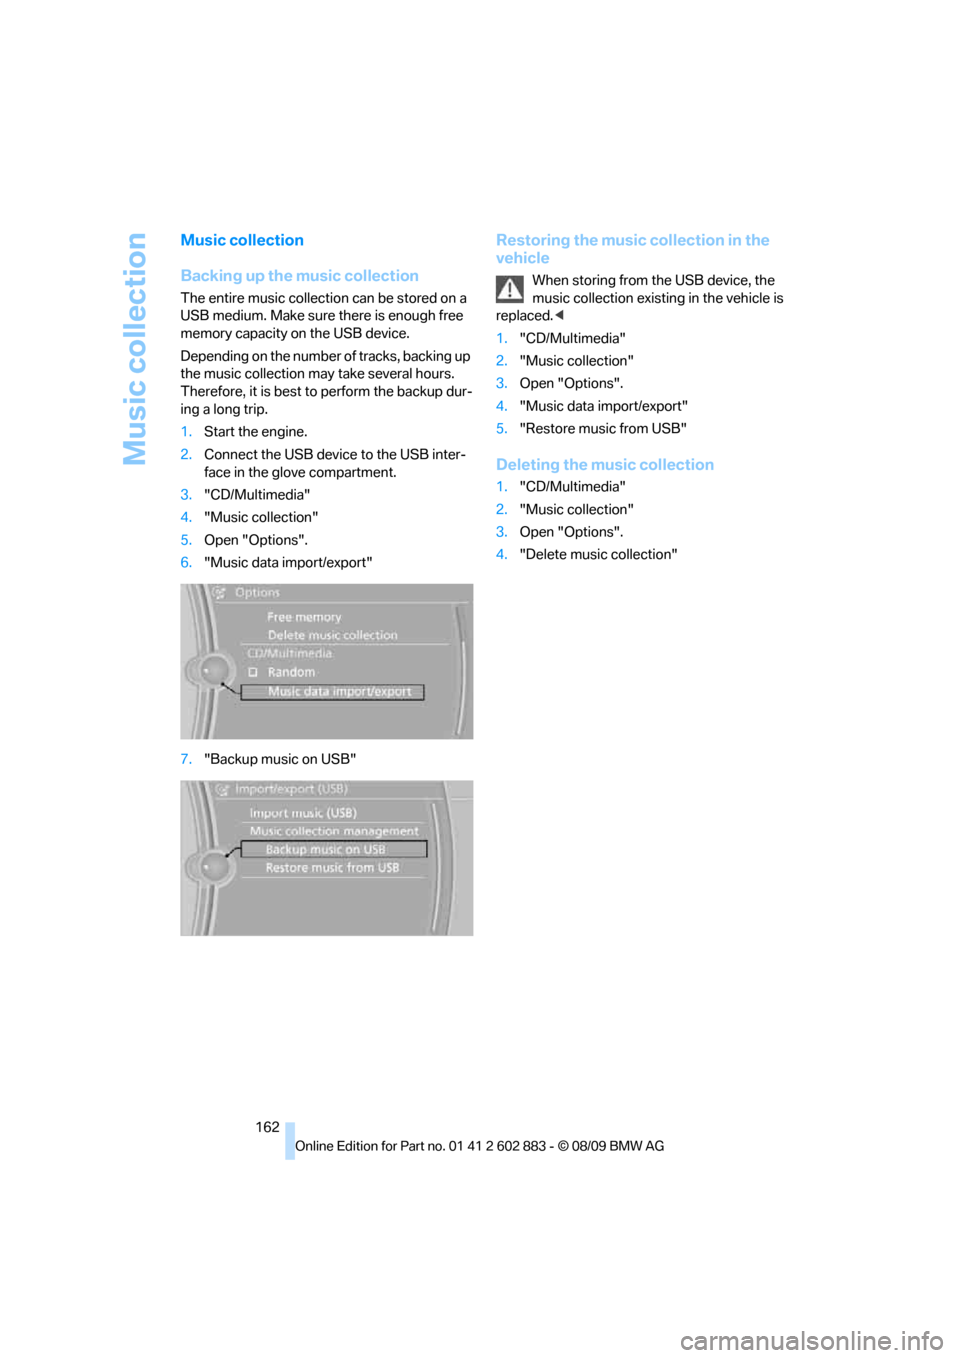
5.Open "Options".
6."Music data import/export"
7."Backup music on USB"
Restoring the music collection in the
vehicle
When storing from the USB device, the
music collection existing in the vehicle is
replaced.<
1."CD/Multimedia"
2."Music collection"
3.Open "Options".
4."Music data import/export"
5."Restore music from USB"
Deleting the music collection
1."CD/Multimedia"
2."Music collection"
3.Open "Options".
4."Delete music collection"
Page 165 of 254
Navigation
Entertainment
Driving tips
163Reference
At a glance
Controls
Communications
Mobility
External devices
AUX-IN port
You can connect an external audio device, for
instance an MP3 player, and play audio tracks
over the car's loudspeaker system. You can
adjust the tone using iDrive.
Connecting
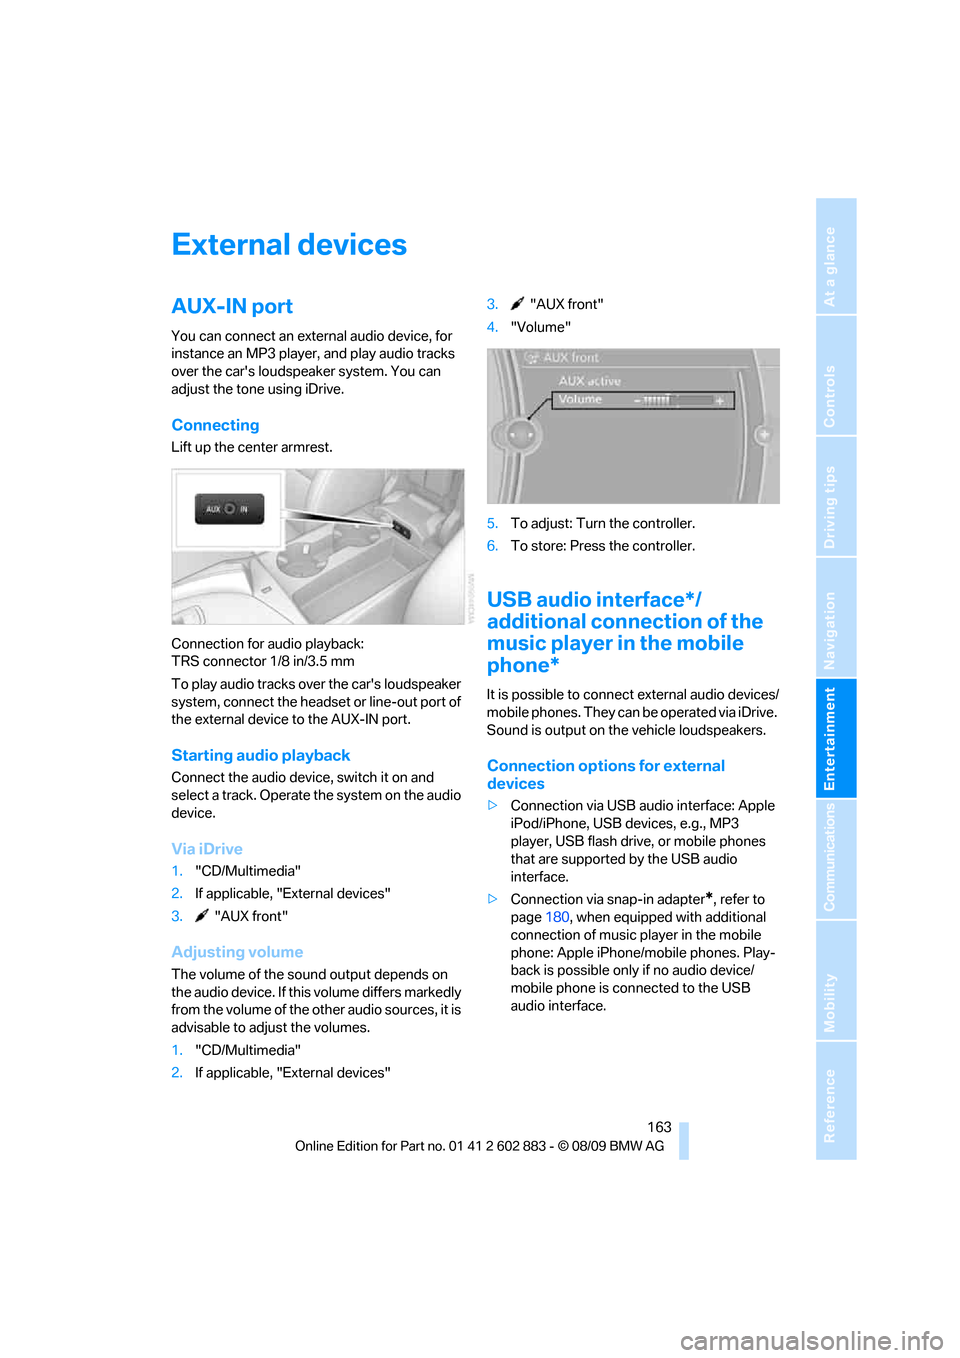
Lift up the center armrest.
Connection for audio playback:
TRS connector 1/8 in/3.5 mm
To play audio tracks over the car's loudspeaker
system, connect the headset or line-out port of
the external device to the AUX-IN port.
Starting audio playback
Connect the audio device, switch it on and
select a track. Operate the system on the audio
device.
Via iDrive
1."CD/Multimedia"
2.If applicable, "External devices"
3. "AUX front"
Adjusting volume
The volume of the sound output depends on
the audio device. If this volume differs markedly
from the volume of the other audio sources, it is
advisable to adjust the volumes.
1."CD/Multimedia"
2.If applicable, "External devices"3. "AUX front"
4."Volume"
5.To adjust: Turn the controller.
6.To store: Press the controller.
USB audio interface*/
additional connection of the
music player in the mobile
phone*
It is possible to connect external audio devices/
mobile phones. They can be operated via iDrive.
Sound is output on the vehicle loudspeakers.
Connection options for external
devices
>Connection via USB audio interface: Apple
iPod/iPhone, USB devices, e.g., MP3
player, USB flash drive, or mobile phones
that are supported by the USB audio
interface.
>Connection via snap-in adapter
*, refer to
page180, when equipped with additional
connection of music player in the mobile
phone: Apple iPhone/mobile phones. Play-
back is possible only if no audio device/
mobile phone is connected to the USB
audio interface.
Page 166 of 254
External devices
164 Due to the large number of different audio
devices/mobile phones available on the market,
it cannot be ensured that every audio device/
mobile phone is operable on the vehicle.
Ask about suitable audio devices/mobile
phones at your BMW center.
Audio files
Standard audio formats, e.g., MP3, WMA, WAV
(PCM) and AAC, and playlists in the M3U format
can be played.
Connecting via USB audio interface
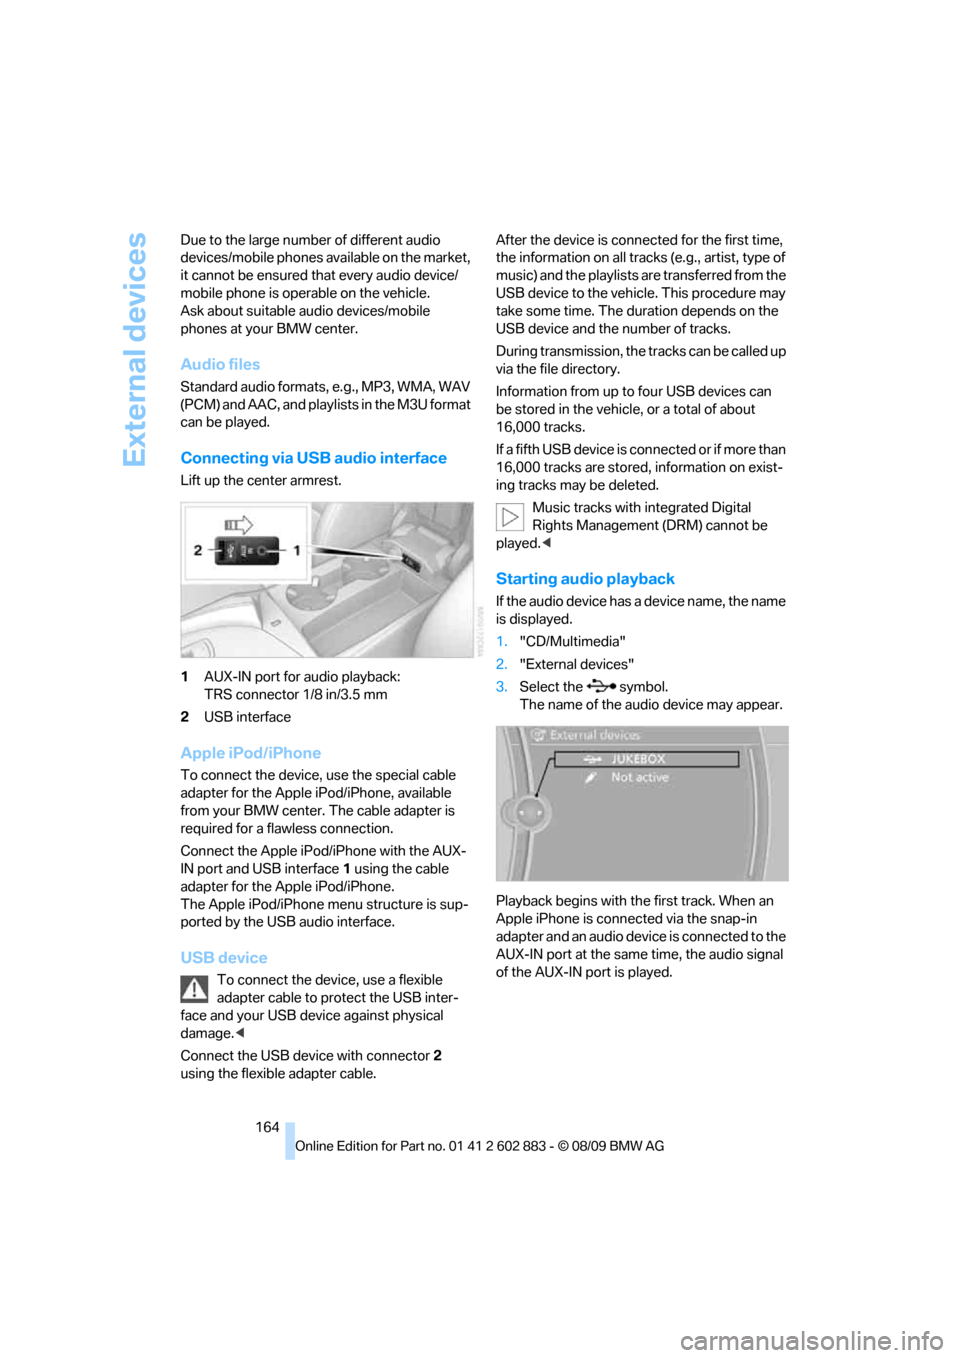
Lift up the center armrest.
1AUX-IN port for audio playback:
TRS connector 1/8 in/3.5 mm
2USB interface
Apple iPod/iPhone
To connect the device, use the special cable
adapter for the Apple iPod/iPhone, available
from your BMW center. The cable adapter is
required for a flawless connection.
Connect the Apple iPod/iPhone with the AUX-
IN port and USB interface1 using the cable
adapter for the Apple iPod/iPhone.
The Apple iPod/iPhone menu structure is sup-
ported by the USB audio interface.
USB device
To connect the device, use a flexible
adapter cable to protect the USB inter-
face and your USB device against physical
damage.<
Connect the USB device with connector 2
using the flexible adapter cable.After the device is connected for the first time,
the information on all tracks (e.g., artist, type of
music) and the playlists are transferred from the
USB device to the vehicle. This procedure may
take some time. The duration depends on the
USB device and the number of tracks.
During transmission, the tracks can be called up
via the file directory.
Information from up to four USB devices can
be stored in the vehicle, or a total of about
16,000 tracks.
I f a f i f t h U S B d e v i c e i s c o n n e c t e d o r i f m o r e t h a n
16,000 tracks are stored, information on exist-
ing tracks may be deleted.
Music tracks with integrated Digital
Rights Management (DRM) cannot be
played.<
Starting audio playback
If the audio device has a device name, the name
is displayed.
1."CD/Multimedia"
2."External devices"
3.Select the symbol.
The name of the audio device may appear.
Playback begins with the first track. When an
Apple iPhone is connected via the snap-in
adapter and an audio device is connected to the
AUX-IN port at the same time, the audio signal
of the AUX-IN port is played.
Page 167 of 254
Navigation
Entertainment
Driving tips
165Reference
At a glance
Controls
Communications
Mobility
Information about the track
If information about a track has been stored, it is
displayed automatically:
>Artist
>Album title
>Number of tracks
>Track file name
Track search
You can call up the tracks using the playlists
and information. With USB devices you can also
call up tracks using the file directory.
Selection is possible via:
>Playback lists
>Information: type of music, artist, album,
track
>Additionally for USB devices: file directory,
composer
Tracks are displayed if they have been saved in
the Latin alphabet.
Starting the track search
1."CD/Multimedia"
2."External devices"
3.Select the symbol.
The name of the audio device may appear.
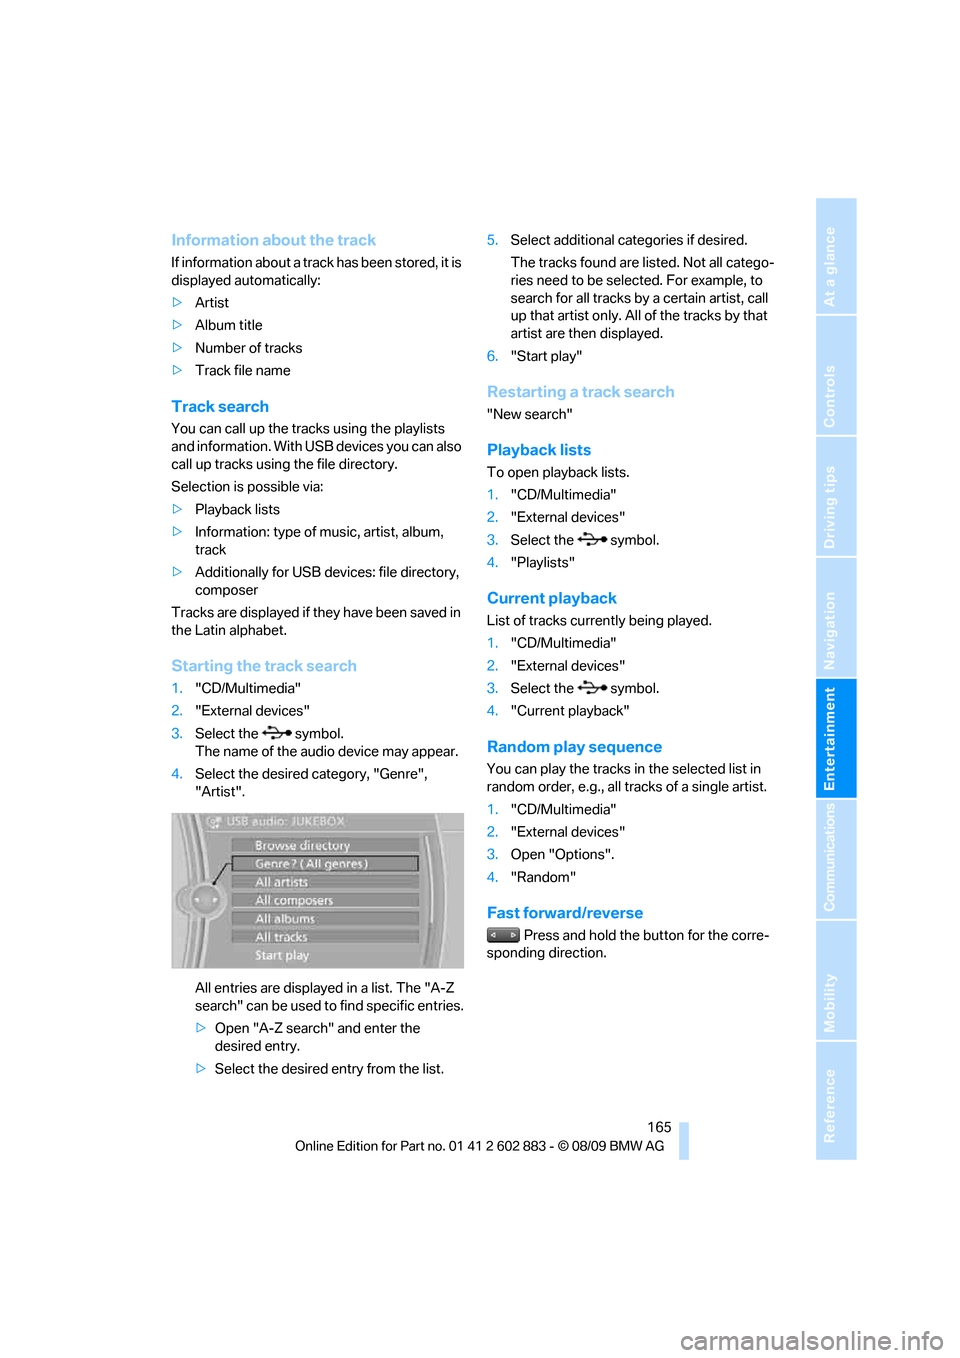
4.Select the desired category, "Genre",
"Artist".
All entries are displayed in a list. The "A-Z
search" can be used to find specific entries.
>Open "A-Z search" and enter the
desired entry.
>Select the desired entry from the list.5.Select additional categories if desired.
The tracks found are listed. Not all catego-
ries need to be selected. For example, to
search for all tracks by a certain artist, call
up that artist only. All of the tracks by that
artist are then displayed.
6."Start play"
Restarting a track search
"New search"
Playback lists
To open playback lists.
1."CD/Multimedia"
2."External devices"
3.Select the symbol.
4."Playlists"
Current playback
List of tracks currently being played.
1."CD/Multimedia"
2."External devices"
3.Select the symbol.
4."Current playback"
Random play sequence
You can play the tracks in the selected list in
random order, e.g., all tracks of a single artist.
1."CD/Multimedia"
2."External devices"
3.Open "Options".
4."Random"
Fast forward/reverse
Press and hold the button for the corre-
sponding direction.
Page 177 of 254
175
Entertainment
Reference
At a glance
Controls
Driving tips Communications
Navigation
Mobility
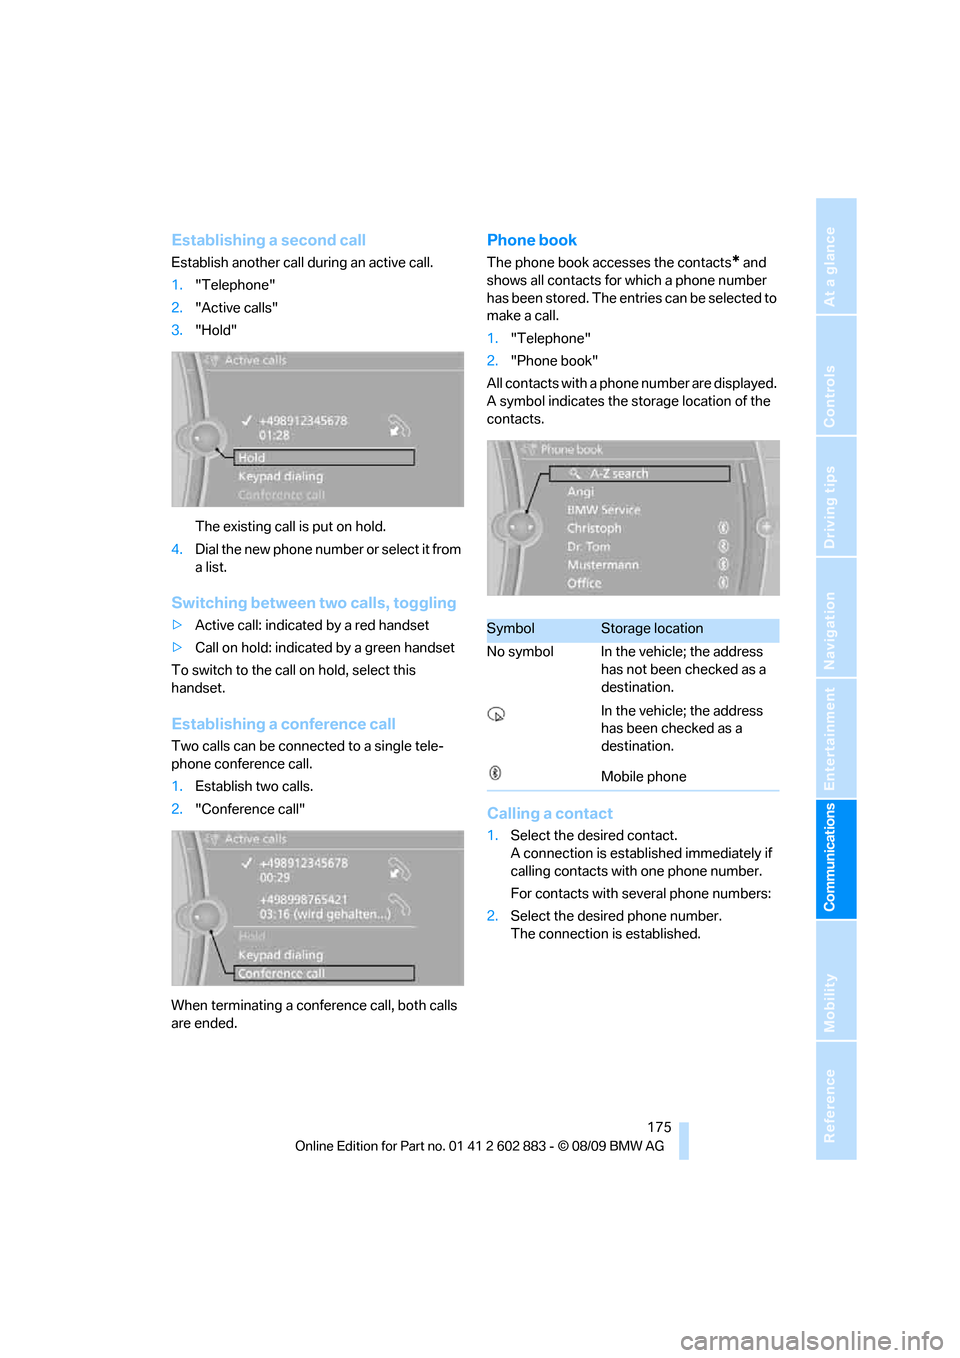
Establishing a second call
Establish another call during an active call.
1."Telephone"
2."Active calls"
3."Hold"
The existing call is put on hold.
4.D ial the new phone number or se lec t it fro m
a list.
Switching between two calls, toggling
>Active call: indicated by a red handset
>Call on hold: indicated by a green handset
To switch to the call on hold, select this
handset.
Establishing a conference call
Two calls can be connected to a single tele-
phone conference call.
1.Establish two calls.
2."Conference call"
When terminating a conference call, both calls
are ended.
Phone book
The phone book accesses the contacts* and
shows all contacts for which a phone number
has been stored. The entries can be selected to
make a call.
1."Telephone"
2."Phone book"
All contacts with a phone number are displayed.
A symbol indicates the storage location of the
contacts.
Calling a contact
1.Select the desired contact.
A connection is established immediately if
calling contacts with one phone number.
For contacts with several phone numbers:
2.Select the desired phone number.
The connection is established.
SymbolStorage location
No symbol In the vehicle; the address
has not been checked as a
destination.
In the vehicle; the address
has been checked as a
destination.
Mobile phone
Page 211 of 254

Mobility
209Reference
At a glance
Controls
Driving tips
Communications
Navigation
Entertainment
7-gear sport automatic transmission
with dual clutch
Before driving into an automatic car wash, per-
form the following steps to ensure that the vehi-
cle can roll:
1.Insert the remote control, even with Com-
fort Access, into the ignition lock.
2.Engage transmission position N.
3.Release the parking brake.
4.Switch off the engine.
5.Leave the remote control in the ignition lock
so that the vehicle can roll.
Transmission position P is engaged:
>Automatically after approx. 30 minutes
>When you take the remote control out of the
ignition lock
Steam jets / high-pressure washers
When using steam jets or high-pressure
washers, ensure that you maintain suffi-
cient clearance to the vehicle and do not exceed
a temperature of 1407/606.
Insufficient clearance or excessive pressure or
temperature can lead to component damage or
water penetration. Follow the operating instruc-
tions of the high-pressure washer.<
When using high-pressure washers, do
not spray against the seals of the retract-
able hardtop, the sensors and the cameras, e.g.,
of the Park Distance Control or Rear View Cam-
era, for an extended period and maintain a dis-
tance of at least 12 in/30 cm.<
Manual car wash
When washing the vehicle by hand, use large
quantities of water and car shampoo if neces-
sary. Clean the vehicle with a sponge or wash-
ing brush, applying light pressure only.
Before cleaning the windshield, deacti-
vate the rain sensor or switch off the igni-
tion to prevent unintentional activation of the
wipers.<
Observe local regulations pertaining to
washing vehicles by hand.<
Headlamps
Do not rub them dry and do not use abrasive or
corrosive cleaning agents.
Loosen dirt, e.g., insects, with shampoo or
insect remover and wash away with copious
quantities of water.
Thaw ice with a windshield deicer and do not
use an ice scraper.
Windows
Clean the inside and outside surfaces of the
windows and the mirrors with window cleaner.
Do not clean the mirrors with cleaners
containing quartz.<
Retractable hardtop
Proceed as you would in a normal car wash.
When you open a wet hardtop, water
drops may run into the cargo area. If nec-
essary, remove items from the cargo area
beforehand to avoid water stains or soiling.<
Paintwork care
Regular care contributes to value retention and
protects the paintwork against the long-term
effects of damaging substances.
Region-specific environmental influences can
damage the vehicle paintwork. Therefore, it is
important to adapt the frequency and scope of
car care accordingly.
Immediately remove aggressive materials such
as spilled fuel, oil, grease, brake fluid, tree sap
or bird droppings to prevent damage to the
paintwork.
Repairing paintwork damage
Immediately repair scratches or similar
damage, such as that caused by stones
hitting the vehicle, where necessary to prevent
rusting.<
BMW recommends having paintwork damage
repaired by a professional paint repair work-
shop according to BMW specifications using
original BMW paint materials.
Page 217 of 254

Mobility
215Reference
At a glance
Controls
Driving tips
Communications
Navigation
Entertainment
2.Pull out the bulb holder, see arrow, and
change the bulb.
3.Attach the bulb holder.
4.Reattach the cover.
License plate lamp, rear lamp, center
brake lamp and turn signal
These lamps use LED technology for operation.
In the event of a malfunction, please contact
your BMW center or a workshop that works
according to BMW repair procedures with cor-
respondingly trained personnel.
Changing wheels
Your BMW is equipped with run-flat tires as
standard. This removes the need to change a
wheel immediately in the event of a puncture.
For information on continuing to drive with a
damaged tire, refer to Indication of a flat tire
on page81.
The symbol identifying run-flat tires is a circle
with the letters RSC on the sidewall, refer to
Run-flat tires, page199.
When mounting new tires or changing over
from summer to winter tires and vice versa,
mount run-flat tires for your own safety. In the
event of a flat, no spare wheel is available. Your
BMW center will be glad to advise you. Refer
also to New wheels and tires, page199.
The tools for changing wheels are avail-
able as optional accessories from your
BMW center.<
Jack mounting points
The jacking points are at the positions shown in
the illustration.
Lug bolt lock*
1Lug bolt for adapter
2Adapter, in onboard vehicle tool kit
Removing the wind deflector
1.Remove the adapter 2 from the onboard
vehicle tool kit and insert it in the lug bolt.
2.Unscrew the lug bolt1.
Remove the adapter after screwing the lug bolt
back on.
The code number is stamped on the front of the
adapter. Please note down this number and
keep it in a safe place in case the adapter should
get lost.