2010 BMW Z4 ROADSTER SDRIVE35I stop start
[x] Cancel search: stop startPage 134 of 254

Destination guidance
132
Destination guidance
through voice instructions
Switching voice instructions on/off
Voice instructions can be switched on or off
during destination guidance.
1."Navigation"
2."Map"
3. Select the symbol.
For rapid access, the feature can be stored on a
programmable memory key, refer to page21.
Repeating a voice instruction
1."Navigation"
2."Map"
3. Highlight the symbol.
4.Press the controller twice.
Adjusting the volume of voice
instructions*
The volume can be adjusted only while a voice
instruction is being issued.
1.Have the last voice instruction repeated, if
necessary.
2.Turn the button during the voice instruction
to select the desired volume.
The setting is stored for the remote control cur-
rently in use.
Map display
Map display
You can have your current position displayed on
a map. After starting the destination guidance,
the planned route is shown on the map.
1."Navigation"
2."Map"
The following functions are directly available in
the map display:
Information in the map display:
>Time, entertainment source, sound output,
map orientation.
>Distance from destination, estimated time
of arrival, if destination guidance is active.
>Any traffic obstructions are highlighted in
color.
To show/hide the information on the map:
Press the controller.
SymbolMeaning
Voice instructions are
switched on
Voice instructions are
switched offSymbolFunction
Starting/stopping destina-
tion guidance
Switching voice instructions
on/off
Changing route criteria or
selecting route alternatives
Special destinations
Display traffic bulletins
Interactive map
Map view settings
Changing scale
Page 156 of 254

CD/DVD player and CD/DVD changer
154
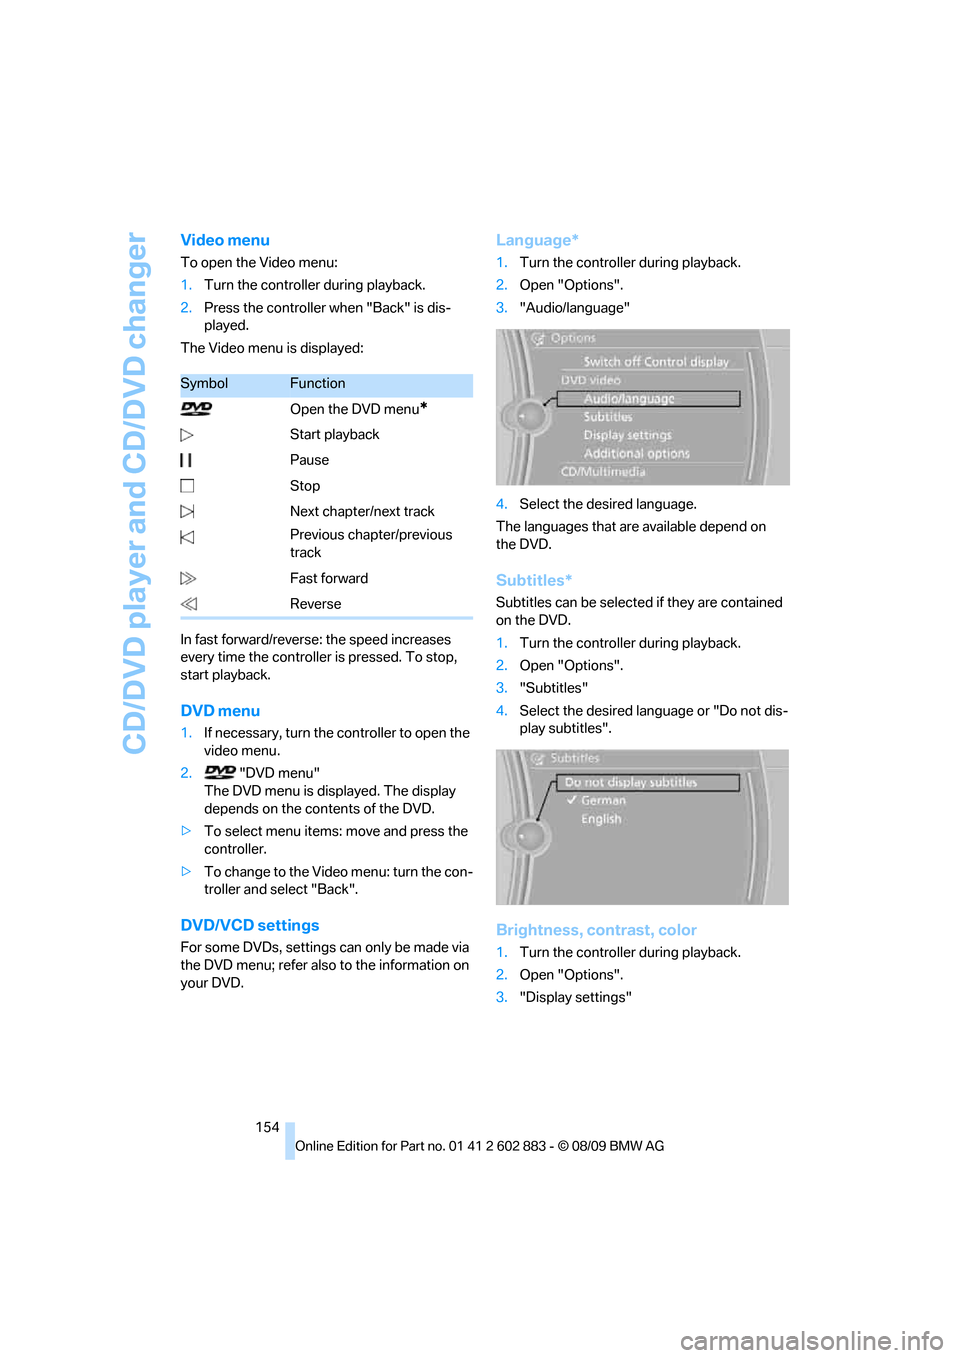
Video menu
To open the Video menu:
1.Turn the controller during playback.
2.Press the controller when "Back" is dis-
played.
The Video menu is displayed:
In fast forward/reverse: the speed increases
every time the controller is pressed. To stop,
start playback.
DVD menu
1.If necessary, turn the controller to open the
video menu.
2. "DVD menu"
The DVD menu is displayed. The display
depends on the contents of the DVD.
>To select menu items: move and press the
controller.
>To change to the Video menu: turn the con-
troller and select "Back".
DVD/VCD settings
For some DVDs, settings can only be made via
the DVD menu; refer also to the information on
your DVD.
Language*
1.Turn the controller during playback.
2.Open "Options".
3."Audio/language"
4.Select the desired language.
The languages that are available depend on
the DVD.
Subtitles*
Subtitles can be selected if they are contained
on the DVD.
1.Turn the controller during playback.
2.Open "Options".
3."Subtitles"
4.Select the desired language or "Do not dis-
play subtitles".
Brightness, contrast, color
1.Turn the controller during playback.
2.Open "Options".
3."Display settings"
SymbolFunction
Open the DVD menu
*
Start playback
Pause
Stop
Next chapter/next track
Previous chapter/previous
track
Fast forward
Reverse
Page 173 of 254

171
Entertainment
Reference
At a glance
Controls
Driving tips Communications
Navigation
Mobility
>The mobile phone is ready to operate.
>Bluetooth is activated in the vehicle, refer to
page173, and on the mobile phone.
>Depending on the mobile phone, certain
settings may be necessary on the mobile
phone, e.g., via the following menu items:
>Bluetooth switched on
>Connection must be allowed without
requiring further confirmation
>Reconnection
>Depending on the mobile phone type, the
power-saving mode setting, for example,
may result in a paired mobile phone not
being detected by the vehicle.
>For pairing purposes, define any 4 to 16-
digit number as a Bluetooth passkey,
e.g. 25081107. A long and complex number
offers the best protection against unautho-
rized access. This Bluetooth passkey is no
longer required after pairing has been suc-
cessful.
>The ignition is switched on.
Pair the mobile phone with the vehicle
only when the car is stationary, to avoid
endangering the car's occupants and other
road users by being distracted.<
Switch on ignition
1.Insert remote control all the way into the
ignition lock.
2.Switch on ignition without operating the
brake or clutch or pressing the start/stop
button.
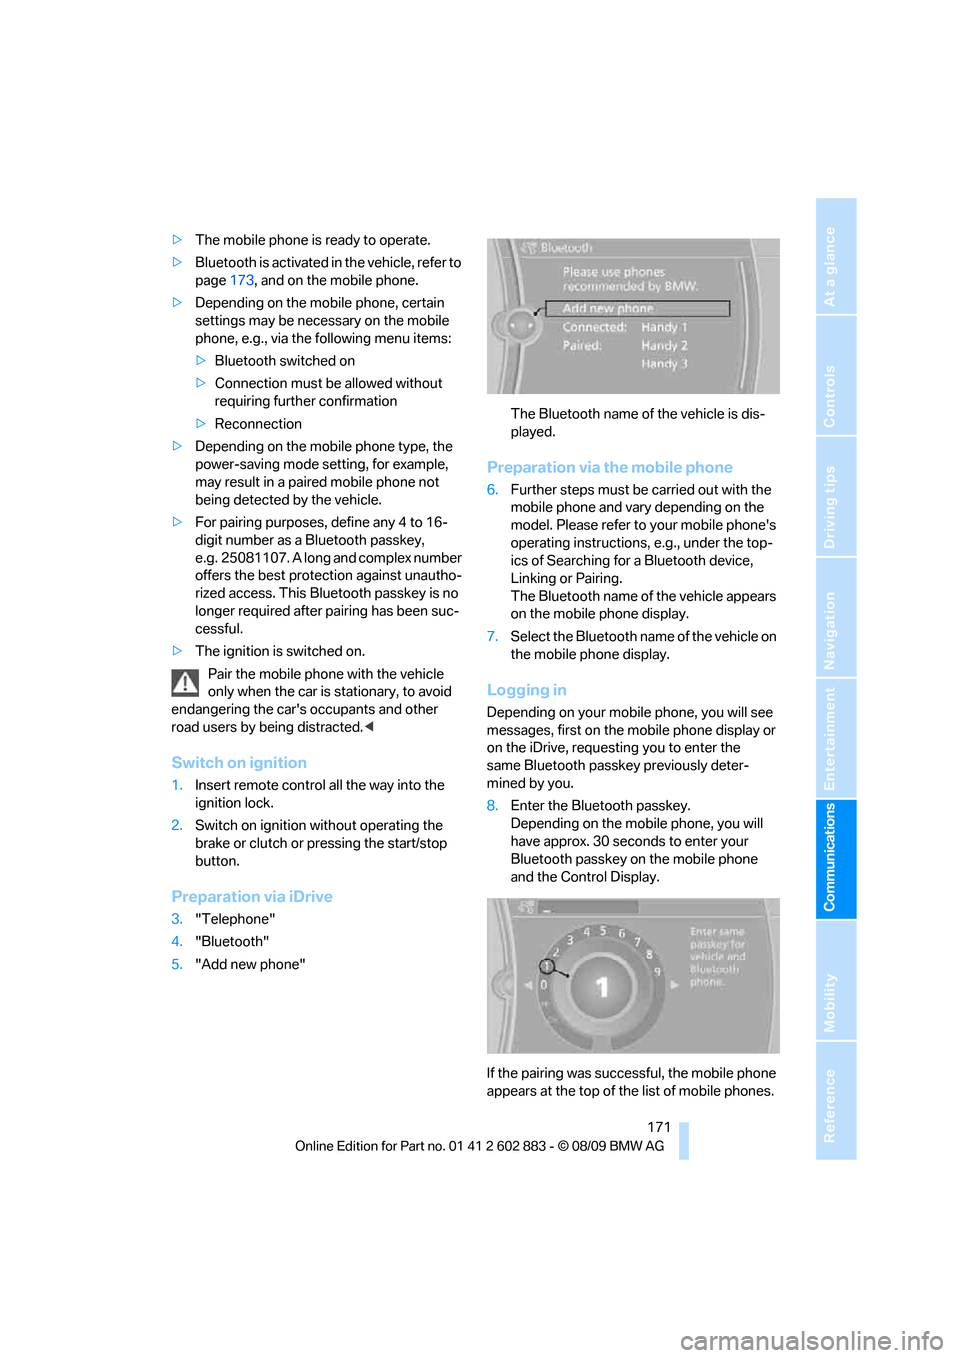
Preparation via iDrive
3."Telephone"
4."Bluetooth"
5."Add new phone"The Bluetooth name of the vehicle is dis-
played.
Preparation via the mobile phone
6.Further steps must be carried out with the
mobile phone and vary depending on the
model. Please refer to your mobile phone's
operating instructions, e.g., under the top-
ics of Searching for a Bluetooth device,
Linking or Pairing.
The Bluetooth name of the vehicle appears
on the mobile phone display.
7.Select the Bluetooth name of the vehicle on
the mobile phone display.
Logging in
Depending on your mobile phone, you will see
messages, first on the mobile phone display or
on the iDrive, requesting you to enter the
same Bluetooth passkey previously deter-
mined by you.
8.Enter the Bluetooth passkey.
Depending on the mobile phone, you will
have approx. 30 seconds to enter your
Bluetooth passkey on the mobile phone
and the Control Display.
If the pairing was successful, the mobile phone
appears at the top of the list of mobile phones.
Page 222 of 254

Giving and receiving assistance
220 2.Attach one terminal clamp of the plus/+
jumper cable to the positive terminal of the
battery or a starting-aid terminal of the vehi-
cle providing assistance.
3.Attach the second terminal clamp of the
plus/+ jumper cable to the positive terminal
of the battery or a starting-aid terminal of
the vehicle to be started.
4.Attach one terminal clamp of the minus/–
jumper cable to the negative terminal of the
battery or to an engine or body ground of
the assisting vehicle.
Your BMW has a special nut as body ground
or negative pole.
5.Attach the second terminal clamp of the
minus/– jumper cable to the negative termi-
nal of the battery or to the engine or body
ground of the vehicle to be started.
Starting the engine
1.Start the engine of the donor vehicle and
allow it to run for a few minutes at slightly
increased idle speed.
2.Start the engine on the other vehicle in the
usual way.
If the first start attempt is not successful,
wait a few minutes before another attempt
in order to allow the discharged battery to
recharge.
3.Let the engines run for a few minutes.
4.Disconnect the jumper cables by reversing
the above connecting sequence.
If necessary, have the battery checked and
recharged.
Never use spray fluids to start the
engine.<
Tow-starting, towing away
Observe the applicable laws and regula-
tions for tow-starting and towing
vehicles.<
Do not transport any passengers other
than the driver in a vehicle that is being
towed.<
Using a tow fitting
The screw-in tow fitting must always be carried
in the car. It can be screwed in at the front or
rear of the BMW.
It is stored in the onboard vehicle tool kit under-
neath the floor panel in the cargo area, refer
to page212.
Use only the towing eyelet supplied with
the vehicle and screw it in firmly until it
stops. Use the tow fitting for towing on paved
roads only. Avoid lateral loading of the tow fit-
ting, e.g., do not lift the vehicle by the tow fitting.
Otherwise, the tow fitting and the vehicle could
be damaged.<
Access to screw thread
Front
Release the cover panel in the bumper:
Press on the recess at the bottom left in the
cover panel.
Page 224 of 254

Giving and receiving assistance
222
With a tow rope
When starting off in the towing vehicle, make
sure that the tow rope is taut.
To avoid jerking and the associated
stresses on vehicle components when
towing, always use nylon ropes or nylon straps.
Attach the tow rope to the tow fittings only, as
attaching it to other parts of the vehicle could
result in damage.<
With a tow truck
Manual and automatic transmission:
7-gear sport automatic transmission with dual
clutch:
Have the BMW transported with a tow truck
with a so-called lift bar or on a flat bed.
Tow-starting
Avoid tow-starting the vehicle whenever possi-
ble; instead, jump-start the engine, refer to
page219. Vehicles with a catalytic converter
should only be tow-started when the engine
is cold.
Vehicles with an automatic transmission or 7-
gear sport automatic transmission with dual
clutch cannot be tow-started at all.
1.Switch on hazard warning flashers, comply
with local regulations.
2.Switch on the ignition, refer to page50.
3.Shift into 3rd gear.
4.Have the vehicle tow-started with the clutch
depressed and slowly release the clutch.
After the engine starts, immediately
depress the clutch completely again.
5.Stop at a suitable location, remove the tow
bar or rope and switch off the hazard warn-
ing flashers.
6.Have the vehicle checked.
Page 233 of 254

Reference 231
At a glance
Controls
Driving tips
Communications
Navigation
Entertainment
Mobility
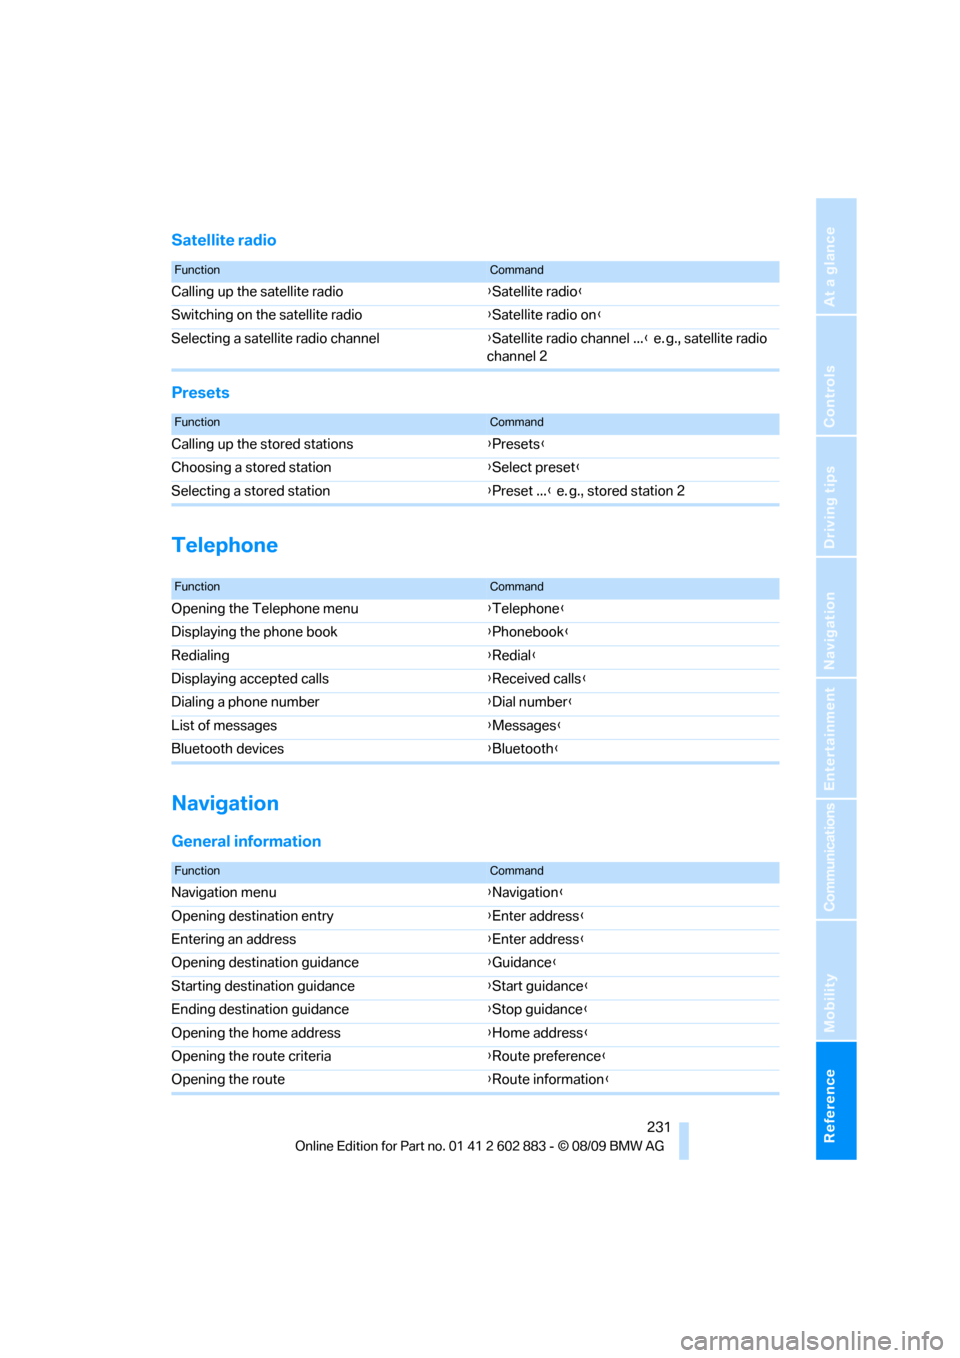
Satellite radio
Presets
Telephone
Navigation
General information
FunctionCommand
Calling up the satellite radio{Satellite radio}
Switching on the satellite radio{Satellite radio on}
Selecting a satellite radio channel{Satellite radio channel ...} e. g., satellite radio
channel 2
FunctionCommand
Calling up the stored stations{Presets}
Choosing a stored station{Select preset}
Selecting a stored station{Preset ...} e. g., stored station 2
FunctionCommand
Opening the Telephone menu{Telephone}
Displaying the phone book{Phonebook}
Redialing{Redial}
Displaying accepted calls{Received calls}
Dialing a phone number{Dial number}
List of messages{Messages}
Bluetooth devices{Bluetooth}
FunctionCommand
Navigation menu{Navigation}
Opening destination entry{Enter address}
Entering an address{Enter address}
Opening destination guidance{Guidance}
Starting destination guidance{Start guidance}
Ending destination guidance{Stop guidance}
Opening the home address{Home address}
Opening the route criteria{Route preference}
Opening the route{Route information}
Page 239 of 254

Reference 237
At a glance
Controls
Driving tips
Communications
Navigation
Entertainment
Mobility
Automatic high beams and
low beams, refer to High-
beam assistant90
Automatic recirculated-air
control AUC98
Automatic Service
Request188
Automatic transmission with
Steptronic53
– interlock53,54
– overriding selector lever
lock55
– shiftlock, refer to Changing
selector lever position54
– sport program54
– towing220
– tow-starting220
AUTO program for automatic
climate control97
AUX-IN port104,163
Available services188
Average fuel consumption66
– setting the units68
Average speed66
Avoid highways in
navigation130
Avoiding unintentional
alarms34
Axle loads, refer to
Weights228
B
Backrest contour, refer to
Lumbar support43
Backrests, refer to Seat
adjustment42
Backrest width adjustment43
Backup lamps
– replacing bulb214
Backup lamps, refer to Tail
lamps214
Band-aids, refer to First-aid
pouch219
Bar, refer to Towing
methods221Base plate for telephone or
mobile phone
– refer to Snap-in adapter180
– refer to Snap-in adapter in
the center armrest storage
compartment104
Bass, tone setting140
Battery216
– charging216
– disposal36,216
– jump-starting219
– remote control28
– temporary power failure216
Battery for mobile phone181
Battery renewal
– remote control36
– remote control for vehicle36
Being towed221
Belts, refer to Safety belts44
Belt tensioner, refer to Safety
belts44
Beverage holders, refer to
Cupholders105
Blower, refer to Air flow
rate94,97
Bluetooth, activating/
deactivating173
Bluetooth, refer to separate
Owner's Manual
BMW
– car shampoo211
BMW Assist,
activating186,188
BMW Assist184
BMW Homepage4
BMW Maintenance
System206
BMW Search186
BMW webpage4
Bottle holders, refer to
Cupholders105
Brake
– parking brake52
Brake Assist, refer to Dynamic
Brake Control DBC78Brake fluid, refer to Service
requirements69
Brake Force Display85
Brake lamps
– Brake Force Display85
– replacing bulb214
Brake pads112
– breaking in112
Brake rotors114
– brakes112
– breaking in112
Brakes
– ABS78
– BMW Maintenance
System206
– breaking in112
– service requirements69
Brakes, refer to Braking
safely114
Brake system112
– BMW Maintenance
System206
– breaking in112
– disc brakes114
Breakdown services, refer to
Roadside Assistance218
Breaking in the clutch112
Breaking in the differential,
refer to Engine and
differential112
Break-in period112
Brightness of Control
Display76
Bulb changing, refer to Lamps
and bulbs212
Button for starting the engine,
refer to Start/stop button50
Buttons on the steering
wheel11
C
California Proposition 65
warning6
Page 249 of 254

Reference 247
At a glance
Controls
Driving tips
Communications
Navigation
Entertainment
Mobility
Seats41
– adjusting electrically42
– adjusting the seats42
– heating43
– memory, refer to Seat and
mirror memory43
– saving a setting, refer to Seat
and mirror memory43
– sitting safely41
Securing cargo107
Securing the vehicle
– from inside32
– from outside29
Selecting new scale for
navigation133
Selector lever56
– automatic transmission with
Steptronic54
Selector lever lock, refer to
Changing selector lever
positions, shiftlock54
Selector lever positions
– automatic transmission with
Steptronic54
Service, refer to Roadside
Assistance218
Service car, refer to Roadside
Assistance218
Service data in the remote
control206
Service Interval Display, refer
to Condition Based Service
CBS206
Service Request187
Service requirement display,
refer to Condition Based
Service CBS206
Service requirements69
Services status188
Servotronic85
Settings
– changing on Control
Display75
– clock, 12h/24h mode72
– DVD154
– language75
Settings and information68Settings for the map
display133
Shifting57
Shifting, sport automatic
transmission57
Shifting gears
– automatic transmission with
Steptronic54
– manual transmission53
Shiftlock
– automatic transmission,
refer to Changing selector
lever positions54
Shift paddles on steering
wheel57
Short commands for the voice
activation system229
Short route in navigation, refer
to Selecting route
130
Side airbags85
Side windows, refer to
Windows36
Signal horn, refer to
Horn10,11
Sitting safely41
– with airbags41
– with safety belts41
Ski bag for convertible, refer to
Through-loading opening
with integrated transport
bag106
Slot for remote control50
Snap-in adapter
– inserting/removing180
– use170
Snap-in adapter, refer to
Center armrest storage
compartment104
Socket, Onboard Diagnosis
OBD207
Socket, refer to Connecting
electrical appliances106
SOS, refer to Sending an
Emergency Request218
Sound output for
entertainment on/off140
Spare fuses,216
Spare fuses, refer to
Fuses216Special destinations124
Special destinations,
displaying126
Special oils, refer to Specified
engine oils204
Specified engine oils204
Speed
– run-flat tires82
– with winter tires200
Speed limit74
Speed limit warning, refer to
Speed limit74
Speedometer12
Speed Volume142
SPORT+ program, Dynamic
Driving Control79,80
SPORT program, Dynamic
Driving Control79,80
Sport program with sport
automatic transmission57
Spray nozzles, refer to
Cleaning windshield and
headlamps61
Stability control, refer to
Driving stability control
systems78,79
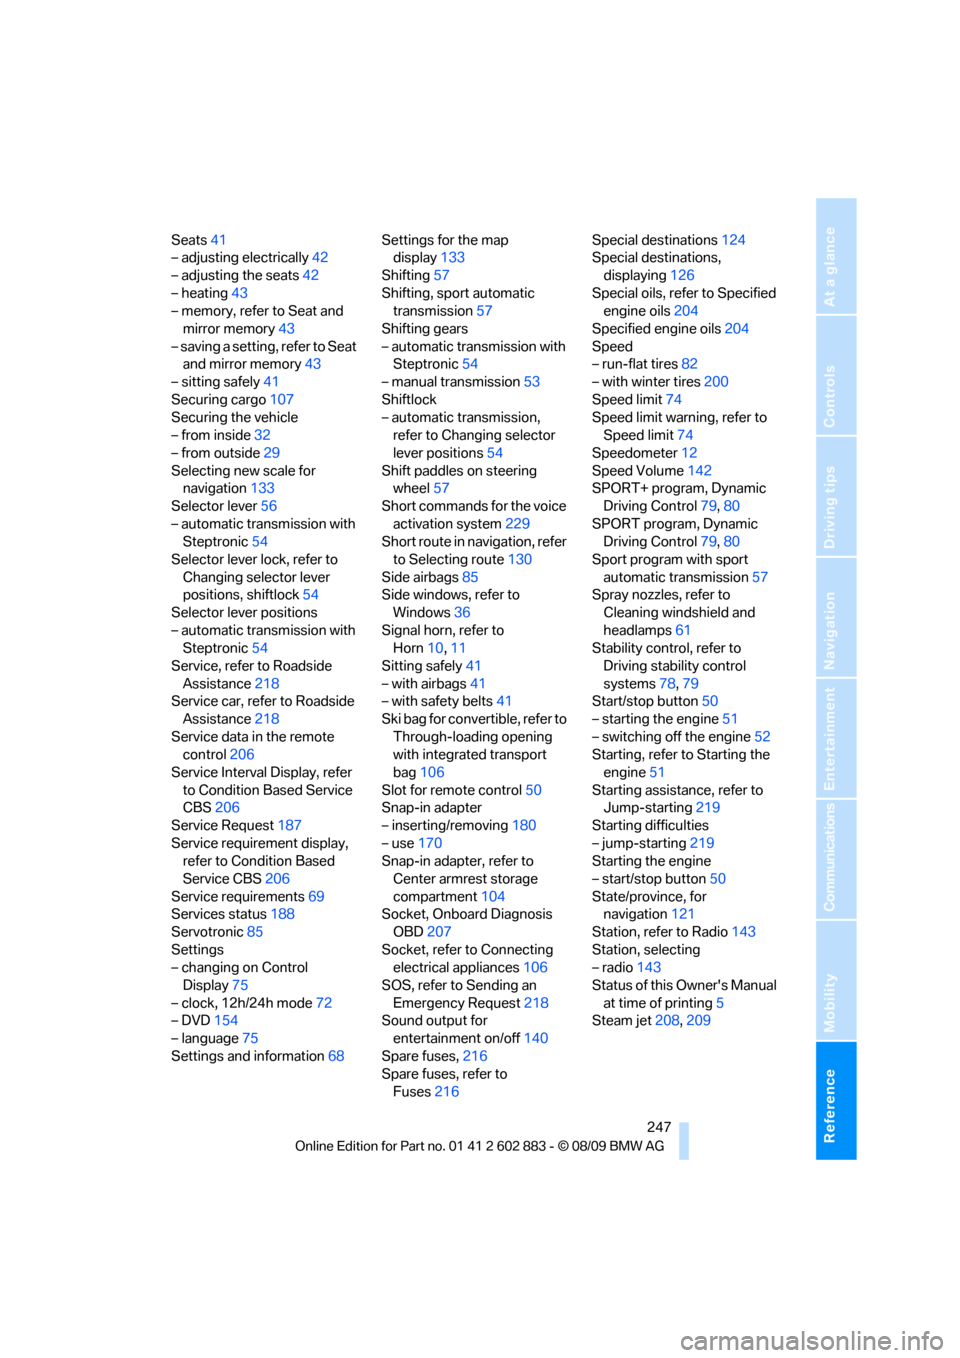
Start/stop button50
– starting the engine51
– switching off the engine52
Starting, refer to Starting the
engine51
Starting assistance, refer to
Jump-starting219
Starting difficulties
– jump-starting219
Starting the engine
– start/stop button50
State/province, for
navigation121
Station, refer to Radio143
Station, selecting
– radio143
Status of this Owner's Manual
at time of printing5
Steam jet208,209