2010 BMW Z4 ROADSTER SDRIVE35I change wheel
[x] Cancel search: change wheelPage 84 of 254
Technology for driving comfort and safety
82 3.In the event of complete tire pressure loss,
0 psi/0 kPa, you can estimate the possible
distance for continued driving on the basis
of the following guidelines:
>With a light load:
1 person without luggage:
approx. 155 miles/250 km
>With a medium load:
1 person, cargo area full, or 2 people
without luggage:
approx. 90 miles/150 km
>With a full load:
2 people, cargo area full:
approx. 30 miles/50 km
Drive cautiously and do not exceed a
speed of 50 mph or 80 km/h; otherwise,
there is a risk of an accident. In the event of
pressure loss, vehicle handling changes. This
includes reduced tracking stability in braking,
extended braking distance and altered natural
steering characteristics.
If unusual vibration or loud noises occur during
the journey, this may be an indication that the
damaged tire has finally failed. Reduce your
speed and pull over as soon as possible at a
suitable location. Otherwise, parts of the tire
could come loose, resulting in an accident. Do
not continue driving. Instead, contact your
BMW center.<
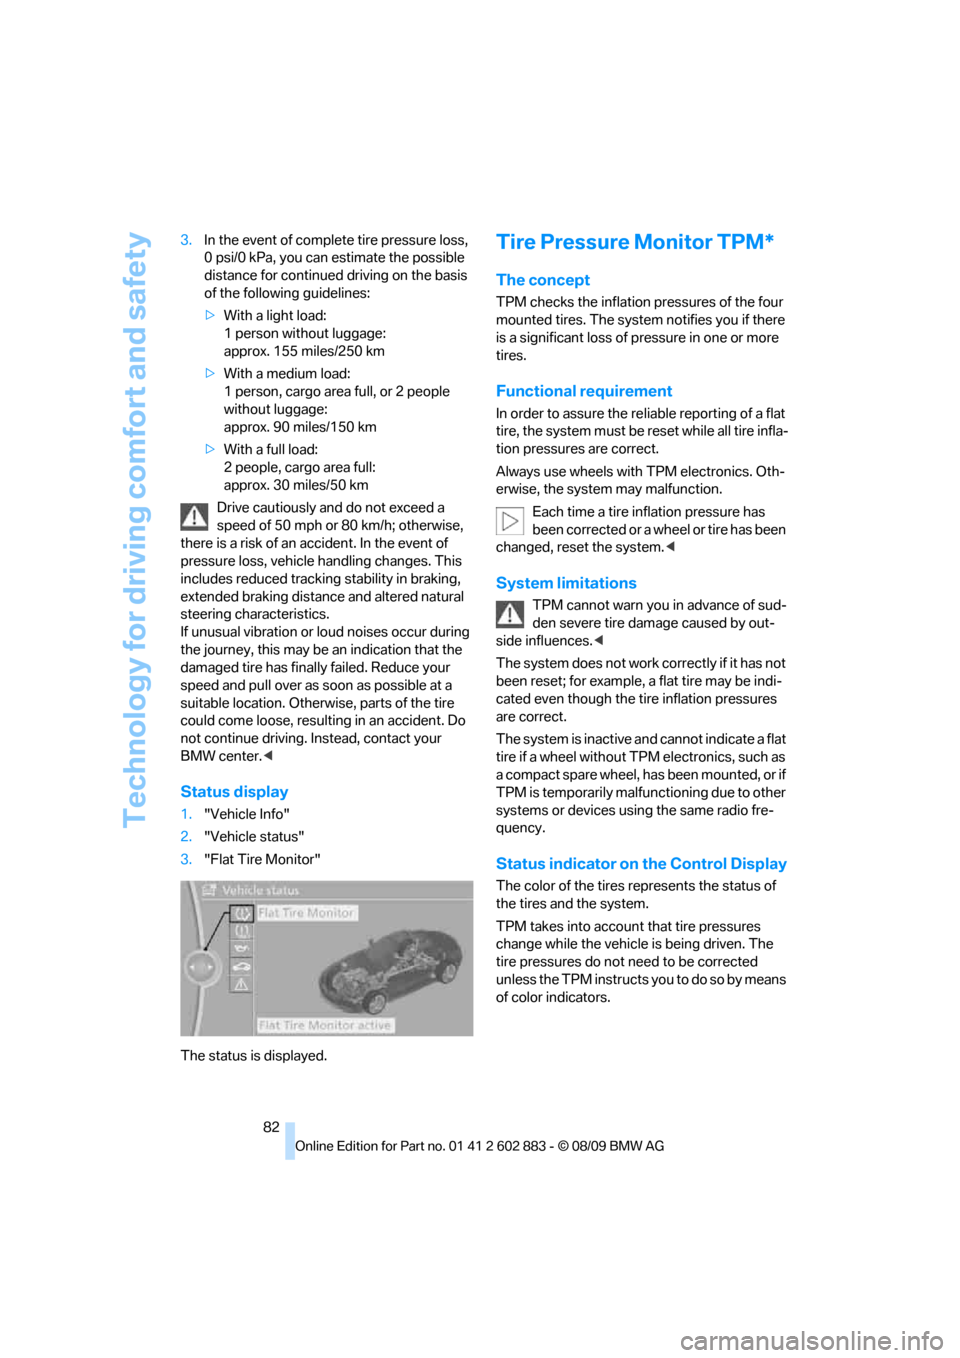
Status display
1."Vehicle Info"
2."Vehicle status"
3."Flat Tire Monitor"
The status is displayed.
Tire Pressure Monitor TPM*
The concept
TPM checks the inflation pressures of the four
mounted tires. The system notifies you if there
is a significant loss of pressure in one or more
tires.
Functional requirement
In order to assure the reliable reporting of a flat
tire, the system must be reset while all tire infla-
tion pressures are correct.
Always use wheels with TPM electronics. Oth-
erwise, the system may malfunction.
Each time a tire inflation pressure has
been corrected or a wheel or tire has been
changed, reset the system.<
System limitations
TPM cannot warn you in advance of sud-
den severe tire damage caused by out-
side influences.<
The system does not work correctly if it has not
been reset; for example, a flat tire may be indi-
cated even though the tire inflation pressures
are correct.
The system is inactive and cannot indicate a flat
tire if a wheel without TPM electronics, such as
a compact spare wheel, has been mounted, or if
TPM is temporarily malfunctioning due to other
systems or devices using the same radio fre-
quency.
Status indicator on the Control Display
The color of the tires represents the status of
the tires and the system.
TPM takes into account that tire pressures
change while the vehicle is being driven. The
tire pressures do not need to be corrected
unless the TPM instructs you to do so by means
of color indicators.
Page 85 of 254
Controls
83Reference
At a glance
Driving tips
Communications
Navigation
Entertainment
Mobility
Green
The tire inflation pressure corresponds to the
established target value.
"TPM active" appears on the Control Display.
One wheel yellow
There is a flat tire or substantial loss of tire pres-
sure in the indicated tire. A message appears on
the Control Display.
All wheels yellow
There is a flat tire or substantial loss of tire pres-
sure in several tires. A message appears on the
Control Display.
Gray
The system cannot detect a puncture.
Possible reasons for this:
>TPM is being reset
>Temporary malfunction caused by systems
or devices using the same radio frequency
>Malfunction
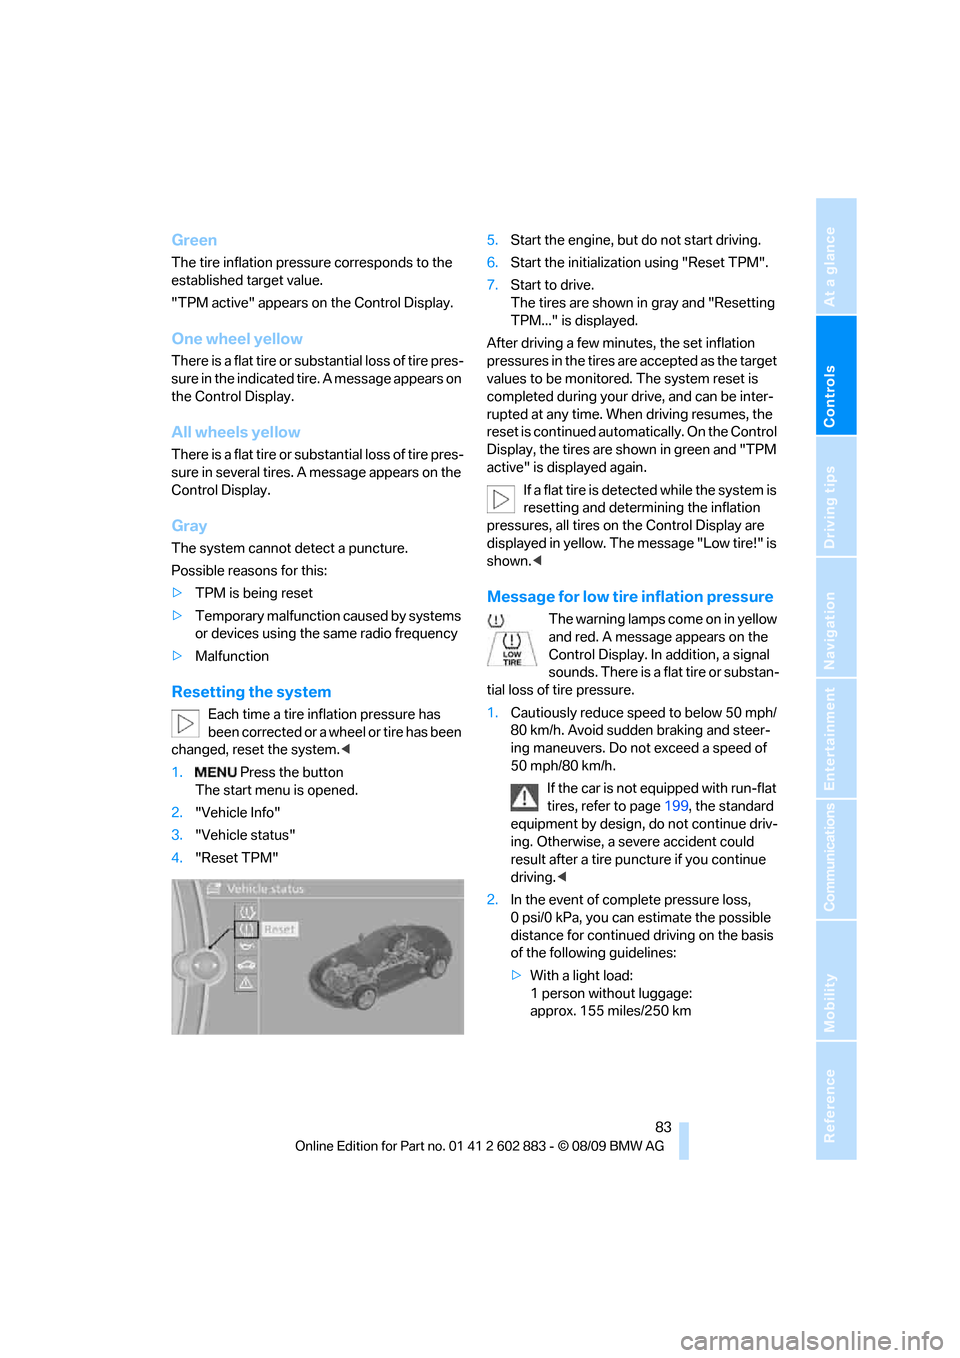
Resetting the system
Each time a tire inflation pressure has
been corrected or a wheel or tire has been
changed, reset the system.<
1. Press the button
The start menu is opened.
2."Vehicle Info"
3."Vehicle status"
4."Reset TPM"5.Start the engine, but do not start driving.
6.Start the initialization using "Reset TPM".
7.Start to drive.
The tires are shown in gray and "Resetting
TPM..." is displayed.
After driving a few minutes, the set inflation
pressures in the tires are accepted as the target
values to be monitored. The system reset is
completed during your drive, and can be inter-
rupted at any time. When driving resumes, the
reset is continued automatically. On the Control
Display, the tires are shown in green and "TPM
active" is displayed again.
If a flat tire is detected while the system is
resetting and determining the inflation
pressures, all tires on the Control Display are
displayed in yellow. The message "Low tire!" is
shown.<
Message for low tire inflation pressure
The warning lamps come on in yellow
and red. A message appears on the
Control Display. In addition, a signal
sounds. There is a flat tire or substan-
tial loss of tire pressure.
1.Cautiously reduce speed to below 50 mph/
80 km/h. Avoid sudden braking and steer-
ing maneuvers. Do not exceed a speed of
50 mph/80 km/h.
If the car is not equipped with run-flat
tires, refer to page199, the standard
equipment by design, do not continue driv-
ing. Otherwise, a severe accident could
result after a tire puncture if you continue
driving.<
2.In the event of complete pressure loss,
0 psi/0 kPa, you can estimate the possible
distance for continued driving on the basis
of the following guidelines:
>With a light load:
1 person without luggage:
approx. 155 miles/250 km
Page 86 of 254

Technology for driving comfort and safety
84 >With a medium load:
1 person, cargo area full, or 2 people
without luggage:
approx. 95 miles/150 km
>With a full load:
2 people, cargo area full:
approx. 30 miles/50 km
Drive cautiously and do not exceed a
speed of 50 mph/80 km/h. In the event of
pressure loss, vehicle handling changes. This
includes reduced tracking stability in braking,
extended braking distance and altered natural
steering characteristics.
If unusual vibration or loud noises occur during
the journey, this may be an indication that the
damaged tire has finally failed. Reduce your
speed and pull over as soon as possible at a
suitable location. Otherwise, parts of the tire
could come loose, resulting in an accident. Do
not continue driving. Instead, contact your
BMW center.<
Message for unsuccessful system
reset
The warning lamp lights up yellow. A
message will appear on the Control
Display. The system was not reset
after a tire was changed, for example.
Check the tire inflation pressure and reset the
system, refer to page83.
Status display
1. Press the button
The start menu is opened.
2."Vehicle Info"
3."Vehicle status"
4."TPM"
5.The status is displayed.
Malfunction
The small warning lamp flashes in
yellow and then lights up continu-
ously; the larger warning lamp comes
on in yellow. On the Control Display,
the tires are shown in gray and a message
appears. No punctures can be detected.This type of message is shown in the following
situations:
>If there is a malfunction
Have the system checked.
>If a wheel without TPM electronics has
been mounted
>If TPM is temporarily malfunctioning due to
other systems or devices using the same
radio frequency.
Declaration according to NHTSA/
FMVSS 138
Tire Pressure Monitoring Systems
Each tire should be checked monthly when cold
and inflated to the inflation pressure recom-
mended by the vehicle manufacturer on the
vehicle placard or tire inflation pressure label. If
your vehicle has tires of a different size than the
size indicated on the vehicle placard or tire infla-
tion pressure label, you should determine the
proper tire inflation pressure for those tires. As
an added safety feature, your vehicle has been
equipped with a tire pressure monitoring sys-
tem, TPMS, that illuminates a low tire pressure
telltale when one or more of your tires are signif-
icantly under-inflated. Accordingly, when the
low tire pressure telltale illuminates, you should
stop and check your tires as soon as possible,
and inflate them to the proper pressure. Driving
on a significantly underinflated tire causes the
tire to overheat and can lead to tire failure.
Underinflation also reduces fuel efficiency and
tire tread life, and may affect the vehicle’s han-
dling and stopping ability. Please note that the
TPMS is not a substitute for proper tire mainte-
nance, and it is the driver’s responsibility to
maintain correct tire pressure, even if underin-
flation has not reached the level at which the
TPMS low tire pressure telltale illuminates.
The TPMS malfunction indicator is combined
with the low tire pressure telltale. When the sys-
tem detects a malfunction, the telltale will flash
for approximately one minute and then remain
continuously lit. This sequence will continue
upon subsequent vehicle startups as long as
the malfunction exists. When the malfunction
indicator is illuminated, the system may not be
Page 88 of 254
Technology for driving comfort and safety
86 vidual components of the system or its wiring in
any way. This includes the upholstered covers
of the steering wheel, the dashboard and the
seats. Do not attempt to remove or dismantle
the steering wheel.
Do not touch the individual components imme-
diately after the system has been triggered,
because there is a danger of burns.
In the event of malfunctions, deactivation or
triggering of the airbag restraint system, have
the testing, repair, removal and disposal of air-
bag generators executed only by a BMW center
or a workshop that works according to repair
procedures of BMW with correspondingly
trained personnel and that has the required
explosives licenses. Unprofessional attempts to
work on the system could lead to failure in an
emergency or to undesired airbag activation,
either of which could result in personal injury.<
Warning notices and information about the air-
bags can also be found on the sun visors.
Automatic deactivation of the
passenger airbags
The system determines whether the passenger
seat is occupied by measuring the resistance of
the human body. Front, knee and side airbags
on the passenger side are activated or deacti-
vated accordingly.
Make sure that the passenger keeps his
or her feet in the footwell; otherwise, the
passenger airbags may not function properly.<
The indicator lamp above the interior rearview
mirror shows the current status of the passen-
ger airbags, deactivated or activated, refer to
Status of passenger airbags below.
Before transporting a child on the front
passenger seat, read the safety precau-
tions and handling instructions under Trans-
porting children safely, see page48.
Malfunction of the automatic
deactivation system
The front, knee and side airbags can also be
deactivated by adolescents and adults sitting in
certain positions; the indicator lamp for the pas-
senger airbags comes on. In such cases, the
passenger should change his or her sitting
position so that the passenger airbags are acti-
vated and the indicator lamp goes out. If the
desired airbag status cannot be achieved by
changing the sitting position, do not transport
the passenger in the vehicle.
To make sure that occupation of the seat cush-
ion can be detected correctly:
>Do not attach seat covers, seat cushion
padding, ball mats or other items to the pas-
senger seat unless they are specifically rec-
ommended by BMW.
>Do not place any items under the seat which
could press against the seat from below.<
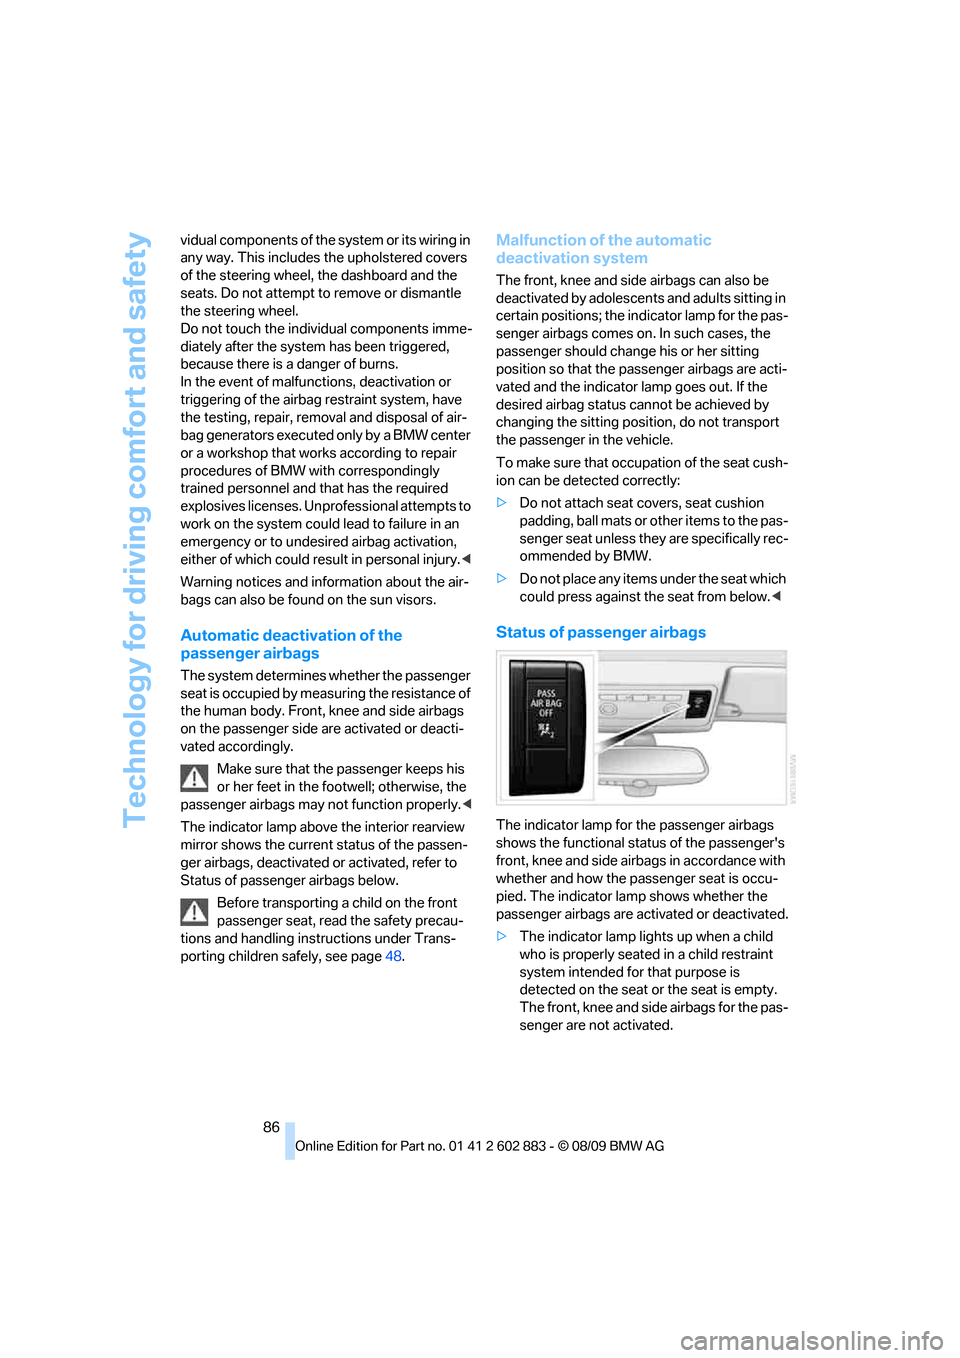
Status of passenger airbags
The indicator lamp for the passenger airbags
shows the functional status of the passenger's
front, knee and side airbags in accordance with
whether and how the passenger seat is occu-
pied. The indicator lamp shows whether the
passenger airbags are activated or deactivated.
>The indicator lamp lights up when a child
who is properly seated in a child restraint
system intended for that purpose is
detected on the seat or the seat is empty.
The front, knee and side airbags for the pas-
senger are not activated.
Page 97 of 254
Controls
95Reference
At a glance
Driving tips
Communications
Navigation
Entertainment
Mobility
Rear window defroster
The defroster switches off auto-
matically after a certain time or
when the hardtop is opened.
Temperature
To increase the temperature, turn
the rotary switch clockwise
towards red.
For a lower temperature, turn the
rotary switch counterclockwise towards blue.
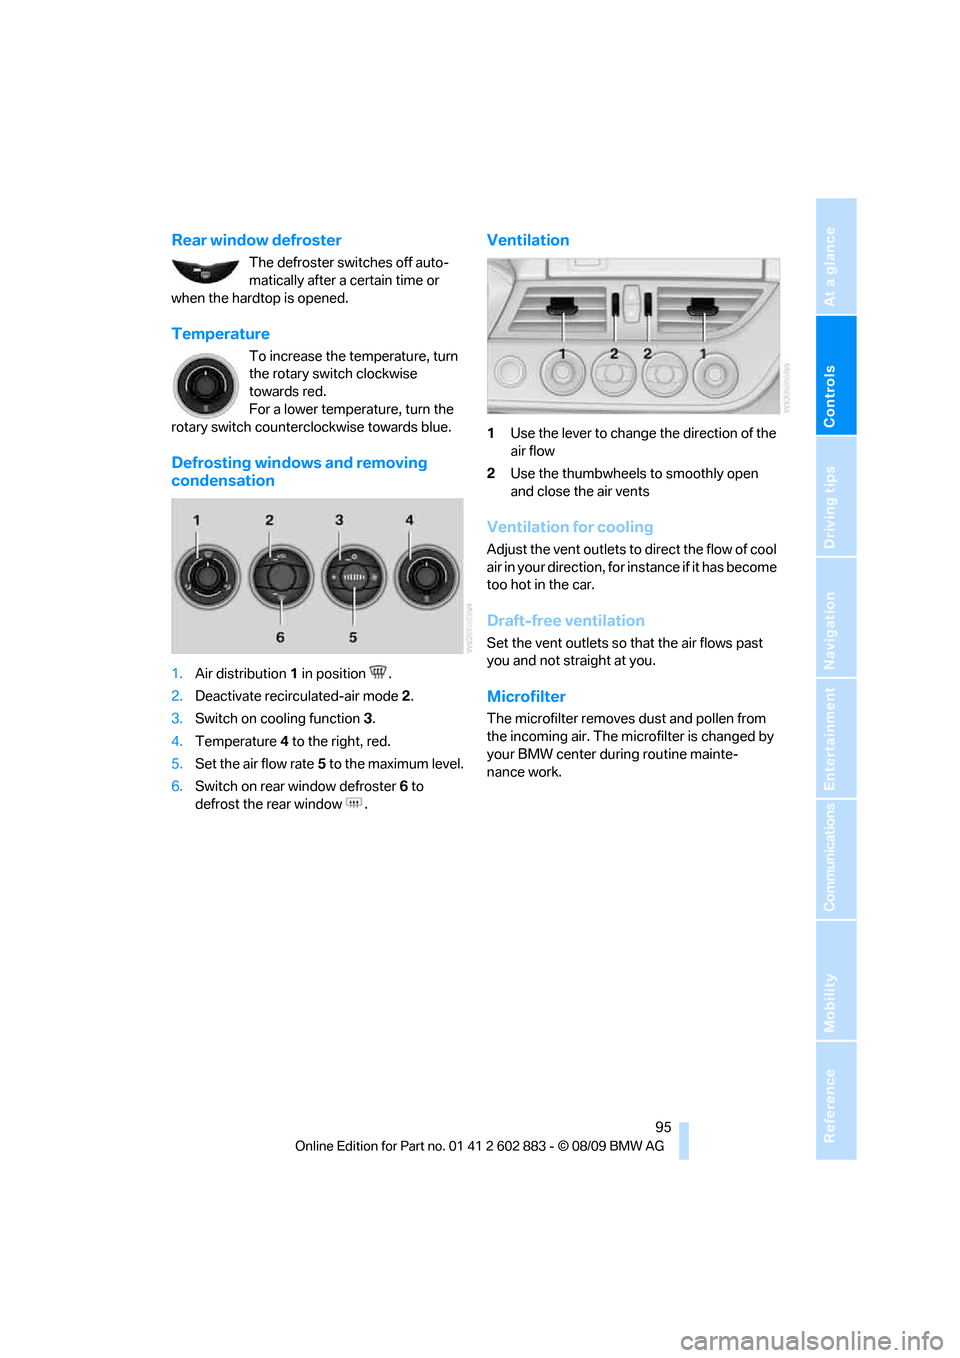
Defrosting windows and removing
condensation
1.Air distribution1 in position .
2.Deactivate recirculated-air mode 2.
3.Switch on cooling function 3.
4.Temperature4 to the right, red.
5.Set the air flow rate5 to the maximum level.
6.Switch on rear window defroster 6 to
defrost the rear window .
Ventilation
1Use the lever to change the direction of the
air flow
2Use the thumbwheels to smoothly open
and close the air vents
Ventilation for cooling
Adjust the vent outlets to direct the flow of cool
air in your direction, for instance if it has become
too hot in the car.
Draft-free ventilation
Set the vent outlets so that the air flows past
you and not straight at you.
Microfilter
The microfilter removes dust and pollen from
the incoming air. The microfilter is changed by
your BMW center during routine mainte-
nance work.
Page 142 of 254
On/off and tone
140
On/off and tone
The following audio and video sources share
the same control elements and adjustments:
>Radio
>CD/DVD player
>CD/DVD changer
*
>Video*
>External devices, e.g., MP3 player
Controls
The audio and video sources can be controlled
using the:
>Buttons near the CD/DVD player
>iDrive
>Buttons on the steering wheel, refer
to page10
>Programmable memory keys, refer
to page21
>Voice activation system
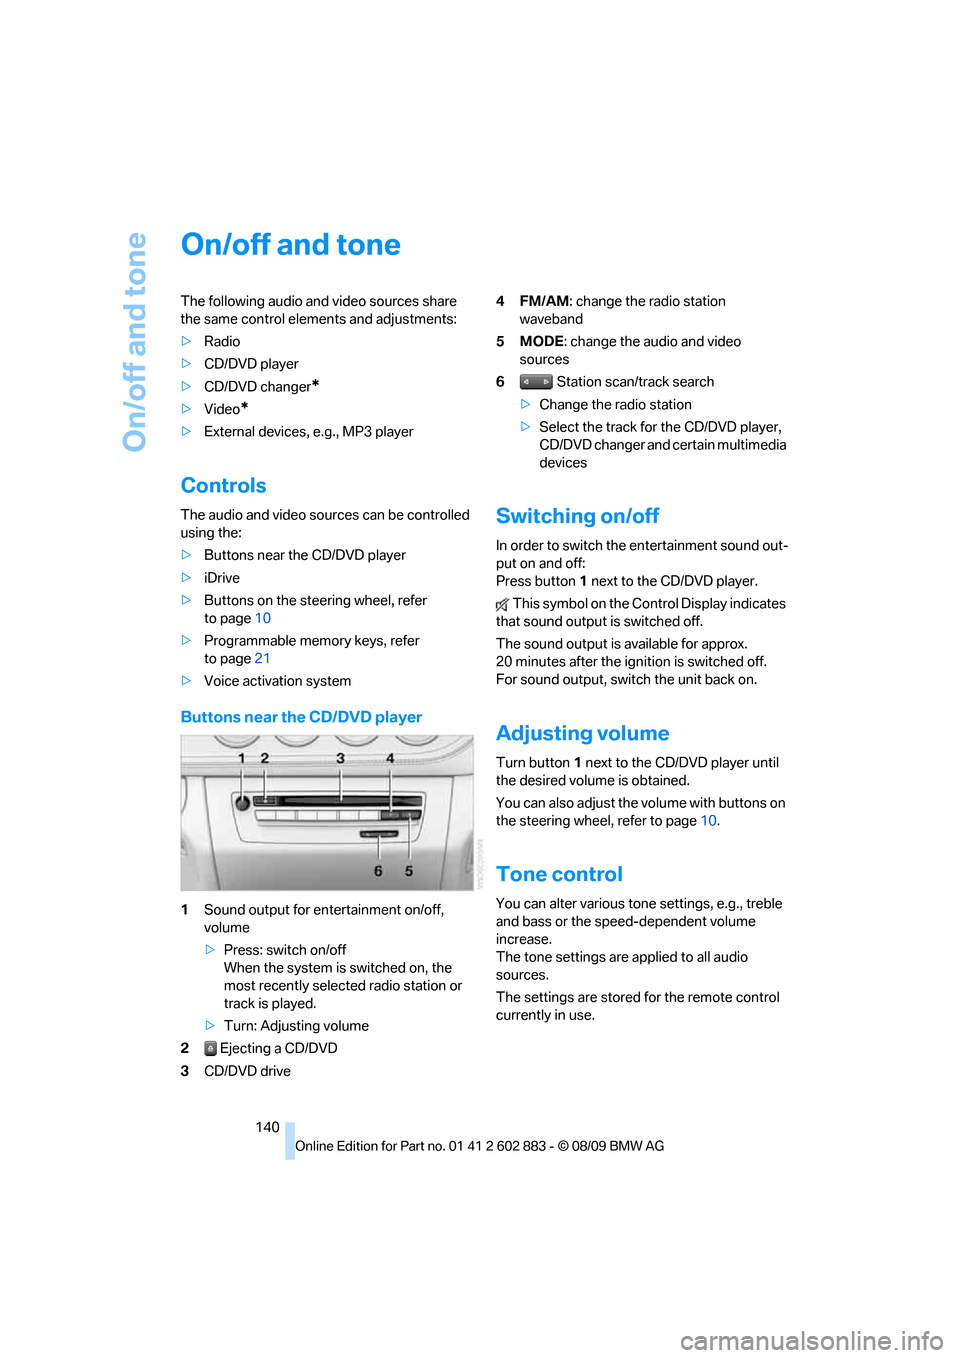
Buttons near the CD/DVD player
1Sound output for entertainment on/off,
volume
>Press: switch on/off
When the system is switched on, the
most recently selected radio station or
track is played.
>Turn: Adjusting volume
2 Ejecting a CD/DVD
3CD/DVD drive4FM/AM: change the radio station
waveband
5MODE: change the audio and video
sources
6 Station scan/track search
>Change the radio station
>Select the track for the CD/DVD player,
CD/DVD changer and certain multimedia
devices
Switching on/off
In order to switch the entertainment sound out-
put on and off:
Press button1 next to the CD/DVD player.
This symbol on the Control Display indicates
that sound output is switched off.
The sound output is available for approx.
20 minutes after the ignition is switched off.
For sound output, switch the unit back on.
Adjusting volume
Turn button1 next to the CD/DVD player until
the desired volume is obtained.
You can also adjust the volume with buttons on
the steering wheel, refer to page10.
Tone control
You can alter various tone settings, e.g., treble
and bass or the speed-dependent volume
increase.
The tone settings are applied to all audio
sources.
The settings are stored for the remote control
currently in use.
Page 215 of 254
Mobility
213Reference
At a glance
Controls
Driving tips
Communications
Navigation
Entertainment
Xenon lamps
Have any work on the xenon lamp system,
including bulb replacements, performed
only by a BMW center or a workshop that works
according to BMW repair procedures with cor-
respondingly trained personnel. Otherwise, if
such work is carried out improperly, the high
voltage in the system presents the danger of
fatal injuries.<
Parking lamps and roadside parking
lamps, daytime running lights
H8 bulb, 35 watts
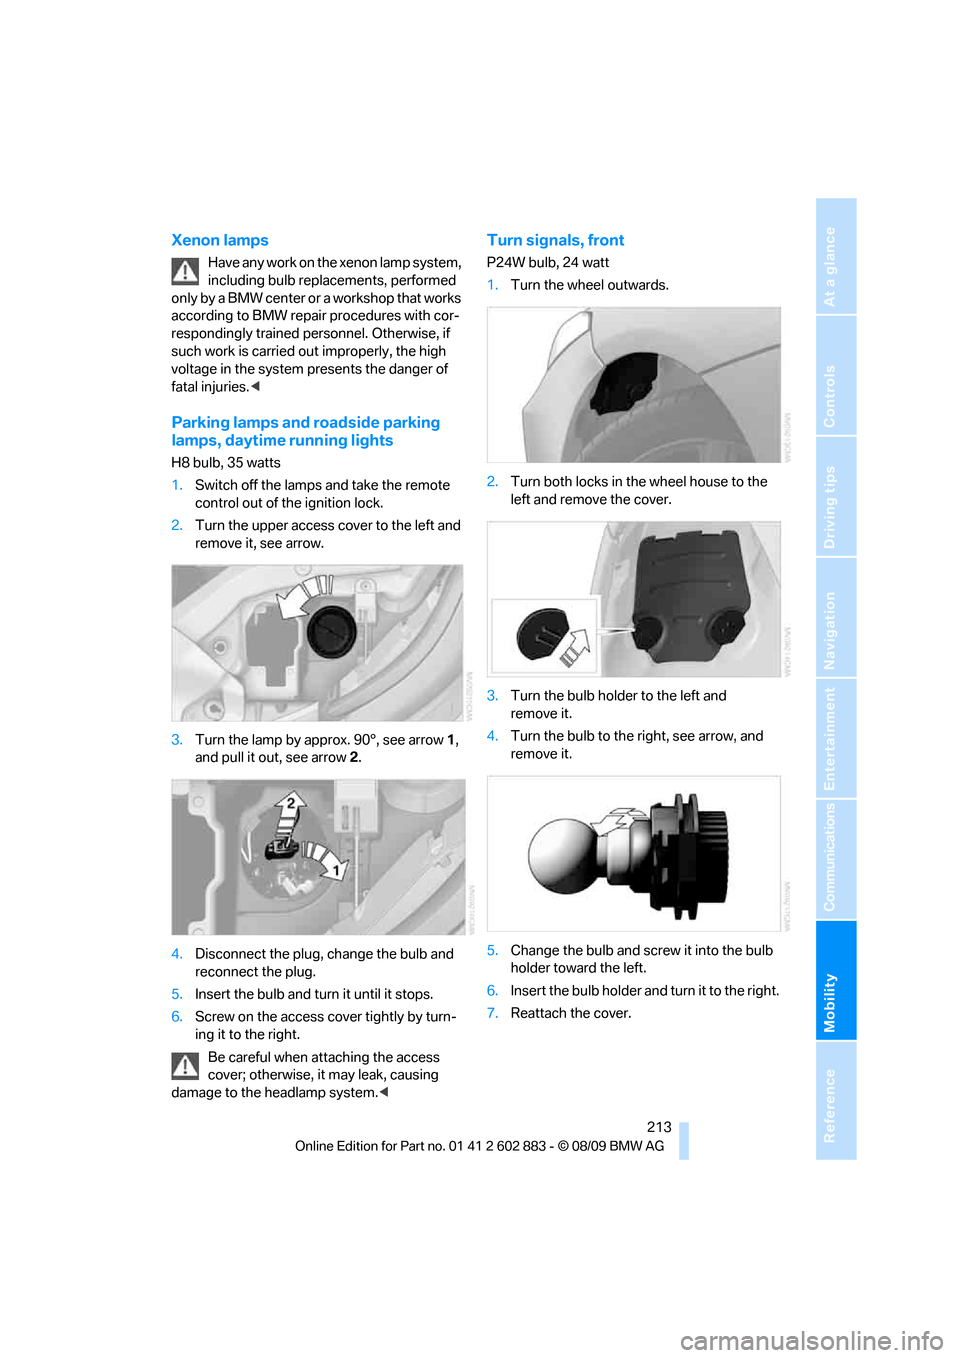
1.Switch off the lamps and take the remote
control out of the ignition lock.
2.Turn the upper access cover to the left and
remove it, see arrow.
3.Turn the lamp by approx. 90°, see arrow 1,
and pull it out, see arrow 2.
4.Disconnect the plug, change the bulb and
reconnect the plug.
5.Insert the bulb and turn it until it stops.
6.Screw on the access cover tightly by turn-
ing it to the right.
Be careful when attaching the access
cover; otherwise, it may leak, causing
damage to the headlamp system.<
Turn signals, front
P24W bulb, 24 watt
1.Turn the wheel outwards.
2.Turn both locks in the wheel house to the
left and remove the cover.
3.Turn the bulb holder to the left and
remove it.
4.Turn the bulb to the right, see arrow, and
remove it.
5.Change the bulb and screw it into the bulb
holder toward the left.
6.Insert the bulb holder and turn it to the right.
7.Reattach the cover.
Page 217 of 254

Mobility
215Reference
At a glance
Controls
Driving tips
Communications
Navigation
Entertainment
2.Pull out the bulb holder, see arrow, and
change the bulb.
3.Attach the bulb holder.
4.Reattach the cover.
License plate lamp, rear lamp, center
brake lamp and turn signal
These lamps use LED technology for operation.
In the event of a malfunction, please contact
your BMW center or a workshop that works
according to BMW repair procedures with cor-
respondingly trained personnel.
Changing wheels
Your BMW is equipped with run-flat tires as
standard. This removes the need to change a
wheel immediately in the event of a puncture.
For information on continuing to drive with a
damaged tire, refer to Indication of a flat tire
on page81.
The symbol identifying run-flat tires is a circle
with the letters RSC on the sidewall, refer to
Run-flat tires, page199.
When mounting new tires or changing over
from summer to winter tires and vice versa,
mount run-flat tires for your own safety. In the
event of a flat, no spare wheel is available. Your
BMW center will be glad to advise you. Refer
also to New wheels and tires, page199.
The tools for changing wheels are avail-
able as optional accessories from your
BMW center.<
Jack mounting points
The jacking points are at the positions shown in
the illustration.
Lug bolt lock*
1Lug bolt for adapter
2Adapter, in onboard vehicle tool kit
Removing the wind deflector
1.Remove the adapter 2 from the onboard
vehicle tool kit and insert it in the lug bolt.
2.Unscrew the lug bolt1.
Remove the adapter after screwing the lug bolt
back on.
The code number is stamped on the front of the
adapter. Please note down this number and
keep it in a safe place in case the adapter should
get lost.