2010 BMW Z4 ROADSTER SDRIVE35I display
[x] Cancel search: displayPage 158 of 254
CD/DVD player and CD/DVD changer
156
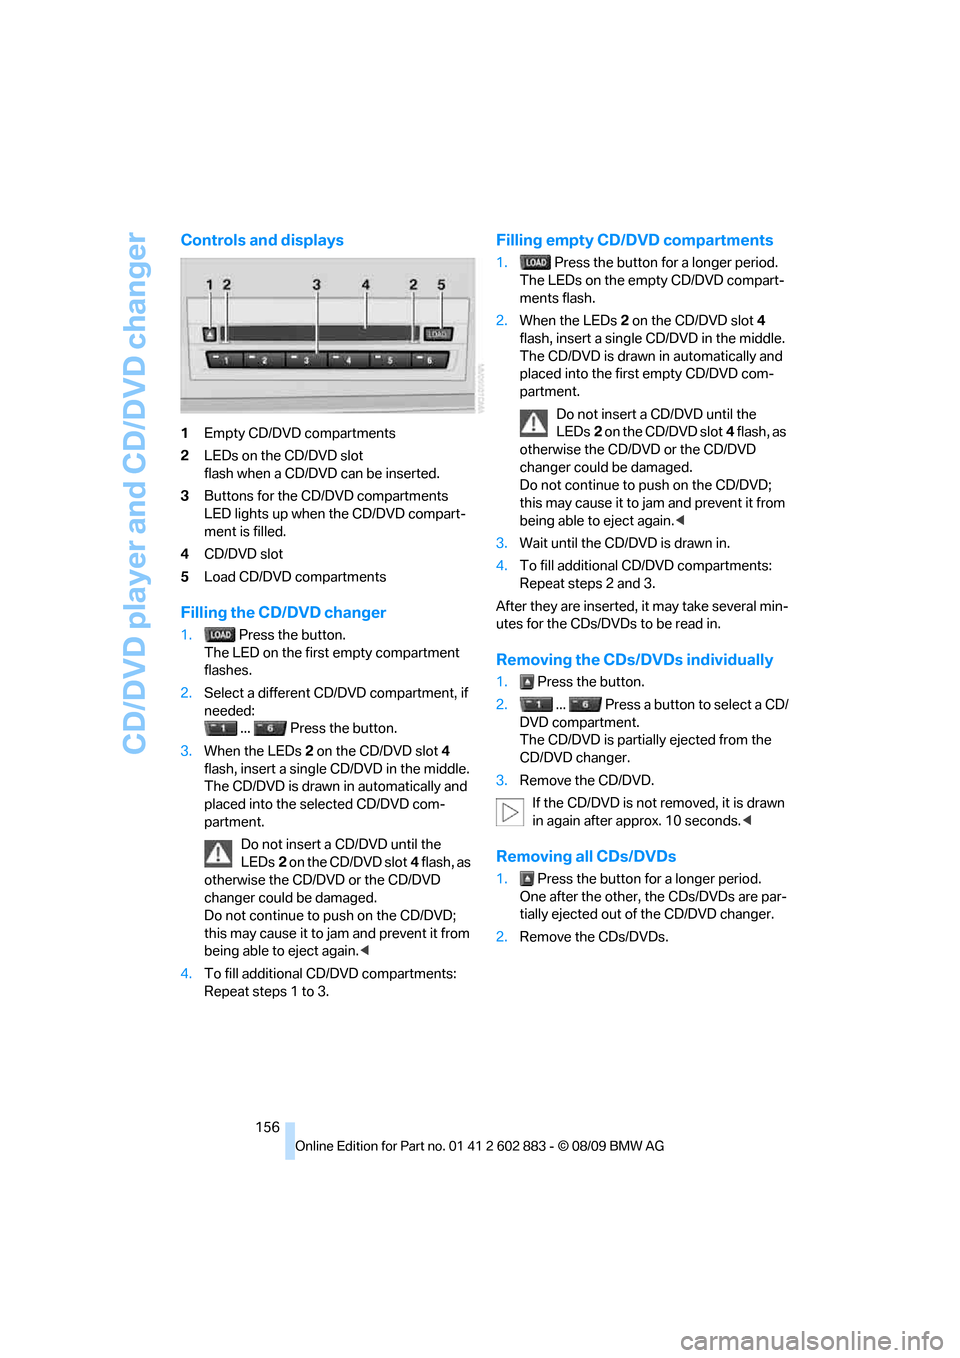
Controls and displays
1Empty CD/DVD compartments
2LEDs on the CD/DVD slot
flash when a CD/DVD can be inserted.
3Buttons for the CD/DVD compartments
LED lights up when the CD/DVD compart-
ment is filled.
4CD/DVD slot
5Load CD/DVD compartments
Filling the CD/DVD changer
1. Press the button.
The LED on the first empty compartment
flashes.
2.Select a different CD/DVD compartment, if
needed:
... Press the button.
3.When the LEDs 2 on the CD/DVD slot4
flash, insert a single CD/DVD in the middle.
The CD/DVD is drawn in automatically and
placed into the selected CD/DVD com-
partment.
Do not insert a CD/DVD until the
LEDs2 on the CD/DVD slot4 flash, as
otherwise the CD/DVD or the CD/DVD
changer could be damaged.
Do not continue to push on the CD/DVD;
this may cause it to jam and prevent it from
being able to eject again.<
4.To fill additional CD/DVD compartments:
Repeat steps 1 to 3.
Filling empty CD/DVD compartments
1. Press the button for a longer period.
The LEDs on the empty CD/DVD compart-
ments flash.
2.When the LEDs 2 on the CD/DVD slot4
flash, insert a single CD/DVD in the middle.
The CD/DVD is drawn in automatically and
placed into the first empty CD/DVD com-
partment.
Do not insert a CD/DVD until the
LEDs2 on the CD/DVD slot4 flash, as
otherwise the CD/DVD or the CD/DVD
changer could be damaged.
Do not continue to push on the CD/DVD;
this may cause it to jam and prevent it from
being able to eject again.<
3.Wait until the CD/DVD is drawn in.
4.To fill additional CD/DVD compartments:
Repeat steps 2 and 3.
After they are inserted, it may take several min-
utes for the CDs/DVDs to be read in.
Removing the CDs/DVDs individually
1. Press the button.
2. ... Press a button to select a CD/
DVD compartment.
The CD/DVD is partially ejected from the
CD/DVD changer.
3.Remove the CD/DVD.
If the CD/DVD is not removed, it is drawn
in again after approx. 10 seconds.<
Removing all CDs/DVDs
1. Press the button for a longer period.
One after the other, the CDs/DVDs are par-
tially ejected out of the CD/DVD changer.
2.Remove the CDs/DVDs.
Page 160 of 254
Music collection
158
Music collection
Storing music
The music tracks from CDs, DVDs and USB
devices can be stored in the music collection in
the vehicle and played from there.
>Audio CD: tracks are converted into a com-
pressed audio format when they are stored.
If available, information on the album, such
as the artist, is stored as well.
>CD/DVD or USB device with compressed
audio files: The entire content of the CD/
DVD or the USB device is stored in the vehi-
cle as an album. After storing, the tracks and
directories can be deleted individually. Files
are only stored in the WMA, MP3, and AAC
formats.
Tracks with DRM copy protection can
be stored in the vehicle but cannot be
played back.
Regularly back up the music data; other-
wise, it could be lost if there is a fault on
the hard drive.<
Music recognition technology and
related data are provided by
Gracenote®. Gracenote® is the industry stan-
dard in music recognition technology and
related content delivery. For more information,
please visit www.gracenote.com.
CD and music-related data from Gracenote,
Inc., copyright
© 2000-2009 Gracenote. Gracenote Software,
copyright 2000-2009 Gracenote. This product
and service may practice one or more of the fol-
lowing U.S. Patents: #5,987,525; #6,061,680;
#6,154,773, #6,161,132, #6,230,192,
#6,230,207, #6,240,459, #6,330,593, and
other patents issued or pending. Some services
supplied under license from Open Globe, Inc.
for U.S. Patent: 6.304.523.Gracenote and CDDB are registered trade
marks of Gracenote. The Gracenote logo, the
logo typeface and the "powered by Gracenote"
logo are trade marks of Gracenote.
Storing from CDs/DVDs
CDs/DVDs can only be stored from the CD/DVD
player.
1.Insert a CD/DVD into the CD/DVD player.
2."CD/Multimedia"
3."CD/DVD"
4. Select the symbol for the CD/DVD
player.
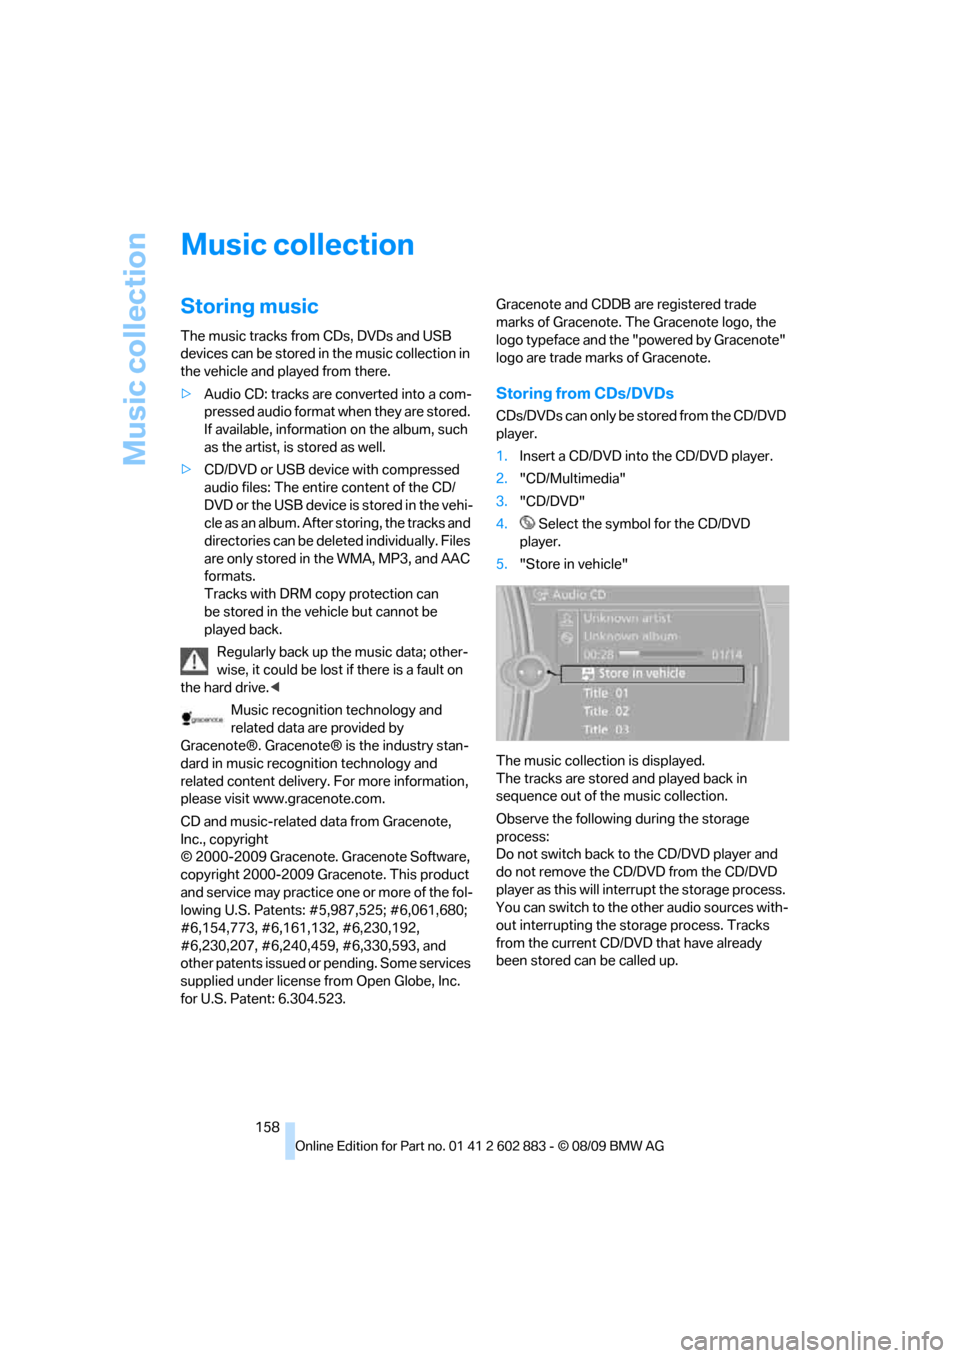
5."Store in vehicle"
The music collection is displayed.
The tracks are stored and played back in
sequence out of the music collection.
Observe the following during the storage
process:
Do not switch back to the CD/DVD player and
do not remove the CD/DVD from the CD/DVD
player as this will interrupt the storage process.
You can switch to the other audio sources with-
out interrupting the storage process. Tracks
from the current CD/DVD that have already
been stored can be called up.
Page 162 of 254
Music collection
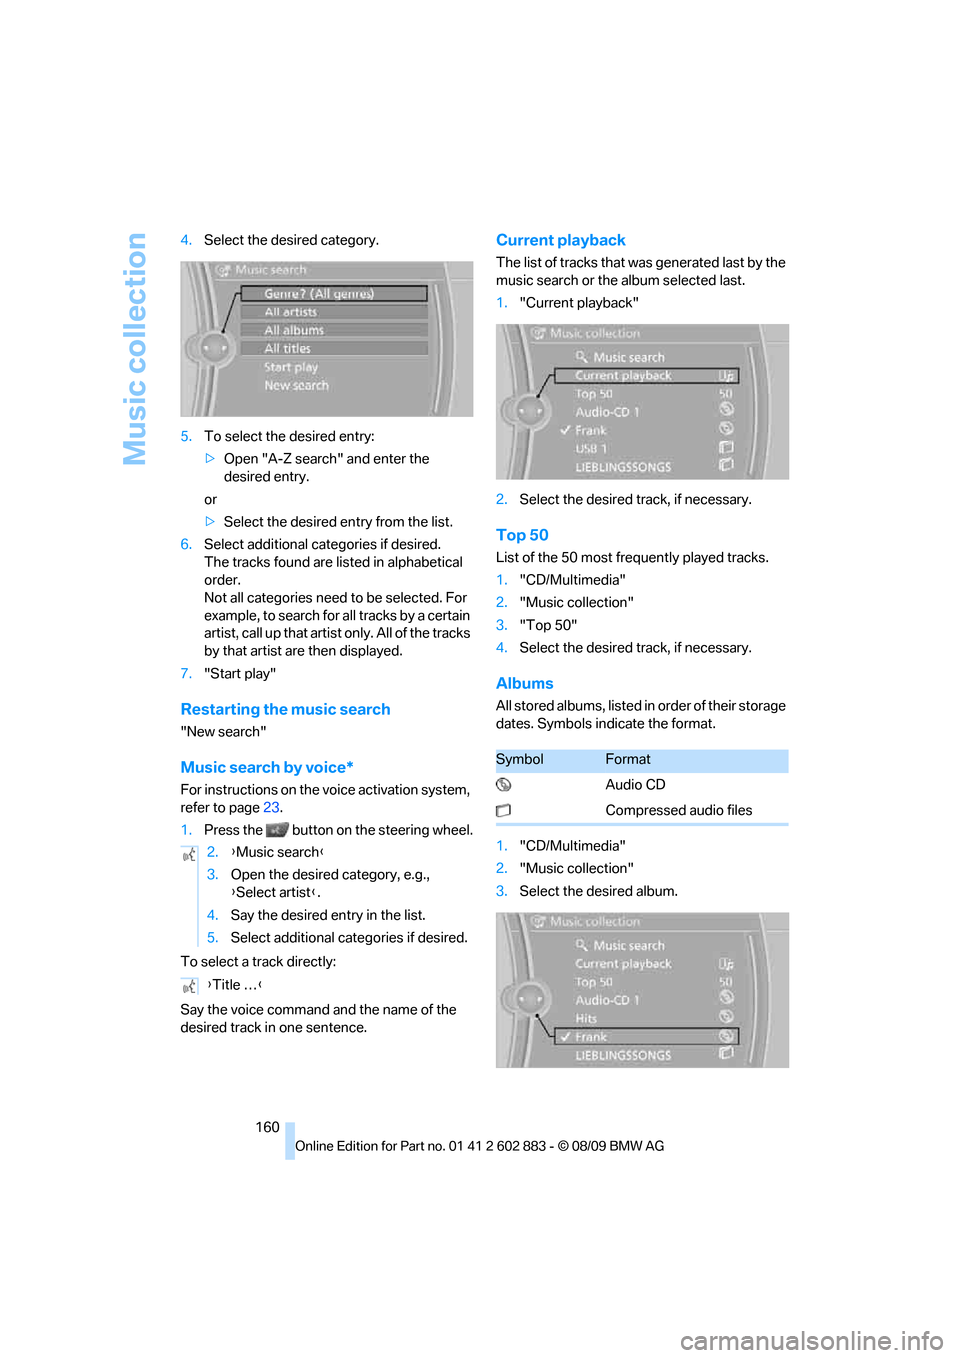
160 4.Select the desired category.
5.To select the desired entry:
>Open "A-Z search" and enter the
desired entry.
or
>Select the desired entry from the list.
6.Select additional categories if desired.
The tracks found are listed in alphabetical
order.
Not all categories need to be selected. For
example, to search for all tracks by a certain
artist, call up that artist only. All of the tracks
by that artist are then displayed.
7."Start play"
Restarting the music search
"New search"
Music search by voice*
For instructions on the voice activation system,
refer to page23.
1.Press the button on the steering wheel.
To select a track directly:
Say the voice command and the name of the
desired track in one sentence.
Current playback
The list of tracks that was generated last by the
music search or the album selected last.
1."Current playback"
2.Select the desired track, if necessary.
Top 50
List of the 50 most frequently played tracks.
1."CD/Multimedia"
2."Music collection"
3."Top 50"
4.Select the desired track, if necessary.
Albums
All stored albums, listed in order of their storage
dates. Symbols indicate the format.
1."CD/Multimedia"
2."Music collection"
3.Select the desired album. 2.{Music search}
3.Open the desired category, e.g.,
{Select artist}.
4.Say the desired entry in the list.
5.Select additional categories if desired.
{Title …}
SymbolFormat
Audio CD
Compressed audio files
Page 163 of 254

Navigation
Entertainment
Driving tips
161Reference
At a glance
Controls
Communications
Mobility
Depending on the album, the tracks or the
subdirectories of the album are displayed.
The first track is played automatically, if
possible.
4.To select tracks, change directories if
needed. To go up one level in the directory,
move the controller to the left.
Random play sequence
All tracks of the selection are played back in
random order.
1."CD/Multimedia"
2."Music collection"
3.Open "Options".
4."Random"
Managing music
Albums
Renaming an album
The name of the album, if available, is automat-
ically entered when the album is stored. If the
name is unknown, it can be changed later.
An album cannot be renamed while a track from
that album is being played.
1."CD/Multimedia"
2."Music collection"
3.Highlight the album.
4.Open "Options".5."Rename album"
6.Select the letters individually.
Deleting an album
An album cannot be deleted while a track from
that album is being played.
1."CD/Multimedia"
2."Music collection"
3.Highlight the album.
4.Open "Options".
5."Delete album"
Deleting a track and directory
A track cannot be deleted while it is being
played back.
A directory cannot be deleted while a track from
that directory is being played back.
1."CD/Multimedia"
2."Music collection"
3.Highlight the directory or track.
4.Open "Options".
5."Delete folder" or "Delete track".
Free memory capacity
Display the free memory capacity in the music
collection.
1."CD/Multimedia"
2."Music collection"
3.Open "Options".
4."Free memory"
Page 166 of 254
External devices
164 Due to the large number of different audio
devices/mobile phones available on the market,
it cannot be ensured that every audio device/
mobile phone is operable on the vehicle.
Ask about suitable audio devices/mobile
phones at your BMW center.
Audio files
Standard audio formats, e.g., MP3, WMA, WAV
(PCM) and AAC, and playlists in the M3U format
can be played.
Connecting via USB audio interface
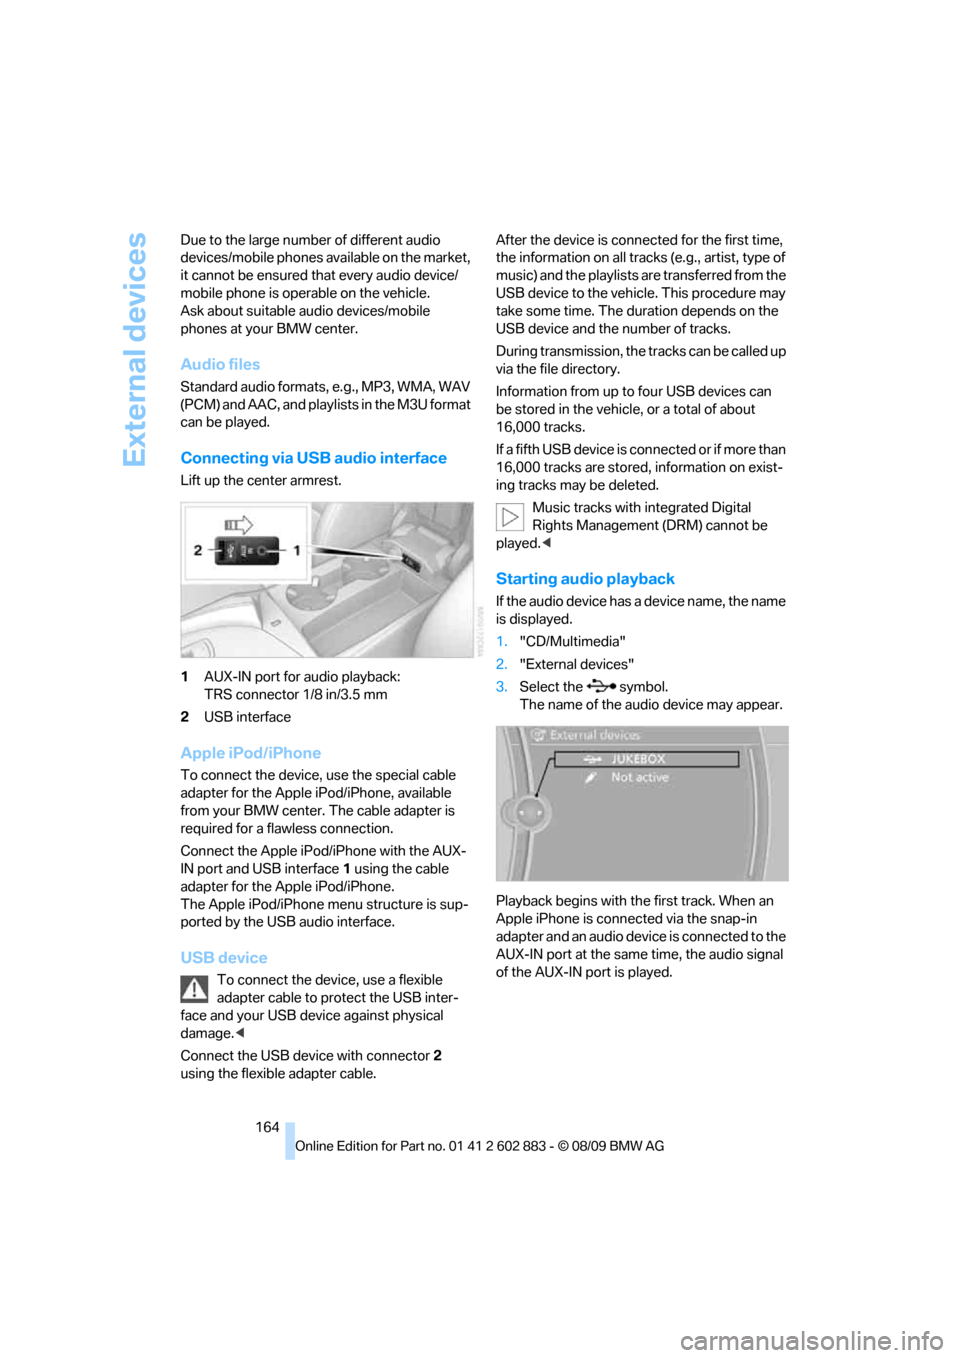
Lift up the center armrest.
1AUX-IN port for audio playback:
TRS connector 1/8 in/3.5 mm
2USB interface
Apple iPod/iPhone
To connect the device, use the special cable
adapter for the Apple iPod/iPhone, available
from your BMW center. The cable adapter is
required for a flawless connection.
Connect the Apple iPod/iPhone with the AUX-
IN port and USB interface1 using the cable
adapter for the Apple iPod/iPhone.
The Apple iPod/iPhone menu structure is sup-
ported by the USB audio interface.
USB device
To connect the device, use a flexible
adapter cable to protect the USB inter-
face and your USB device against physical
damage.<
Connect the USB device with connector 2
using the flexible adapter cable.After the device is connected for the first time,
the information on all tracks (e.g., artist, type of
music) and the playlists are transferred from the
USB device to the vehicle. This procedure may
take some time. The duration depends on the
USB device and the number of tracks.
During transmission, the tracks can be called up
via the file directory.
Information from up to four USB devices can
be stored in the vehicle, or a total of about
16,000 tracks.
I f a f i f t h U S B d e v i c e i s c o n n e c t e d o r i f m o r e t h a n
16,000 tracks are stored, information on exist-
ing tracks may be deleted.
Music tracks with integrated Digital
Rights Management (DRM) cannot be
played.<
Starting audio playback
If the audio device has a device name, the name
is displayed.
1."CD/Multimedia"
2."External devices"
3.Select the symbol.
The name of the audio device may appear.
Playback begins with the first track. When an
Apple iPhone is connected via the snap-in
adapter and an audio device is connected to the
AUX-IN port at the same time, the audio signal
of the AUX-IN port is played.
Page 167 of 254
Navigation
Entertainment
Driving tips
165Reference
At a glance
Controls
Communications
Mobility
Information about the track
If information about a track has been stored, it is
displayed automatically:
>Artist
>Album title
>Number of tracks
>Track file name
Track search
You can call up the tracks using the playlists
and information. With USB devices you can also
call up tracks using the file directory.
Selection is possible via:
>Playback lists
>Information: type of music, artist, album,
track
>Additionally for USB devices: file directory,
composer
Tracks are displayed if they have been saved in
the Latin alphabet.
Starting the track search
1."CD/Multimedia"
2."External devices"
3.Select the symbol.
The name of the audio device may appear.
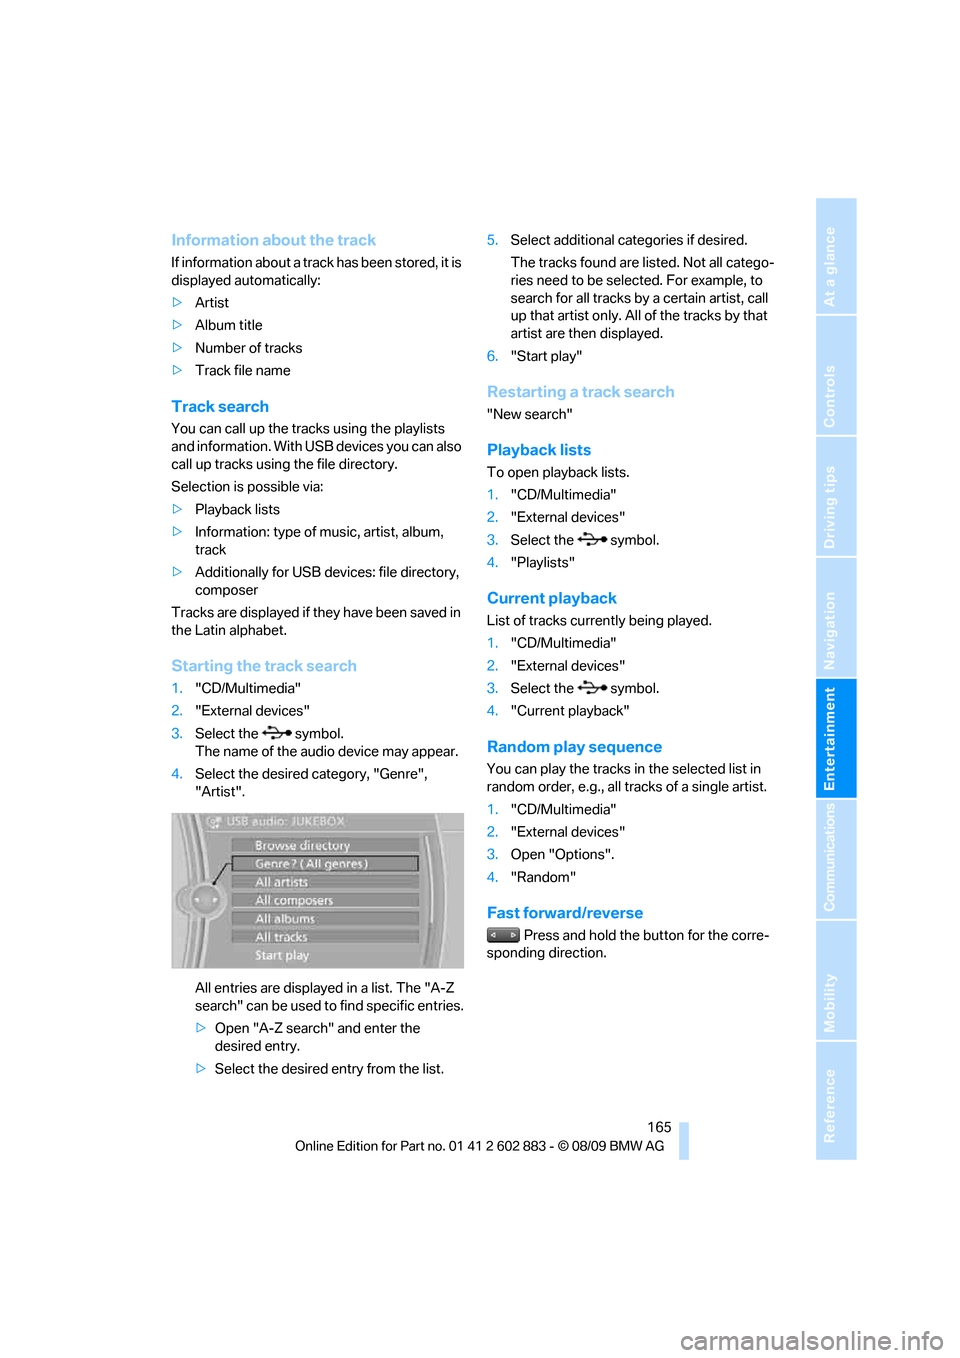
4.Select the desired category, "Genre",
"Artist".
All entries are displayed in a list. The "A-Z
search" can be used to find specific entries.
>Open "A-Z search" and enter the
desired entry.
>Select the desired entry from the list.5.Select additional categories if desired.
The tracks found are listed. Not all catego-
ries need to be selected. For example, to
search for all tracks by a certain artist, call
up that artist only. All of the tracks by that
artist are then displayed.
6."Start play"
Restarting a track search
"New search"
Playback lists
To open playback lists.
1."CD/Multimedia"
2."External devices"
3.Select the symbol.
4."Playlists"
Current playback
List of tracks currently being played.
1."CD/Multimedia"
2."External devices"
3.Select the symbol.
4."Current playback"
Random play sequence
You can play the tracks in the selected list in
random order, e.g., all tracks of a single artist.
1."CD/Multimedia"
2."External devices"
3.Open "Options".
4."Random"
Fast forward/reverse
Press and hold the button for the corre-
sponding direction.
Page 173 of 254
171
Entertainment
Reference
At a glance
Controls
Driving tips Communications
Navigation
Mobility
>The mobile phone is ready to operate.
>Bluetooth is activated in the vehicle, refer to
page173, and on the mobile phone.
>Depending on the mobile phone, certain
settings may be necessary on the mobile
phone, e.g., via the following menu items:
>Bluetooth switched on
>Connection must be allowed without
requiring further confirmation
>Reconnection
>Depending on the mobile phone type, the
power-saving mode setting, for example,
may result in a paired mobile phone not
being detected by the vehicle.
>For pairing purposes, define any 4 to 16-
digit number as a Bluetooth passkey,
e.g. 25081107. A long and complex number
offers the best protection against unautho-
rized access. This Bluetooth passkey is no
longer required after pairing has been suc-
cessful.
>The ignition is switched on.
Pair the mobile phone with the vehicle
only when the car is stationary, to avoid
endangering the car's occupants and other
road users by being distracted.<
Switch on ignition
1.Insert remote control all the way into the
ignition lock.
2.Switch on ignition without operating the
brake or clutch or pressing the start/stop
button.
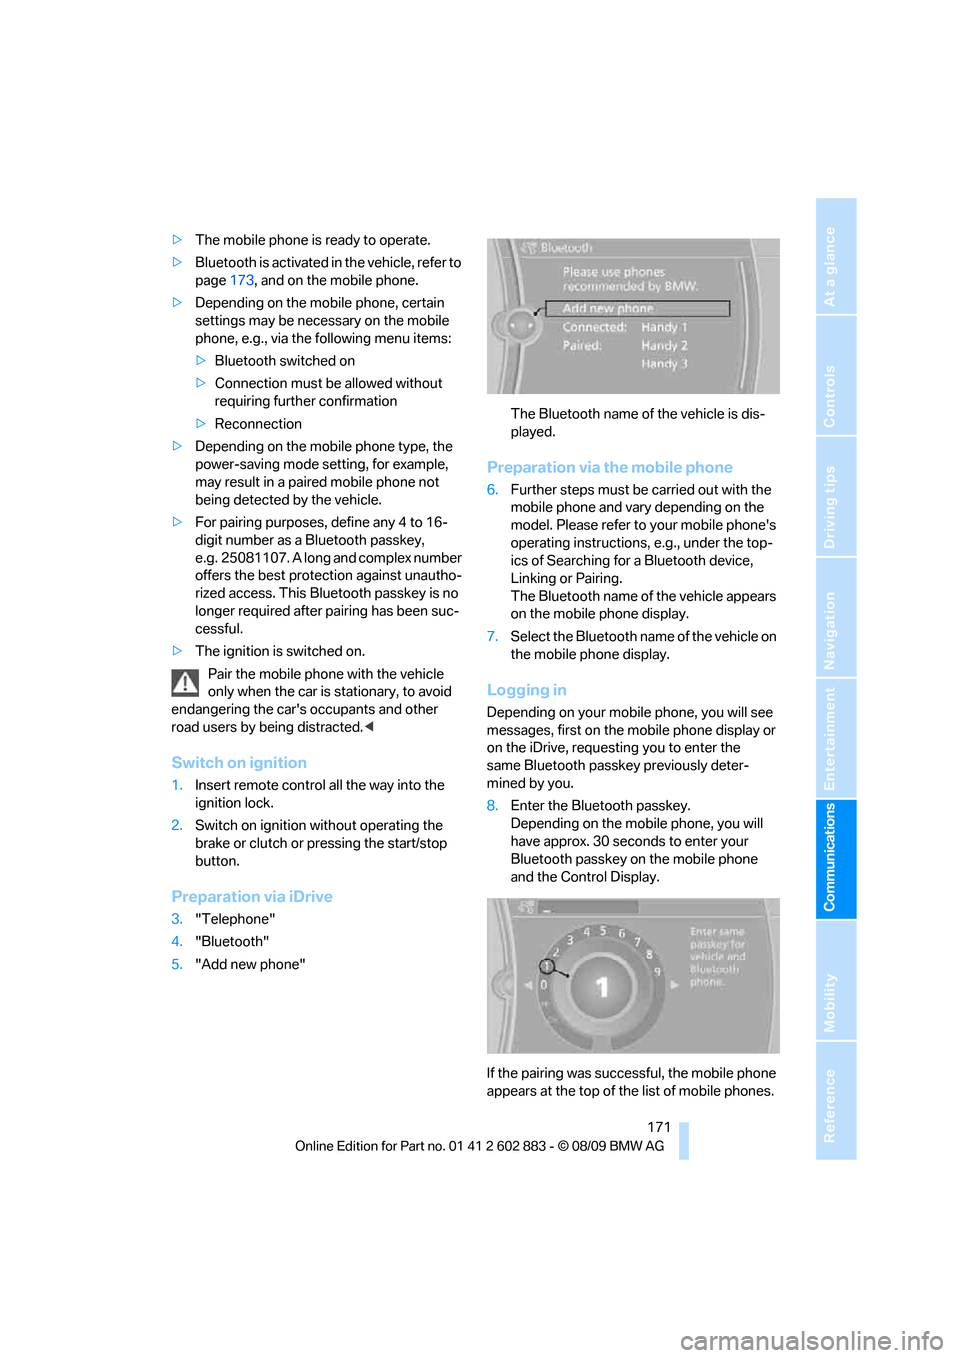
Preparation via iDrive
3."Telephone"
4."Bluetooth"
5."Add new phone"The Bluetooth name of the vehicle is dis-
played.
Preparation via the mobile phone
6.Further steps must be carried out with the
mobile phone and vary depending on the
model. Please refer to your mobile phone's
operating instructions, e.g., under the top-
ics of Searching for a Bluetooth device,
Linking or Pairing.
The Bluetooth name of the vehicle appears
on the mobile phone display.
7.Select the Bluetooth name of the vehicle on
the mobile phone display.
Logging in
Depending on your mobile phone, you will see
messages, first on the mobile phone display or
on the iDrive, requesting you to enter the
same Bluetooth passkey previously deter-
mined by you.
8.Enter the Bluetooth passkey.
Depending on the mobile phone, you will
have approx. 30 seconds to enter your
Bluetooth passkey on the mobile phone
and the Control Display.
If the pairing was successful, the mobile phone
appears at the top of the list of mobile phones.
Page 174 of 254
Telephone
172
Following the initial pairing
>The mobile phone is detected/connected in
the vehicle within 2 minutes if the engine is
running or the ignition is switched on.
>As soon as a mobile phone is detected by
the vehicle, the phone book entries stored
on the SIM card or on your mobile phone are
transmitted to the vehicle. This transmis-
sion is dependent on your mobile phone,
refer to the operating instructions of the
mobile phone if necessary, and can take
several minutes.
>Four mobile phones can be paired.
>Specific settings may be necessary in some
mobile phones, e.g., authorization or a
secure connection, refer to the mobile
phone operating instructions.
If not all phone book entries are displayed:
>Transfer all phone book entries from the
SIM card to the mobile phone, if necessary.
>Phone book entries with special characters
may not be displayed.
Checks to perform if pairing is
unsuccessful
>Is the mobile phone supported by the
mobile phone preparation package? You
can obtain information on the Internet at:
www.bmw.com/bluetooth.
>Do the Bluetooth passkeys on the mobile
phone and vehicle match? The same Blue-
tooth passkey must be entered on the
mobile phone's display and via iDrive.
>Did it take you more than 30 seconds to
enter the Bluetooth passkey? Then repeat
the pairing procedure.
>Are too many Bluetooth devices connected
to the mobile phone? If so, delete the con-
nections with other devices on the mobile
phone.
>Is the mobile phone no longer responding?
Switch the mobile phone off and on or
briefly disconnect the power supply.>Repeat the pairing procedure.
>If all items on the list have been checked
and the mobile phone still cannot be paired,
please contact Customer Relations.
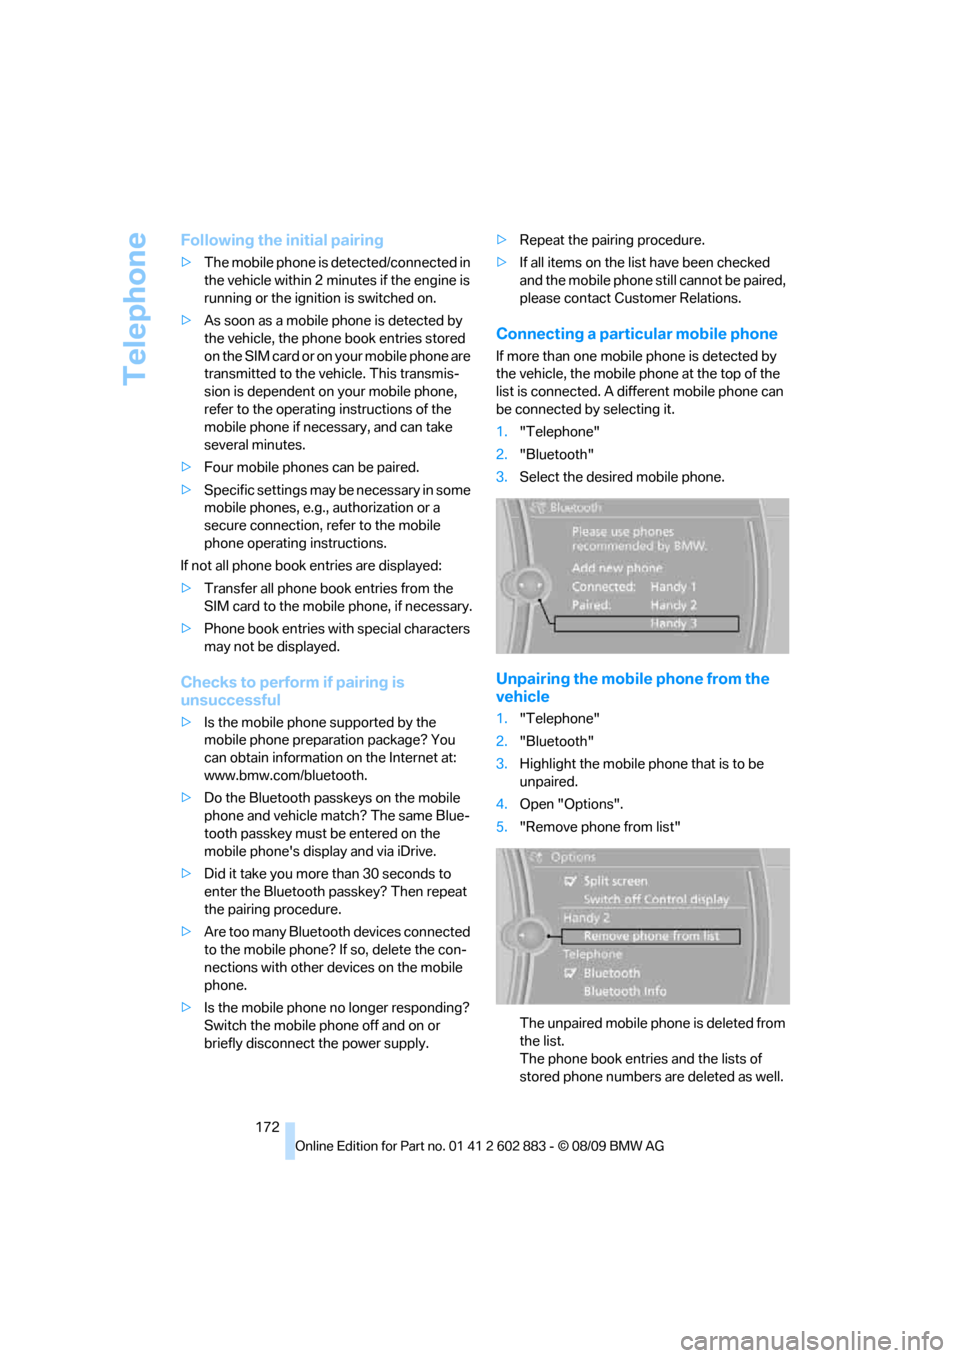
Connecting a particular mobile phone
If more than one mobile phone is detected by
the vehicle, the mobile phone at the top of the
list is connected. A different mobile phone can
be connected by selecting it.
1."Telephone"
2."Bluetooth"
3.Select the desired mobile phone.
Unpairing the mobile phone from the
vehicle
1."Telephone"
2."Bluetooth"
3.Highlight the mobile phone that is to be
unpaired.
4.Open "Options".
5."Remove phone from list"
The unpaired mobile phone is deleted from
the list.
The phone book entries and the lists of
stored phone numbers are deleted as well.