2010 BMW Z4 ROADSTER SDRIVE30I buttons
[x] Cancel search: buttonsPage 46 of 254
Adjustments
44
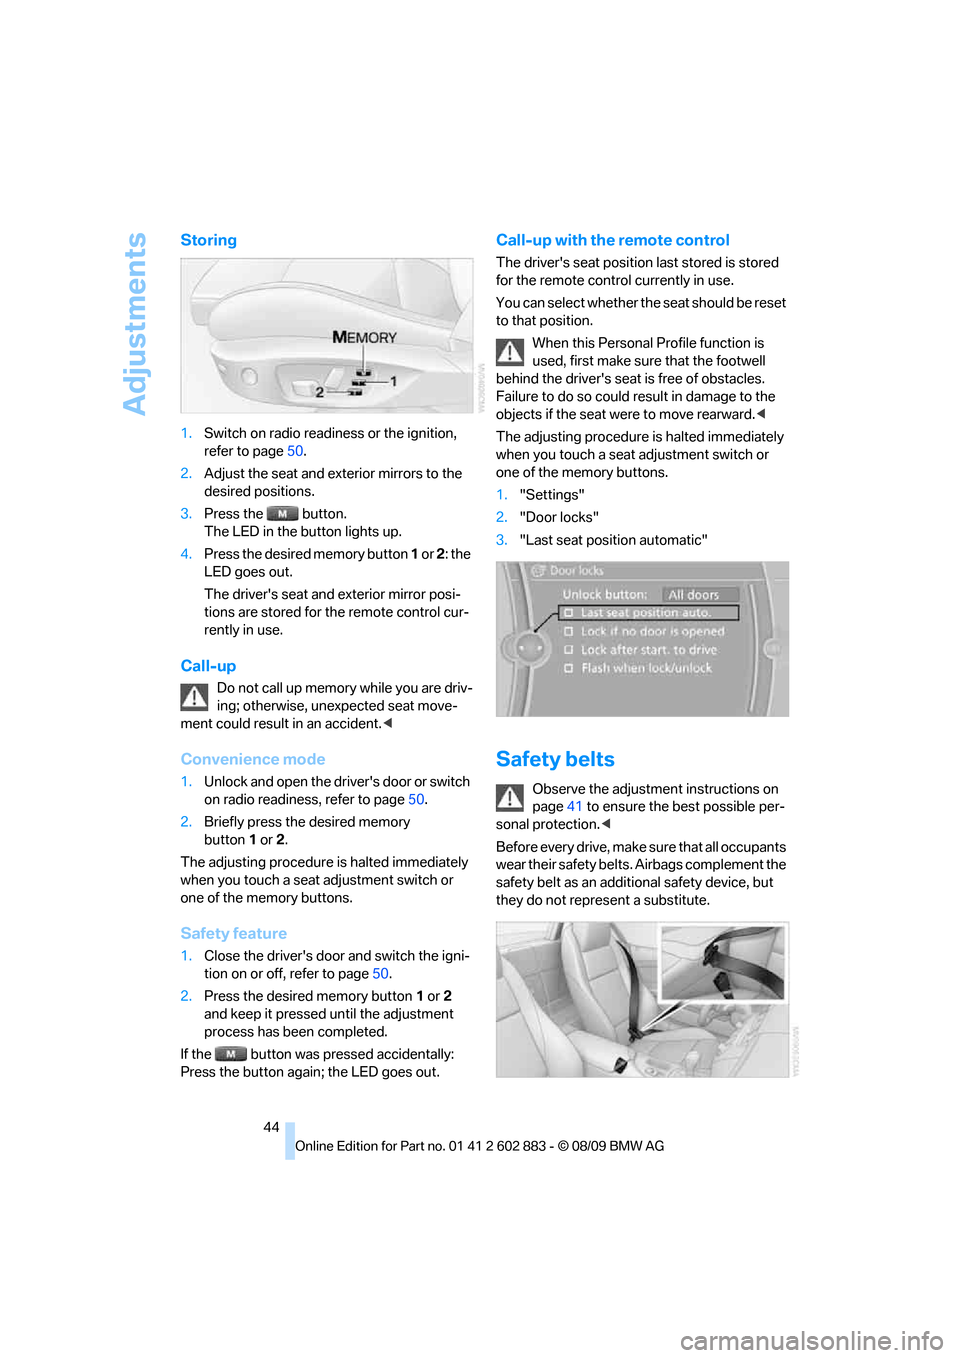
Storing
1.Switch on radio readiness or the ignition,
refer to page50.
2.Adjust the seat and exterior mirrors to the
desired positions.
3.Press the button.
The LED in the button lights up.
4.Press the desired memory button 1 or 2: the
LED goes out.
The driver's seat and exterior mirror posi-
tions are stored for the remote control cur-
rently in use.
Call-up
Do not call up memory while you are driv-
ing; otherwise, unexpected seat move-
ment could result in an accident.<
Convenience mode
1.Unlock and open the driver's door or switch
on radio readiness, refer to page50.
2.Briefly press the desired memory
button1or 2.
The adjusting procedure is halted immediately
when you touch a seat adjustment switch or
one of the memory buttons.
Safety feature
1.Close the driver's door and switch the igni-
tion on or off, refer to page50.
2.Press the desired memory button1 or2
and keep it pressed until the adjustment
process has been completed.
If the button was pressed accidentally:
Press the button again; the LED goes out.
Call-up with the remote control
The driver's seat position last stored is stored
for the remote control currently in use.
You can select whether the seat should be reset
to that position.
When this Personal Profile function is
used, first make sure that the footwell
behind the driver's seat is free of obstacles.
Failure to do so could result in damage to the
objects if the seat were to move rearward.<
The adjusting procedure is halted immediately
when you touch a seat adjustment switch or
one of the memory buttons.
1."Settings"
2."Door locks"
3."Last seat position automatic"
Safety belts
Observe the adjustment instructions on
page41 to ensure the best possible per-
sonal protection.<
Before every drive, make sure that all occupants
wear their safety belts. Airbags complement the
safety belt as an additional safety device, but
they do not represent a substitute.
Page 81 of 254
Controls
79Reference
At a glance
Driving tips
Communications
Navigation
Entertainment
Mobility
Dynamic Driving Control
The concept
Dynamic Driving Control can be used to adjust
the driving dynamics of the vehicle.
Several programs are available for this purpose;
they can be activated using the two Dynamic
Driving Control buttons.
The following characteristics are adapted,
depending on which program was selected:
>Engine response.
>Shift times of the automatic transmission
*.
>Power steering support
*.
>Changes in the suspension characteristics
through damping control
*.
>Vehicle stabilization through DSC Dynamic
Stability Control.
Operating the programs
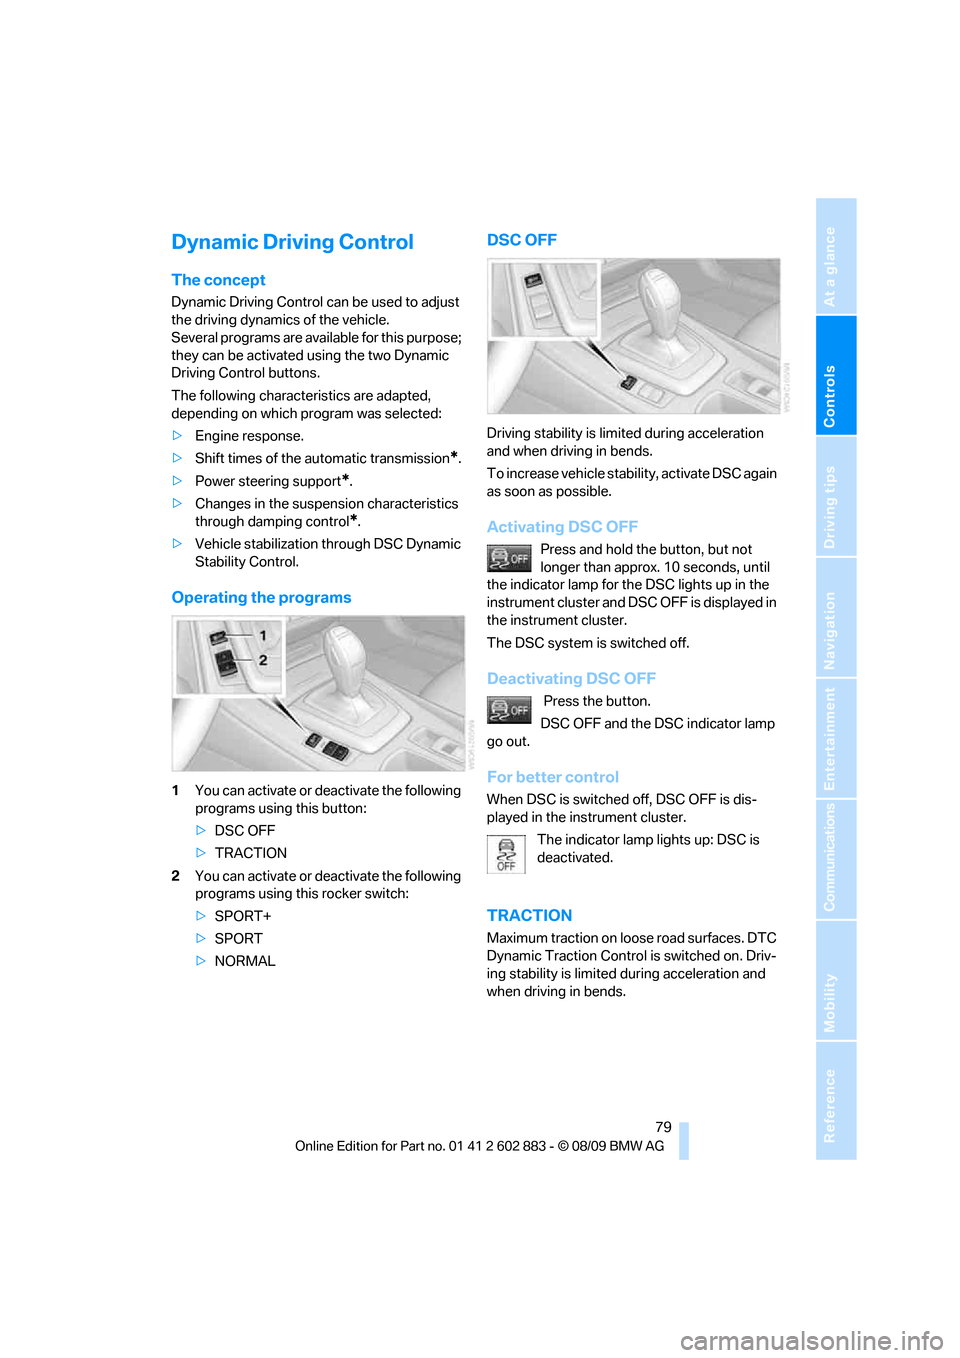
1You can activate or deactivate the following
programs using this button:
>DSC OFF
>TRACTION
2You can activate or deactivate the following
programs using this rocker switch:
>SPORT+
>SPORT
>NORMAL
DSC OFF
Driving stability is limited during acceleration
and when driving in bends.
To increase vehicle stability, activate DSC again
as soon as possible.
Activating DSC OFF
Press and hold the button, but not
longer than approx. 10 seconds, until
the indicator lamp for the DSC lights up in the
instrument cluster and DSC OFF is displayed in
the instrument cluster.
The DSC system is switched off.
Deactivating DSC OFF
Press the button.
DSC OFF and the DSC indicator lamp
go out.
For better control
When DSC is switched off, DSC OFF is dis-
played in the instrument cluster.
The indicator lamp lights up: DSC is
deactivated.
TRACTION
Maximum traction on loose road surfaces. DTC
Dynamic Traction Control is switched on. Driv-
ing stability is limited during acceleration and
when driving in bends.
Page 99 of 254
Controls
97Reference
At a glance
Driving tips
Communications
Navigation
Entertainment
Mobility
Switching the cooling function on
and off
The cooling function cools and
dehumidifies the incoming air
before reheating it as required,
according to the temperature set-
ting. This function is only available while the
engine is running.
The cooling function helps prevent condensa-
tion on the windows or removes it quickly.
Depending on the weather, the windshield may
fog over briefly when the engine is started.
The cooling function is automatically switched
on along with the AUTO program.
Maximum cooling
Maximum cooling is achieved most
quickly at outside temperatures
above 327/06 and when the
engine is running.
The automatic climate control goes into recir-
culated-air mode at the lowest temperature. Air
flows at maximum rate from the vents for the
upper body area. You should therefore open the
vents for maximum cooling.
AUTO program
The AUTO program automatically adjusts the
air distribution to the windshield and side win-
dows, towards the upper body area, and into the
footwell and knee area.
The air flow rate and air distribution, in addition
to your temperature specifications, will be
adapted to outside influences as a result of sea-
sonal changes, e.g., sunlight or window con-
densation.
The cooling is switched on automatically with
the AUTO program.
Switching on/off
Press the button.
Manual air distribution and air flow rate are acti-
vated when the AUTO program is deactivated.
AUTO program climate level
The climate levels can be used to vary the inten-
sity when the AUTO program is switched on.
For example, air flow is adjusted automatically
to optimize climate control.
When the AUTO program is
switched on, you can select the cli-
mate level of the AUTO program
using the buttons for controlling the manual air
flow rate.
The selected climate level is displayed by
an LED.
Convertible program
When the hardtop is open, the convertible pro-
gram is activated as well. In the convertible pro-
gram, the automatic climate control is opti-
mized for driving with the hardtop open. In
addition, the air flow rate is increased as vehicle
speed increases.
The effectiveness of the convertible pro-
gram can be enhanced considerably by
installing the wind deflector.<
Adjusting air flow rate manually
Press the left side of the button to
reduce air flow. Press the right side
of the button to increase it.
The air flow rate may be reduced to save battery
power. The display remains the same.
Switching the system on/off
With the blower at its lowest setting, press the
left side of the button to switch off the auto-
matic climate control. All displays are cleared
except for the rear window defroster if it is
switched on.
Press any button except the rear window
defroster to reactivate the automatic climate
control.
Page 102 of 254
Practical interior accessories
100
Practical interior accessories
Integrated universal remote
control*
The concept
The integrated universal remote control can
replace as many as three hand-held transmit-
ters for various remote-controlled devices,
such as garage doors and gates or lighting sys-
tems. The integrated universal remote control
registers and stores signals from the original
hand-held transmitters.
The signal of an original hand-held transmitter
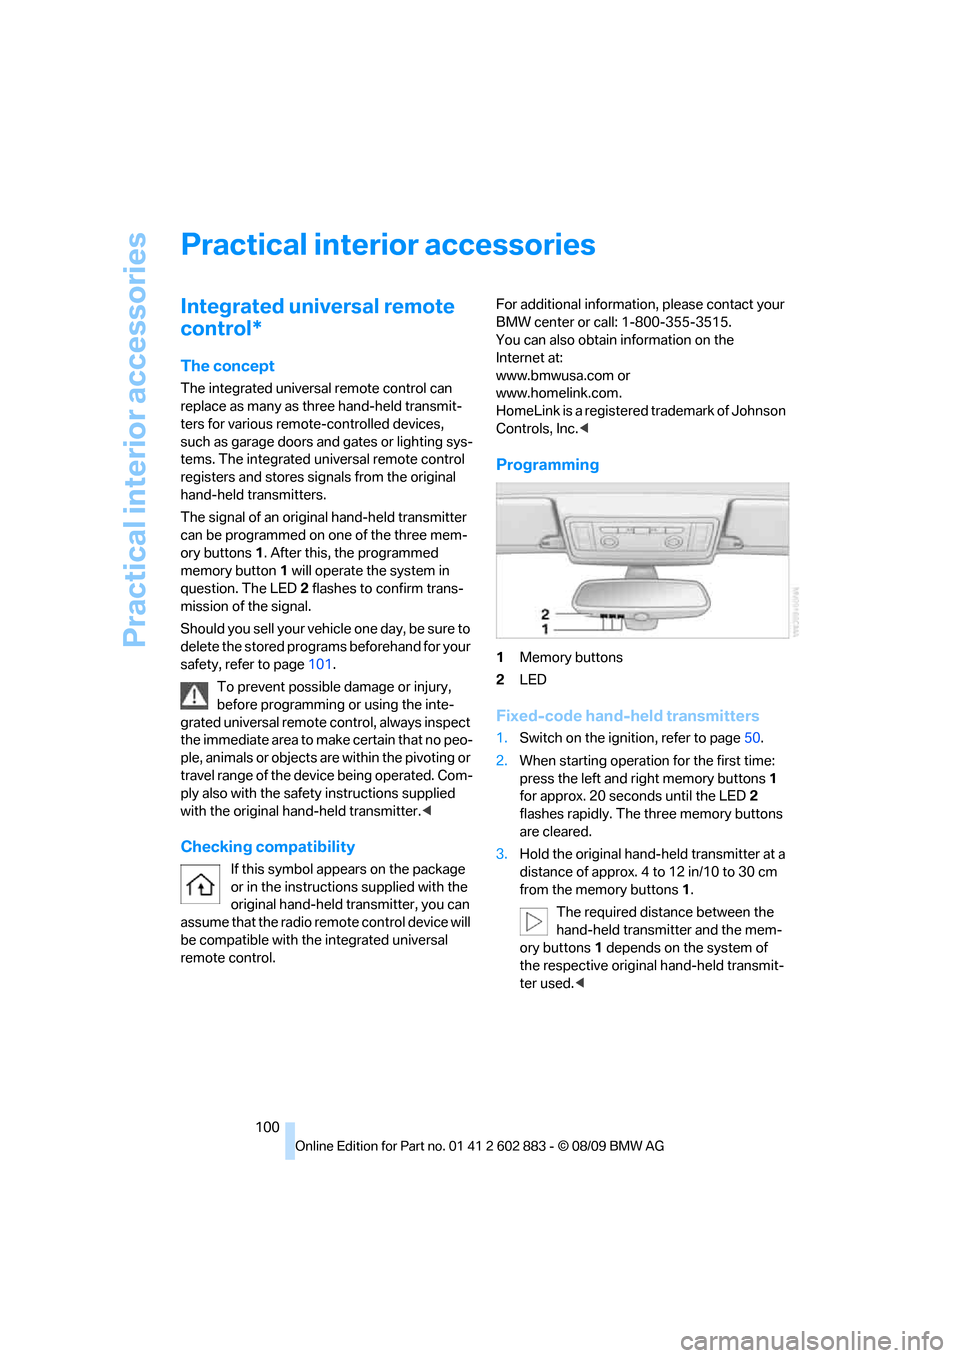
can be programmed on one of the three mem-
ory buttons1. After this, the programmed
memory button1 will operate the system in
question. The LED2 flashes to confirm trans-
mission of the signal.
Should you sell your vehicle one day, be sure to
delete the stored programs beforehand for your
safety, refer to page101.
To prevent possible damage or injury,
before programming or using the inte-
grated universal remote control, always inspect
the immediate area to make certain that no peo-
ple, animals or objects are within the pivoting or
travel range of the device being operated. Com-
ply also with the safety instructions supplied
with the original hand-held transmitter.<
Checking compatibility
If this symbol appears on the package
or in the instructions supplied with the
original hand-held transmitter, you can
assume that the radio remote control device will
be compatible with the integrated universal
remote control.For additional information, please contact your
BMW center or call: 1-800-355-3515.
You can also obtain information on the
Internet at:
www.bmwusa.com or
www.homelink.com.
HomeLink is a registered trademark of Johnson
Controls, Inc.<
Programming
1Memory buttons
2LED
Fixed-code hand-held transmitters
1.Switch on the ignition, refer to page50.
2.When starting operation for the first time:
press the left and right memory buttons1
for approx. 20 seconds until the LED2
flashes rapidly. The three memory buttons
are cleared.
3.Hold the original hand-held transmitter at a
distance of approx. 4 to 12 in/10 to 30 cm
from the memory buttons1.
The required distance between the
hand-held transmitter and the mem-
ory buttons1 depends on the system of
the respective original hand-held transmit-
ter used.<
Page 103 of 254

Controls
101Reference
At a glance
Driving tips
Communications
Navigation
Entertainment
Mobility
4.Simultaneously press the transmit key on
the original hand-held transmitter and the
desired memory button 1 on the integrated
universal remote control. The LED 2 flashes
slowly at first. As soon as the LED2 flashes
rapidly, release both buttons. If the LED2
does not flash rapidly after approx.
15 seconds, alter the distance and repeat
this step.
5.To program other original hand-held trans-
mitters, repeat steps 3 and 4.
The corresponding memory button 1 is now
programmed with the signal of the original
hand-held transmitter.
You can operate the device while the ignition is
switched on.
If the device fails to function even after
repeated programming, check whether
the original hand-held transmitter uses an alter-
nating-code system. To do so, either read the
instructions for the original hand-held transmit-
ter or hold down the programmed memory
button1 of the integrated universal remote
control. If the LED2 on the integrated universal
remote control flashes rapidly and then remains
lit for about two seconds, the original hand-held
transmitter uses an alternating-code system. If
it uses an alternating-code system, program
the memory buttons1 as described under
Alternating-code hand-held transmitters.<
Alternating-code hand-held
transmitters
To program the integrated universal remote
control, consult the operating instructions for
the device to be set. You will find information
there on the possibilities for synchronization.
When programming hand-held transmitters
that employ an alternating code, please observe
the following supplementary instructions:
Programming will be easier with the aid of
a second person.<1.Park your vehicle within the range of the
remote-controlled device.
2.Program the integrated universal remote
control as described above in the section
Fixed-code hand-held transmitters.
3.Locate the button on the receiver of the
device to be set, e.g., on the drive unit.
4.Press the button on the receiver of the
device to be set. After step 4, you have
approx. 30 seconds for step 5.
5.Press the programmed memory button1 of
the integrated universal remote control
three times.
The corresponding memory button 1 is now
programmed with the signal of the original
hand-held transmitter.
If you have any questions, please contact
your BMW center.<
Deleting all stored programs
Press the left and right memory buttons1 for
approx. 20 seconds until the LED2 flashes rap-
idly: all stored programs are deleted.
Reassigning individual programs
1.Hold the original hand-held transmitter at a
distance of approx. 4 to 12 in/10 to 30 cm
from the memory buttons1.
The required distance between the
hand-held transmitter and the mem-
ory buttons1 depends on the system of
the respective original hand-held transmit-
ter used.<
2.Press the desired memory button1 of the
integrated universal remote control.
3.If the LED2 flashes slowly after approx.
20 seconds, press the transmit key of the
original hand-held transmitter. Release
both buttons as soon as the LED2 flashes
rapidly. If the LED2 does not flash rapidly
after approx. 15 seconds, alter the distance
and repeat this step.
Page 142 of 254
On/off and tone
140
On/off and tone
The following audio and video sources share
the same control elements and adjustments:
>Radio
>CD/DVD player
>CD/DVD changer
*
>Video*
>External devices, e.g., MP3 player
Controls
The audio and video sources can be controlled
using the:
>Buttons near the CD/DVD player
>iDrive
>Buttons on the steering wheel, refer
to page10
>Programmable memory keys, refer
to page21
>Voice activation system
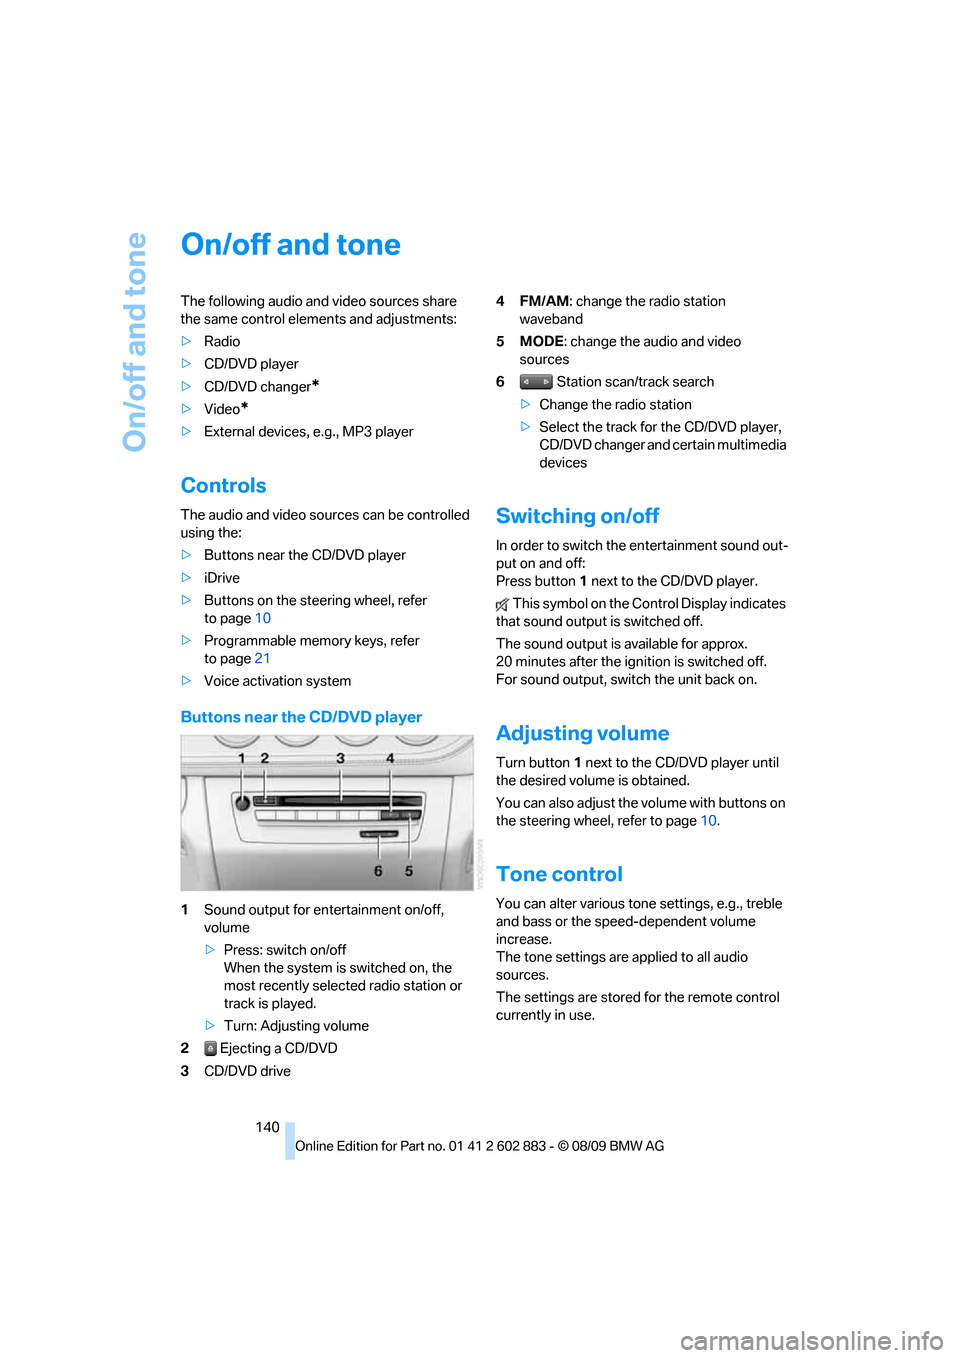
Buttons near the CD/DVD player
1Sound output for entertainment on/off,
volume
>Press: switch on/off
When the system is switched on, the
most recently selected radio station or
track is played.
>Turn: Adjusting volume
2 Ejecting a CD/DVD
3CD/DVD drive4FM/AM: change the radio station
waveband
5MODE: change the audio and video
sources
6 Station scan/track search
>Change the radio station
>Select the track for the CD/DVD player,
CD/DVD changer and certain multimedia
devices
Switching on/off
In order to switch the entertainment sound out-
put on and off:
Press button1 next to the CD/DVD player.
This symbol on the Control Display indicates
that sound output is switched off.
The sound output is available for approx.
20 minutes after the ignition is switched off.
For sound output, switch the unit back on.
Adjusting volume
Turn button1 next to the CD/DVD player until
the desired volume is obtained.
You can also adjust the volume with buttons on
the steering wheel, refer to page10.
Tone control
You can alter various tone settings, e.g., treble
and bass or the speed-dependent volume
increase.
The tone settings are applied to all audio
sources.
The settings are stored for the remote control
currently in use.
Page 145 of 254
Navigation
Entertainment
Driving tips
143Reference
At a glance
Controls
Communications
Mobility
Radio
Your radio is designed for reception of the fol-
lowing stations:
>FM and AM
>HD Radio
*
>Satellite radio*
Selecting a station
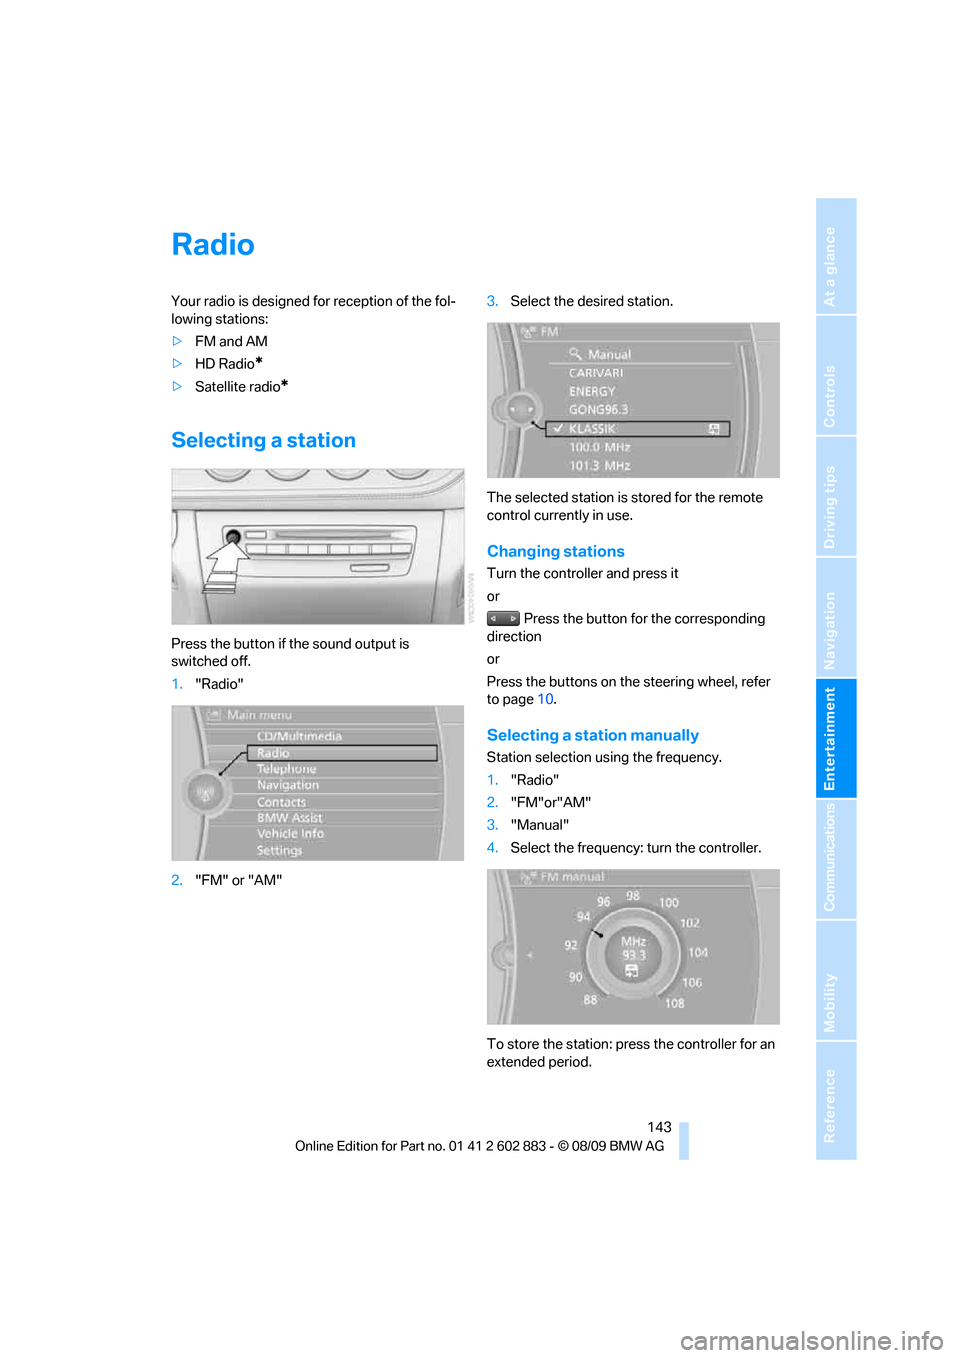
Press the button if the sound output is
switched off.
1."Radio"
2."FM" or "AM"3.Select the desired station.
The selected station is stored for the remote
control currently in use.
Changing stations
Turn the controller and press it
or
Press the button for the corresponding
direction
or
Press the buttons on the steering wheel, refer
to page10.
Selecting a station manually
Station selection using the frequency.
1."Radio"
2."FM"or"AM"
3."Manual"
4.Select the frequency: turn the controller.
To store the station: press the controller for an
extended period.
Page 148 of 254
Satellite radio
146
Satellite radio
General information
The channels are offered in predefined pack-
ages. The packages must be enabled by tele-
phone.
Navigation bar overview
The functions of the navigation bar symbols can
also be stored on the programmable memory
buttons, refer to page21.
Managing a subscription
To be able to enable or unsubscribe from the
channels, you must have reception. It is usually
at its best when you have an unobstructed view
of the sky. The channel name is displayed in the
status line.
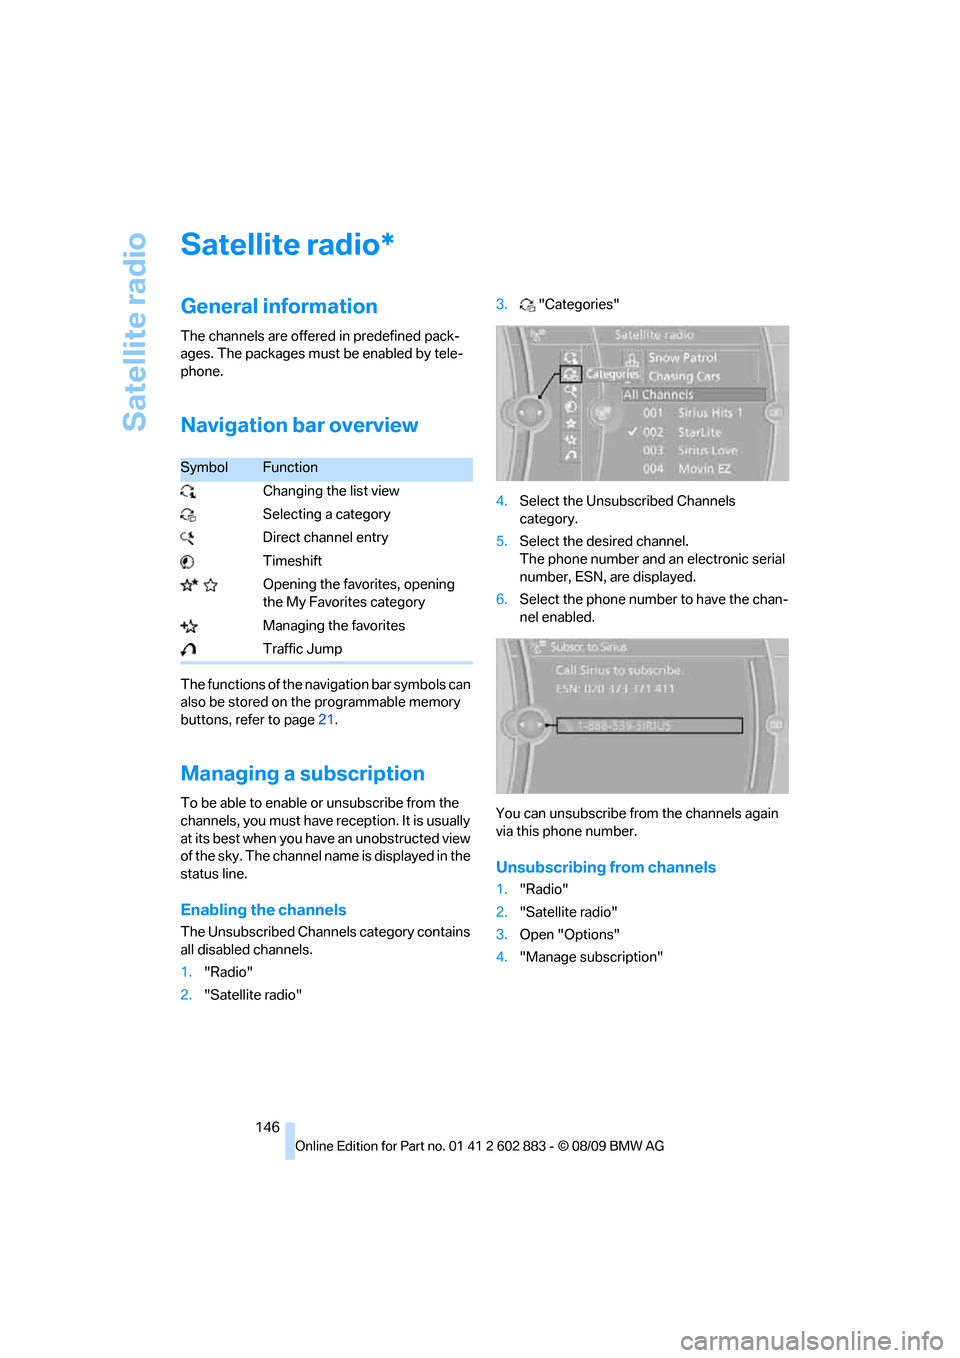
Enabling the channels
The Unsubscribed Channels category contains
all disabled channels.
1."Radio"
2."Satellite radio"3."Categories"
4.Select the Unsubscribed Channels
category.
5.Select the desired channel.
The phone number and an electronic serial
number, ESN, are displayed.
6.Select the phone number to have the chan-
nel enabled.
You can unsubscribe from the channels again
via this phone number.
Unsubscribing from channels
1."Radio"
2."Satellite radio"
3.Open "Options"
4."Manage subscription"
*
SymbolFunction
Changing the list view
Selecting a category
Direct channel entry
Timeshift
Opening the favorites, opening
the My Favorites category
Managing the favorites
Traffic Jump