2010 BMW M5 light
[x] Cancel search: lightPage 123 of 266

Driving tips
121Reference
At a glance
Controls
Communications
Navigation
Entertainment
Mobility
BMW M5 Engineering
V10 High Output Engine
With a 305 cu in/5 liter displacement, the high-
speed V10 engine generates a maximum out-
put of 373 kW and a maximum torque of
384 lb ft/520 Nm. Its spontaneous response
characteristics yield a very broad usable engine
speed range. At the maximum engine speed of
8,250 rpm, the flow of fuel is interrupted in
order to protect the engine. Due to the powerful
engine dynamics, when the vehicle is at rest,
the maximum engine speed is limited to
7,000 rpm.
Warming up
The emissions control system causes the
V10 high-output engine to have slightly
rougher running characteristics during its
warm-up phase.
When the engine is cold, the exhaust system
has a slightly metallic undertone due to the sys-
tem design.
For additional information on warming up, refer
to Tachometer on page67 and Engine oil tem-
perature on page68.
Compound brake
Your BMW M5 has a high-performance brake
system with perforated compound brake rotors.
Due to the special structural features of these
brake rotors, function noises occur during brak-
ing, but this has no effect on the performance,
operating safety, and stability of the brakes.
Braking correctly
In order to keep the brake system in optimum
condition, it is useful to put them under load at
regular intervals in accordance with the nature
of the vehicle.
Also refer to Corrosion on brake rotors on
page117.
Drive train
In your BMW M5, particular importance was
attached to the direct connection of the engine
to the drive system. Due to the torsionally rigid
design of the drive train, the transmission of the
torque is also audible, as is customary in a
sports car. As a result, load shifts can be dis-
tinctly audible. This does not in any way impair
the function or the service life of the compo-
nents.
Page 126 of 266

Starting navigation system
124
Starting navigation system
Your navigation system can use satellites to
ascertain the precise position of your vehicle
and guide you reliably to any destination you
enter.
Navigation DVD
The navigation system requires a special navi-
gation DVD. The latest version is available at
your BMW center.
Inserting navigation DVD
1.Insert the navigation DVD with the labeled
side up. The navigation DVD is retracted.
2.Allow several seconds for the system to
scan the data from the DVD.
Removing navigation DVD
1.Press button 1.
The DVD emerges slightly from the drive.
2.Remove the DVD.
If the DVD is not ejected from the drive, it is pos-
sible that it is blocked. In this case a message is
also shown on the Control Display.
Display in assistance window
You can display the route or the current position
in the assistance window. This display remains
visible even if you change to another applica-
tion.
1.Move the controller to the right to enter the
assistance window.
2.Press the controller.
Other menu items are displayed.
3.Select the desired route view or "Current
position".
4.Press the controller.
Displaying arrow view in map view*
If the navigation system suggests a change of
direction, the arrow view is briefly displayed.
1.Press the button.
This opens the start menu.
2.Press the controller to open the menu.
3.Turn the controller until "Settings" is
selected and press the controller.
*
Page 132 of 266

Destination entry
130 volume, avoiding excessive emphasis and
pauses.
The system can suggest up to 20 destina-
tions that match your entries. Up to
6 entries are displayed at once on the Con-
trol Display.
The town/city can also be selected from the list
via iDrive:
Turn the controller until the destination is
selected and press the controller.
Entering the destination as an entire
word*
Towns/cities and streets located in the region
where the language of the voice command sys-
tem is spoken can be entered as an entire word.
Example: to enter a US destination as an entire
word, the system language must be English.
Speak smoothly and at normal volume, avoiding
excessive emphasis and pauses.1.Wait for the system to request the destina-
tion.
The system can suggest up to 6 destina-
tions that match your entries.
The town/city can also be selected from the list
via iDrive:
Turn the controller until the destination is
selected and press the controller.
Destinations that sound the same which
cannot be differentiated by the system
are summarized in a separate list and shown as
a destination followed by three dots.
Select this entry with {Yes} if necessary. Then
select the desired town/city from this list.<
Entering street and house number
The street is entered in the same way as the
destination.
To enter the house number:
Up to 4-digit house numbers can be entered.
Say the house number as individual numbers. 1.Spell town/city name:
Say at least the first three letters of the
destination. The more letters you say,
the more exactly the system recognizes
the town/city.
A destination is suggested by the system.
2.Select town/city:
>Select highlighted town/city: {Yes}
>Select other town/city: {No}
>Select entry, e.g. {Entry 3}
>To show other entries in the list:
{Next page}
>To respell the town/city: {Repeat}
2.Say the name of the destination.
A destination is suggested by the system.
3.Select town/city:
>Select highlighted town/city: {Yes}
>Select other town/city: {No}
>Select entry, e.g. {Entry 3}
>To reenter the town/city: {Repeat}
>To enter the town/city by spelling:
{Spell}
1.{House number}
2.Say the house number.
Page 146 of 266

Destination guidance
144 3.Select "Traffic Info" and press the control-
ler.
First the traffic information along the planned
route is shown sorted according to the distance
to the current vehicle position.
Depiction of traffic information in map
view
The traffic information symbols are shown in
the map view up to a scale of 100 miles/200 km.
The section of the route affected by a traffic
report as well as the number for the type of inci-
dent are displayed and hidden. This occurs as a
function of the scale selected.
Displaying detailed traffic information
Select a traffic information item from the list and
press the controller.
To exit from the menu:
Select the arrow and press the controller.
Symbols for traffic information
Traffic event with map scales greater
than 5 miles/10 km, arrow points in
the direction of travel concerned.
Several traffic events have been
received. Select a smaller scale to
display these individually.
Traffic light failure
Roadwork
General traffic obstruction
Transport of hazardous load
Vehicle on wrong carriage way
Danger
Low clearance
No parking
Fog
Heavy rain
Slippery road
Cross winds
Smog
Road close
Slow traffic
Traffic back up
Stopped traffic
Icy roads
Uneven surface
Accident
Page 166 of 266

CD player and CD changer
164
CD player and CD changer
Listening to CDs
Compressed audio files*
CDs with compressed audio files, i.e. MP3, can
be played by the CD player, but not by the CD
changer.
CD player: starting CD
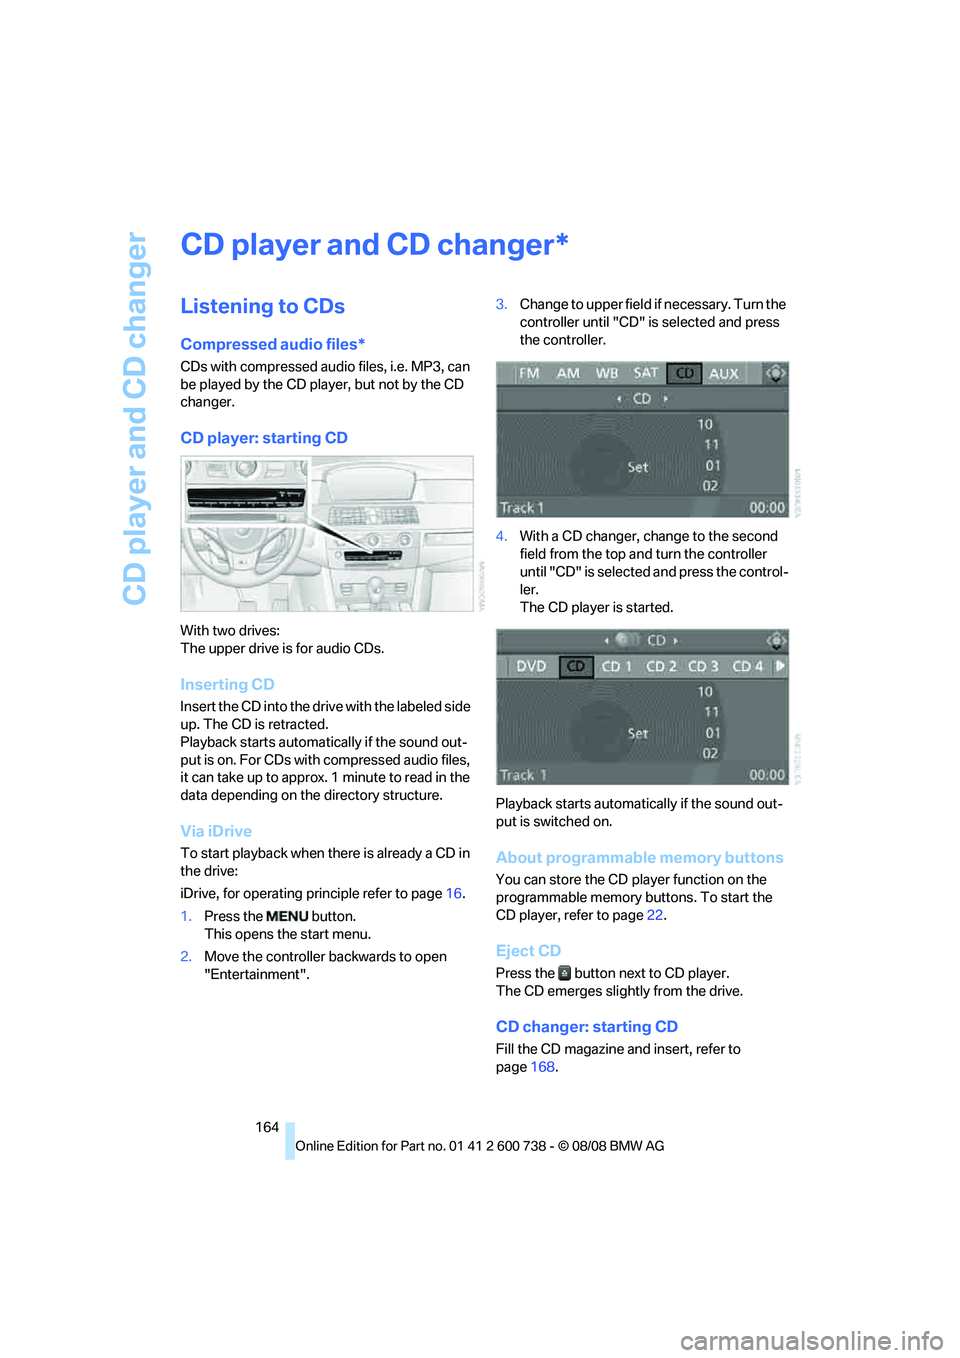
With two drives:
The upper drive is for audio CDs.
Inserting CD
Insert the CD into the drive with the labeled side
up. The CD is retracted.
Playback starts automatically if the sound out-
put is on. For CDs with compressed audio files,
it can take up to approx. 1 minute to read in the
data depending on the directory structure.
Via iDrive
To start playback when there is already a CD in
the drive:
iDrive, for operating principle refer to page16.
1.Press the button.
This opens the start menu.
2.Move the controller backwards to open
"Entertainment".3.Change to upper field if necessary. Turn the
controller until "CD" is selected and press
the controller.
4.With a CD changer, change to the second
field from the top and turn the controller
until "CD" is selected and press the control-
ler.
The CD player is started.
Playback starts automatically if the sound out-
put is switched on.About programmable memory buttons
You can store the CD player function on the
programmable memory buttons. To start the
CD player, refer to page22.
Eject CD
Press the button next to CD player.
The CD emerges slightly from the drive.
CD changer: starting CD
Fill the CD magazine and insert, refer to
page168.
*
Page 171 of 266

Navigation
Entertainment
Driving tips
169Reference
At a glance
Controls
Communications
Mobility
Notes
BMW CD/DVD players and changers are
officially designated Class 1 laser prod-
ucts. Do not operate if the cover is damaged,
otherwise severe eye damage can result.
Do not use self-recorded CDs/DVDs with labels
applied as these can become detached during
playback due to heat buildup and can cause
irreparable damage to the device.
Only use round CDs/DVDs with a standard
diameter of 4.7 in/12 cm and do not play CDs/
DVDs with an adapter, e.g. CD singles, as other-
wise the CD/DVD or the adapter can jam and
may no longer eject properly.
Do not use a combined CD/DVD, e. g. DVD
Plus,
otherwise the CD/DVD can jam and will no
longer eject.<
General malfunctions
BMW CD/DVD changers and players have been
optimized for performance in vehicles. In some
instances they may be more sensitive to faulty
CDs/DVDs than stationary devices would be.
If a CD/DVD cannot be played, first check
whether it has been inserted correctly.
Humidity
High levels of humidity can lead to condensa-
tion on the CD/DVD or the laser's scan lens and
temporarily prevent playback.
Malfunctions with individual CDs/DVDs
If malfunctions occur only with particular CDs/
DVDs, this can be due to one of the following
causes.
Self-recorded CDs/DVDs
Possible reasons for malfunctions with self-
recorded CDs/DVDs are, e.g. inconsistent data-
creation or recording processes, or poor quality
or high age of the CD/DVD blank.
Only label CDs/DVDs on the upper side with a
pen intended for this purpose.
Damaged CDs/DVDs
Avoid fingerprints, dust, scratches and mois-
ture.
Store CDs/DVDs in a sleeve.
Do not subject CDs/DVDs to temperatures over
1227/506, high levels of humidity or direct
sunlight.
CDs/DVDs with copy protection
CDs/DVDs are often provided with a copy pro-
tection feature by the manufacturer. This can
m e a n t h a t s o m e C D s / D V D s c a n n o t b e p l a y e d o r
can only be played to a limited extent.
Care
If necessary, clean the reflective scanning side
of the CDs/DVDs with a commercially available
cleaning cloth by wiping in straight lines from
the center outward.
Page 180 of 266

Telephoning
178 7.Move the highlight marker to the second
field from the top, select "Phone" and press
the controller.
8.Select "Pair new phone" and press the con-
troller.
9.Select "Start pairing" and press the control-
ler.
The Bluetooth name of the vehicle is dis-
played.
Preparation with mobile phone
10.Additional operations must be carried out
on the mobile phone and differ depending
on the model, refer to the operating instruc-
tions of your mobile phone, e.g. find, con-
nect or pair under Bluetooth device. The
Bluetooth name of the vehicle is also shown
on the mobile phone display.
11.Select the Bluetooth name of the vehicle on
the mobile phone display.
Pairing
Depending on your mobile phone, you will first
be requested consecutively via the display of
your mobile phone or iDrive to enter the Blue-
tooth passkey you specified.
12.Enter the Bluetooth passkey.
Depending on the mobile phone, approx.
30 seconds are available for entering the
Bluetooth passkey on the mobile phone
and on the Control Display.
13.Move the highlight marker to the third field
from the top, select "Confirm passkey" and
press the controller.
14.Wait several seconds until the "Communi-
cation" menu is displayed.
The next time you use the mobile phone inside
the vehicle, it will be recognized within a few
minutes as long as the engine is running or the
ignition is switched on.
With some mobile phone models it may
be necessary to make certain settings for
a permanent Bluetooth link, e.g. via the menu
item Authorization or Secure connection. Refer
to the operating instructions of your mobile
phone.<
Page 182 of 266

Telephoning
180 vehicle simultaneously, you can operate the
mobile phone highest up in the list via the vehi-
cle.
You can change the order of the mobile phones
in the list. As long as a mobile phone is selected
in this list, the mobile phones cannot be oper-
ated via the vehicle.
iDrive, for operating principle refer to page16.
1.Press the button to open the start
menu.
2.Press the controller to open the menu.
3.Select "Settings" and press the controller.
4.Select "Bluetooth" and press the controller.
5.Move the highlight marker to the second
field from the top, select "Phone" and press
the controller.
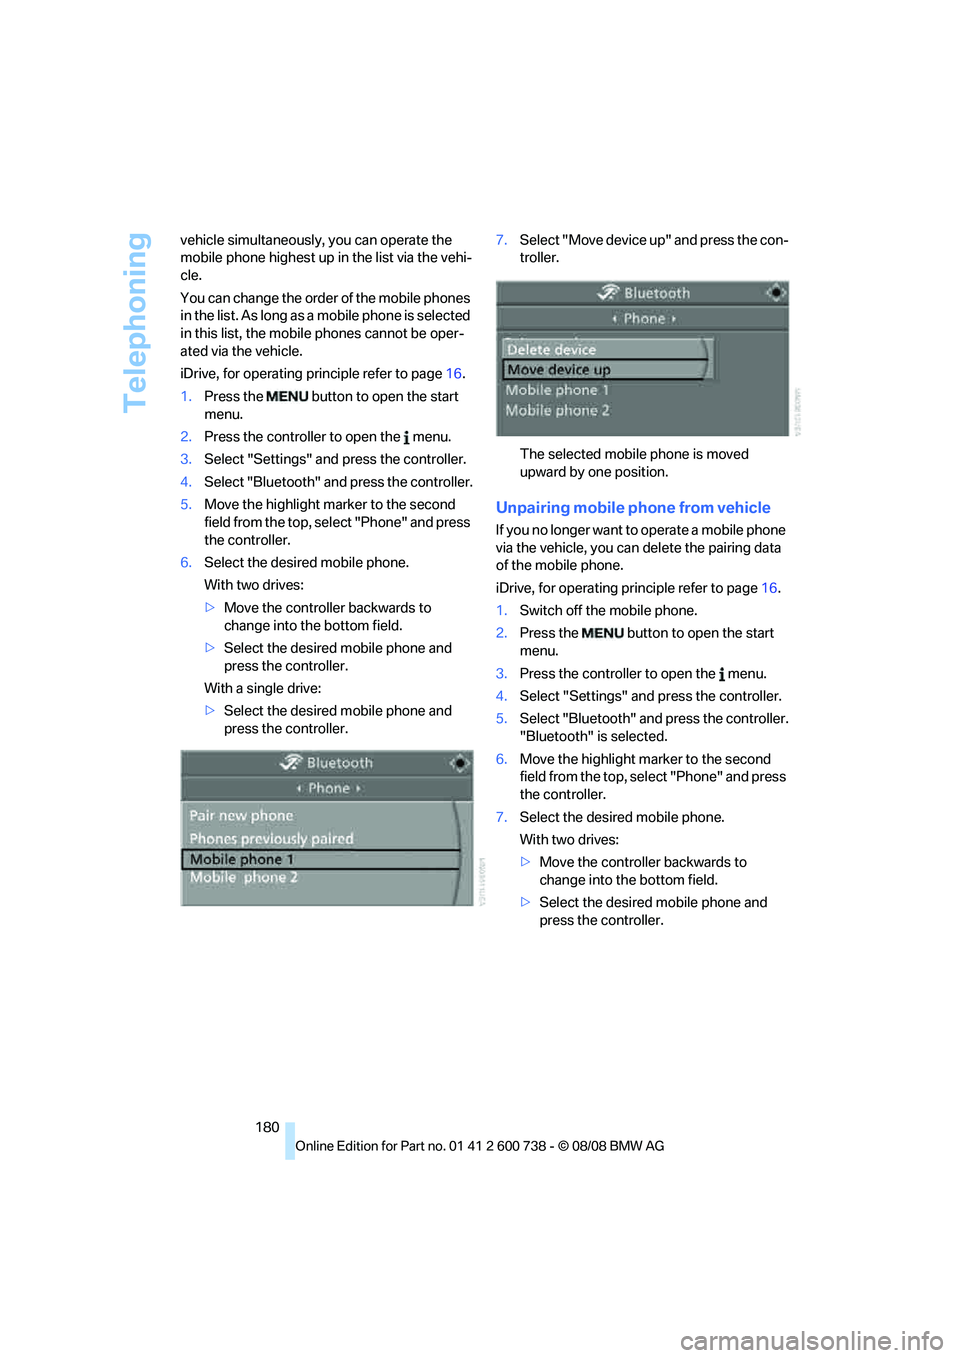
6.Select the desired mobile phone.
With two drives:
>Move the controller backwards to
change into the bottom field.
>Select the desired mobile phone and
press the controller.
With a single drive:
>Select the desired mobile phone and
press the controller.7.Select "Move device up" and press the con-
troller.
The selected mobile phone is moved
upward by one position.
Unpairing mobile phone from vehicle
If you no longer want to operate a mobile phone
via the vehicle, you can delete the pairing data
of the mobile phone.
iDrive, for operating principle refer to page16.
1.Switch off the mobile phone.
2.Press the button to open the start
menu.
3.Press the controller to open the menu.
4.Select "Settings" and press the controller.
5.Select "Bluetooth" and press the controller.
"Bluetooth" is selected.
6.Move the highlight marker to the second
field from the top, select "Phone" and press
the controller.
7.Select the desired mobile phone.
With two drives:
>Move the controller backwards to
change into the bottom field.
>Select the desired mobile phone and
press the controller.