2010 BMW M3 SEDAN socket
[x] Cancel search: socketPage 110 of 274

Practical interior accessories
108
Lighter
With the engine running or the ignition switched
on, press in the cigarette lighter.
The lighter can be pulled out as soon as it pops
back out.
Hold or touch the hot cigarette lighter by
the knob only. Holding or touching it in
other areas could result in burns.
When leaving the car, always remove the
remote control so that children cannot operate
the cigarette lighter and burn themselves.<
Connecting electrical
appliances
In your BMW, when the engine is running or the
ignition is switched on, you can use electrical
devices such as a hand lamp, car vacuum
cleaner, etc., up to approx. 200 watts at
12 volts, as long as one of the following sockets
is available. Avoid damaging the sockets by
attempting to insert plugs of unsuitable shape
or size.
Cigarette lighter socket*
To access the socket: take the cigarette lighter
out of the socket.
Socket* in the front passenger footwell
A socket is located under the glove compart-
ment on the left.
Socket in the center armrest
External audio device, refer to page106.
Sockets in the rear center console*
Remove corresponding cover.
Socket in the cargo area*
Sedan
Sports Wagon
Open the cap.
Page 172 of 274
External devices
170 device supports this. Therefore, do not con-
nect the device to the power socket in the
vehicle.
>Do not forcibly connect the plug to the USB
interface.
>Do not connect devices such as fans or
lamps to the USB audio interface.
>Do not connect USB hard drives.
>Do not use the USB audio interface to
charge external devices.
Page 226 of 274
Maintenance
224
Socket for Onboard
Diagnosis OBD
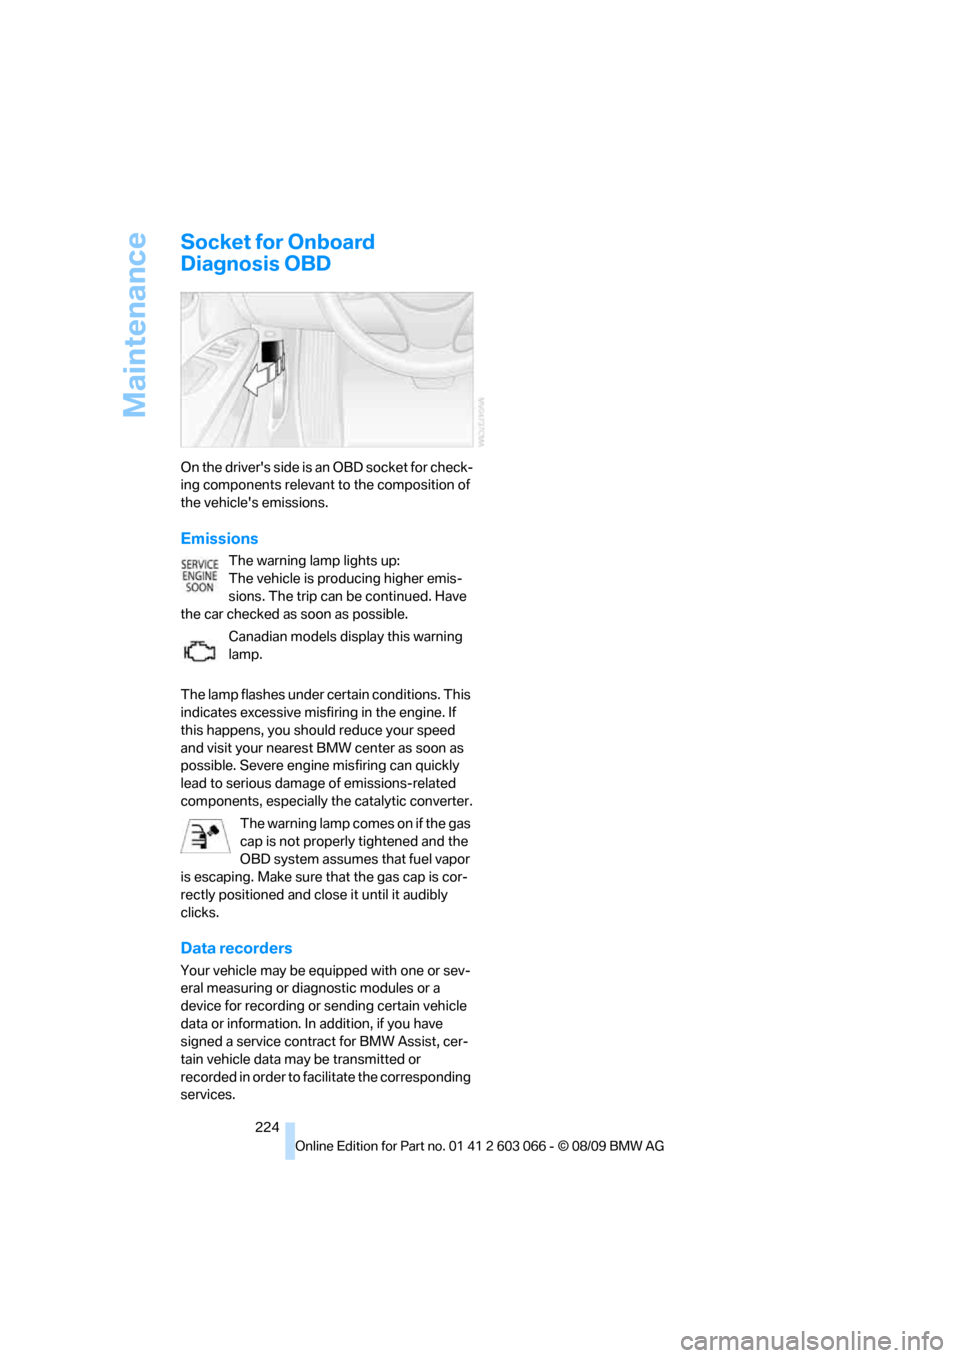
On the driver's side is an OBD socket for check-
ing components relevant to the composition of
the vehicle's emissions.
Emissions
The warning lamp lights up:
The vehicle is producing higher emis-
sions. The trip can be continued. Have
the car checked as soon as possible.
Canadian models display this warning
lamp.
The lamp flashes under certain conditions. This
indicates excessive misfiring in the engine. If
this happens, you should reduce your speed
and visit your nearest BMW center as soon as
possible. Severe engine misfiring can quickly
lead to serious damage of emissions-related
components, especially the catalytic converter.
The warning lamp comes on if the gas
cap is not properly tightened and the
OBD system assumes that fuel vapor
is escaping. Make sure that the gas cap is cor-
rectly positioned and close it until it audibly
clicks.
Data recorders
Your vehicle may be equipped with one or sev-
eral measuring or diagnostic modules or a
device for recording or sending certain vehicle
data or information. In addition, if you have
signed a service contract for BMW Assist, cer-
tain vehicle data may be transmitted or
recorded in order to facilitate the corresponding
services.
Page 233 of 274
Mobility
231Reference
At a glance
Controls
Driving tips
Communications
Navigation
Entertainment
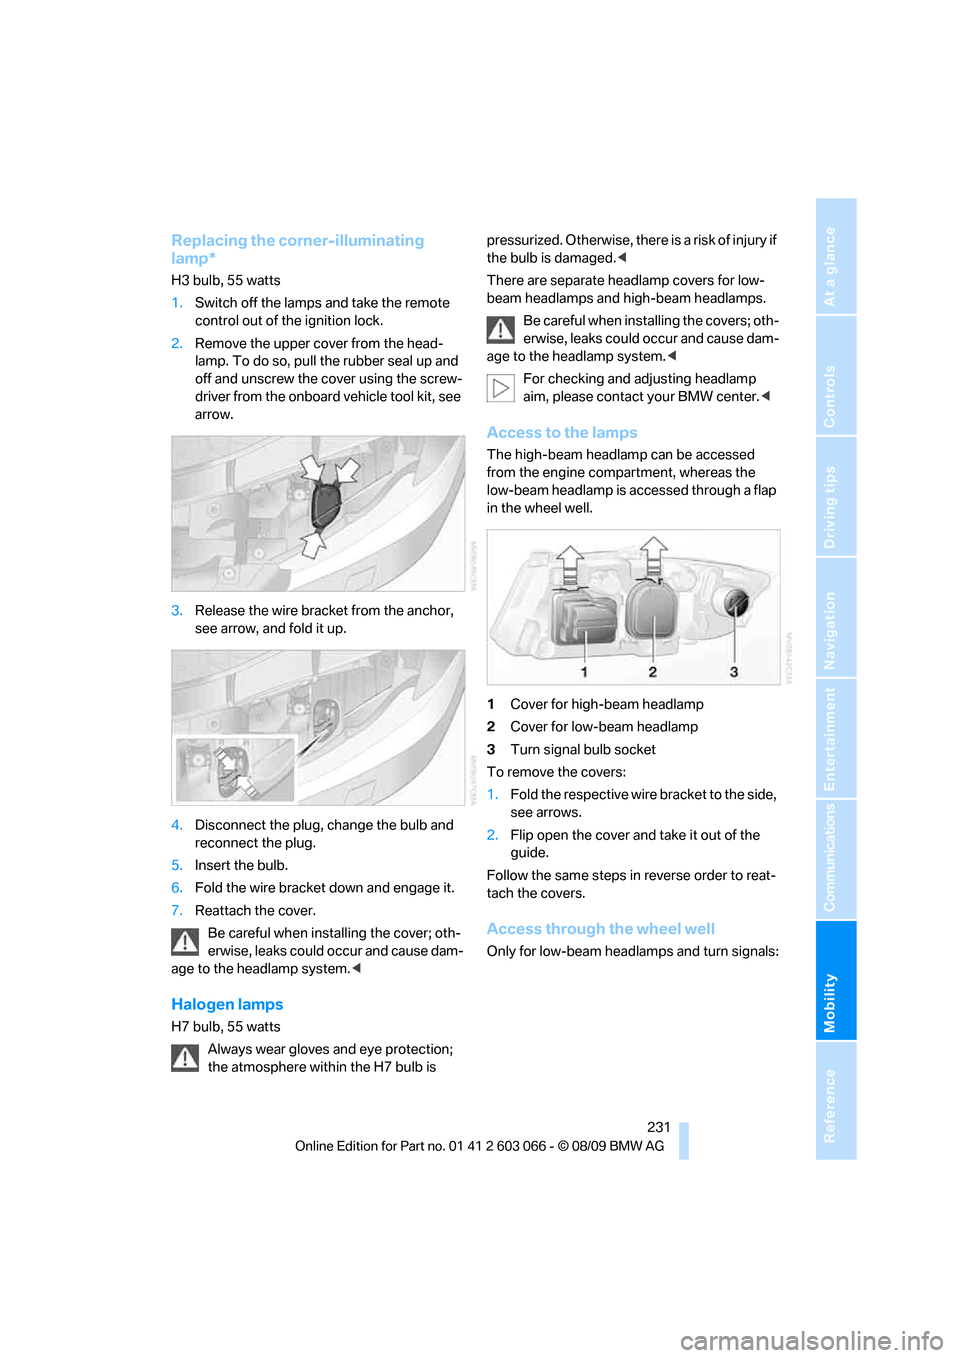
Replacing the corner-illuminating
lamp*
H3 bulb, 55 watts
1.Switch off the lamps and take the remote
control out of the ignition lock.
2.Remove the upper cover from the head-
lamp. To do so, pull the rubber seal up and
off and unscrew the cover using the screw-
driver from the onboard vehicle tool kit, see
arrow.
3.Release the wire bracket from the anchor,
see arrow, and fold it up.
4.Disconnect the plug, change the bulb and
reconnect the plug.
5.Insert the bulb.
6.Fold the wire bracket down and engage it.
7.Reattach the cover.
Be careful when installing the cover; oth-
erwise, leaks could occur and cause dam-
age to the headlamp system.<
Halogen lamps
H7 bulb, 55 watts
Always wear gloves and eye protection;
the atmosphere within the H7 bulb is pressurized. Otherwise, there is a risk of injury if
the bulb is damaged.<
There are separate headlamp covers for low-
beam headlamps and high-beam headlamps.
Be careful when installing the covers; oth-
erwise, leaks could occur and cause dam-
age to the headlamp system.<
For checking and adjusting headlamp
aim, please contact your BMW center.<
Access to the lamps
The high-beam headlamp can be accessed
from the engine compartment, whereas the
low-beam headlamp is accessed through a flap
in the wheel well.
1Cover for high-beam headlamp
2Cover for low-beam headlamp
3Turn signal bulb socket
To remove the covers:
1.Fold the respective wire bracket to the side,
see arrows.
2.Flip open the cover and take it out of the
guide.
Follow the same steps in reverse order to reat-
tach the covers.
Access through the wheel well
Only for low-beam headlamps and turn signals:
Page 234 of 274
Replacing components
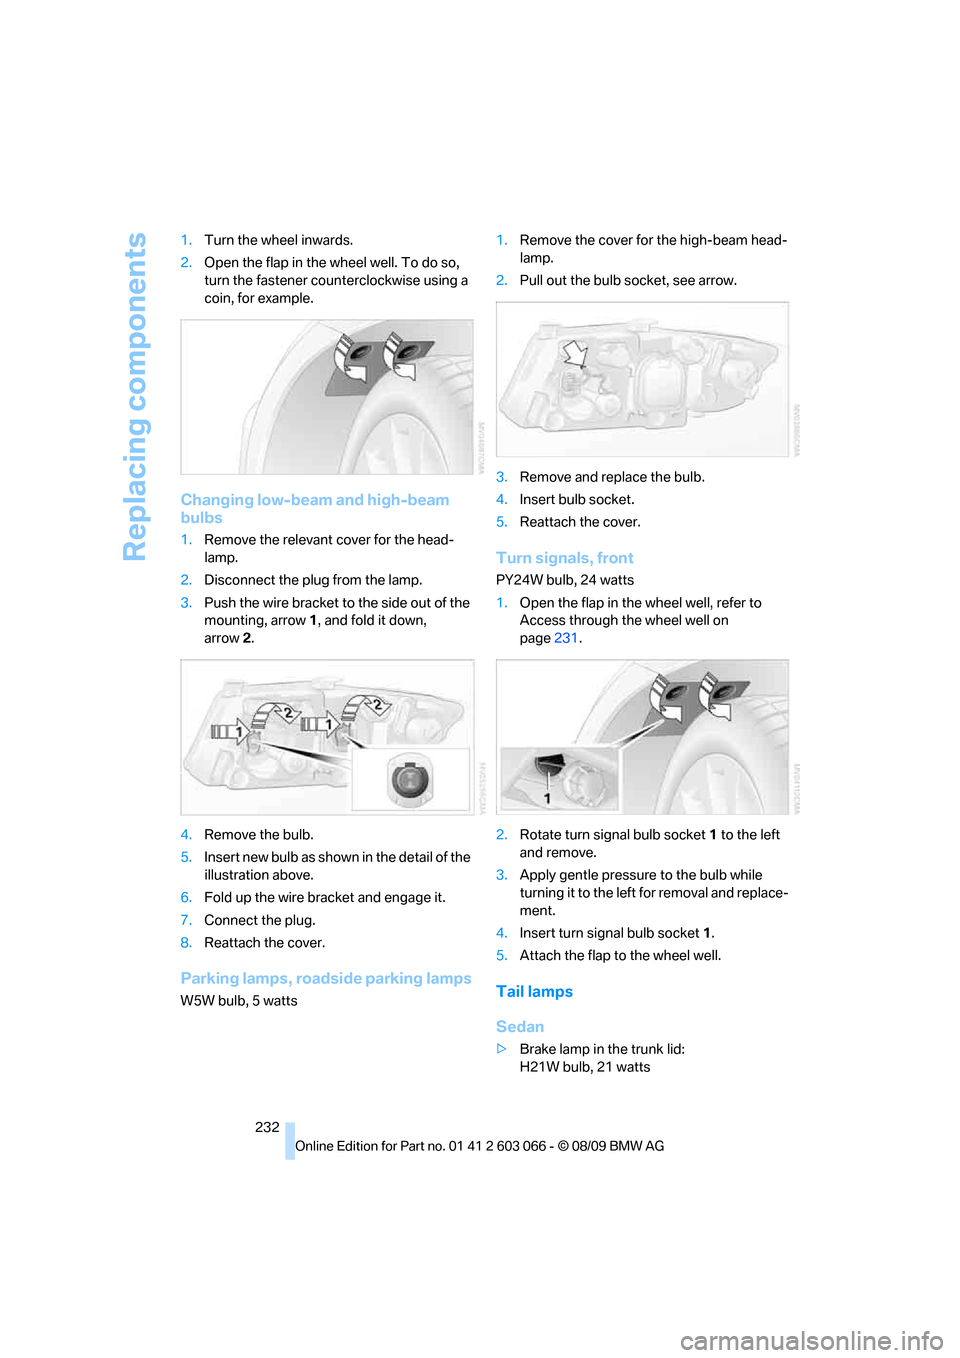
232 1.Turn the wheel inwards.
2.Open the flap in the wheel well. To do so,
turn the fastener counterclockwise using a
coin, for example.
Changing low-beam and high-beam
bulbs
1.Remove the relevant cover for the head-
lamp.
2.Disconnect the plug from the lamp.
3.Push the wire bracket to the side out of the
mounting, arrow1, and fold it down,
arrow2.
4.Remove the bulb.
5.Insert new bulb as shown in the detail of the
illustration above.
6.Fold up the wire bracket and engage it.
7.Connect the plug.
8.Reattach the cover.
Parking lamps, roadside parking lamps
W5W bulb, 5 watts1.Remove the cover for the high-beam head-
lamp.
2.Pull out the bulb socket, see arrow.
3.Remove and replace the bulb.
4.Insert bulb socket.
5.Reattach the cover.
Turn signals, front
PY24W bulb, 24 watts
1.Open the flap in the wheel well, refer to
Access through the wheel well on
page231.
2.Rotate turn signal bulb socket 1 to the left
and remove.
3.Apply gentle pressure to the bulb while
turning it to the left for removal and replace-
ment.
4.Insert turn signal bulb socket 1.
5.Attach the flap to the wheel well.
Tail lamps
Sedan
>Brake lamp in the trunk lid:
H21W bulb, 21 watts
Page 265 of 274
Reference 263
At a glance
Controls
Driving tips
Communications
Navigation
Entertainment
Mobility
New tires216
North-facing map136
Nozzles97
Number of cylinders, refer to
Engine data244
Nylon rope, refer to Tow
rope240
O
OBD socket, refer to Socket
for Onboard Diagnosis224
Octane ratings, refer to Fuel
specifications197
Odometer69
Oil, refer to Engine oil219
Oil consumption219
Oil level219
Old batteries, refer to
Disposal236
Onboard vehicle tool kit229
Opening and closing
– Comfort Access34
– from inside30
– from outside27
– using the door lock29
– via the remote control27
Options, selecting for
navigation134
Orientation menu, refer to
Start menu17
Outlets
– refer to Ventilation100
Output, refer to Engine
data244
Outside-air mode
– automatic climate control99
Outside temperature
display69
– changing units of
measure73
– in computer73
Outside temperature
warning69
Overheated engine, refer to
Coolant temperature70
Overriding selector lever
lock58Overview
– radio control144
P
Paintwork care226
Panorama glass roof38
– closing after electrical
malfunction39
– comfort position39
– Convenient operation28
– initializing39
– opening, closing38
– pinch protection system39
– power failure39
– raising38
– remote control28
Park assistant, refer to Park
Distance Control81
Park Distance Control PDC81
Parked car ventilation100
– preselecting switch-on
times101
– switching on and off
directly101
Parking
– vehicle55
Parking aid, refer to Park
Distance Control PDC81
Parking brake56
– indicator lamp56
Parking lamps92
– replacing bulbs230,232
Parking lamps/low beams92
Particulate filter, refer to
Diesel particulate filter117
Partition net111
Passenger side mirror tilt
function48
Pathway lighting93
Personal Profile26
Phone book177
Phone numbers
– dialing178
Pinch protection system
– glass roof, electric37
– panorama glass roof39
– windows36Placing a call, refer to
telephone owner's manual
Playing music163
Polish227
Pollen
– refer to Microfilter/activated-
charcoal filter for automatic
climate control100
Postal code, entering for
navigation126
Power failure236
Power windows36
– safety switch36
Power windows, refer to
Windows36
Preheating, refer to Diesel
engine
55
Pressure, tires201
Pressure monitoring, tires84
– Flat Tire Monitor84
Pressure monitoring of tires,
refer to Tire Pressure
Monitor TPM86
Programmable buttons on the
steering wheel11
Protection function, refer to
Pinch protection system
– glass roof, electric37
– panorama glass roof39
– windows36
Providing medical assistance,
refer to First aid pouch237
Puncture
– Flat Tire Monitor84
R
Radio
– controls144
– HD Radio148
– satellite radio150
– selecting a waveband147
– storing stations147
– switching on/off144
– tone control144
– volume144
Radio position, refer to Radio
readiness54
Page 267 of 274

Reference 265
At a glance
Controls
Driving tips
Communications
Navigation
Entertainment
Mobility
Safety systems
– airbags90
– Antilock Brake System
ABS82
– brake system82
– driving stability control
systems82
– Dynamic Stability Control
DSC82
– safety belts46
Safety tires, refer to Run-flat
tires216
Satellite radio150
– enabling or unsubscribing
from a channel150
– favorites152
– selecting channel151
– storing channel151
– timeshift152
– Traffic Jump153
Saving fuel116
Screen, refer to iDrive
controls16
Screw thread for tow
fitting240
SDARS, refer to Satellite
radio150
Seat adjustment
– electric42
– mechanical42
Seat and mirror memory45
Seat belt reminder, refer to
"Fasten safety belts"
reminder46
Seat heating45
Seats42
– adjusting electrically42
– adjusting the seats42
– heating45
– memory, refer to Seat and
mirror memory45
– saving a setting, refer to Seat
and mirror memory45
– sitting safely41
Securing cargo113
Securing the vehicle
– from inside30
– from outside27
Selecting a detour139Selecting distance for active
cruise control64
Selecting new scale for
navigation137
Selector lever
– automatic transmission with
Steptronic57
Selector lever lock, refer to
Changing selector lever
positions, shiftlock57
Selector lever positions
– automatic transmission with
Steptronic57
Service, refer to Roadside
Assistance
237
Service car, refer to Roadside
Assistance237
Service data in the remote
control223
Service Interval Display, refer
to Condition Based Service
CBS223
Service Request191
Service requirement display,
refer to Condition Based
Service CBS223
Service requirements73
Service status192
Settings
– changing on Control
Display79
– clock, 12h/24h format76
– DVD158
– language79
Settings and information72
Settings for the map view137
Setting times, refer to
Preselecting switch-on
times101
Shifting gears
– automatic transmission with
Steptronic57
– manual transmission56
Shiftlock
– automatic transmission,
refer to Changing selector
lever positions57
Short commands for the voice
activation system249Short route in navigation, refer
to Selecting route134
Shuffled, refer to Random
– CD changer156
– CD player156
Side airbags90
Side window blind, refer to
Roller sun blinds105
Side windows, refer to
Windows36
Signal horn, refer to
Horn10,11
Sitting safely41
– with airbags41
– with head restraint41
– with safety belts41
Ski bag112
Sliding/tilt sunroof
– refer to Panorama glass
roof38
Sliding/tilt sunroof, refer to
Glass roof, electric37
Slot for remote control54
Smokers' package, refer to
Ashtray108
Snap-in adapter
– inserting/removing184
– use174
Snap-in adapter, refer to
Center armrest storage
compartment106
Socket, Onboard Diagnosis
OBD224
Socket, refer to Connecting
electrical appliances108
Soot particulate filter, refer to
Diesel particulate filter117
SOS, refer to Sending an
Emergency Request237
Sound, adjusting during audio
playback, refer to Tone
control144
Sound output for
entertainment on/off144
Spare fuses236
Special destinations128
Special destinations,
displaying130