2010 BMW M3 SEDAN Button
[x] Cancel search: ButtonPage 113 of 274

Controls
111Reference
At a glance
Driving tips
Communications
Navigation
Entertainment
Mobility
Partition net
Do not let the partition net retract; other-
wise, there is a risk of danger and the par-
tition net could be damaged.<
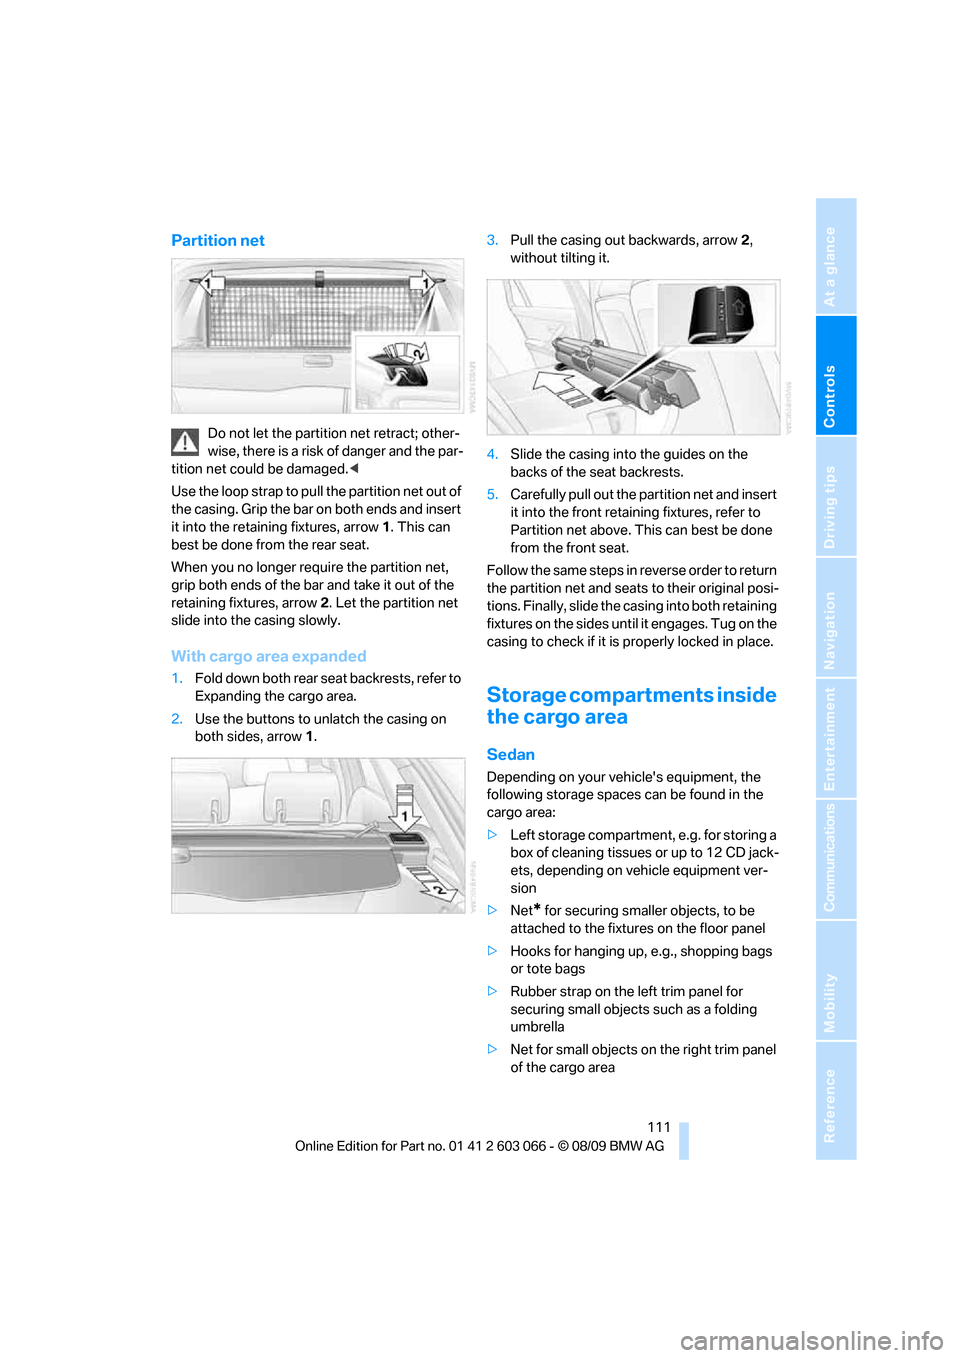
Use the loop strap to pull the partition net out of
the casing. Grip the bar on both ends and insert
it into the retaining fixtures, arrow 1. This can
best be done from the rear seat.
When you no longer require the partition net,
grip both ends of the bar and take it out of the
retaining fixtures, arrow 2. Let the partition net
slide into the casing slowly.
With cargo area expanded
1.Fold down both rear seat backrests, refer to
Expanding the cargo area.
2.Use the buttons to unlatch the casing on
both sides, arrow 1.3.Pull the casing out backwards, arrow 2,
without tilting it.
4.Slide the casing into the guides on the
backs of the seat backrests.
5.Carefully pull out the partition net and insert
it into the front retaining fixtures, refer to
Partition net above. This can best be done
from the front seat.
Follow the same steps in reverse order to return
the partition net and seats to their original posi-
tions. Finally, slide the casing into both retaining
fixtures on the sides until it engages. Tug on the
casing to check if it is properly locked in place.
Storage compartments inside
the cargo area
Sedan
Depending on your vehicle's equipment, the
following storage spaces can be found in the
cargo area:
>Left storage compartment, e.g. for storing a
box of cleaning tissues or up to 12 CD jack-
ets, depending on vehicle equipment ver-
sion
>Net
* for securing smaller objects, to be
attached to the fixtures on the floor panel
>Hooks for hanging up, e.g., shopping bags
or tote bags
>Rubber strap on the left trim panel for
securing small objects such as a folding
umbrella
>Net for small objects on the right trim panel
of the cargo area
Page 115 of 274

Controls
113Reference
At a glance
Driving tips
Communications
Navigation
Entertainment
Mobility
Loading
1.Fold down the center armrest.
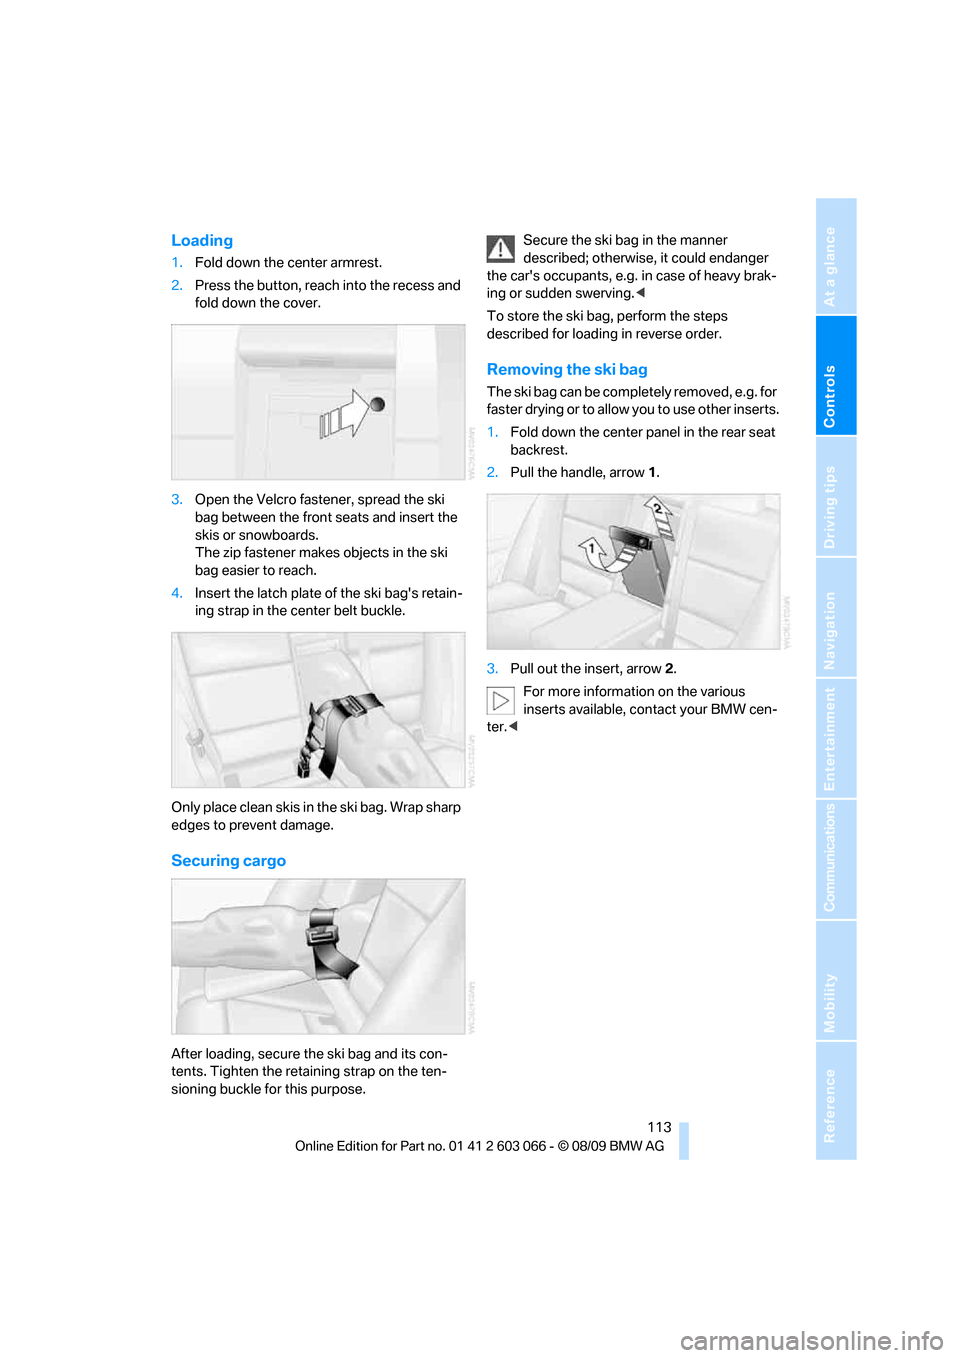
2.Press the button, reach into the recess and
fold down the cover.
3.Open the Velcro fastener, spread the ski
bag between the front seats and insert the
skis or snowboards.
The zip fastener makes objects in the ski
bag easier to reach.
4.Insert the latch plate of the ski bag's retain-
ing strap in the center belt buckle.
Only place clean skis in the ski bag. Wrap sharp
edges to prevent damage.
Securing cargo
After loading, secure the ski bag and its con-
tents. Tighten the retaining strap on the ten-
sioning buckle for this purpose.Secure the ski bag in the manner
described; otherwise, it could endanger
the car's occupants, e.g. in case of heavy brak-
ing or sudden swerving.<
To store the ski bag, perform the steps
described for loading in reverse order.
Removing the ski bag
The ski bag can be completely removed, e.g. for
faster drying or to allow you to use other inserts.
1.Fold down the center panel in the rear seat
backrest.
2.Pull the handle, arrow1.
3.Pull out the insert, arrow 2.
For more information on the various
inserts available, contact your BMW cen-
ter.<
Page 126 of 274

Navigation system
124
Navigation system
General information
With the help of satellites, the navigation sys-
tem is able to ascertain the precise position of
the vehicle and guide you reliably to any desti-
nation you enter.
Enter data only when the vehicle is sta-
tionary, and always give priority to the
applicable traffic regulations in the event of any
contradiction between traffic and road condi-
tions and the instructions issued by the naviga-
tion system. Failure to take to this precaution
can place you in violation of the law and put
vehicle occupants and other road users in dan-
ger.<
Navigation data
General information
Navigation data are stored in the vehicle and
can be updated.
Navigation data and authorization codes are
available from your BMW center.
Depending on the data volume, a data update
may take several hours.
>The data are updated while you are driving.
>The update is resumed automatically when
a trip is continued after an interruption.
>All functions are available during the trip.
>The data are stored in the vehicle.
>After the update, the system restarts.
>The medium that holds the navigation data
can be removed after the update is com-
pleted.
Updating the navigation data
Inserting navigation DVD
1.Insert the navigation DVD into the DVD
player with the labeled side facing up.
2.Follow the instructions on the Control Dis-
play.3.Enter the authorization code of the naviga-
tion DVD and change the DVD if needed.
Removing navigation DVD
1. Press button 1.
The DVD emerges slightly from the drive.
2.Remove the DVD.
Displaying information on the version
1."Navigation"
2.Open "Options".
3."Navigation system version":
Information on the data version is displayed.
*
Page 127 of 274

Navigation
Driving tips
125Reference
At a glance
Controls
Communications
Entertainment
Mobility
Destination entry
In entering your destination you can select from
the following options:
>Entering a destination manually, see below
>Selecting destination from address book,
refer to page127
>Last destinations, refer to page128
>Special destinations, refer to page128
>Entering a destination on the map, refer to
page130
>Selecting home address, refer to page128
>Entering a destination by voice com-
mands*, refer to page131
>Destination entry via BMW Assist
*, refer to
page129
You can also store a navigation destination on
the programmable memory keys, refer to
page20.
Enter data only when the vehicle is sta-
tionary, and always give priority to the
applicable traffic regulations in the event of any
contradiction between traffic and road condi-
tions and the instructions issued by the naviga-
tion system. Otherwise, vehicle occupants and
other road users may be endangered.<
Entering a destination
manually
The system's word-matching principle makes it
easier for you to enter the names of streets or
towns, refer to page133. This allows you to
enter different spellings and completes your
entry automatically, so that stored names can
be called up quickly.
1.Press the MENU button.
2."Navigation"3."Enter address"
The system also supports you with the follow-
ing features:
>If you do not enter a street, the system will
guide you to the downtown area of a town or
city.
>You can skip the entry of state/province and
town/city if the current entries should be
retained for your new destination.
Entering a state/province
1."Navigation"
2."Enter address"
3.Select "State/Province" or the displayed
state/province.
Entering a town/city
1.Select "Town/City/Postal Code" or the dis-
played town/city.
2.Select letters, if necessary.
Page 133 of 274

Navigation
Driving tips
131Reference
At a glance
Controls
Communications
Entertainment
Mobility
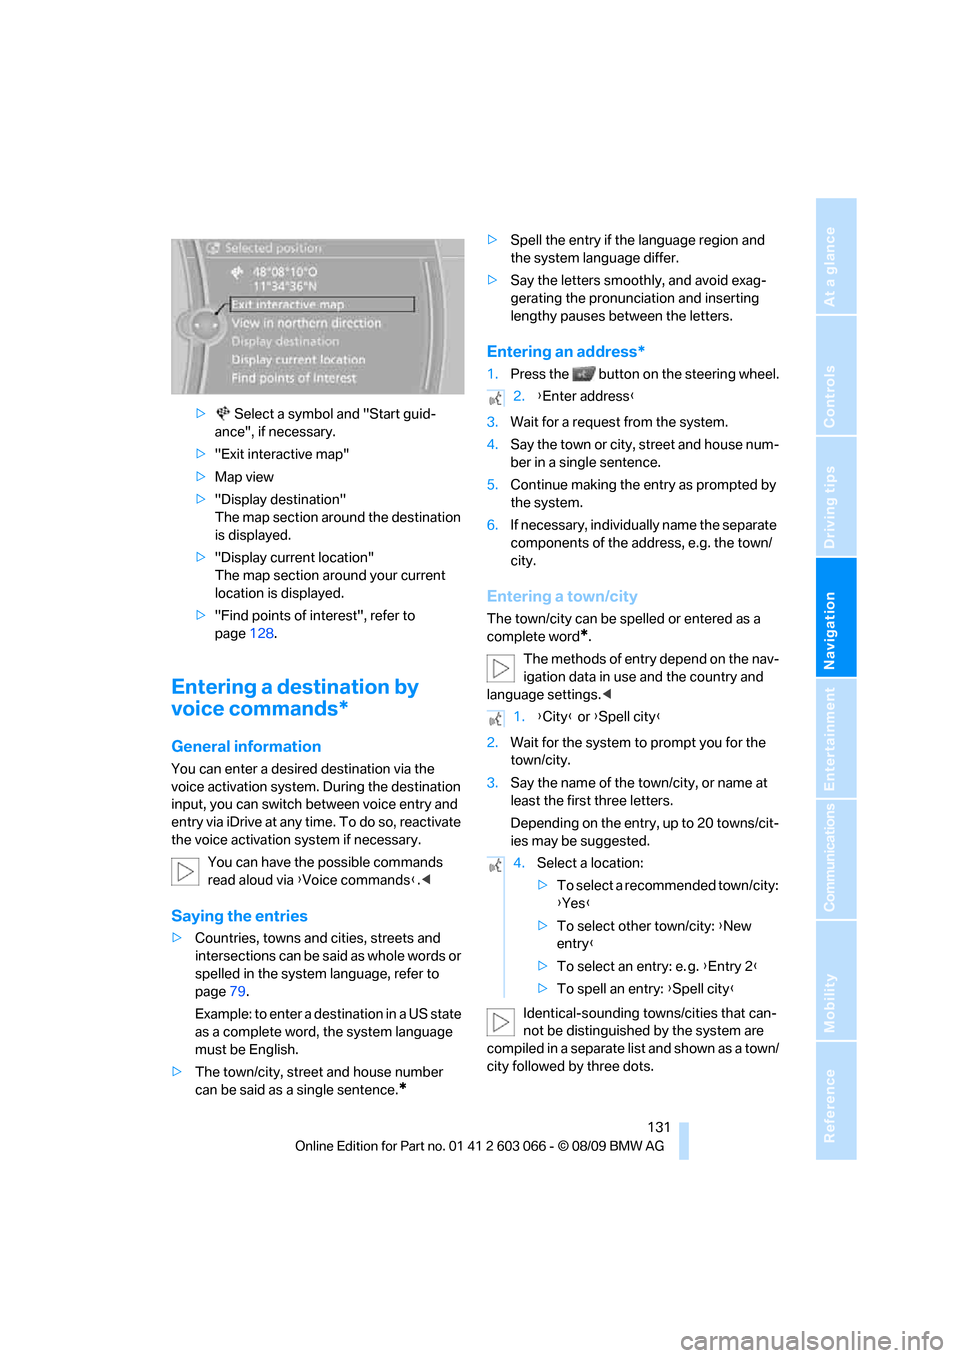
> Select a symbol and "Start guid-
ance", if necessary.
>"Exit interactive map"
>Map view
>"Display destination"
The map section around the destination
is displayed.
>"Display current location"
The map section around your current
location is displayed.
>"Find points of interest", refer to
page128.
Entering a destination by
voice commands*
General information
You can enter a desired destination via the
voice activation system. During the destination
input, you can switch between voice entry and
entry via iDrive at any time. To do so, reactivate
the voice activation system if necessary.
You can have the possible commands
read aloud via {Voice commands}.<
Saying the entries
>Countries, towns and cities, streets and
intersections can be said as whole words or
spelled in the system language, refer to
page79.
Example: to enter a destination in a US state
as a complete word, the system language
must be English.
>The town/city, street and house number
can be said as a single sentence.
*
>Spell the entry if the language region and
the system language differ.
>Say the letters smoothly, and avoid exag-
gerating the pronunciation and inserting
lengthy pauses between the letters.
Entering an address*
1.Press the button on the steering wheel.
3.Wait for a request from the system.
4.Say the town or city, street and house num-
ber in a single sentence.
5.Continue making the entry as prompted by
the system.
6.If necessary, individually name the separate
components of the address, e.g. the town/
city.
Entering a town/city
The town/city can be spelled or entered as a
complete word
*.
The methods of entry depend on the nav-
igation data in use and the country and
language settings.<
2.Wait for the system to prompt you for the
town/city.
3.Say the name of the town/city, or name at
least the first three letters.
Depending on the entry, up to 20 towns/cit-
ies may be suggested.
Identical-sounding towns/cities that can-
not be distinguished by the system are
compiled in a separate list and shown as a town/
city followed by three dots.
2.{Enter address}
1.{City} or {Spell city}
4.Select a location:
>To select a recommended town/city:
{Yes}
>To select other town/city: {New
entry}
>To select an entry: e. g. {Entry 2}
>To spell an entry: {Spell city}
Page 138 of 274

Destination guidance
136 1."Navigation"
2."Map"
3.Select the symbol.
For rapid access, the feature can be stored on a
programmable memory key, refer to page20.
Repeating a voice instruction
1."Navigation"
2."Map"
3.Highlight the symbol.
4.Press the controller twice.
Adjusting the volume of voice
instructions*
The volume can be adjusted only while a voice
instruction is being issued.
1.Have the last voice instruction repeated, if
necessary.
2.Turn the button during the voice instruction
to select the desired volume.
The setting is stored for the remote control cur-
rently in use.
Map view
Displaying the map view
You can have your current position displayed on
a map. After starting the destination guidance,
the planned route is shown on the map.
1."Navigation"
2."Map"
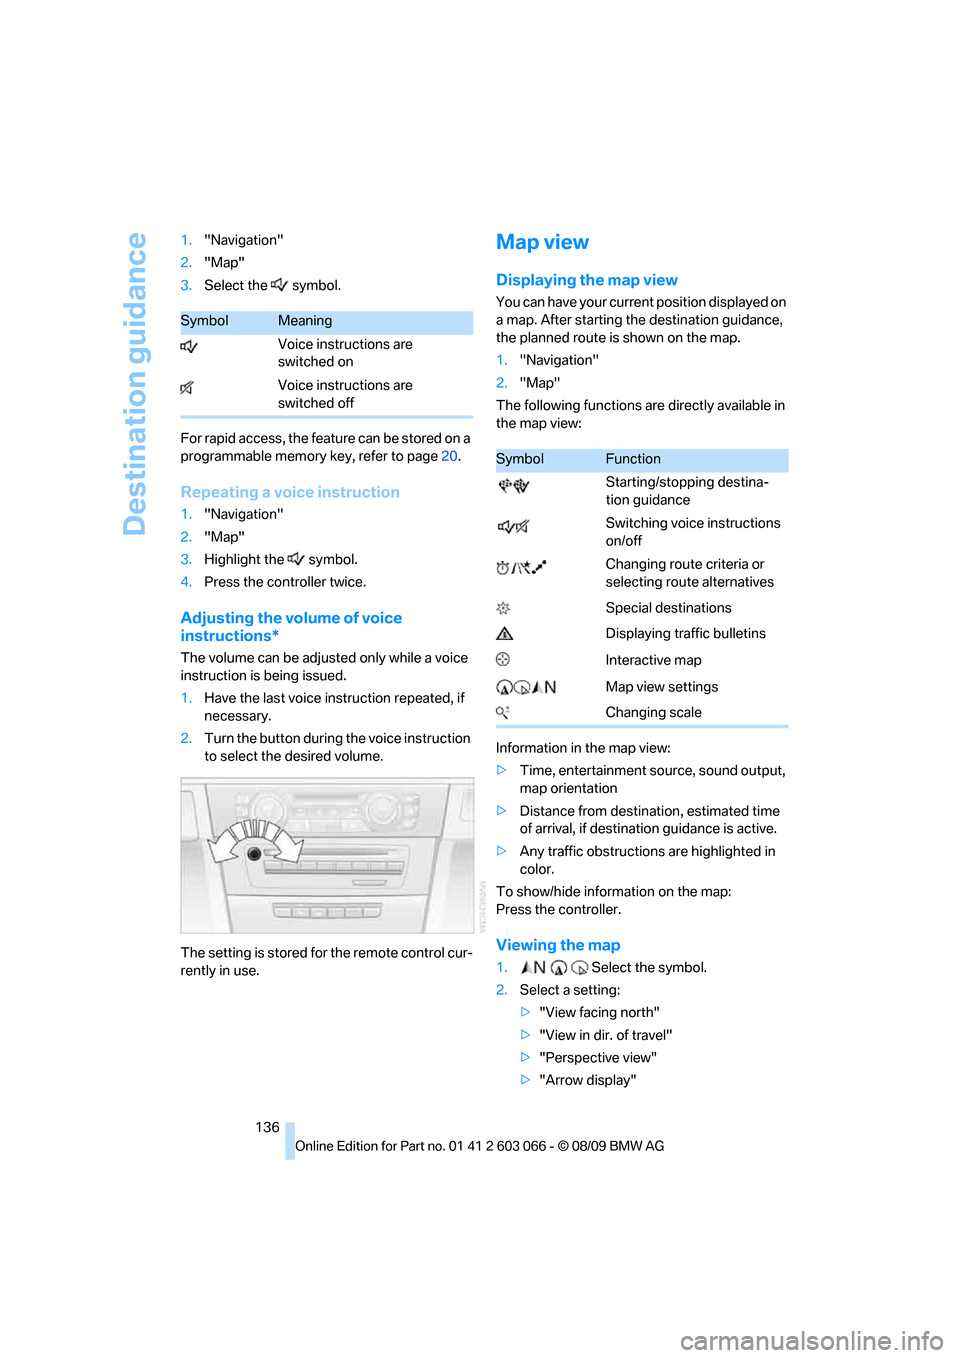
The following functions are directly available in
the map view:
Information in the map view:
>Time, entertainment source, sound output,
map orientation
>Distance from destination, estimated time
of arrival, if destination guidance is active.
>Any traffic obstructions are highlighted in
color.
To show/hide information on the map:
Press the controller.
Viewing the map
1.Select the symbol.
2.Select a setting:
>"View facing north"
>"View in dir. of travel"
>"Perspective view"
>"Arrow display"
SymbolMeaning
Voice instructions are
switched on
Voice instructions are
switched off
SymbolFunction
Starting/stopping destina-
tion guidance
Switching voice instructions
on/off
Changing route criteria or
selecting route alternatives
Special destinations
Displaying traffic bulletins
Interactive map
Map view settings
Changing scale
Page 146 of 274

On/off and tone
144
On/off and tone
The following audio and video sources share
the same control elements and adjustments:
>Radio
>CD/DVD player
>CD changer
*
>Video*
>External devices, e.g. MP3 player
Controls
The audio and video sources can be controlled
using the:
>Buttons near the CD/DVD player
>iDrive
>Buttons on the steering wheel, refer to
page10
>Programmable memory keys, refer to
page20
>Voice activation system
Buttons in the area of the CD/DVD
player
1Sound output for entertainment on/off, vol-
ume
>Press: switch on/off
When you switch on the unit, the last set
radio station or track is played.
>Turn: adjusting the volume
2 Eject the CD/DVD
3CD/DVD drive
*
4FM/AM: change the radio station wave-
band
5MODE: change the audio and video
sources
6 Station scan/track search
>Change the radio station
>Select the track for the CD/DVD player,
CD changer and certain multimedia
devices
Switching on/off
To switch the entertainment audio output on or
off:
Press button1 next to the CD/DVD player.
This symbol on the Control Display indicates
that sound output is switched off.
The sound output is available for approx.
20 minutes after the ignition was switched off.
For sound output, switch the unit back on.
Adjusting volume
Turn button1 next to the CD/DVD player until
the desired volume is obtained.
You can also adjust the volume with buttons on
the steering wheel, refer to page10.
Tone control
You can alter various tone settings, e.g. treble
and bass or the speed-dependent volume
increase.
The tone settings are applied to all audio
sources.
The settings are stored for the remote control
currently in use.
Treble, bass, balance, fader
>"Balance": left/right volume distribution
Page 149 of 274

Navigation
Entertainment
Driving tips
147Reference
At a glance
Controls
Communications
Mobility
Radio
Your radio is designed for reception of the fol-
lowing stations:
>FM and AM
>HD Radio
*
>Satellite radio*
Selecting a station
Press the button if the sound output is switched
off.
1."Radio"
2."FM" or "AM"
3.Select the desired station.The selected station is stored for the remote
control currently in use.
Changing stations
Turn the controller and press it
or
press the button for the corresponding
direction
or
press the buttons on the steering wheel, refer to
page10.
Selecting a station manually
Station selection using the frequency.
1."Radio"
2."FM" or "AM"
3."Manual"
4.Select the frequency: turn the controller.
To store the station: press the controller for an
extended period.
Storing stations
Via iDrive
1."Radio"
2."FM" or "AM"