2010 BMW M3 radio controls
[x] Cancel search: radio controlsPage 93 of 196

Reference
At a glance
Controls
Driving tips
Mobility
91
Practical interior accessories
Integrated universal remote
control*
The concept
The integrated universal remote control can
replace as many as three hand-held transmit-
ters for various remote-controlled devices,
such as garage doors and gates or lighting sys-
tems. The integrated universal remote control
registers and stores signals from the original
hand-held transmitters.
The signal of an original hand-held transmitter
can be programmed on one of the three mem-
ory buttons1. After this, the programmed
memory button1 will operate the system in
question. The LED2 flashes to confirm trans-
mission of the signal.
Should you sell your vehicle one day, be sure to
delete the stored programs beforehand for your
safety, refer to page92.
To prevent possible damage or injury,
before programming or using the inte-
grated universal remote control, always inspect
the immediate area to make certain that no peo-
ple, animals or objects are within the pivoting or
travel range of the device being operated. Com-
ply also with the safety instructions supplied
with the original hand-held transmitter.<
Checking compatibility
If this symbol appears on the package
or in the instructions supplied with the
original hand-held transmitter, you can
assume that the radio remote control device will
be compatible with the integrated universal
remote control.
For additional information, please contact your
BMW center or call: 1-800-355-3515.
You can also obtain information on the Internet
at:
www.bmwusa.com or
www.homelink.com. HomeLink is a registered trademark of Johnson
Controls, Inc.<
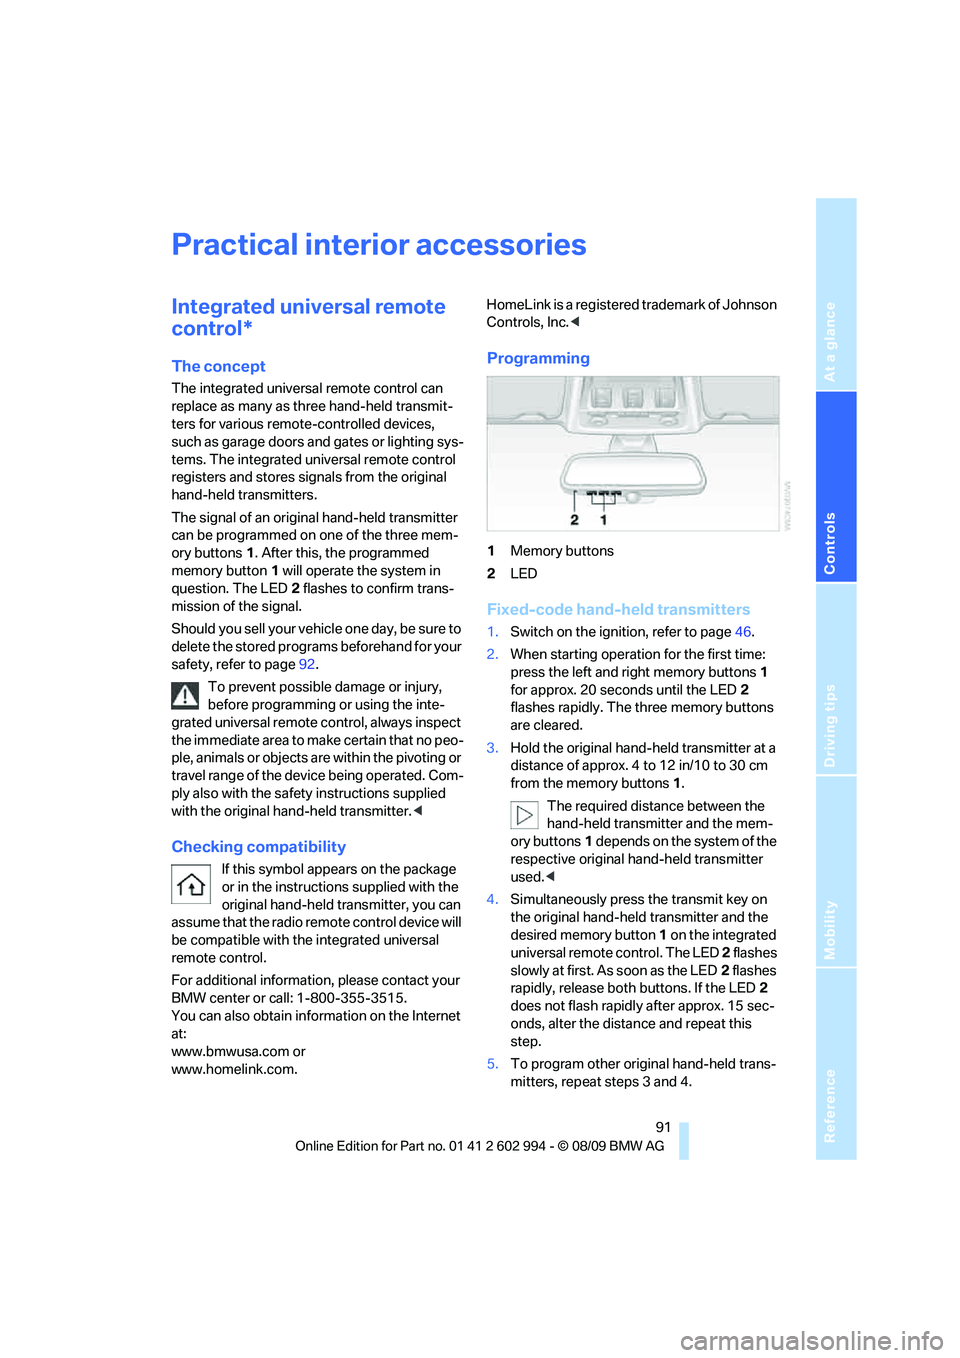
Programming
1Memory buttons
2LED
Fixed-code hand-held transmitters
1.Switch on the ignition, refer to page46.
2.When starting operation for the first time:
press the left and right memory buttons1
for approx. 20 seconds until the LED2
flashes rapidly. The three memory buttons
are cleared.
3.Hold the original hand-held transmitter at a
distance of approx. 4 to 12 in/10 to 30 cm
from the memory buttons1.
The required distance between the
hand-held transmitter and the mem-
ory buttons1 depends on the system of the
respective original hand-held transmitter
used.<
4.Simultaneously press the transmit key on
the original hand-held transmitter and the
desired memory button 1 on the integrated
universal remote control. The LED 2 flashes
slowly at first. As soon as the LED2 flashes
rapidly, release both buttons. If the LED2
does not flash rapidly after approx. 15 sec-
onds, alter the distance and repeat this
step.
5.To program other original hand-held trans-
mitters, repeat steps 3 and 4.
Page 97 of 196

Reference
At a glance
Controls
Driving tips
Mobility
95
Locking
To lock the glove compartment, use the inte-
grated key of the remote control, refer to
page18.
Center armrest
Storage compartment
The center armrest between the front seats
contains either a compartment or the cover for
the snap-in adapter
*, depending on the equip-
ment version.
Opening
Press the button, see arrow.
Settings*
Slide the center armrest on the driver's side into
the desired position.
Connection for external audio device
You can connect an external audio device such
as a CD or MP3 player and play audio tracks
over the car's loudspeaker system. You can set
the volume and tone by means of the car radio,
refer to the separate Owner's Manual for Radio.
Connecting
Lift up the center armrest.
AUX-IN port for audio playback:
TRS connector 1/8 in/3.5 mm
To play audio tracks over the car's loudspeaker
system, connect the headset or line-out port of
the external device to the connector.
Storage compartments inside
the vehicle
Depending on your vehicle's equipment, you
will find compartments beside the steering col-
umn
*, in the front doors and in the center con-
sole
*.
There are nets
* on the front-seat backrests.
Clothes hooks
There are clothes hooks on the grab handles in
the rear passenger compartment.
Items of clothing hung from the hooks
must not obstruct the driver's view. Do
not hang heavy objects from the hooks; other-
wise, they could endanger the car's occupants,
e.g. in case of heavy braking or sudden swerv-
ing.<
Cupholders
Use lightweight and shatterproof contain-
ers and do not transport hot beverages;
otherwise, there is an increased risk of injury in
the event of the accident. Do not force contain-
ers that are too large into the cupholders; other-
wise, damage could result.<
Page 147 of 196

Reference
At a glance
Controls
Driving tips
Mobility
145
Outside sensors/cameras
Keep the sensors and cameras on the
outside of the vehicle, e.g. those for Park
Distance Control, clean and free of ice to ensure
that they remain fully functional.<
Interior care
Upholstery fabrics/cloth trims/
Alcantara fabrics
Vacuum regularly with a vacuum cleaner to
remove superficial dirt.
To remove severe spots such as stains from
beverages, use a soft sponge or lint-free
microfiber cloth and suitable interior cleaners.
Follow the instructions on the packaging.
Clean the upholstery down to the seams
using a sweeping motion. Avoid strong
rubbing.<
Opened Velcro fasteners on pants or
other articles of clothing can damage the
seat covers. Ensure that Velcro fasteners are
closed.<
Leather/leather trim
The leather used by BMW is a high quality
natural product. Slight irregularities in the
leather are a typical characteristic of natural
leather.<
Dust and road grit in the pores and folds of the
leather have an abrasive effect, leading to
increased wear and causing the leather surface
to become brittle prematurely. Therefore, fre-
quently clean the leather of dust using a cloth or
vacuum cleaner.
Clean light-colored leather more frequently as
dust and dirt are more noticeable.
Treat the leather at least once every two
months using a leather lotion as dirt and grease
will gradually attack the leather's protective
layer.
Carpets/cargo area
You can vacuum the carpets and floor mats or
clean them with interior cleaner if heavily soiled.The floor mats can be removed for cleaning.
When replacing the mats, ensure that the seat
rails do not extend over the floor mats, as this
may damage the mats.
Lint on the floor mats occurs for technical rea-
sons and can be removed by vacuuming
repeatedly.
Interior plastic parts
>Imitation leather surfaces
>Lamp glasses
>Display pane of instrument cluster
>Matte parts
Clean with water and solvent-free plastic
cleaner if necessary.
Fine wood parts
Clean fine wood trim and fine wood parts with a
damp cloth. Wipe dry with a soft cloth.
Safety belts
Dirty belt straps impede the reeling action and
thus have a negative impact on safety.
Do not clean chemically, as this may
destroy the webbing.<
Interior sensors/cameras
To clean interior sensors and cameras, use a
lint-free cloth moistened with glass cleaner.
Displays
To clean displays, e.g. of the radio or instrument
cluster, use a cleaning cloth for displays or a
soft, non-abrasive, lint-free cloth.
Avoid applying excessive pressure when
cleaning the displays; otherwise, damage
may occur.<
Do not use chemical or abrasive house-
hold cleaning agents. Keep all types of
fluid away from the device. Otherwise, surfaces
or electrical components may be corroded or
damaged.<
Page 155 of 196

Reference
At a glance
Controls
Driving tips
Mobility
153
Changing wheels
Your BMW is equipped with run-flat tires as
standard. This removes the need to change a
wheel immediately in the event of a puncture.
For information on continuing to drive with a
damaged tire, refer to Indication of a flat tire on
page73.
The symbol identifying run-flat tires is a circle
with the letters RSC on the sidewall, refer to
Run-flat tires, page134.
When mounting new tires or changing over
from summer to winter tires and vice versa,
mount run-flat tires for your own safety. In the
event of a flat, no spare wheel is available. Your
BMW center will be glad to advise you. Refer
also to New wheels and tires, page134.
The tools for changing wheels are avail-
able as optional accessories from your
BMW center.<
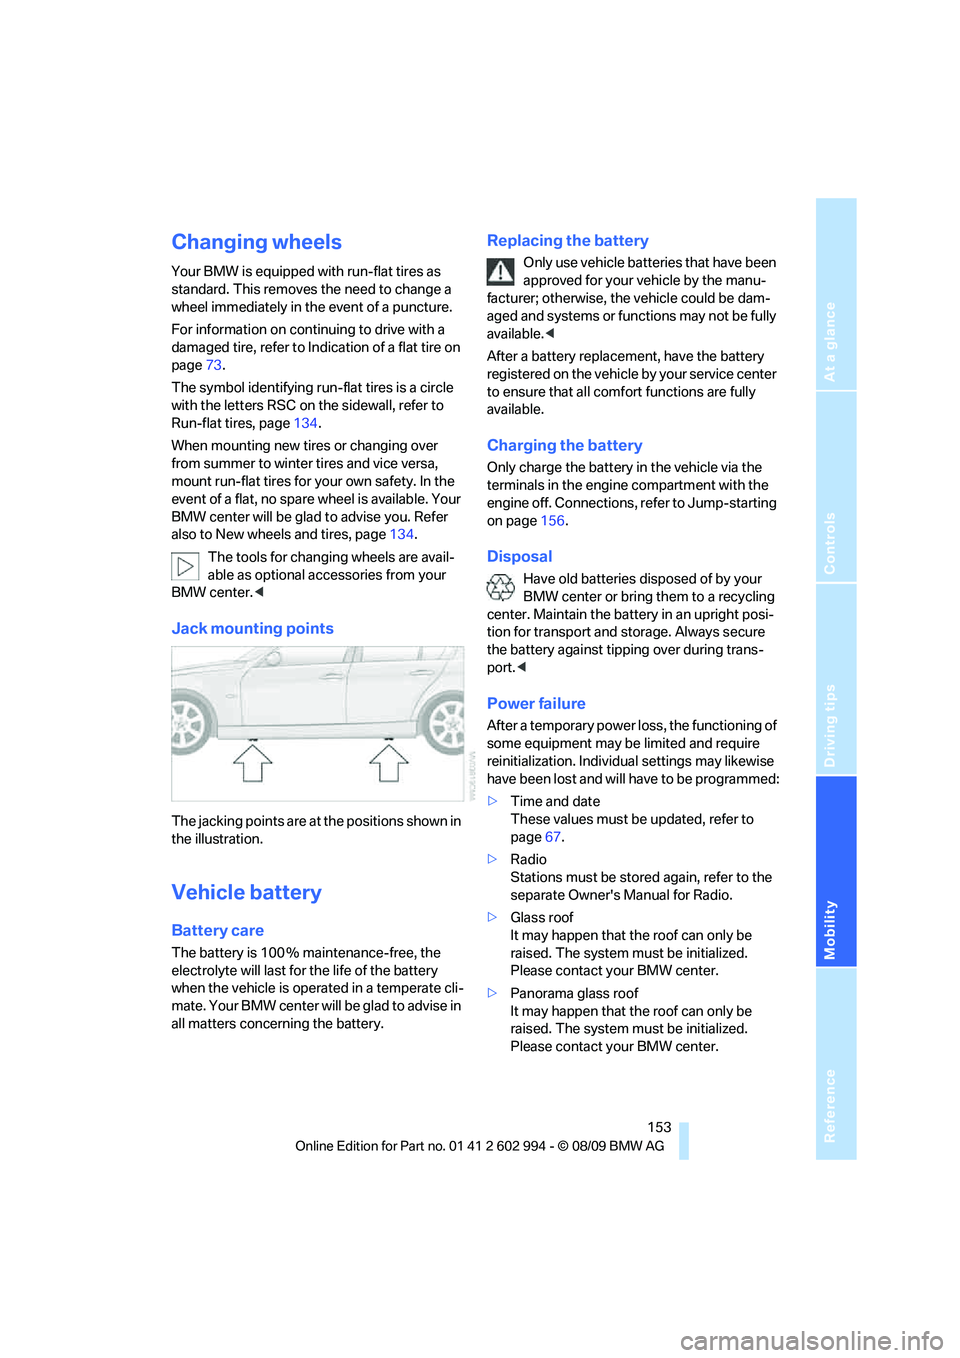
Jack mounting points
The jacking points are at the positions shown in
the illustration.
Vehicle battery
Battery care
The battery is 100 % maintenance-free, the
electrolyte will last for the life of the battery
when the vehicle is operated in a temperate cli-
mate. Your BMW center will be glad to advise in
all matters concerning the battery.
Replacing the battery
Only use vehicle batteries that have been
approved for your vehicle by the manu-
facturer; otherwise, the vehicle could be dam-
aged and systems or functions may not be fully
available.<
After a battery replacement, have the battery
registered on the vehicle by your service center
to ensure that all comfort functions are fully
available.
Charging the battery
Only charge the battery in the vehicle via the
terminals in the engine compartment with the
engine off. Connections, refer to Jump-starting
on page156.
Disposal
Have old batteries disposed of by your
BMW center or bring them to a recycling
center. Maintain the battery in an upright posi-
tion for transport and storage. Always secure
the battery against tipping over during trans-
port.<
Power failure
After a temporary power loss, the functioning of
some equipment may be limited and require
reinitialization. Individual settings may likewise
have been lost and will have to be programmed:
>Time and date
These values must be updated, refer to
page67.
>Radio
Stations must be stored again, refer to the
separate Owner's Manual for Radio.
>Glass roof
It may happen that the roof can only be
raised. The system must be initialized.
Please contact your BMW center.
>Panorama glass roof
It may happen that the roof can only be
raised. The system must be initialized.
Please contact your BMW center.
Page 157 of 196

Reference
At a glance
Controls
Driving tips
Mobility
155
Giving and receiving assistance
Emergency Request*
Conditions for an Emergency Request:
>Full preparation package mobile phone: this
equipment makes it possible to send an
Emergency Request even if no mobile
phone is paired with the vehicle.
>BMW Assist is activated. Activating
BMW Assist, refer to separate Owner's
Manual.
>Radio readiness is on.
>The BMW Assist system is logged on to a
mobile phone network.
>The Emergency Request system is opera-
ble.
Once your service contract for BMW Assist
expires, the BMW Assist system can be deacti-
vated by a BMW center without you having to
visit a workshop. Once the BMW Assist system
has been deactivated, Emergency Requests
are not possible. The BMW Assist system can
be reactivated by a BMW center after a new
contract has been signed.
Sending an Emergency Request
1.Briefly press the cover flap to open.
2.Press the SOS button until the LED in the
button lights up.
As soon as the voice connection to the BMW
Assist Response Center has been established,
the LED flashes.
Once the BMW Assist Response Center has
received your Emergency Request, the BMW Assist Response Center contacts you
and takes further steps to help you. Even if you
are unable to respond, the BMW Assist
Response Center will be able to initiate further
steps to assist you under certain conditions.
If the circumstances allow this, remain in the
vehicle until the connection has been estab-
lished. You will then be able to provide a
detailed description of the situation.
Data for determining the necessary rescue
measures are transmitted to the BMW Assist
Response Center, e.g. the current position of
your vehicle, if it can be determined.
If the LED is flashing but the BMW Assist
Response Center cannot be heard over the
hands-free system, it is possible that the
hands-free system is malfunctioning. You may
still be heard by the BMW Assist Response
Center, however.
Under certain conditions, an Emergency
Request is sent automatically immediately after
a severe accident. This Automatic Collision
Notification is not affected by the button being
pressed.
For technical reasons, the Emergency
Request service cannot be guaranteed
for the most unfavorable conditions.<
Roadside Assistance
The BMW Roadside Assistance is there to
assist you around the clock in the event of a
breakdown, including on weekends and public
holidays.
The phone numbers of Roadside Assistance in
your home country can be found in the Contact
brochure.
First aid pouch*
Some of the articles contained in the first aid
pouch have a limited service life. Therefore,
Page 169 of 196

Reference
At a glance
Controls
Driving tips
Mobility
167
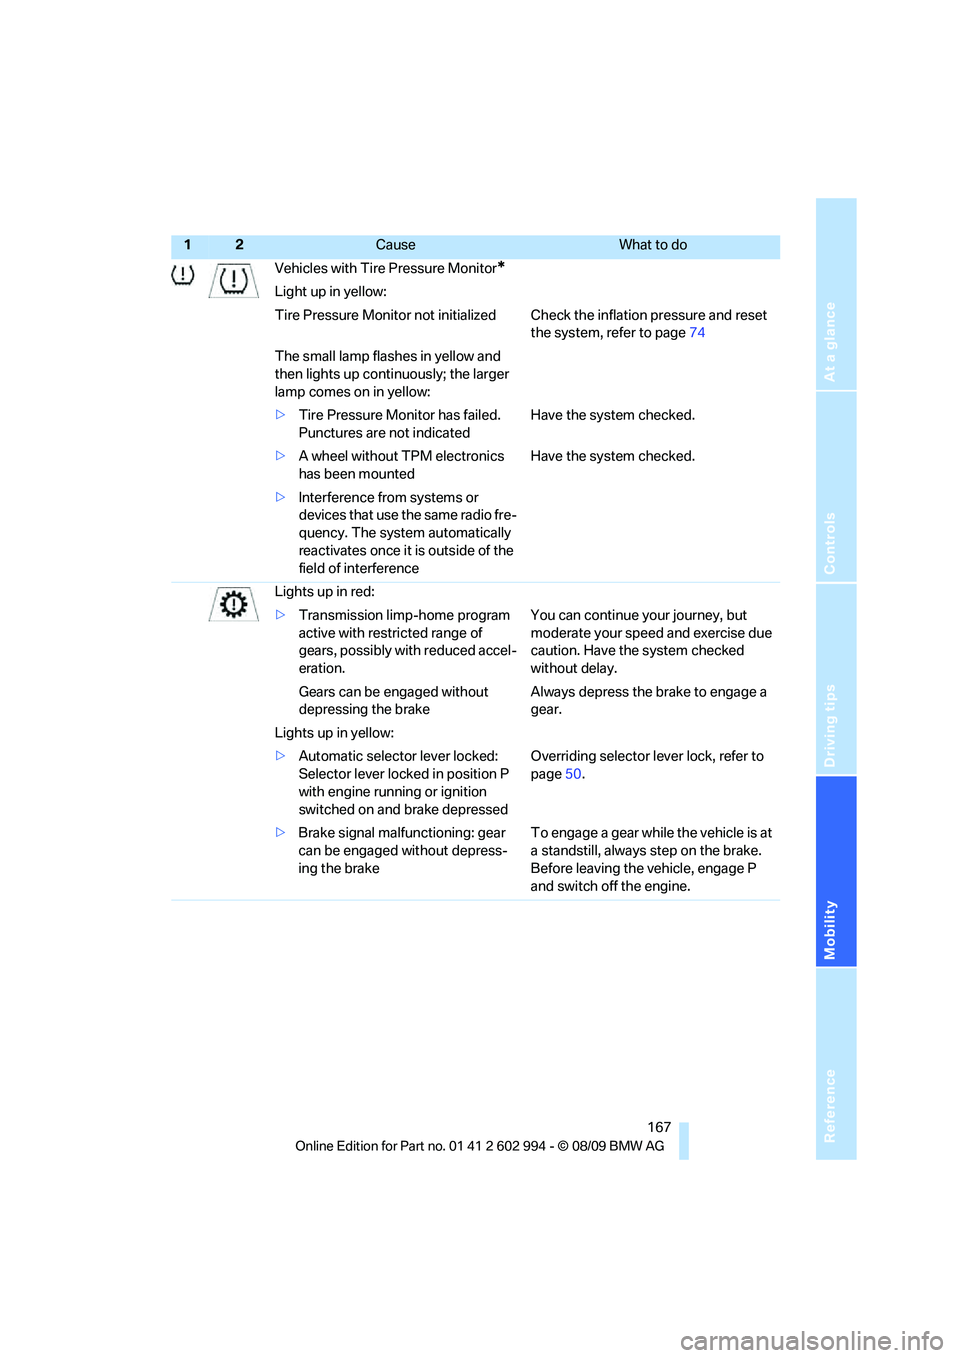
Vehicles with Tire Pressure Monitor*
Light up in yellow:
Tire Pressure Monitor not initialized Check the inflation pressure and reset
the system, refer to page74
The small lamp flashes in yellow and
then lights up continuously; the larger
lamp comes on in yellow:
>Tire Pressure Monitor has failed.
Punctures are not indicatedHave the system checked.
>A wheel without TPM electronics
has been mountedHave the system checked.
>Interference from systems or
devices that use the same radio fre-
quency. The system automatically
reactivates once it is outside of the
field of interference
Lights up in red:
>Transmission limp-home program
active with restricted range of
gears, possibly with reduced accel-
eration.You can continue your journey, but
moderate your speed and exercise due
caution. Have the system checked
without delay.
Gears can be engaged without
depressing the brakeAlways depress the brake to engage a
gear.
Lights up in yellow:
>Automatic selector lever locked:
Selector lever locked in position P
with engine running or ignition
switched on and brake depressedOverriding selector lever lock, refer to
page50.
>Brake signal malfunctioning: gear
can be engaged without depress-
ing the brakeTo engage a gear while the vehicle is at
a standstill, always step on the brake.
Before leaving the vehicle, engage P
and switch off the engine.
12Cause What to do
Page 187 of 196

Reference
At a glance
Controls
Driving tips
Mobility
185
Glass roof, electric29
– closing after electrical
malfunction30
– Convenient operation20,22
– initializing30
– opening, closing29
– pinch protection system30
– power failure30
– raising29
– remote control20
Glove compartment94
Grills, refer to Air vents84
Gross vehicle weight, refer to
Weights177
H
Halogen lamps
– replacing bulbs149
Handbrake, refer to Parking
brake48
Hands-free system14
Hazard warning flashers14
HDC Hill Descent Control71
Head airbags77
Headlamp control,
automatic79
Headlamp cover149
Headlamp flasher50
– indicator lamp11,14,160
Headlamps
– replacing bulbs149
Head restraints35
– rear, removing36
– sitting safely33
Heated
– mirrors40
– rear window86,89
– seats37
– steering wheel41
Heating84
– mirrors40
– rear window86,89
– seats37
– steering wheel41
Heating and ventilation, refer
to Climate84
Heavy loads, refer to Stowing
cargo109Height, refer to
Dimensions175
Height adjustment
– seats34
– steering wheel40
High-beam assistant81
High beams81
– headlamp flasher81
– indicator lamp160
– replacing bulbs149
High beams and low beams,
automatic, refer to High-
beam assistant81
High-pressure
washer143,144
High water, refer to Driving
through water108
Hill Descent Control HDC71
Hills108
Holders for cups95
Homepage BMW4
Hood136
Hooks for shopping bags100
Horn10,11
Hotel function, refer to
Locking or unlocking
separately24
Hot exhaust system107
Hydraulic brake assist, refer to
Dynamic Brake Control
DBC70
Hydroplaning108
I
Ice warning, refer to Outside
temperature
warning61
Identification marks
– run-flat tires134
– tire coding132
Ignition46
– switched off47
– switched on46
Ignition key, refer to Remote
control with integrated
key18
Ignition key position 1, refer to
Radio readiness46Ignition key position 2, refer to
Ignition on46
Ignition lock46
Imprint2
Indicator and warning
lamps13
– Tire Pressure Monitor
TPM74
Indicator and warning lamps,
overview160
Individual air distribution85
Inflation pressure, refer to Tire
inflation pressure119
Inflation pressure monitoring,
refer to Tire Pressure
Monitor TPM73
Initializing
– after power failure153
– compass, refer to
Calibrating93
– Flat Tire Monitor FTM72
– glass roof30
– panorama glass roof32
Installation location
– telephone95
Instrument cluster12
Instrument lighting82
Instrument panel, refer to
Cockpit10
Integrated key18
Integrated universal remote
control91
Interior lamps83
– remote control20
Interior motion sensor26
Interior rearview mirror40
– automatic dimming
feature40
– compass93
Interlock, refer to Disengaging
the remote control48
Intermittent mode of the
wipers51
J
Jacking points153
Jumpering, refer to Jump-
starting156