2010 BMW M3 headlamp
[x] Cancel search: headlampPage 139 of 196
Reference
At a glance
Controls
Driving tips
Mobility
137
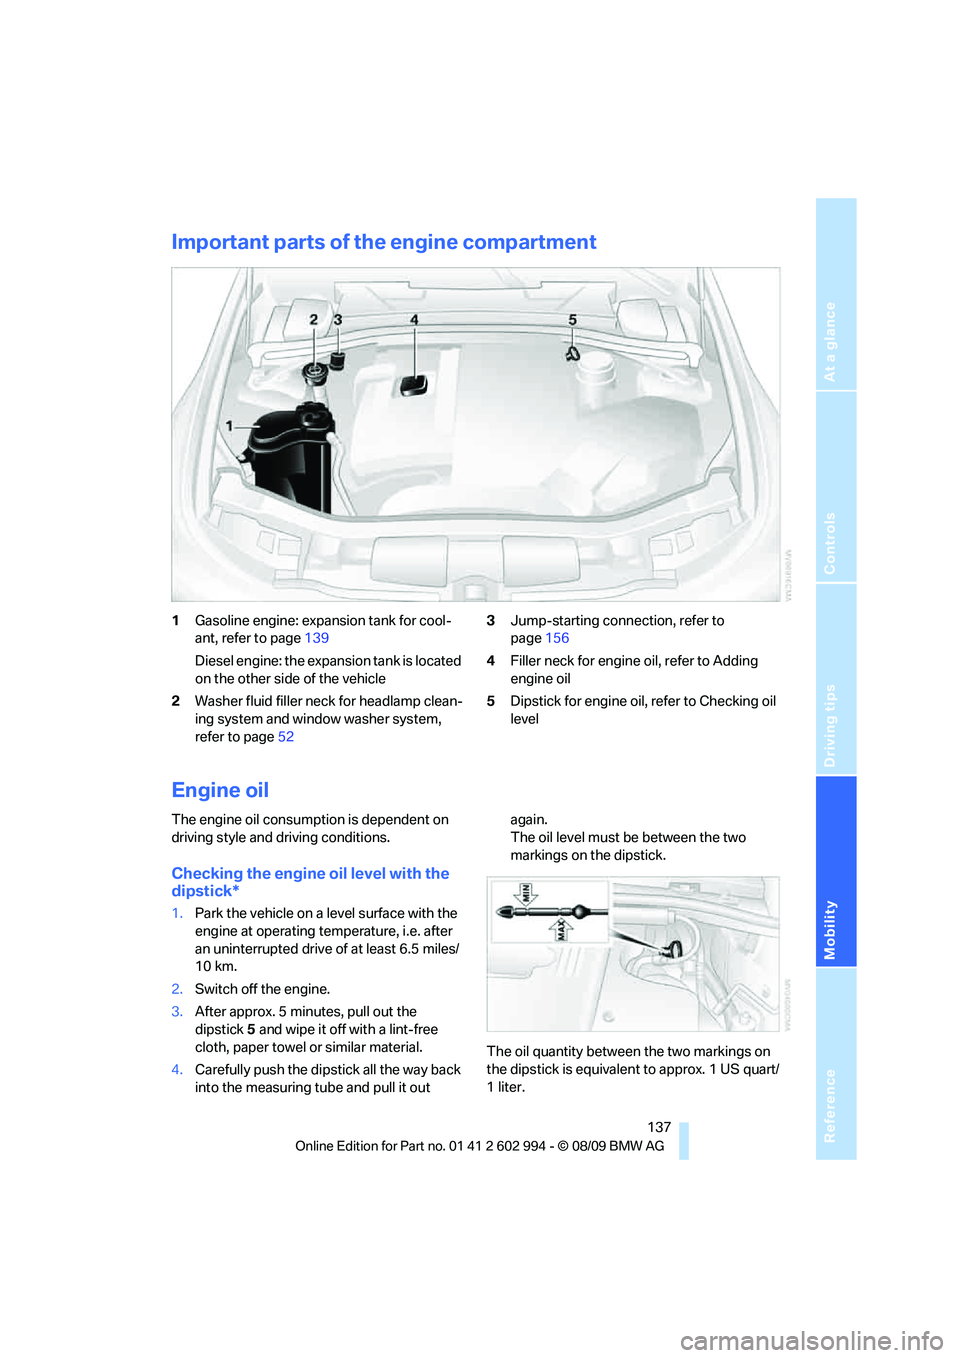
Important parts of the engine compartment
1Gasoline engine: expansion tank for cool-
ant, refer to page139
Diesel engine: the expansion tank is located
on the other side of the vehicle
2Washer fluid filler neck for headlamp clean-
ing system and window washer system,
refer to page523Jump-starting connection, refer to
page156
4Filler neck for engine oil, refer to Adding
engine oil
5Dipstick for engine oil, refer to Checking oil
level
Engine oil
The engine oil consumption is dependent on
driving style and driving conditions.
Checking the engine oil level with the
dipstick*
1.Park the vehicle on a level surface with the
engine at operating temperature, i.e. after
an uninterrupted drive of at least 6.5 miles/
10 km.
2.Switch off the engine.
3.After approx. 5 minutes, pull out the
dipstick5 and wipe it off with a lint-free
cloth, paper towel or similar material.
4.Carefully push the dipstick all the way back
into the measuring tube and pull it out again.
The oil level must be between the two
markings on the dipstick.
The oil quantity between the two markings on
the dipstick is equivalent to approx. 1 US quart/
1liter.
Page 146 of 196

Care
144 water penetration. Follow the operating instruc-
tions of the high-pressure washer.<
When using high-pressure washers, do
not spray against the sensors and cam-
eras, e.g. of the Park Distance Control or Rear
View Camera, for an extended period and main-
tain a distance of at least 1 ft/30 cm.<
Manual car wash
When washing the vehicle by hand, use large
quantities of water and car shampoo if neces-
sary. Clean the vehicle with a sponge or wash-
ing brush, applying light pressure only.
Before cleaning the windshield, deacti-
vate the rain sensor or switch off the igni-
tion to prevent unintentional activation of the
wipers.<
Observe local regulations pertaining to
washing vehicles by hand.<
Headlamps
Do not rub them dry and do not use abrasive or
corrosive cleaning agents.
Loosen dirt, e.g. insects, with shampoo or
insect remover and wash away with copious
quantities of water.
Thaw ice with a windshield deicer and do not
use an ice scraper.
Windows
Clean the inside and outside surfaces of the
windows and the mirrors with window cleaner.
Do not clean the mirrors with cleaners
containing quartz.<
Paintwork care
Regular care contributes to value retention and
protects the paintwork against the long-term
effects of damaging substances.
Region-specific environmental influences can
damage the vehicle paintwork. Therefore, it is
important to adapt the frequency and scope of
car care accordingly.
Immediately remove aggressive materials such
as spilled fuel, oil, grease, brake fluid, tree sap or bird droppings to prevent damage to the paint-
work.
Repairing paintwork damage
Immediately repair scratches or similar
damage, such as that caused by stones
hitting the vehicle, where necessary to prevent
rusting.<
BMW recommends having paintwork damage
repaired by a professional paint repair work-
shop according to BMW specifications using
original BMW paint materials.
Preservation
A preservation treatment is necessary when
water no longer beads off the clean paintwork
surface. Only use products for paintwork pres-
ervation that contain carnauba or synthetic
waxes.
Rubber seals
Treat only with water or rubber care products.
Do not use silicon-containing care prod-
ucts on rubber seals; otherwise, noise
and damage could occur.<
Chrome parts
Carefully clean vehicle parts such as the radia-
tor grill, door handles or window frames with
copious quantities of water and a shampoo
additive, especially when roads are treated with
deicing salt. For additional treatment, use a
chrome polish.
Light-alloy wheels
For technical reasons, dust is generated during
braking that is deposited on the light-alloy
wheels. Remove the dust regularly using acid-
free rim cleaner.
Do not use aggressive, acidic, strongly
alkaline and abrasive cleaning agents or
steam jets over 1407/606; otherwise, dam-
age may occur.<
Page 150 of 196

Replacing components
148 For care of the headlamps, please follow the
instructions in the chapter entitled 'Care'.
If the routine for changing a particular
bulb is not described here, please contact
your BMW center or a workshop that works
according to BMW repair procedures with cor-
respondingly trained personnel.<
Light-emitting diodes LED
Light-emitting diodes installed behind translu-
cent lenses serve as the light source for many of
the controls and displays in your vehicle. These
light-emitting diodes, which operate using a
concept similar to that applied in conventional
lasers, are officially designated as Class 1 light-
emitting diodes.
Do not remove the covers or expose the
eyes directly to the unfiltered light source
for several hours; otherwise, this could cause
irritation of the retina.<
Xenon lamps
These bulbs have a very long service life and are
highly unlikely to fail. If a xenon lamp fails never-
theless, switch on the fog lamps and continue
the journey with great care, provided that local
legislation does not prohibit this.
Have any work on the xenon lamp system,
including bulb replacements, performed
o n ly b y a BM W c e n t e r o r a w o r k s h o p t h a t w o r k s
according to BMW repair procedures with cor-
respondingly trained personnel. Otherwise, if
such work is carried out improperly, the high
voltage in the system presents the danger of
fatal injuries.<
Replacing parking lamps, roadside
parking lamps, and daytime running
lights
H8 bulb, 35 watts1.Switch off the lamps and take the remote
control out of the ignition lock.
2.Turn the cover to the left, see arrow, and
remove it.
3.Turn the bulb approx. 90°, see arrow, and
take it out.
4.Disconnect the plug, change the bulb and
reconnect the plug.
5.Insert the bulb and turn it until it stops.
6.Reattach the cover.
Replacing the corner-illuminating
lamp*
H3 bulb, 55 watts
1.Switch off the lamps and take the remote
control out of the ignition lock.
2.Remove the upper cover from the head-
lamp. To do so, pull the rubber seal up and
off and unscrew the cover using the screw-
Page 151 of 196
Reference
At a glance
Controls
Driving tips
Mobility
149
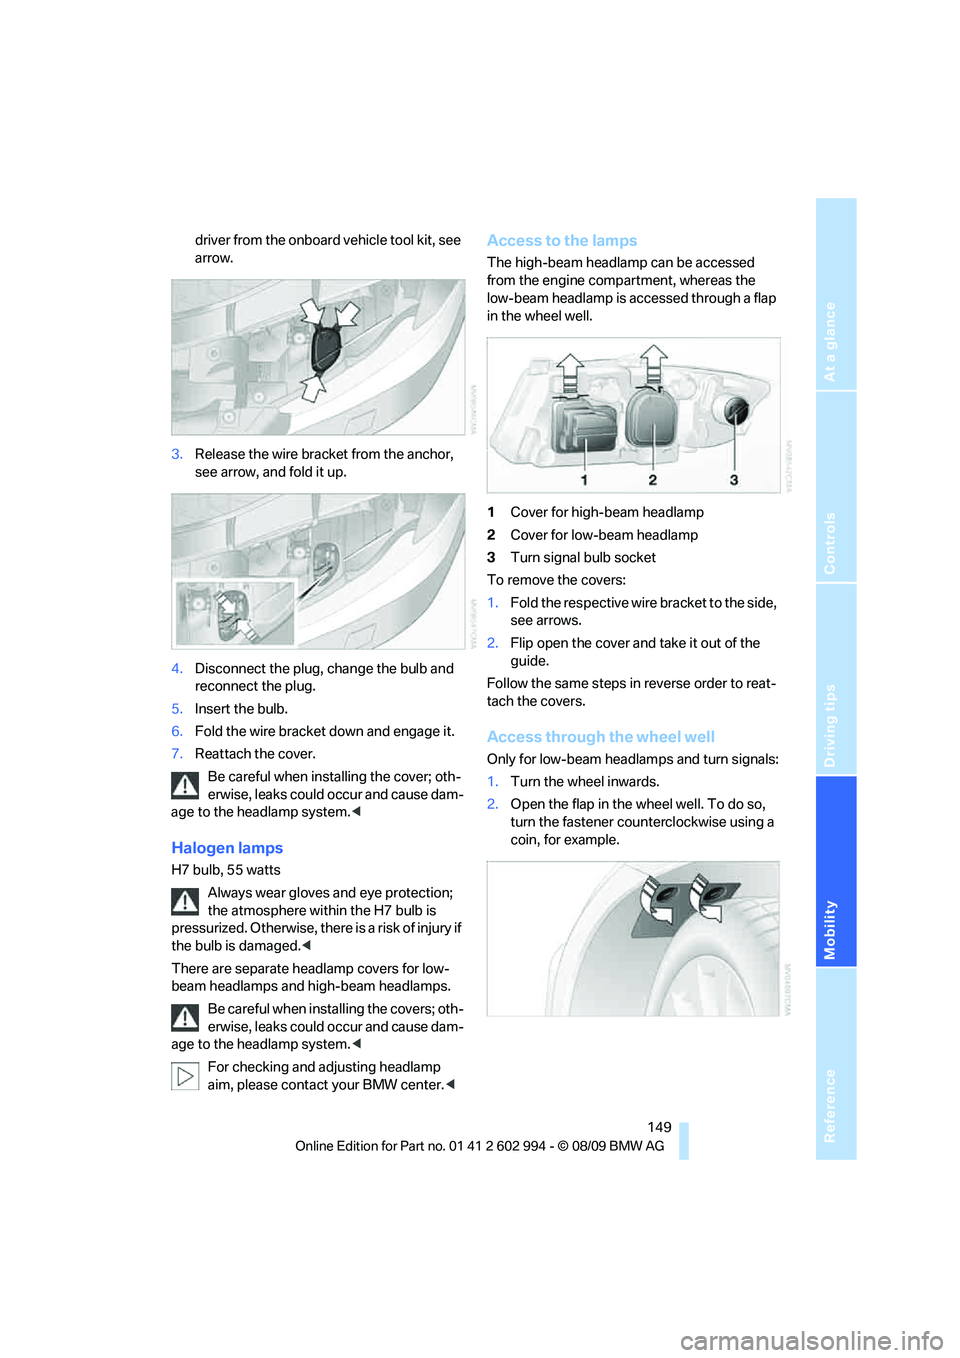
driver from the onboard vehicle tool kit, see
arrow.
3.Release the wire bracket from the anchor,
see arrow, and fold it up.
4.Disconnect the plug, change the bulb and
reconnect the plug.
5.Insert the bulb.
6.Fold the wire bracket down and engage it.
7.Reattach the cover.
Be careful when installing the cover; oth-
erwise, leaks could occur and cause dam-
age to the headlamp system.<
Halogen lamps
H7 bulb, 55 watts
Always wear gloves and eye protection;
the atmosphere within the H7 bulb is
pressurized. Otherwise, there is a risk of injury if
the bulb is damaged.<
There are separate headlamp covers for low-
beam headlamps and high-beam headlamps.
Be careful when installing the covers; oth-
erwise, leaks could occur and cause dam-
age to the headlamp system.<
For checking and adjusting headlamp
aim, please contact your BMW center.<
Access to the lamps
The high-beam headlamp can be accessed
from the engine compartment, whereas the
low-beam headlamp is accessed through a flap
in the wheel well.
1Cover for high-beam headlamp
2Cover for low-beam headlamp
3Turn signal bulb socket
To remove the covers:
1.Fold the respective wire bracket to the side,
see arrows.
2.Flip open the cover and take it out of the
guide.
Follow the same steps in reverse order to reat-
tach the covers.
Access through the wheel well
Only for low-beam headlamps and turn signals:
1.Turn the wheel inwards.
2.Open the flap in the wheel well. To do so,
turn the fastener counterclockwise using a
coin, for example.
Page 160 of 196
Giving and receiving assistance
158 the vehicle by the tow fitting. Otherwise, the
tow fitting and the vehicle could be damaged.<
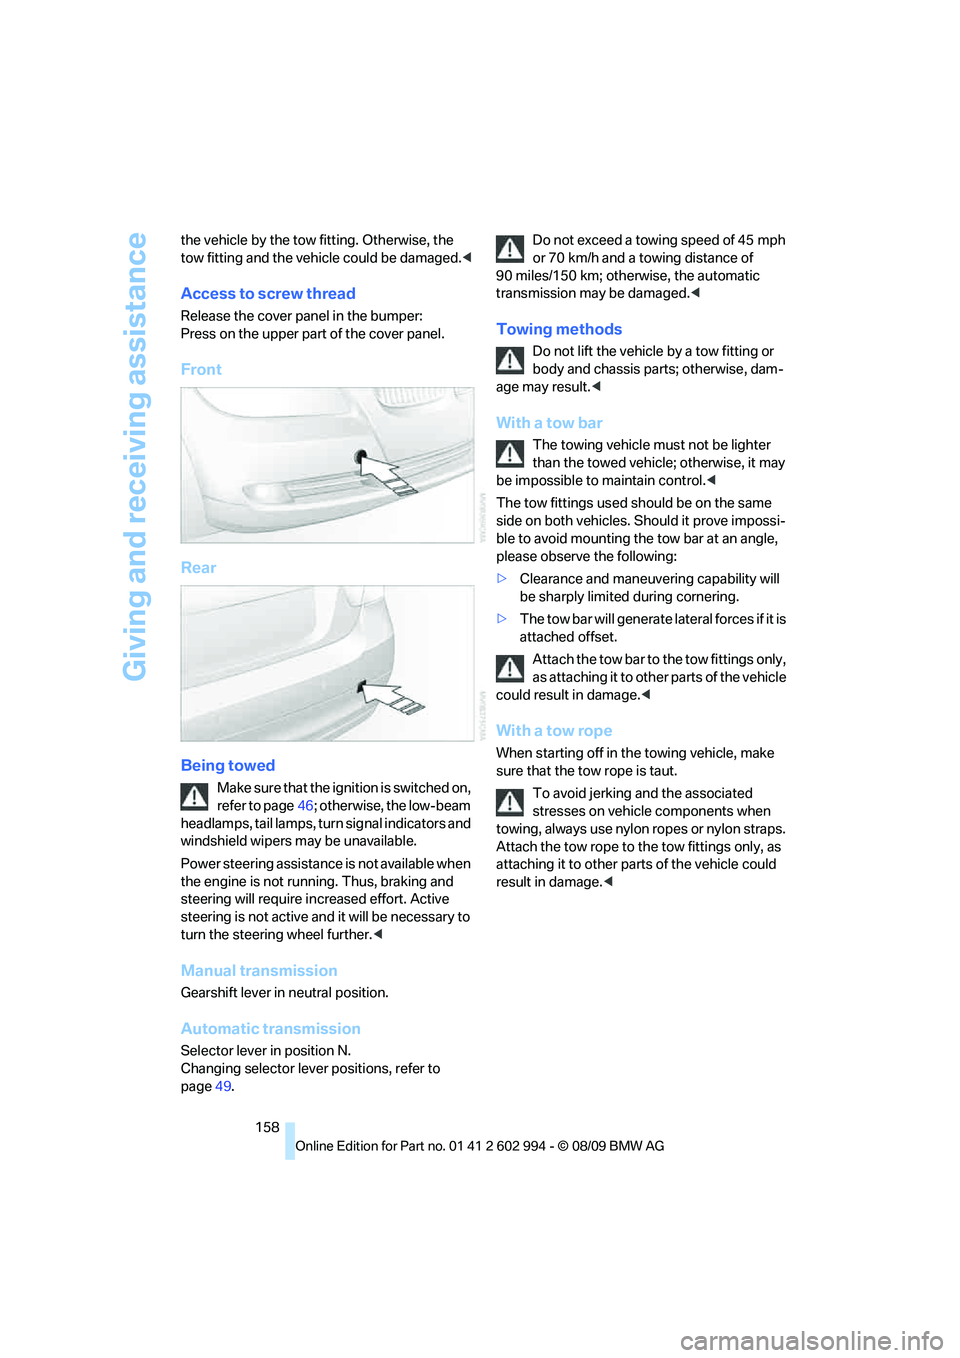
Access to screw thread
Release the cover panel in the bumper:
Press on the upper part of the cover panel.
Front
Rear
Being towed
Make sure that the ignition is switched on,
refer to page46; otherwise, the low-beam
headlamps, tail lamps, turn signal indicators and
windshield wipers may be unavailable.
Power steering assistance is not available when
the engine is not running. Thus, braking and
steering will require increased effort. Active
steering is not active and it will be necessary to
turn the steering wheel further.<
Manual transmission
Gearshift lever in neutral position.
Automatic transmission
Selector lever in position N.
Changing selector lever positions, refer to
page49.Do not exceed a towing speed of 45 mph
or 70 km/h and a towing distance of
90 miles/150 km; otherwise, the automatic
transmission may be damaged.<
Towing methods
Do not lift the vehicle by a tow fitting or
body and chassis parts; otherwise, dam-
age may result.<
With a tow bar
The towing vehicle must not be lighter
than the towed vehicle; otherwise, it may
be impossible to maintain control.<
The tow fittings used should be on the same
side on both vehicles. Should it prove impossi-
ble to avoid mounting the tow bar at an angle,
please observe the following:
>Clearance and maneuvering capability will
be sharply limited during cornering.
>The tow bar will generate lateral forces if it is
attached offset.
Attach the tow bar to the tow fittings only,
as attaching it to other parts of the vehicle
could result in damage.<
With a tow rope
When starting off in the towing vehicle, make
sure that the tow rope is taut.
To avoid jerking and the associated
stresses on vehicle components when
towing, always use nylon ropes or nylon straps.
Attach the tow rope to the tow fittings only, as
attaching it to other parts of the vehicle could
result in damage.<
Page 162 of 196
Indicator and warning lamps
160
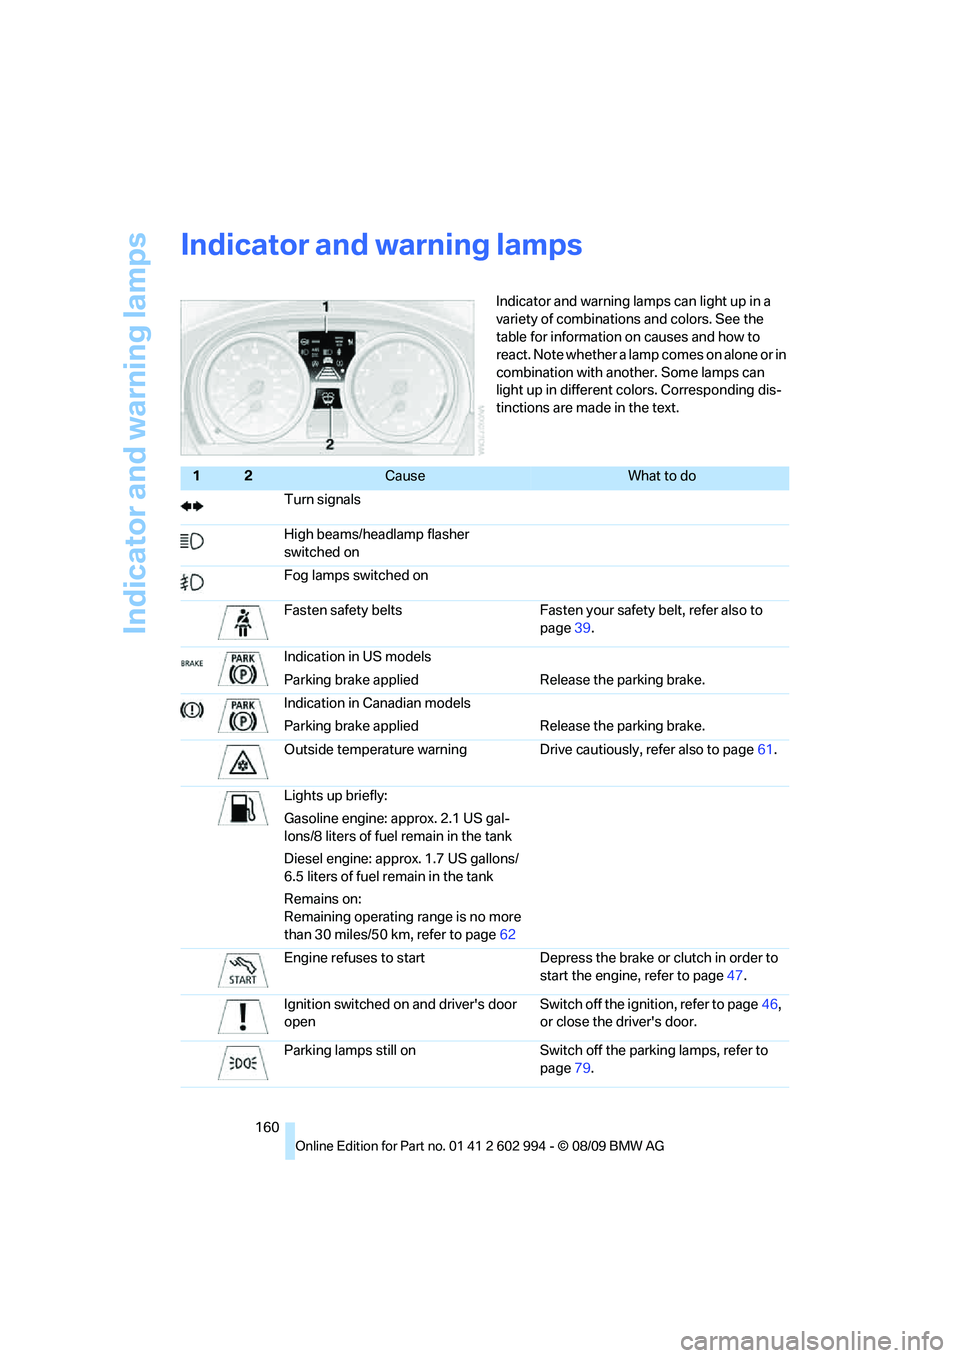
Indicator and warning lamps
Indicator and warning lamps can light up in a
variety of combinations and colors. See the
table for information on causes and how to
react. Note whether a lamp comes on alone or in
combination with another. Some lamps can
light up in different colors. Corresponding dis-
tinctions are made in the text.
12Cause What to do
Turn signals
High beams/headlamp flasher
switched on
Fog lamps switched on
Fasten safety belts Fasten your safety belt, refer also to
page39.
Indication in US models
Parking brake applied Release the parking brake.
Indication in Canadian models
Parking brake applied Release the parking brake.
Outside temperature warning Drive cautiously, refer also to page61.
Lights up briefly:
Gasoline engine: approx. 2.1 US gal-
lons/8 liters of fuel remain in the tank
Diesel engine: approx. 1.7 US gallons/
6.5 liters of fuel remain in the tank
Remains on:
Remaining operating range is no more
than 30 miles/50 km, refer to page62
Engine refuses to start Depress the brake or clutch in order to
start the engine, refer to page47.
Ignition switched on and driver's door
openSwitch off the ignition, refer to page46,
or close the driver's door.
Parking lamps still on Switch off the parking lamps, refer to
page79.
Page 171 of 196
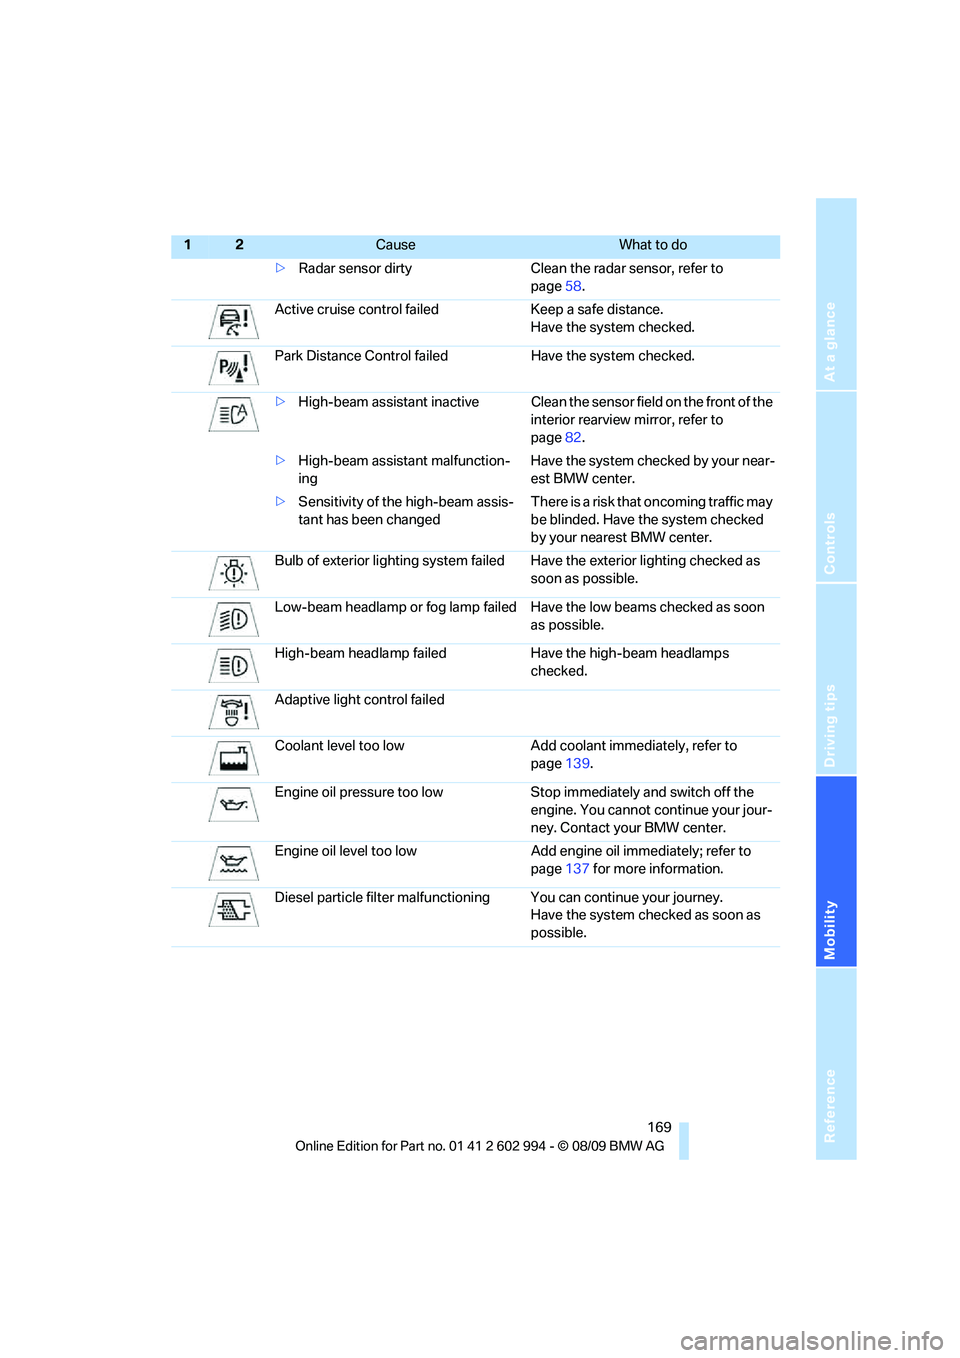
Reference
At a glance
Controls
Driving tips
Mobility
169
>Radar sensor dirty Clean the radar sensor, refer to
page58.
Active cruise control failed Keep a safe distance.
Have the system checked.
Park Distance Control failed Have the system checked.
>High-beam assistant inactive Clean the sensor field on the front of the
interior rearview mirror, refer to
page82.
>High-beam assistant malfunction-
ingHave the system checked by your near-
est BMW center.
>Sensitivity of the high-beam assis-
tant has been changedThere is a risk that oncoming traffic may
be blinded. Have the system checked
by your nearest BMW center.
Bulb of exterior lighting system failed Have the exterior lighting checked as
soon as possible.
Low-beam headlamp or fog lamp failed Have the low beams checked as soon
as possible.
High-beam headlamp failed Have the high-beam headlamps
checked.
Adaptive light control failed
Coolant level too low Add coolant immediately, refer to
page139.
Engine oil pressure too low Stop immediately and switch off the
engine. You cannot continue your jour-
ney. Contact your BMW center.
Engine oil level too low Add engine oil immediately; refer to
page137 for more information.
Diesel particle filter malfunctioning You can continue your journey.
Have the system checked as soon as
possible.
12Cause What to do
Page 180 of 196

Technical data
178
Sports Wagon
Never exceed either the approved axle loads or
the gross vehicle weight.
Capacities
328i328i
xDrive
Approved gross weight
>with manual transmission lbs/kg 4,630/2,100 4,872/2,210
>with automatic transmission lbs/kg 4,696/2,130 4,916/2,230
Load lbs/kg 1,058/480 1,058/480
Approved front axle load lbs/kg 2,127/965 2,326/1,055
Approved rear axle load lbs/kg 2,646/1,200 2,646/1,200
Approved roof load capacity lbs/kg 165/75 165/75
Cargo area capacity cu ft/liters 16.2 - 48.9/460 -1385 16.2 - 48.9/460 -1385
Notes
Fuel tank US gal/liters approx. 16.1/61 Fuel grade: page115
including reserve of
>Gasoline engine US gal/liters approx. 2.1/8.0
>Diesel engine US gal/liters approx. 1.7/6.5
Window washer system For more details: page53
including headlamp washers US qt/liters approx. 6.3/6.0