Page 205 of 252
Mobility
203Reference
At a glance
Controls
Driving tips
Communications
Navigation
Entertainment
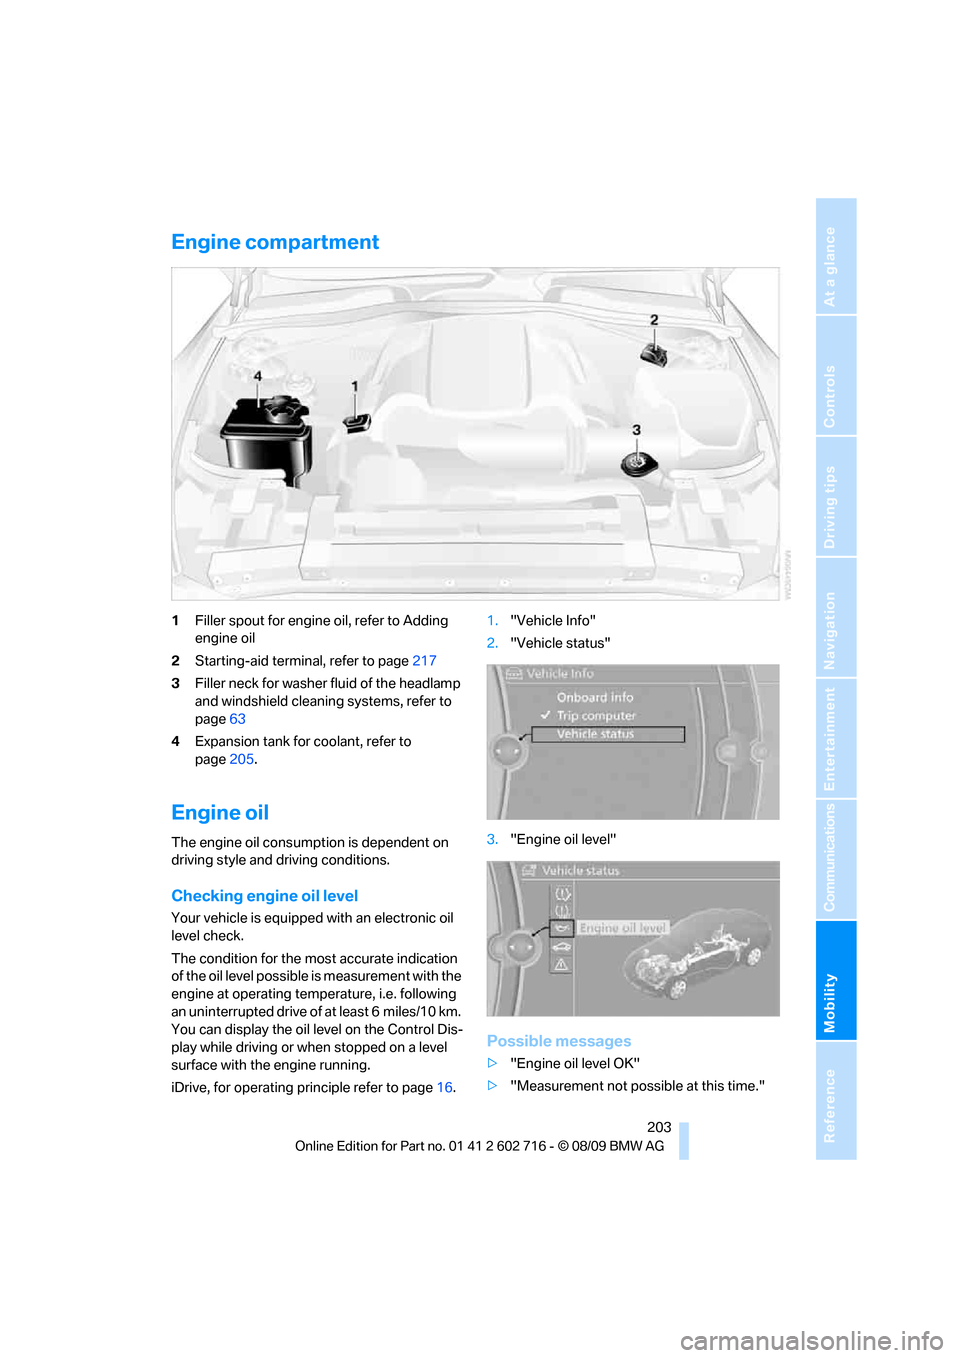
Engine compartment
1Filler spout for engine oil, refer to Adding
engine oil
2Starting-aid terminal, refer to page217
3Filler neck for washer fluid of the headlamp
and windshield cleaning systems, refer to
page63
4Expansion tank for coolant, refer to
page205.
Engine oil
The engine oil consumption is dependent on
driving style and driving conditions.
Checking engine oil level
Your vehicle is equipped with an electronic oil
level check.
The condition for the most accurate indication
of the oil level possible is measurement with the
engine at operating temperature, i.e. following
an uninterrupted drive of at least 6 miles/10 km.
You can display the oil level on the Control Dis-
play while driving or when stopped on a level
surface with the engine running.
iDrive, for operating principle refer to page16.1."Vehicle Info"
2."Vehicle status"
3."Engine oil level"
Possible messages
>"Engine oil level OK"
>"Measurement not possible at this time."
Page 207 of 252
Mobility
205Reference
At a glance
Controls
Driving tips
Communications
Navigation
Entertainment
These oils can be used at all temperatures.
Coolant
Do not open the cooling system when the
engine is hot. Escaping coolant can cause
burns.<
Coolant is composed of equal parts water and a
coolant additive. Not all commercially available
additives are suitable for your BMW. Ask your
BMW center for suitable additives.
Only use suitable additives, otherwise
engine damage may result. The additives
present a health hazard.<
Always observe all applicable environ-
mental laws and regulations when dis-
posing of used coolant additives.<
Checking coolant level
1.Do not open the hood until the engine has
cooled down.
2.Turn the cap of the expansion tank counter-
clockwise to allow any accumulated pres-
sure to escape, then continue turning to
open.
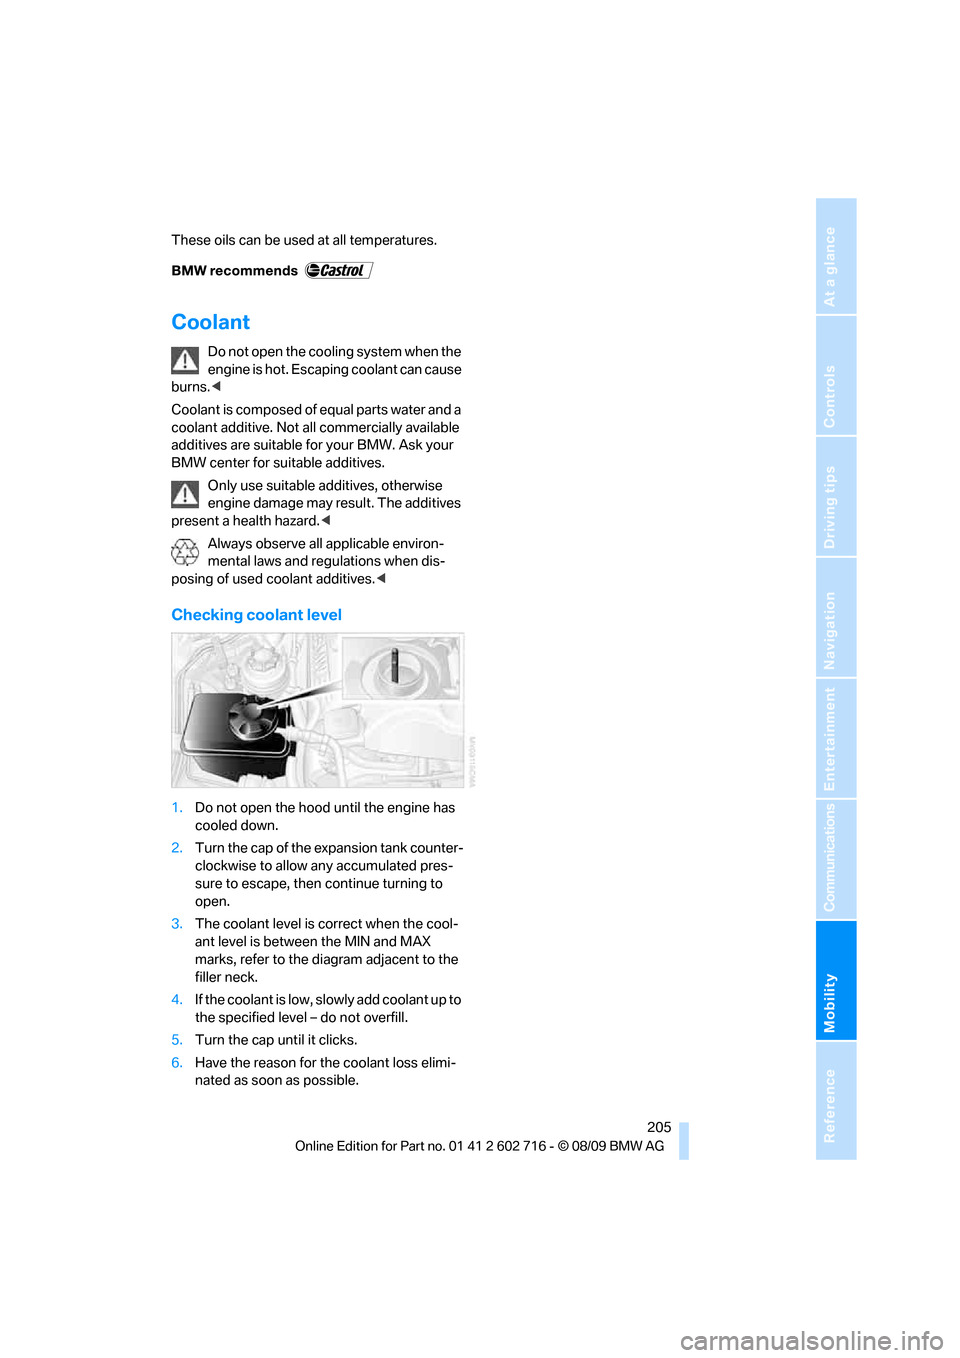
3.The coolant level is correct when the cool-
ant level is between the MIN and MAX
marks, refer to the diagram adjacent to the
filler neck.
4.If the coolant is low, slowly add coolant up to
the specified level – do not overfill.
5.Turn the cap until it clicks.
6.Have the reason for the coolant loss elimi-
nated as soon as possible.
Page 209 of 252
Mobility
207Reference
At a glance
Controls
Driving tips
Communications
Navigation
Entertainment
Socket for OBD Onboard
Diagnostics interface
Components which are decisive for the
exhaust-gas composition can be checked via
the OBD socket with a device.
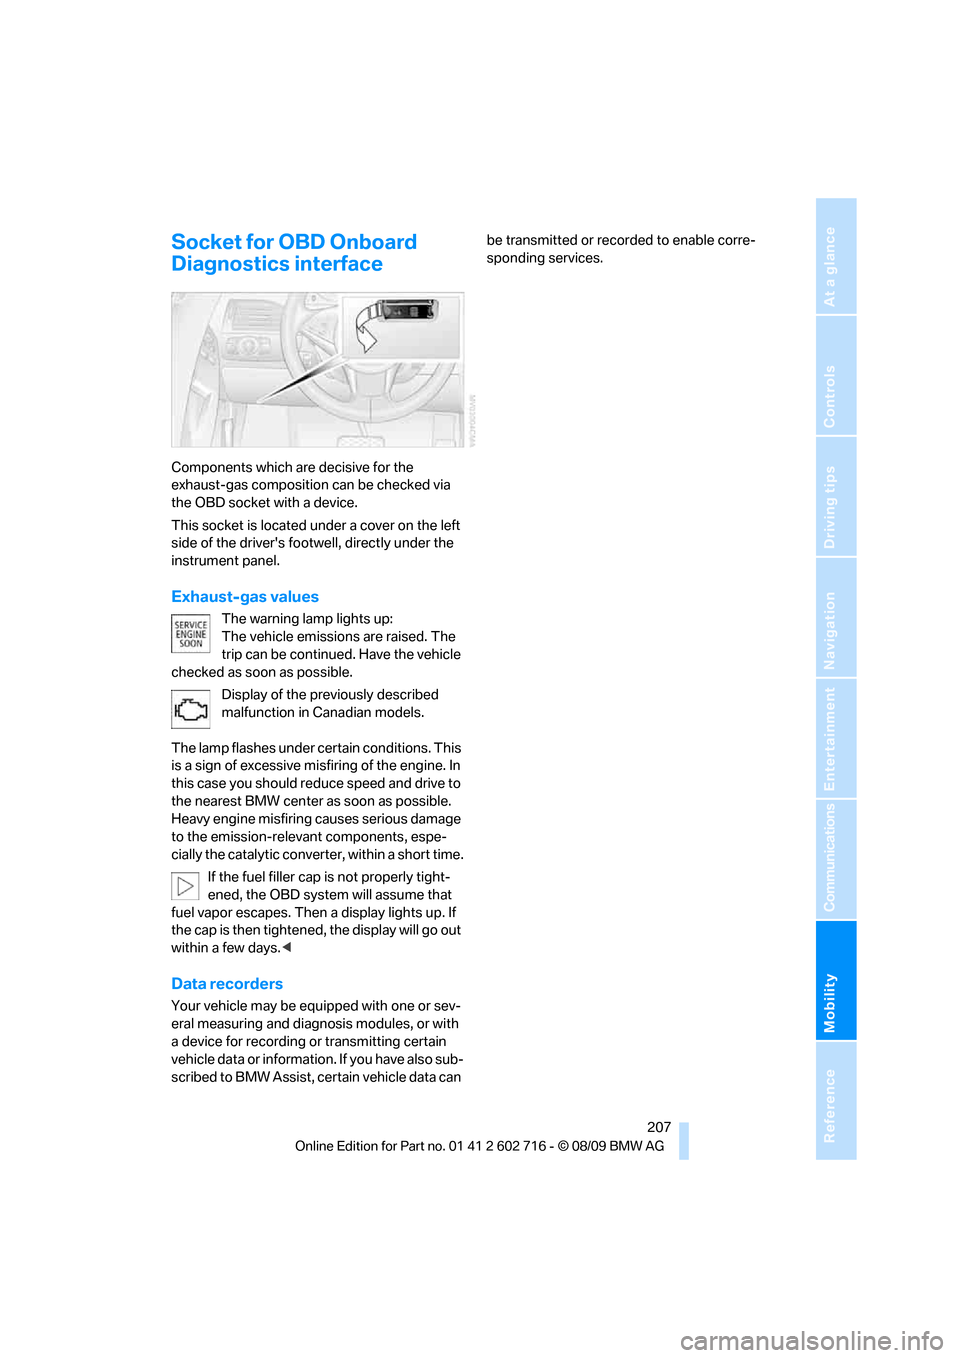
This socket is located under a cover on the left
side of the driver's footwell, directly under the
instrument panel.
Exhaust-gas values
The warning lamp lights up:
The vehicle emissions are raised. The
trip can be continued. Have the vehicle
checked as soon as possible.
Display of the previously described
malfunction in Canadian models.
The lamp flashes under certain conditions. This
is a sign of excessive misfiring of the engine. In
this case you should reduce speed and drive to
the nearest BMW center as soon as possible.
Heavy engine misfiring causes serious damage
to the emission-relevant components, espe-
cially the catalytic converter, within a short time.
If the fuel filler cap is not properly tight-
ened, the OBD system will assume that
fuel vapor escapes. Then a display lights up. If
the cap is then tightened, the display will go out
within a few days.<
Data recorders
Your vehicle may be equipped with one or sev-
eral measuring and diagnosis modules, or with
a device for recording or transmitting certain
vehicle data or information. If you have also sub-
scribed to BMW Assist, certain vehicle data can be transmitted or recorded to enable corre-
sponding services.
Page 215 of 252
Mobility
213Reference
At a glance
Controls
Driving tips
Communications
Navigation
Entertainment
Do not remove the covers, and never
stare into the unfiltered light for several
hours, as irritation of the retina could result.<
Xenon lamps
The service life of these bulbs is very long and
the probability of a failure is very low, provided
that they are not switched on and off an unusual
number of times. If one of these bulbs should
nevertheless fail, it is possible to continue driv-
ing with great caution using the fog lamps, pro-
vided traffic laws in your area do not prohibit
this.
Have work on the xenon lighting system
performed only by your BMW center or a
workshop that works according to BMW repair
procedures with correspondingly trained per-
sonnel. Due to the high voltage present in the
system, there is a danger of fatal injuries when
work is carried out improperly.<
Parking lamps, roadside parking
lamps, daytime running lamps
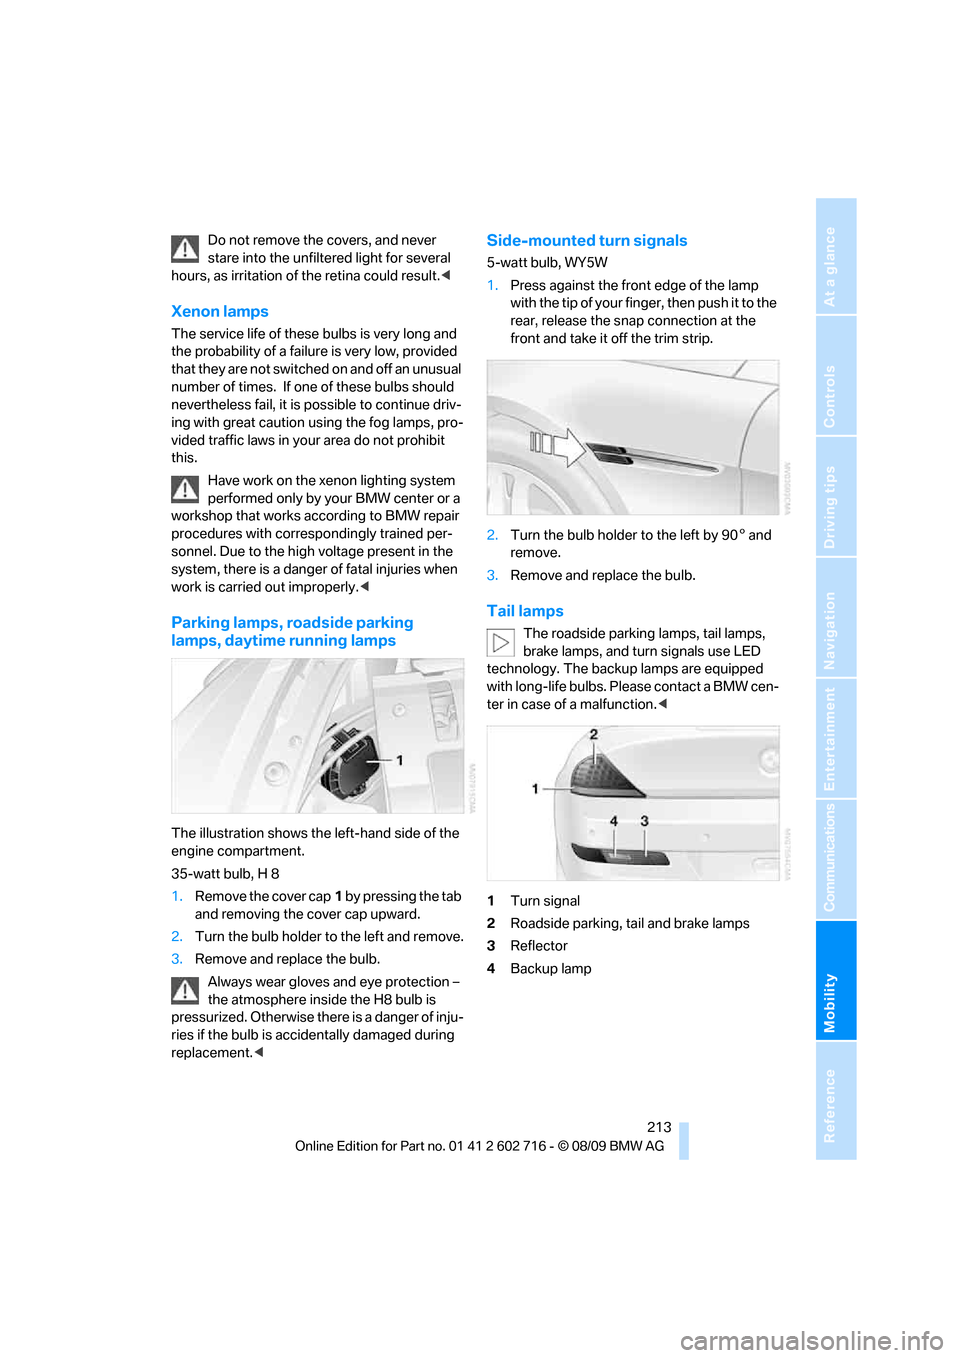
The illustration shows the left-hand side of the
engine compartment.
35-watt bulb, H 8
1.Remove the cover cap1 by pressing the tab
and removing the cover cap upward.
2.Turn the bulb holder to the left and remove.
3.Remove and replace the bulb.
Always wear gloves and eye protection –
the atmosphere inside the H8 bulb is
pressurized. Otherwise there is a danger of inju-
ries if the bulb is accidentally damaged during
replacement.<
Side-mounted turn signals
5-watt bulb, WY5W
1.Press against the front edge of the lamp
with the tip of your finger, then push it to the
rear, release the snap connection at the
front and take it off the trim strip.
2.Turn the bulb holder to the left by 905 and
remove.
3.Remove and replace the bulb.
Tail lamps
The roadside parking lamps, tail lamps,
brake lamps, and turn signals use LED
technology. The backup lamps are equipped
with long-life bulbs. Please contact a BMW cen-
ter in case of a malfunction.<
1Turn signal
2Roadside parking, tail and brake lamps
3Reflector
4Backup lamp
Page 217 of 252
Mobility
215Reference
At a glance
Controls
Driving tips
Communications
Navigation
Entertainment
>Seat, mirror and steering wheel* memory
The positions must be stored again, refer to
page47.
>Time and date
Must be updated again, refer to page76.
>Radio
Radio stations need to be stored again,
refer to page150.
>Navigation system
You must wait until the system becomes
functional again, refer to page126.
>Glass roof, electric
It may not be possible to move the glass
roof. The system must be initialized, refer to
page38.
>Active steering
The system automatically initializes itself
briefly during a trip. The system is deacti-
vated during this time, refer to page89.
>Power windows
The pinch prevention system for the power
windows must be reinitialized, refer to
page36.
Talk to your BMW center before placing
the stored vehicle back in service. <
Fuses
Never attempt to repair a blown fuse and
do not replace a defective fuse with a sub-
stitute of another color or amperage rating, as
this could lead to a circuit overload, ultimately
resulting in a fire in the vehicle.<
Spare fuses and a pair of plastic tweezers are
located in the compartment for the onboard tool
kit, refer to page212.
Information on fuse allocation is located below
the bracket for the onboard tool kit, see below.
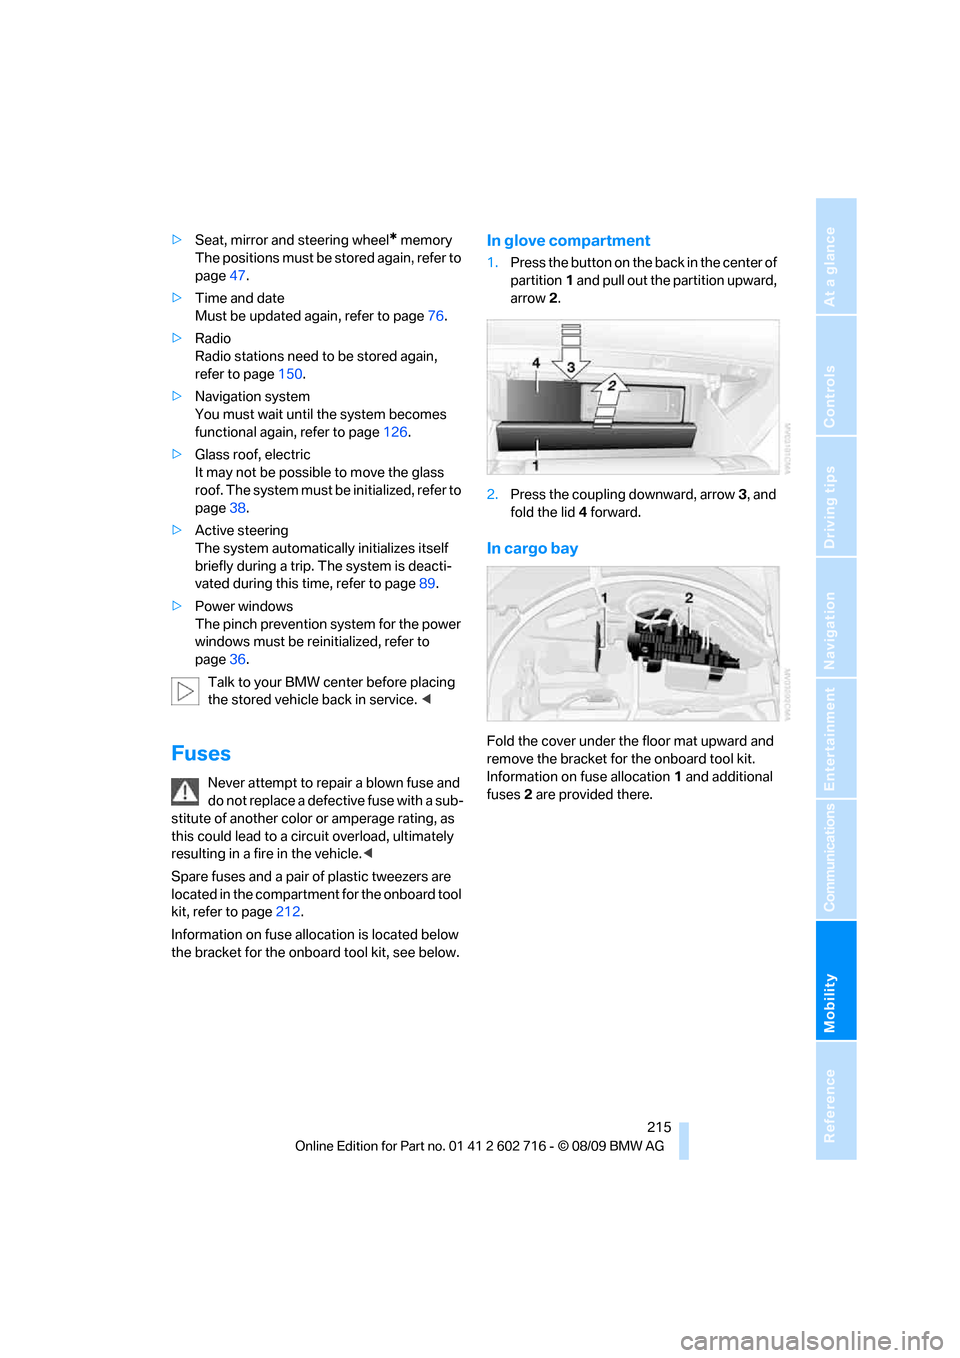
In glove compartment
1.Press the button on the back in the center of
partition1 and pull out the partition upward,
arrow2.
2.Press the coupling downward, arrow3, and
fold the lid 4 forward.
In cargo bay
Fold the cover under the floor mat upward and
remove the bracket for the onboard tool kit.
Information on fuse allocation1 and additional
fuses2 are provided there.
Page 219 of 252
Mobility
217Reference
At a glance
Controls
Driving tips
Communications
Navigation
Entertainment
Warning triangle*
The warning triangle is located on the left-hand
side in the luggage compartment.
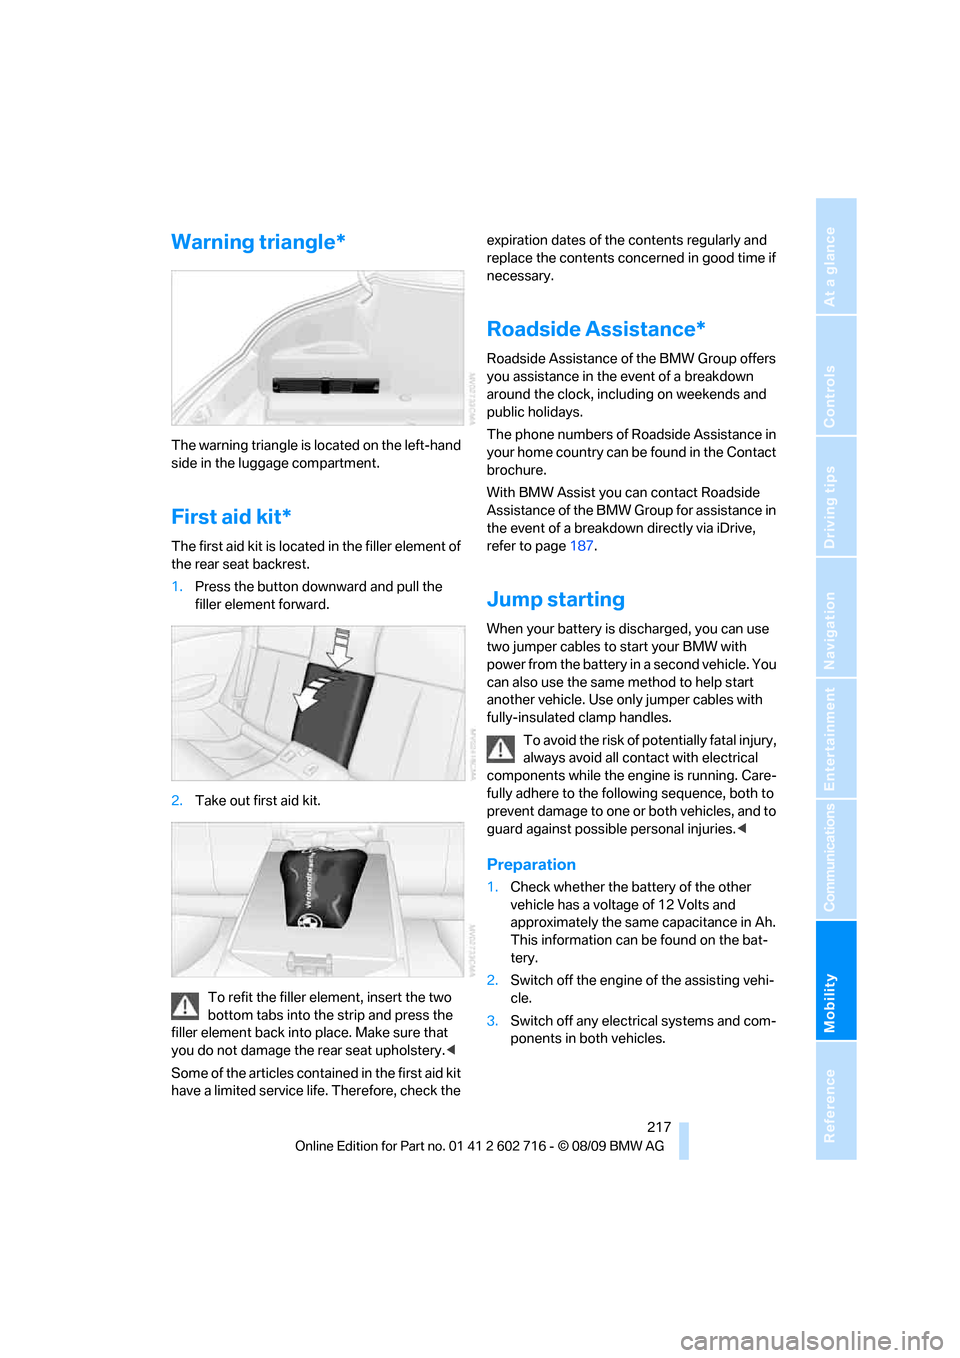
First aid kit*
The first aid kit is located in the filler element of
the rear seat backrest.
1.Press the button downward and pull the
filler element forward.
2.Take out first aid kit.
To refit the filler element, insert the two
bottom tabs into the strip and press the
filler element back into place. Make sure that
you do not damage the rear seat upholstery.<
Some of the articles contained in the first aid kit
have a limited service life. Therefore, check the expiration dates of the contents regularly and
replace the contents concerned in good time if
necessary.
Roadside Assistance*
Roadside Assistance of the BMW Group offers
you assistance in the event of a breakdown
around the clock, including on weekends and
public holidays.
The phone numbers of Roadside Assistance in
your home country can be found in the Contact
brochure.
With BMW Assist you can contact Roadside
Assistance of the BMW Group for assistance in
the event of a breakdown directly via iDrive,
refer to page187.
Jump starting
When your battery is discharged, you can use
two jumper cables to start your BMW with
power from the battery in a second vehicle. You
can also use the same method to help start
another vehicle. Use only jumper cables with
fully-insulated clamp handles.
To avoid the risk of potentially fatal injury,
always avoid all contact with electrical
components while the engine is running. Care-
fully adhere to the following sequence, both to
prevent damage to one or both vehicles, and to
guard against possible personal injuries.<
Preparation
1.Check whether the battery of the other
vehicle has a voltage of 12 Volts and
approximately the same capacitance in Ah.
This information can be found on the bat-
tery.
2.Switch off the engine of the assisting vehi-
cle.
3.Switch off any electrical systems and com-
ponents in both vehicles.
Page 229 of 252
Reference 227
At a glance
Controls
Driving tips
Communications
Navigation
Entertainment
Mobility
Weights
Never exceed either the approved axle loads or
the gross vehicle weight.
Capacities
650i Coupe 650i Convertible
Curb weight lbs./kg 3,814/1,730 4,277/1,940
Approved gross vehicle weight lbs./kg 4,652/2,110 5,049/2,290
Load lbs./kg 838/380 772/350
Approved front axle load lbs./kg 2,337/1,060 2,403/1,090
Approved rear axle load lbs./kg 2,491/1,130 2,778/1,260
Cargo bay capacity cu ft/l 15.9/450 10.6/300
>with raised convertible top compart-
ment floor, refer to page32cu ft/l – 12.4/350
Notes
Fuel tank US gal/liters approx. 18.5/70 Fuel grade: page195
including reserve of: US gal/liters approx. 2.6/10
Window and headlamp
washer systemUS quarts/liters approx. 5.3/5 For more details: page63
Page 232 of 252
Short commands of voice activation system
230
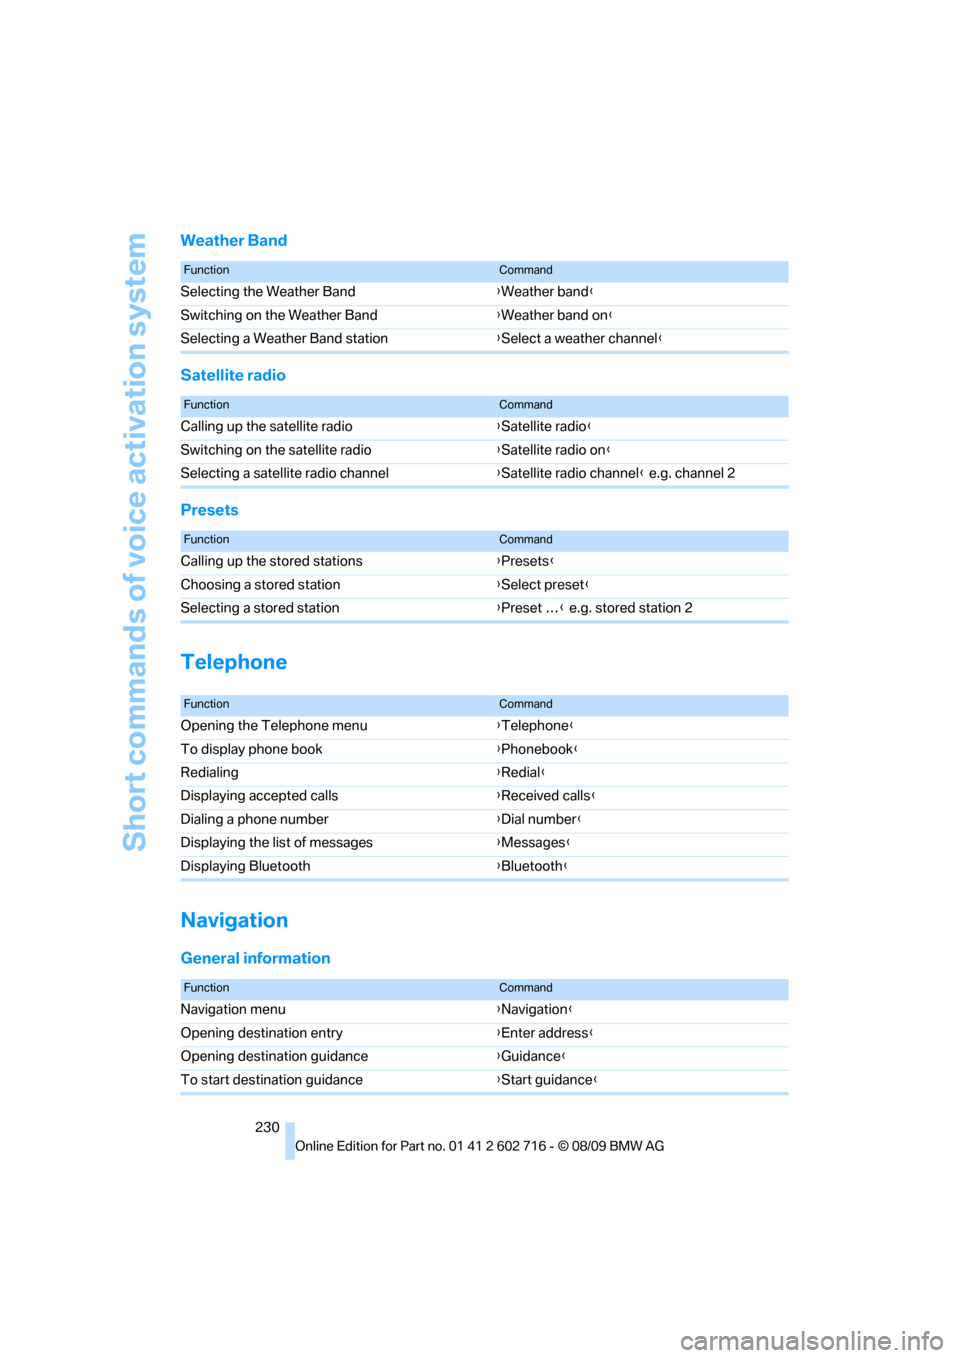
Weather Band
Satellite radio
Presets
Telephone
Navigation
General information
FunctionCommand
Selecting the Weather Band{Weather band}
Switching on the Weather Band{Weather band on}
Selecting a Weather Band station{Select a weather channel}
FunctionCommand
Calling up the satellite radio{Satellite radio}
Switching on the satellite radio{Satellite radio on}
Selecting a satellite radio channel{Satellite radio channel} e.g. channel 2
FunctionCommand
Calling up the stored stations{Presets}
Choosing a stored station{Select preset}
Selecting a stored station{Preset …} e.g. stored station 2
FunctionCommand
Opening the Telephone menu{Telephone}
To display phone book{Phonebook}
Redialing{Redial}
Displaying accepted calls{Received calls}
Dialing a phone number{Dial number}
Displaying the list of messages{Messages}
Displaying Bluetooth{Bluetooth}
FunctionCommand
Navigation menu{Navigation}
Opening destination entry{Enter address}
Opening destination guidance{Guidance}
To start destination guidance{Start guidance}