2010 BMW 650I CONVERTIBLE stop start
[x] Cancel search: stop startPage 138 of 252
Destination guidance
136
Destination guidance
Starting destination
guidance
1."Navigation"
2."Enter address"
3.Select the destination.
4."Accept destination"
5."Start guidance"
The route is displayed on the Control Display
after it is calculated.
Terminating destination
guidance
1."Navigation"
2."Map"
3.Select the symbol.
4."Stop guidance"
Continuing destination
guidance
If the destination was not reached during the
last trip, destination guidance can be resumed.
"Resume guidance"
Route criteria
General information
You can influence the calculated route by
choosing certain route criteria. You can change
the route criteria as often as you like while
entering the destination and whenever the des-
tination guidance is active.
The route is planned according to fixed rules.
The type of road is taken into account, e.g.
whether it is a highway or a winding road. As a
result, the routes recommended by the naviga-
tion system may not always be the same ones that you would choose based on personal expe-
rience.
The settings are stored for the remote control
currently in use.
Changing route criteria
1."Navigation"
2."Map"
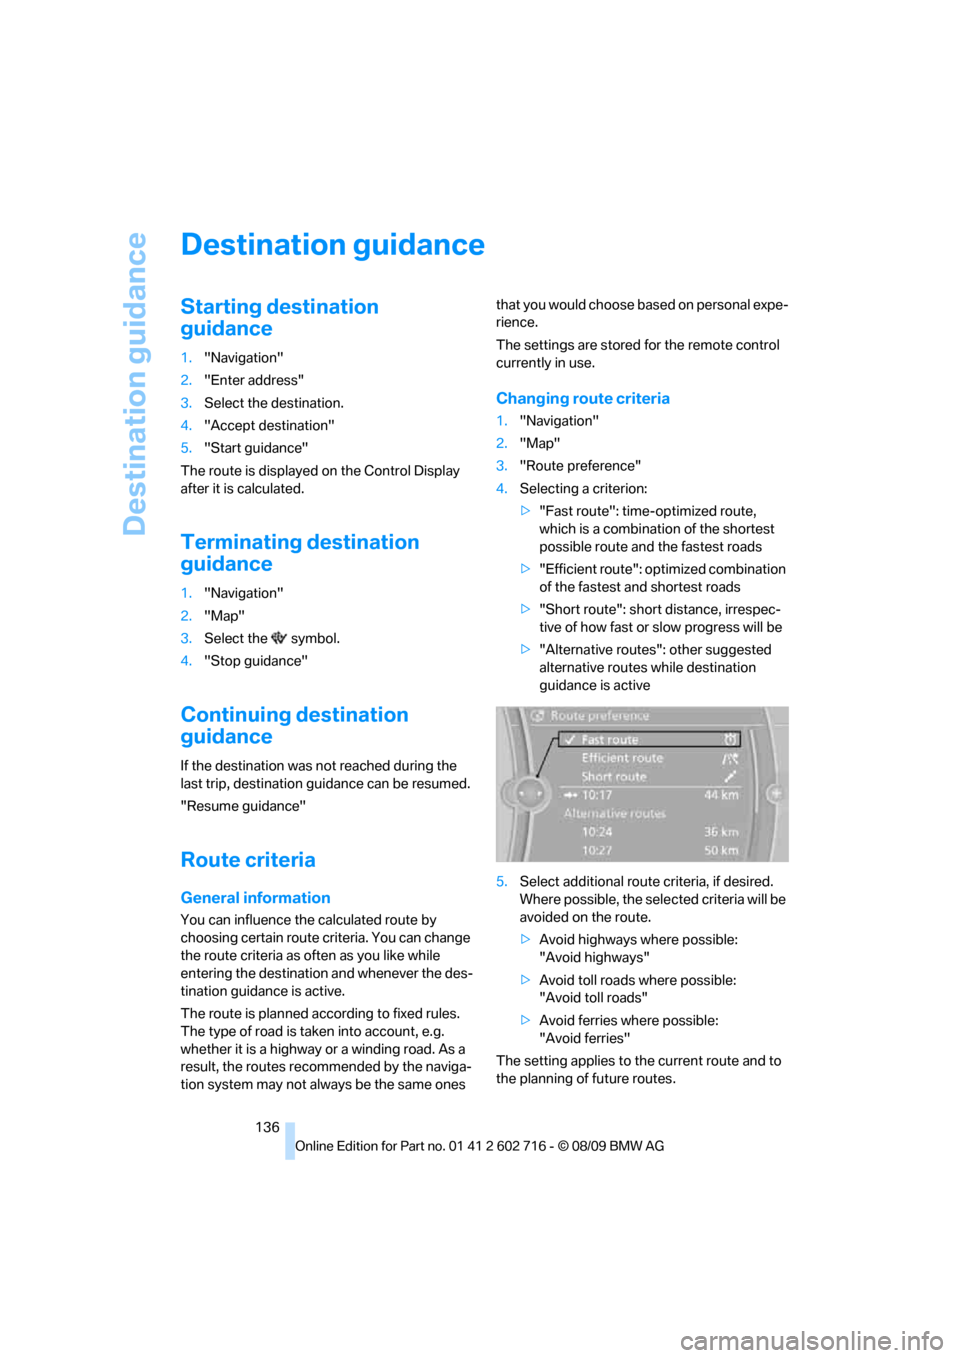
3."Route preference"
4.Selecting a criterion:
>"Fast route": time-optimized route,
which is a combination of the shortest
possible route and the fastest roads
>"Efficient route": optimized combination
of the fastest and shortest roads
>"Short route": short distance, irrespec-
tive of how fast or slow progress will be
>"Alternative routes": other suggested
alternative routes while destination
guidance is active
5.Select additional route criteria, if desired.
Where possible, the selected criteria will be
avoided on the route.
>Avoid highways where possible:
"Avoid highways"
>Avoid toll roads where possible:
"Avoid toll roads"
>Avoid ferries where possible:
"Avoid ferries"
The setting applies to the current route and to
the planning of future routes.
Page 140 of 252
Destination guidance
138 1."Navigation"
2."Map"
3. Select the symbol.
For rapid access, the feature can be stored on a
programmable memory key, refer to page20.
Repeating a voice instruction
1."Navigation"
2."Map"
3. Highlight the symbol.
4.Press the controller twice.
Adjusting the volume of voice
instructions*
The volume can be adjusted only while a voice
instruction is being issued.
1.Repeat the last voice instruction, if neces-
sary.
2.Turn the knob during the voice instruction
to select the desired volume.
The setting is stored for the remote control cur-
rently in use.
Map display
Displaying map view
You can have your current position displayed on
a map. After starting the destination guidance,
the planned route is shown on the map.
1."Navigation"
2."Map"
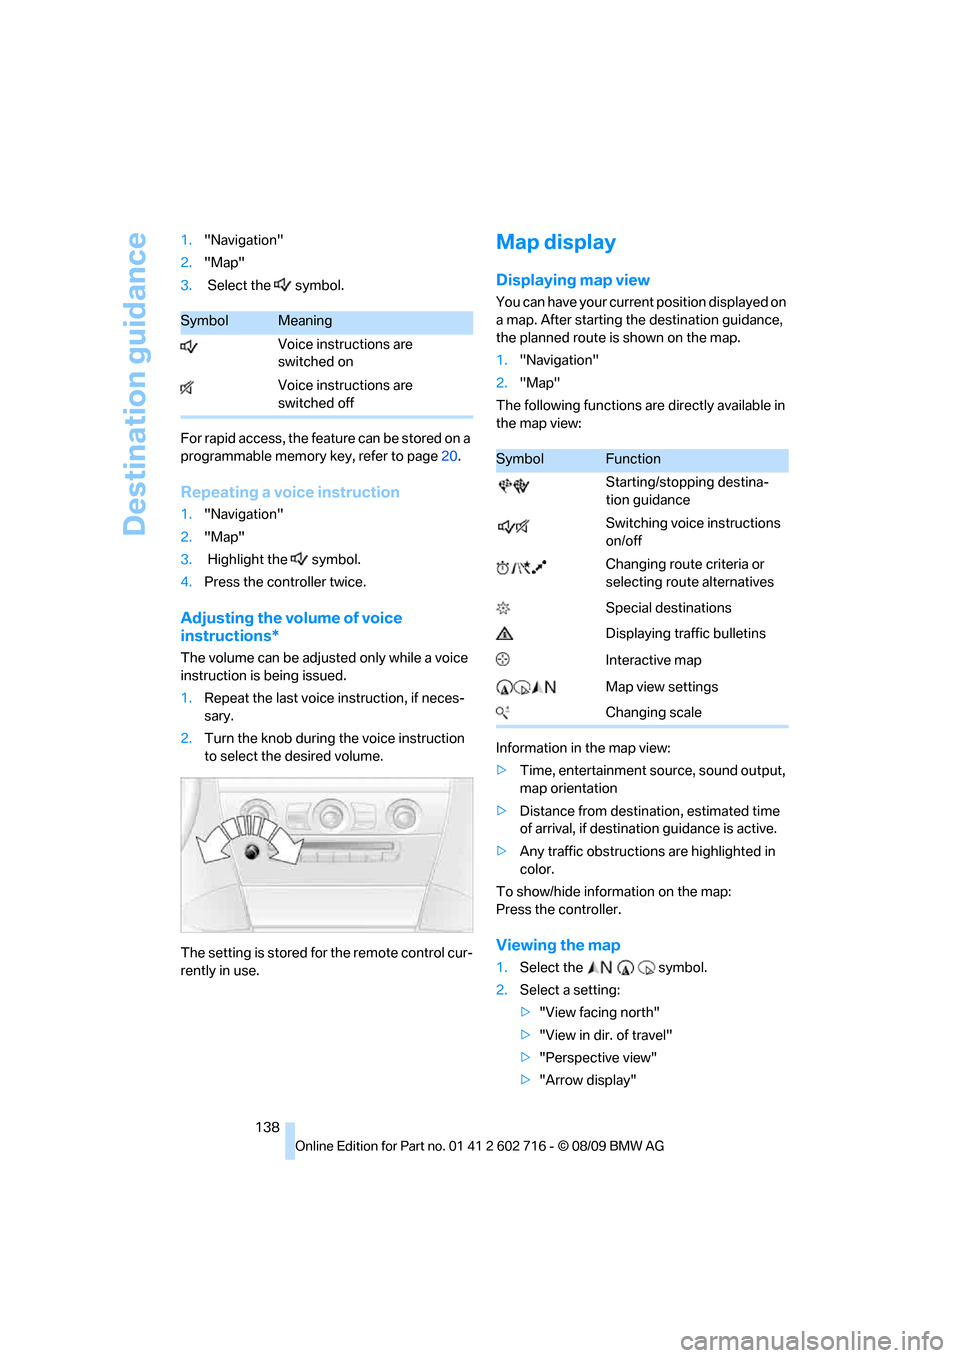
The following functions are directly available in
the map view:
Information in the map view:
>Time, entertainment source, sound output,
map orientation
>Distance from destination, estimated time
of arrival, if destination guidance is active.
>Any traffic obstructions are highlighted in
color.
To show/hide information on the map:
Press the controller.
Viewing the map
1.Select the symbol.
2.Select a setting:
>"View facing north"
>"View in dir. of travel"
>"Perspective view"
>"Arrow display"
SymbolMeaning
Voice instructions are
switched on
Voice instructions are
switched off
SymbolFunction
Starting/stopping destina-
tion guidance
Switching voice instructions
on/off
Changing route criteria or
selecting route alternatives
Special destinations
Displaying traffic bulletins
Interactive map
Map view settings
Changing scale
Page 159 of 252
Navigation
Entertainment
Driving tips
157Reference
At a glance
Controls
Communications
Mobility
Video menu
To open the Video menu:
1.Turn the controller during playback.
2.Press the controller when "Back" is dis-
played.
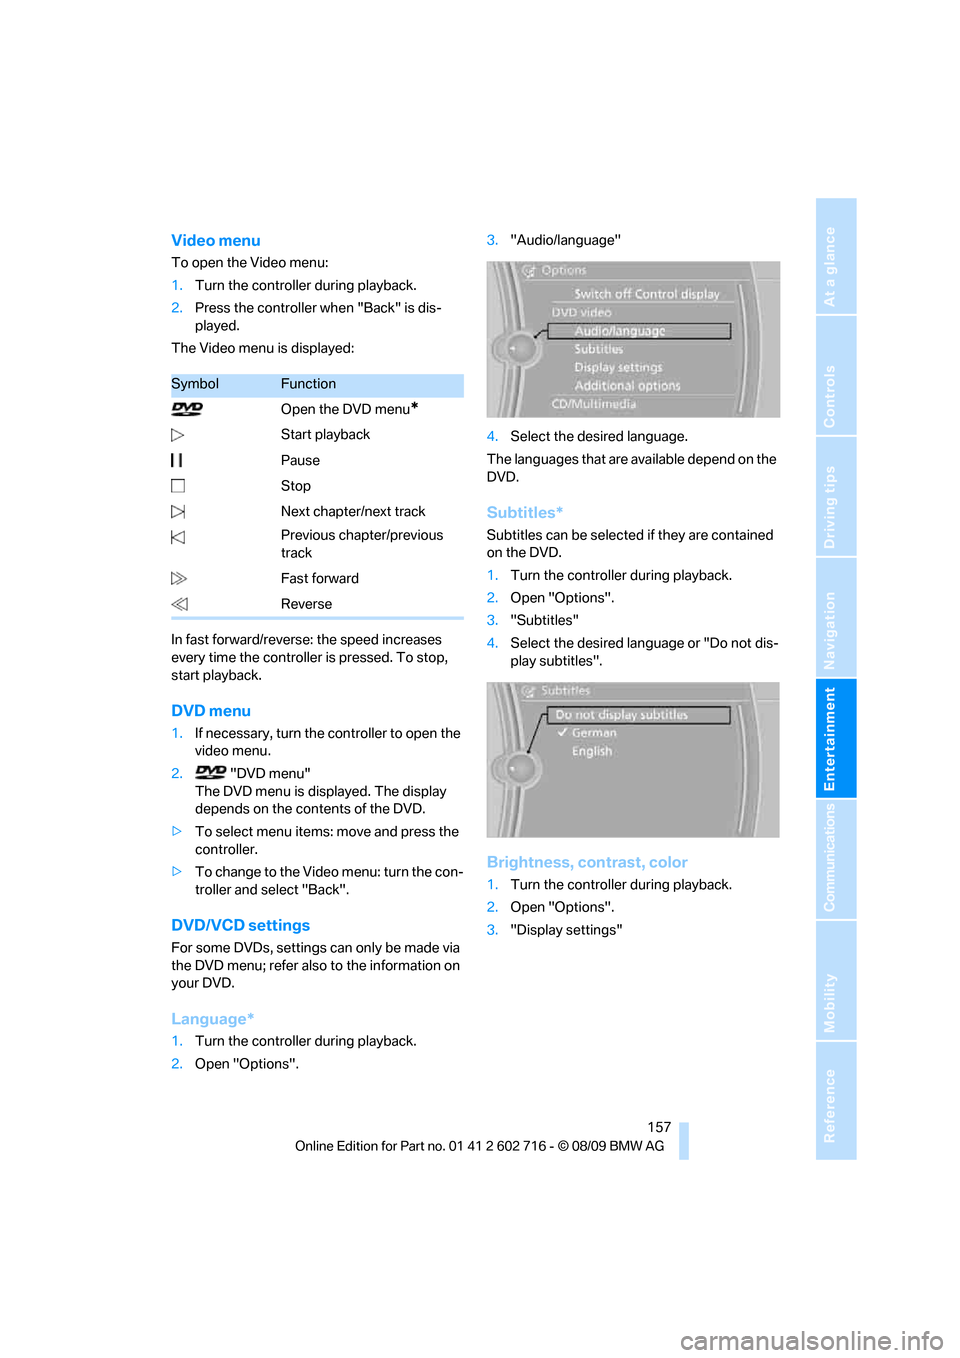
The Video menu is displayed:
In fast forward/reverse: the speed increases
every time the controller is pressed. To stop,
start playback.
DVD menu
1.If necessary, turn the controller to open the
video menu.
2. "DVD menu"
The DVD menu is displayed. The display
depends on the contents of the DVD.
>To select menu items: move and press the
controller.
>To change to the Video menu: turn the con-
troller and select "Back".
DVD/VCD settings
For some DVDs, settings can only be made via
the DVD menu; refer also to the information on
your DVD.
Language*
1.Turn the controller during playback.
2.Open "Options".3."Audio/language"
4.Select the desired language.
The languages that are available depend on the
DVD.
Subtitles*
Subtitles can be selected if they are contained
on the DVD.
1.Turn the controller during playback.
2.Open "Options".
3."Subtitles"
4.Select the desired language or "Do not dis-
play subtitles".
Brightness, contrast, color
1.Turn the controller during playback.
2.Open "Options".
3."Display settings"
SymbolFunction
Open the DVD menu
*
Start playback
Pause
Stop
Next chapter/next track
Previous chapter/previous
track
Fast forward
Reverse
Page 175 of 252
173
Entertainment
Reference
At a glance
Controls
Driving tips Communications
Navigation
Mobility
>Depending on the mobile phone, certain
settings may be necessary on the mobile
phone, e. g. via the following menu items:
>Bluetooth activated
>Connection must be allowed without
requiring further confirmation
>Reconnect
>Depending on the mobile phone model, the
setting energy saving mode can, for exam-
ple, result in vehicle failing to detect the
paired mobile phone.
>For pairing, define a 4- to 16-digit number
of your choice as the Bluetooth Passkey,
e.g. 25081107. A long and complex number
offers better protection against unautho-
rized access. This Bluetooth passkey is no
longer required following successful pair-
ing.
>The ignition is switched on.
Only pair the mobile phone with the vehi-
cle stopped, otherwise the passengers
and other road users can be endangered due to
a lack of attentiveness on the part of the
driver.<
Switching on ignition
1.Insert the remote control as far as possible
into the ignition lock.
2.Switch on the ignition by pressing the Start/
Stop button without depressing the brake
or clutch pedal.
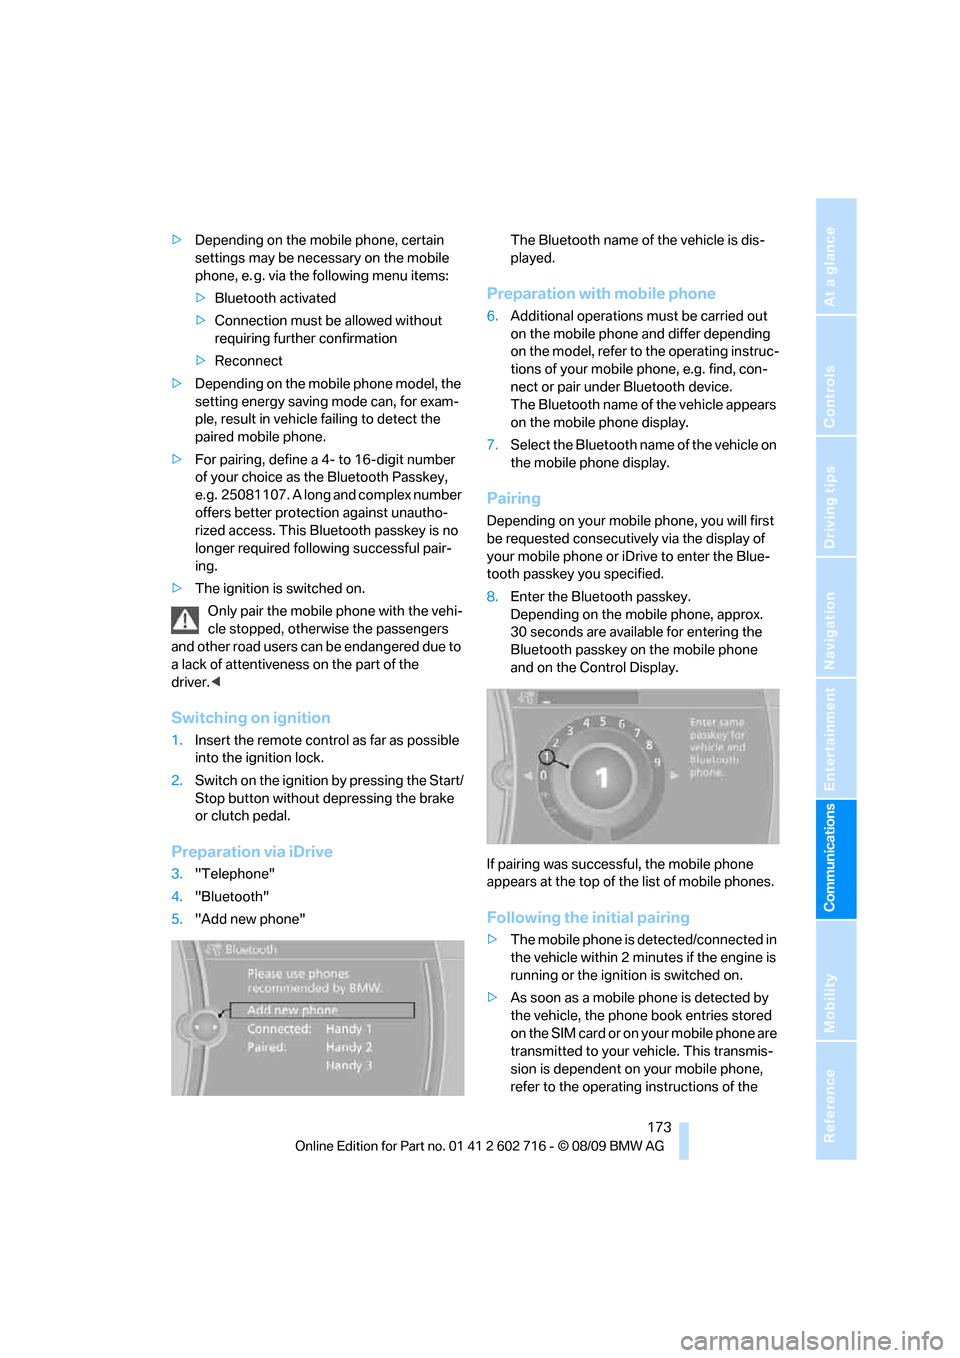
Preparation via iDrive
3."Telephone"
4."Bluetooth"
5."Add new phone"The Bluetooth name of the vehicle is dis-
played.
Preparation with mobile phone
6.Additional operations must be carried out
on the mobile phone and differ depending
on the model, refer to the operating instruc-
tions of your mobile phone, e.g. find, con-
nect or pair under Bluetooth device.
The Bluetooth name of the vehicle appears
on the mobile phone display.
7.Select the Bluetooth name of the vehicle on
the mobile phone display.
Pairing
Depending on your mobile phone, you will first
be requested consecutively via the display of
your mobile phone or iDrive to enter the Blue-
tooth passkey you specified.
8.Enter the Bluetooth passkey.
Depending on the mobile phone, approx.
30 seconds are available for entering the
Bluetooth passkey on the mobile phone
and on the Control Display.
If pairing was successful, the mobile phone
appears at the top of the list of mobile phones.
Following the initial pairing
>The mobile phone is detected/connected in
the vehicle within 2 minutes if the engine is
running or the ignition is switched on.
>As soon as a mobile phone is detected by
the vehicle, the phone book entries stored
on the SIM card or on your mobile phone are
transmitted to your vehicle. This transmis-
sion is dependent on your mobile phone,
refer to the operating instructions of the
Page 205 of 252
Mobility
203Reference
At a glance
Controls
Driving tips
Communications
Navigation
Entertainment
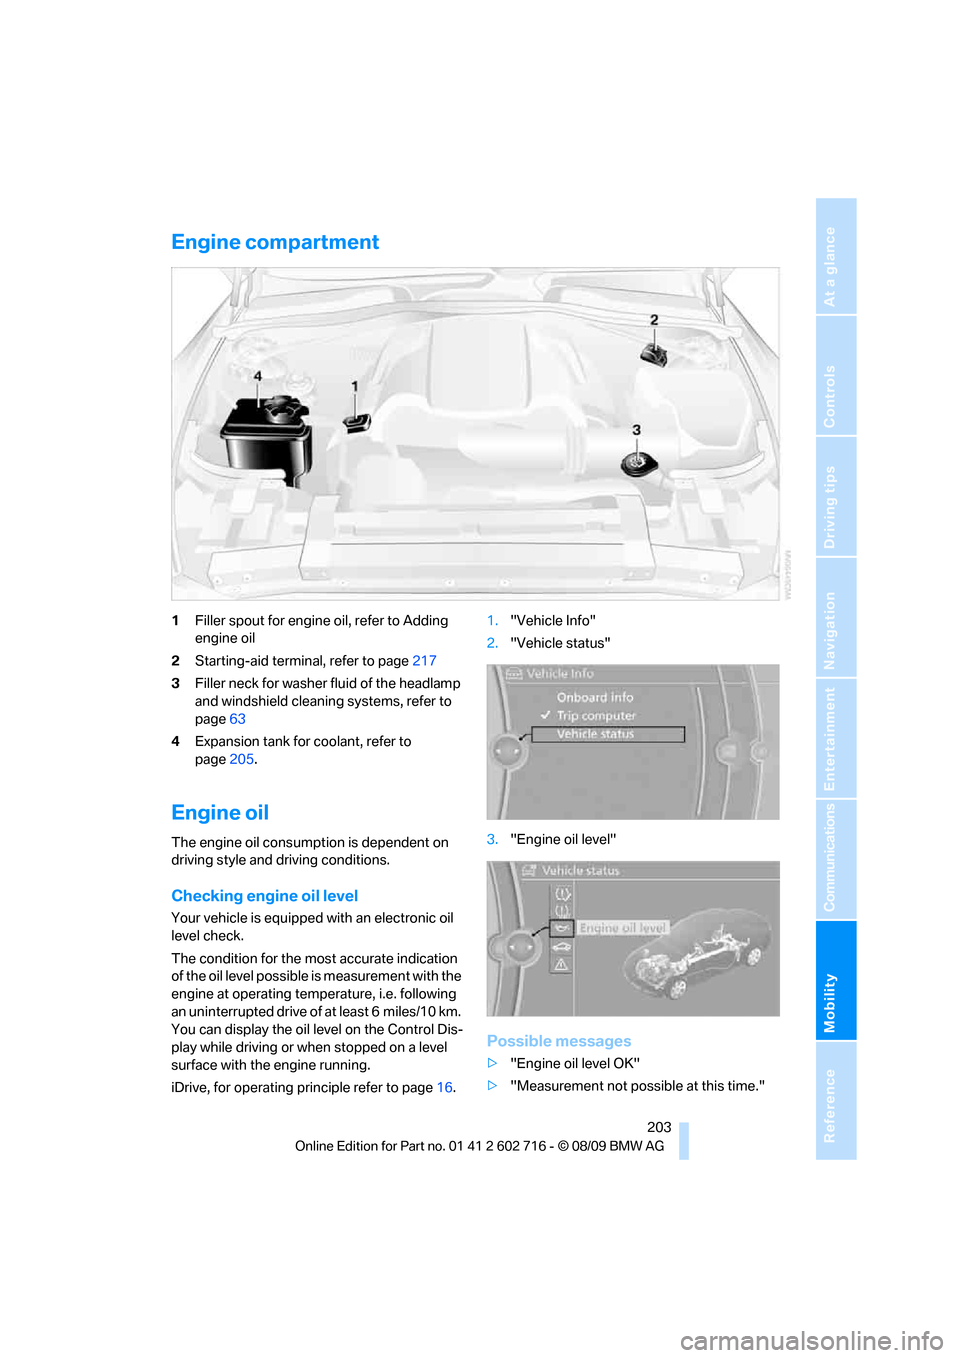
Engine compartment
1Filler spout for engine oil, refer to Adding
engine oil
2Starting-aid terminal, refer to page217
3Filler neck for washer fluid of the headlamp
and windshield cleaning systems, refer to
page63
4Expansion tank for coolant, refer to
page205.
Engine oil
The engine oil consumption is dependent on
driving style and driving conditions.
Checking engine oil level
Your vehicle is equipped with an electronic oil
level check.
The condition for the most accurate indication
of the oil level possible is measurement with the
engine at operating temperature, i.e. following
an uninterrupted drive of at least 6 miles/10 km.
You can display the oil level on the Control Dis-
play while driving or when stopped on a level
surface with the engine running.
iDrive, for operating principle refer to page16.1."Vehicle Info"
2."Vehicle status"
3."Engine oil level"
Possible messages
>"Engine oil level OK"
>"Measurement not possible at this time."
Page 221 of 252

Mobility
219Reference
At a glance
Controls
Driving tips
Communications
Navigation
Entertainment
Access to screw thread
Press the arrow symbol on the cover in the
bumper.
Front
Rear
Being towed
Make sure that the ignition is switched on,
refer to page56, otherwise the low
beams, tail lamps, turn signals and windshield
wipers would not be available. Do not tow the
vehicle with the rear axle raised, as otherwise
the steering can turn to the left or right.When
the engine is stopped, there is no power assist.
This then requires increased effort for braking
and steering. Active steering is deactivated and
larger steering wheel movements are
required.<
Switch on the hazard warning flashers depend-
ing on the local regulations. If the electrical sys-
tem fails, mark the vehicle to be towed, e.g. with
a sign or warning triangle in the rear window.
Manual transmission
Gearshift lever in neutral position.
Sport automatic transmission
Before towing, manually release the
transmission lock, even if there is no mal-
function in the transmission. Otherwise there is
a risk that the transmission lock will engage dur-
ing towing.<
Manually unlocking and locking transmission
lock, refer to page60.
Do not exceed a towing speed of
45 mph/70 km/h and a towing distance of
90 miles/150 km; otherwise, the sport auto-
matic transmission may be damaged.<
Towing methods
Do not lift vehicle by tow fitting or body
and chassis parts; otherwise, damage
may result.<
In some countries, towing with tow bars or
ropes in public traffic is not permitted. Familiar-
ize yourself with the regulations on towing in the
respective country.
With tow bar
The towing vehicle may not be lighter
than the vehicle to be towed, otherwise it
will not be possible to reliably control vehicle
response.<
The tow fittings used should be on the same
side on both vehicles. Should it prove impossi-
ble to avoid mounting the tow bar at an offset
angle, please observe the following:
>Clearance and maneuvering capability will
be sharply limited during cornering.
>When mounted at an angle, the tow bar will
exert lateral forces, tending to push the
vehicle sideways.
Only attach the tow bar to the tow fittings,
as attachment to other vehicle parts can
lead to damage.<
With tow rope
When starting off in the towing vehicle, make
sure that the tow rope is taut.
To avoid jerking and the associated
stresses on vehicle components when
Page 222 of 252

Giving and receiving assistance
220 towing, always use nylon ropes or nylon straps.
Only attach tow ropes to the tow fittings, as
attachment to other vehicle parts can lead to
damage.<
With tow truck
Have the BMW transported with a tow truck
with a so-called lift bar or on a flat bed.
Tow-starting
Do not tow-start the vehicle if possible, but
instead start the engine by means of jump start-
ing, refer to page217. Vehicles equipped with a
catalytic converter should only be tow-started
when the engine is cold. When equipped with a
sport automatic transmission, the engine can-
not be started by tow-starting.
1.Switch on the hazard warning flashers,
comply with country-specific regulations.
2.Switch on the ignition, refer to page56.
3.Shift into 3rd gear.
4.Tow-start with the clutch completely
depressed and slowly release the clutch.
After the engine starts, immediately
depress the clutch again completely.
5.Stop at a suitable location, remove the tow
bar or rope and switch off the hazard warn-
ing flashers.
6.Have the vehicle checked.
Page 237 of 252

Reference 235
At a glance
Controls
Driving tips
Communications
Navigation
Entertainment
Mobility
Automatic climate control103
– automatic air
distribution104
– convertible program104
– parked car ventilation/
heating107
– switching on and off106
Automatic closing of doors,
refer to Automatic soft
closing31
Automatic curb monitor51
Automatic lighting
– refer to Automatic headlamp
control98
– refer to Daytime running
lamps99
– refer to Interior lamps102
– refer to Pathway lighting99
– refer to Welcome lamps98
Automatic lights
– refer to High-beam
Assistant100
Automatic Service
Request190
Automatic soft closing31
AUTO program for automatic
climate control104
AUX-IN connection111
AUX-IN port166
Available services190
Average fuel consumption73
– setting units74
Average speed73
Avoiding highways for
navigation136
Avoiding unintentional
alarms34
Axle loads, refer to
Weights227
B
Backrest contour, refer to
Lumbar support46
Backrests, refer to Seats45
Backup lamps, replacing
bulbs, refer to Tail
lamps213Band-aids, refer to First aid
kit217
Bass, refer to Tone
control146
Battery
– jump starting217
– refer to Vehicle battery214
Battery replacement, remote
control for Comfort
Access36
BC button, refer to
Computer73
Being towed219
Belts, refer to Safety belts50
Beverage holder, refer to
Cupholders112
Blower, refer to Air
volume105
Bluetooth, activating/
deactivating174
BMW
– Car Shampoo211
BMW Assist,
activating188,190
BMW Assist186
BMW homepage4
BMW maintenance
system206
BMW Night Vision94
– activating95
– cleaning camera96
– cleaning camera, refer to
Wiper system62
– deactivating96
– making settings96
BMW Search188
BMW website4
Bottle holder, refer to
Cupholders112
Bracket for telephone or
mobile phone
– refer to Snap-in adapter182
Brake assistant83
– adaptive83
Brake force display90
Brake lamps
– replacing bulbs, refer to Tail
lamps213
– two-stage90Brake rotors
– breaking-in118
– refer to Braking safely120
Brakes
– ABS Antilock Brake
System83
– brake force display90
– breaking-in
118
– CBC Cornering Brake
Control83
– electronic brake-force
distribution83
– parking brake58
– refer to Braking safely120
Brake system118
– brake pads118
– brake rotors120
– breaking-in118
– warning lamp13,84
Braking safely120
Breakdown services, refer to
Roadside Assistance217
Breaking-in brake pads118
Breaking-in the clutch118
Breaking-in the differential,
refer to Engine and
differential118
Break-in period118
Brightness of Control
Display81
Button for starting engine,
refer to Start/Stop button56
Buttons on steering wheel11
C
California Proposition 65
Warning6
Call
– accepting175
– ending176
– rejecting176
Calling, refer to Phone
numbers, dialing176
Can holder, refer to
Cupholders112
Capacities227
Car battery, refer to Vehicle
battery214