2010 BMW 650I CONVERTIBLE service
[x] Cancel search: servicePage 94 of 252

Technology for comfort, convenience and safety
92 But the front, knee and side airbags on the
front passenger side are still deactivated.
Operational readiness of airbag system
From radio readiness, refer to page56, the
warning lamp lights up briefly, indicating the
operational readiness of the entire airbag sys-
tem and the safety belt tensioners.
Airbag system malfunction
>Warning lamp does not light up from radio
readiness.
>Warning lamp lights up continuously.
Have the airbag system checked immedi-
ately in case of a malfunction, otherwise
there is a danger that the airbag system may not
respond in the expected manner in an accident
despite an impact of corresponding intensity.<
Convertible: rollover
protection system
The rollover protection system is automatically
activated in the event of an accident or a critical
driving situation, extreme inclination on the lon-
gitudinal axis, or loss of ground contact. The
rollover bars located behind the rear head
restraints are deployed within fractions of a sec-
ond.
As a supplement to the rollover bar integrated
into the windshield frame, the rollover protec-
tion system ensures that all vehicle occupants
have the necessary headroom.
Always keep the path of movement of the
rollover protection system clear.
In minor accidents, you are protected by the
fastened safety belt and, depending on acci-dent severity, by the safety belt tensioner and
multi-phase airbag retention system.<
Lowering
If the rollover protection system experienced no
impact after automatic activation, then it can be
lowered again. No tools are necessary for this
purpose.
1.Press the release backward and hold in that
position.
2.Press the rollover protection unit halfway
down from above.
3.Let go of the release.
4.Press the rollover protection unit down until
it snaps into place.
5.Use the same procedure for the second roll-
over protection unit.
Have the rollover protection system checked
after unexpected triggering.
Never move the convertible top when the
rollover protection system is raised.
No changes of any nature may be made to the
individual components of the rollover protec-
tion system and wiring.
Work on the rollover protection system may
only be performed at a BMW center.
Non-professional attempts to service the sys-
Page 95 of 252
Controls
93Reference
At a glance
Driving tips
Communications
Navigation
Entertainment
Mobility
tem can lead to failure or malfunction.
For a system check and to ensure long-term
functioning, you must comply with the mainte-
nance intervals of the service requirements,
refer to page75.<
Head-up Display*
The concept
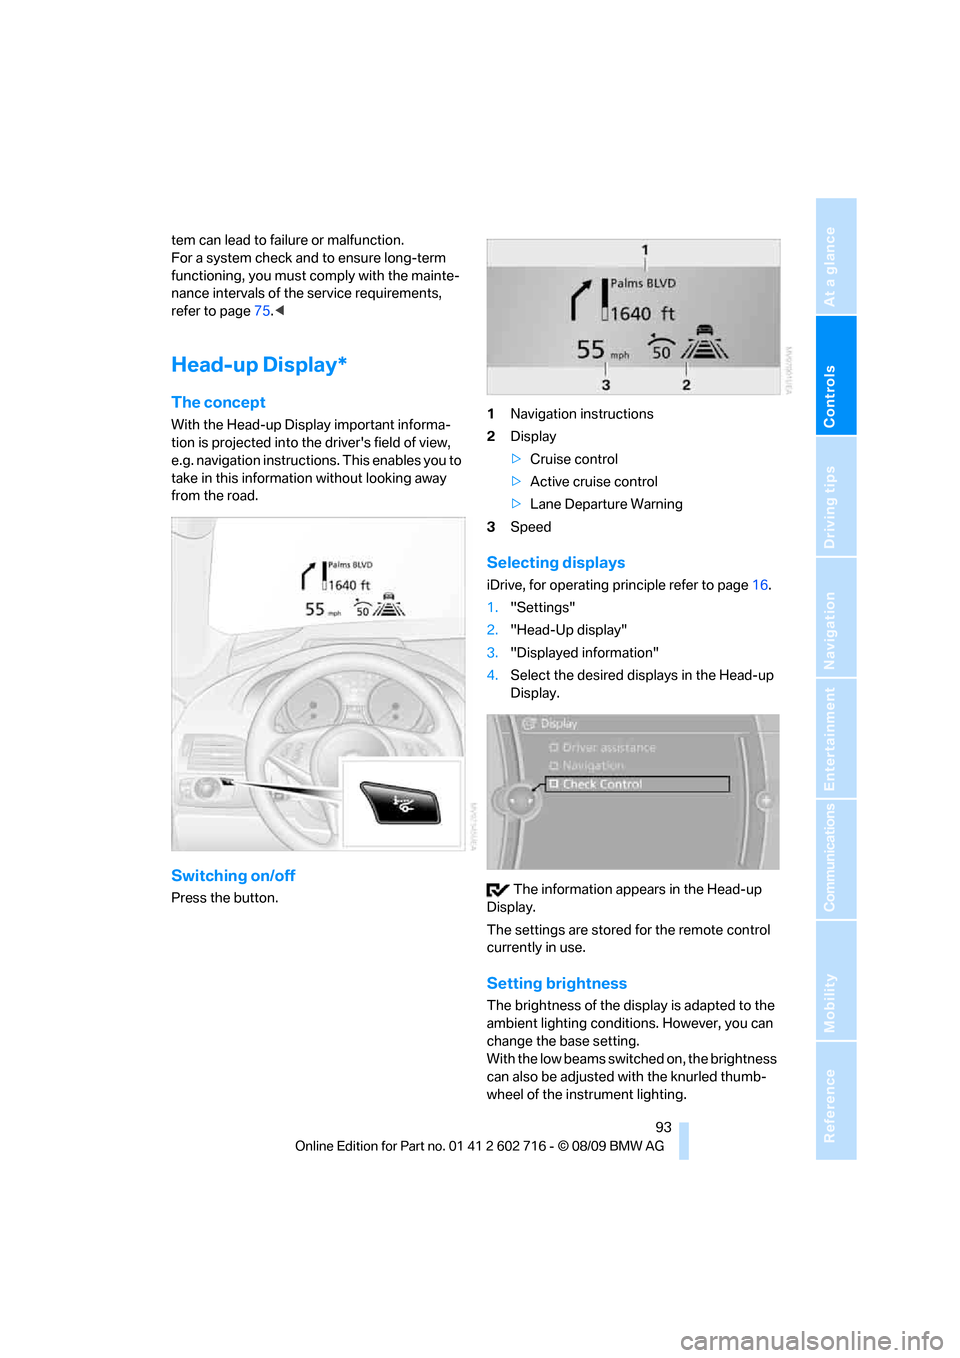
With the Head-up Display important informa-
tion is projected into the driver's field of view,
e.g. navigation instructions. This enables you to
take in this information without looking away
from the road.
Switching on/off
Press the button.1Navigation instructions
2Display
>Cruise control
>Active cruise control
>Lane Departure Warning
3Speed
Selecting displays
iDrive, for operating principle refer to page16.
1."Settings"
2."Head-Up display"
3."Displayed information"
4.Select the desired displays in the Head-up
Display.
The information appears in the Head-up
Display.
The settings are stored for the remote control
currently in use.
Setting brightness
The brightness of the display is adapted to the
ambient lighting conditions. However, you can
change the base setting.
With the low beams switched on, the brightness
can also be adjusted with the knurled thumb-
wheel of the instrument lighting.
Page 120 of 252

Things to remember when driving
118
Things to remember when driving
Break-in period
Moving parts need breaking-in time to adjust to
each other. To ensure that your vehicle contin-
ues to provide optimized economy of operation
throughout an extended service life, we request
that you devote careful attention to the follow-
ing section.
Engine and differential
Always obey all official speed limits.
Up to 1,200 miles/2,000 km
Drive at changing engine and driving speeds,
however do not exceed 4,500 rpm or 100 mph/
160 km/h.
Avoid full-throttle operation and use of the
transmission's kickdown mode during these
initial miles.
From 1,200 miles/2,000 km
The engine and vehicle speed can gradually be
increased.
Tires
Due to technical factors associated with their
manufacture, tires do not achieve their full trac-
tion potential until after an initial break-in
period. Therefore, drive reservedly during the
first 200 miles/300 km.
Brake system
Brakes require an initial break-in period of
approx. 300 miles/500 km to achieve optimized
contact and wear patterns between brake pads
and rotors. Drive in a reserved manner during
this break-in period.
Clutch
The function of the clutch is only at its opti-
mized level after a distance driven of approx.
300 miles/500 km. During this break-in period,
engage the clutch gently.
Following part replacement
Observe the break-in instructions again if com-
ponents mentioned above must be replaced
after subsequent driving operation.
Saving fuel
The fuel consumption of your vehicle depends
on various factors. Through a few simple steps,
your driving style, and regular maintenance, you
can have a positive influence on your fuel con-
sumption and environmental impact.
Removing unnecessary cargo
Additional weight increases fuel consumption.
Removing add-on parts after use
Remove unneeded auxiliary mirrors, roof or rear
luggage racks after use. Add-on parts attached
to the vehicle impede the aerodynamics and
increase the fuel consumption.
Closing windows and glass sunroof
An open glass sunroof or open windows like-
wise increase the drag coefficient and therefore
the fuel consumption.
Checking tire inflation pressures
regularly
Check and correct the tire inflation pressure as
needed at least twice a month and before long
trips.
An insufficient tire inflation pressure increases
the rolling resistance and thus increases the
fuel consumption and tire wear.
Driving off immediately
Do not allow the engine to warm up by leaving it
running while the vehicle remains stationary.
Instead, begin to drive at a moderate engine
speed. This is the fastest way for the cold
engine to reach its operating temperature.
Page 121 of 252
Driving tips
119Reference
At a glance
Controls
Communications
Navigation
Entertainment
Mobility
Thinking ahead when driving
Avoid unnecessary acceleration and braking.
To do so, maintain the appropriate distance
from the vehicle in front of you. An anticipatory
and smooth driving style reduces fuel con-
sumption.
Avoiding high engine speeds
Use 1st gear only for starting off. Accelerate
rapidly in 2nd gear and above. Avoid high
engine speeds in doing so and shift into the
next gear early.
When you have reached the desired speed,
shift into the highest possible gear and drive
with the lowest possible engine speed while
maintaining a constant vehicle speed.
In general: driving at a low engine speed
reduces fuel consumption and minimizes wear.
Taking advantage of coasting
When approaching a red light, let off the gas
and allow the vehicle to coast to a stop in the
highest possible gear.
On steep roadways, let off the gas and allow the
vehicle to roll in the appropriate gear.
The flow of fuel is interrupted when coasting.
Switching off the engine during longer
stops
Switch off the engine at longer stops such as
traffic signals, railroad crossings, or in traffic
jams. Even having the engine switched off for
approx. 4 seconds results in fuel savings.
Switching off functions currently not
required
Functions such as the cooling function of the
automatic climate control, seat heating or rear
window defroster draw large amounts of power
and consume additional fuel. Their influence is
particularly pronounced in city and stop-and-go
traffic. For this reason, it is a good idea to switch
these functions off when they are not really
needed.
Having maintenance carried out
Have the vehicle serviced regularly in order to
achieve the optimum economy and service life
of your vehicle. BMW recommends having the
maintenance performed by a BMW center. Also
please pay attention to the BMW maintenance
system, refer to page206.
General driving notes
Closing luggage compartment lid
Only drive with the luggage compartment
lid completely closed, otherwise exhaust
can penetrate into the passenger compart-
ment.<
If it is absolutely necessary to drive with the lug-
gage compartment lid open:
1.Coupe: close both windows and the glass
sunroof.
Convertible: with closed top, close all win-
dows.
2.Increase the air volume of the automatic cli-
mate control to a high level, refer to
page105.
Hot exhaust system
As in all vehicles, extremely high temper-
atures are generated on the exhaust sys-
tem. Do not remove the heat shields installed
adjacent to it, and never apply undercoating to
them. When driving, standing at idle and while
parking take care to avoid possible contact
between the hot exhaust system and any highly
flammable materials such as hay, leaves, grass,
etc. Such contact could lead to a fire, and with it
the risk of serious property damage as well as
personal injury. Do not touch hot exhaust tail
pipes. Otherwise there is a risk of burns.<
Hydroplaning
When driving on wet or slushy roads,
reduce road speed. If you do not, a wedge
of water can form between tires and road sur-
face. This phenomenon is referred to as hydro-
planing, and is characterized by a partial or
complete loss of contact between the tires and
Page 133 of 252
Navigation
Driving tips
131Reference
At a glance
Controls
Communications
Entertainment
Mobility
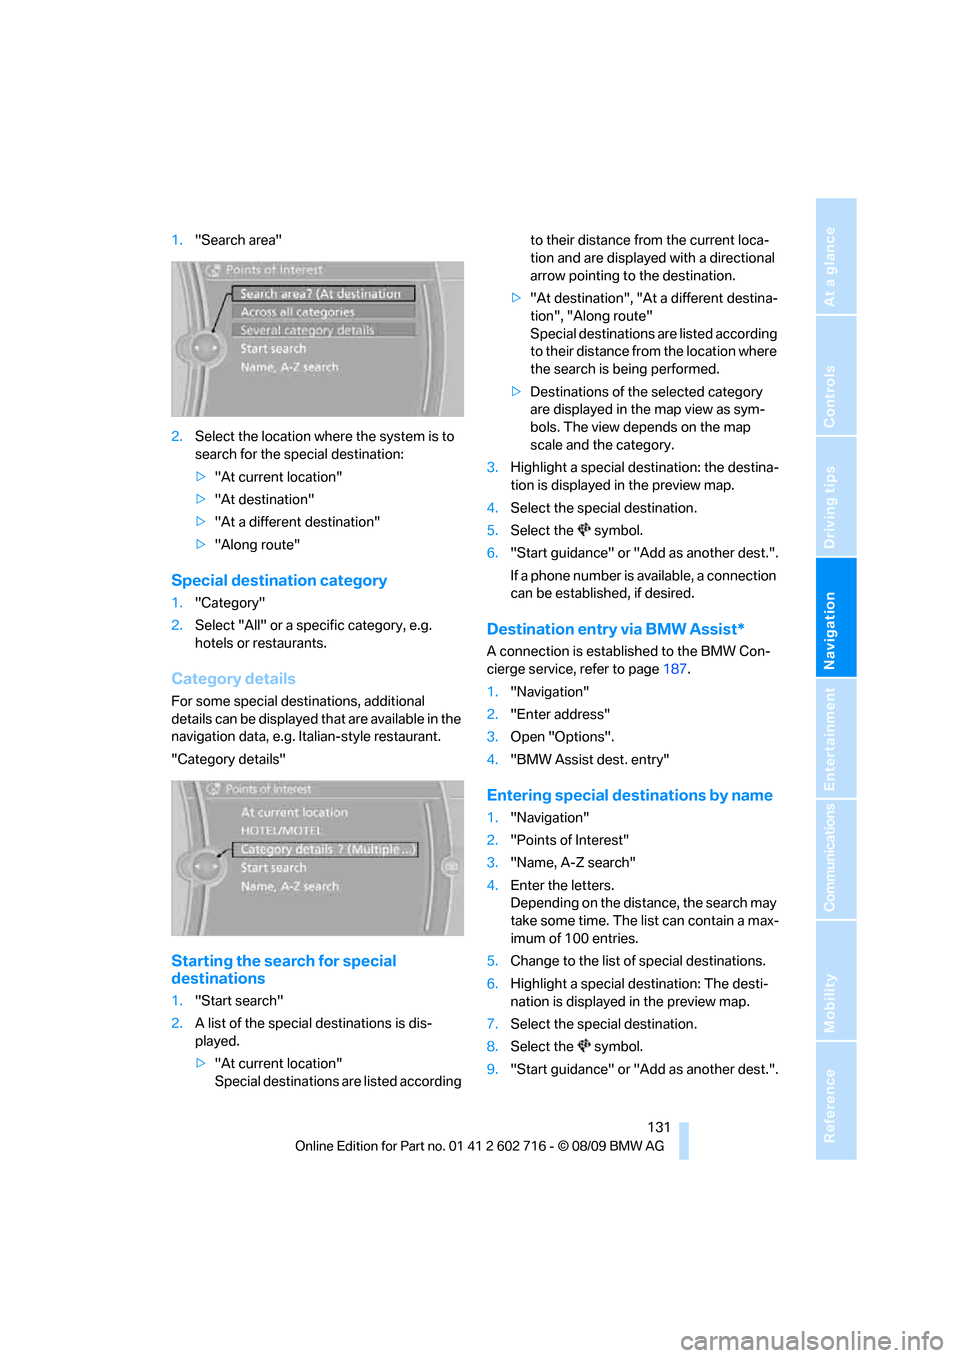
1."Search area"
2.Select the location where the system is to
search for the special destination:
>"At current location"
>"At destination"
>"At a different destination"
>"Along route"
Special destination category
1."Category"
2.Select "All" or a specific category, e.g.
hotels or restaurants.
Category details
For some special destinations, additional
details can be displayed that are available in the
navigation data, e.g. Italian-style restaurant.
"Category details"
Starting the search for special
destinations
1."Start search"
2.A list of the special destinations is dis-
played.
>"At current location"
Special destinations are listed according to their distance from the current loca-
tion and are displayed with a directional
arrow pointing to the destination.
>"At destination", "At a different destina-
tion", "Along route"
Special destinations are listed according
to their distance from the location where
the search is being performed.
>Destinations of the selected category
are displayed in the map view as sym-
bols. The view depends on the map
scale and the category.
3.Highlight a special destination: the destina-
tion is displayed in the preview map.
4.Select the special destination.
5.Select the symbol.
6."Start guidance" or "Add as another dest.".
If a phone number is available, a connection
can be established, if desired.
Destination entry via BMW Assist*
A connection is established to the BMW Con-
cierge service, refer to page187.
1."Navigation"
2."Enter address"
3.Open "Options".
4."BMW Assist dest. entry"
Entering special destinations by name
1."Navigation"
2."Points of Interest"
3."Name, A-Z search"
4.Enter the letters.
Depending on the distance, the search may
take some time. The list can contain a max-
imum of 100 entries.
5.Change to the list of special destinations.
6.Highlight a special destination: The desti-
nation is displayed in the preview map.
7.Select the special destination.
8.Select the symbol.
9."Start guidance" or "Add as another dest.".
Page 141 of 252
Navigation
Driving tips
139Reference
At a glance
Controls
Communications
Entertainment
Mobility
3.Press the controller.
Changing the map section
Select the interactive map.
>To shift the map: move the controller in the
required direction.
>To shift the map diagonally: move the con-
troller in the required direction and turn it.
Changing the scale
1.Select the symbol.
2.Turn the controller to adjust the scale.
Automatic scaling of the map
In the map view facing north, turn the controller
in any direction until AUTO is displayed as the
map scale.
The map shows the entire range from your loca-
tion to the destination.
Settings for the map view
The map is shown on the Control Display.
1.Open "Options".
2."Settings"
3.Set the optimized map view.
>"Day/night mode"
Select and create the necessary settings
depending on the light conditions. When
the traffic bulletin map is activated, this
setting is disregarded.
>"Satellite images"
Satellite images
* are displayed depend-
ing on availability and resolution.
>"Perspective view in 3D"
Displays a spatial view. Prominent areas
that are contained in the navigation data
are displayed on the map in 3D.
>"Traffic Info map"
The map is optimized for displaying traf-
fic bulletins. Symbols for the special
destinations are no longer displayed.
Map view for the split screen display
The map view for the split screen can be
selected separately from the main screen.1.Open "Options".
2."Split screen"
The split screen is switched on.
3.Move the controller to the right repeatedly
until the split screen content is selected.
4.Select the map view:
>"Arrow display"
>"Map facing north"
>"Map direction of travel"
>"Map view with perspective"
>"Exit ramp view"
Changing the scale
1.Move the controller to the right until the
split screen is selected.
2.Turn the controller.
Traffic information*
You can display the traffic bulletins from radio
stations that broadcast the TMC (Traffic Mes-
sage Channel) of a traffic information service.
This information from the traffic information
service is continuously updated on the basis of
measurement data from traffic control centers
and information on traffic congestion.
During destination guidance, traffic bulletins
that are relevant to areas along the route are
automatically displayed and taken into account
in the route planning. You can open all traffic
bulletins manually via iDrive.
The traffic bulletins are shown in the map view.
Real Time Traffic Information End-User
Provisions
Certain BMW models equipped with navigation
have the capability to display real-time traffic
information. If your system has this capability
the following additional terms and conditions
apply:
An End-User shall no longer have the right to
use the Traffic Data in the event that the End-
User is in material breach of the terms and con-
ditions contained herein.
Page 153 of 252
Navigation
Entertainment
Driving tips
151Reference
At a glance
Controls
Communications
Mobility
Displaying additional information
Some stations broadcast additional information
on the current track, such as the name of the
artist.
1.Select the desired station.
2.Open "Options".
3."Station info"
Selecting a substation
1.Select the desired station.
2.Press the controller.
3.Select the substation.
Presets
It is possible to store up to 40 stations.
Calling up a station
1."Radio"
2."Presets"
3.Select the desired station.
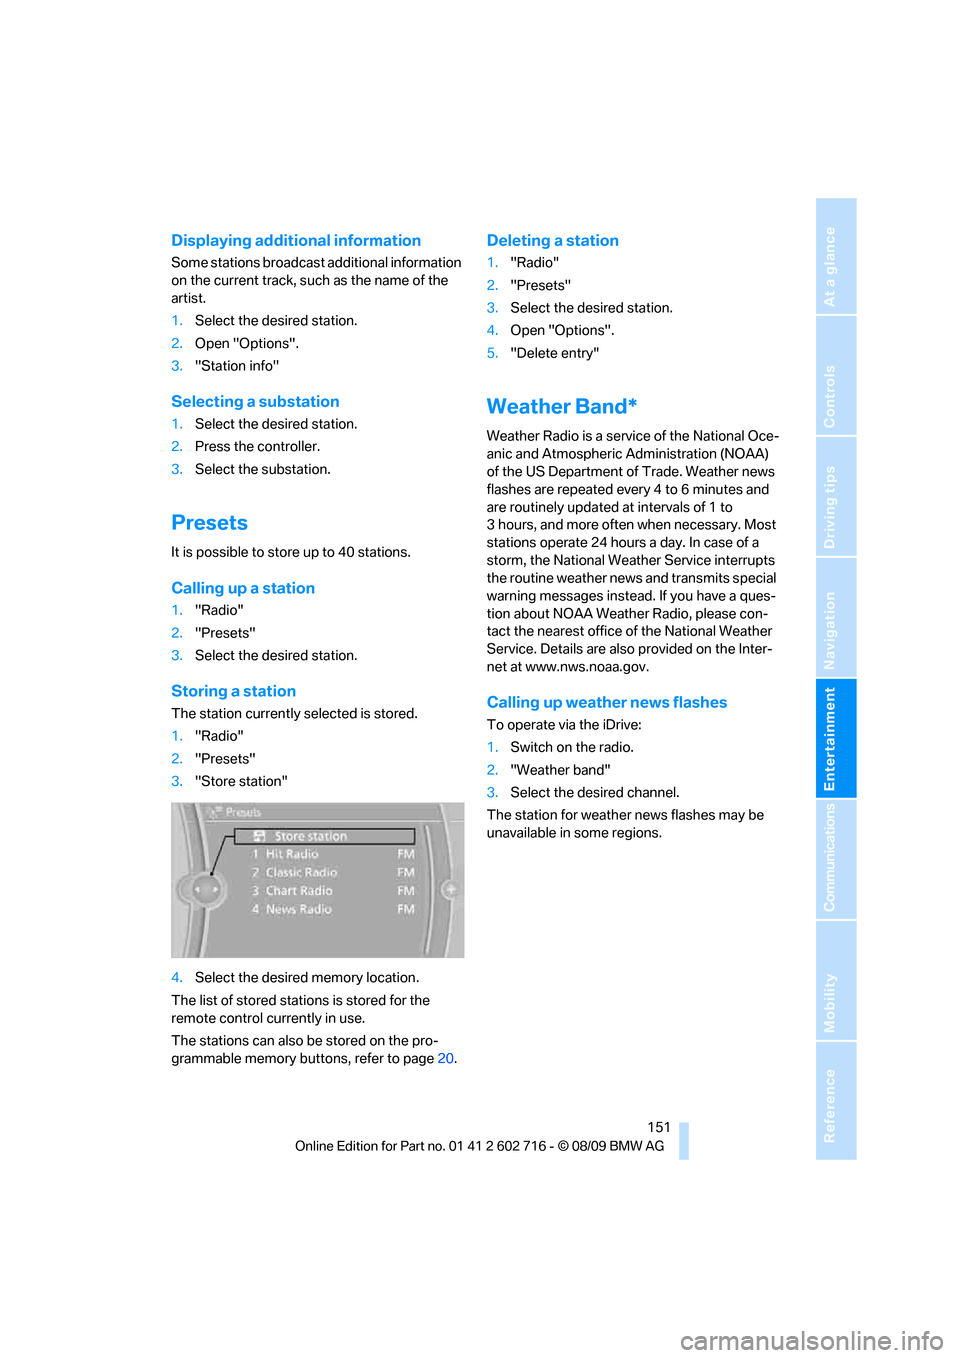
Storing a station
The station currently selected is stored.
1."Radio"
2."Presets"
3."Store station"
4.Select the desired memory location.
The list of stored stations is stored for the
remote control currently in use.
The stations can also be stored on the pro-
grammable memory buttons, refer to page20.
Deleting a station
1."Radio"
2."Presets"
3.Select the desired station.
4.Open "Options".
5."Delete entry"
Weather Band*
Weather Radio is a service of the National Oce-
anic and Atmospheric Administration (NOAA)
of the US Department of Trade. Weather news
flashes are repeated every 4 to 6 minutes and
are routinely updated at intervals of 1 to
3 hours, and more often when necessary. Most
stations operate 24 hours a day. In case of a
storm, the National Weather Service interrupts
the routine weather news and transmits special
warning messages instead. If you have a ques-
tion about NOAA Weather Radio, please con-
tact the nearest office of the National Weather
Service. Details are also provided on the Inter-
net at www.nws.noaa.gov.
Calling up weather news flashes
To operate via the iDrive:
1.Switch on the radio.
2."Weather band"
3.Select the desired channel.
The station for weather news flashes may be
unavailable in some regions.
Page 163 of 252
Navigation
Entertainment
Driving tips
161Reference
At a glance
Controls
Communications
Mobility
Music collection
Storing music
Music tracks from CDs, DVDs and USB devices
can be stored in the music collection in the vehi-
cle and played from there.
>Audio CD: tracks are converted into a com-
pressed audio format when they are stored.
If available, information on the album, such
as the artist, is stored as well.
>CD/DVD or USB device with compressed
audio files: the entire content of the CD/
DVD or the USB device is stored in the vehi-
cle as an album. After storing, the tracks and
directories can be deleted individually. Files
are only stored in the WMA, MP3, and AAC
formats.
Tracks with DRM copy protection can be
stored in the vehicle but cannot be played
back.
Regularly back up the music data; other-
wise, it could be lost if there is a fault on
the hard disc.<
Music recognition technology and
related data are provided by
Gracenote®. Gracenote® is the industry stan-
dard in music recognition technology and
related content delivery. For more information,
please visit www.gracenote.com.
CD and music-related data from Gracenote,
Inc., copyright © 2000-2009 Gracenote.
Gracenote Software copyright 2000-2009
Gracenote. This product and service may prac-
tice one or more of the following U.S. Patents:
#5,987,525; #6,061,680; #6,154,773,
#6,161,132, #6,230,192, #6,230,207,
#6,240,459, #6,330,593, and other patents
issued or pending. Some services supplied
under license from Open Globe, Inc., for U.S.
Patent: #6,304,523.
Gracenote and CDDB are registered trade
marks of Gracenote. The Gracenote logo, the
logo typeface and the "powered by Gracenote"
logo are trade marks of Gracenote.
Storing from CDs/DVDs
Data can only be stored from CDs/DVDs on the
CD/DVD player.
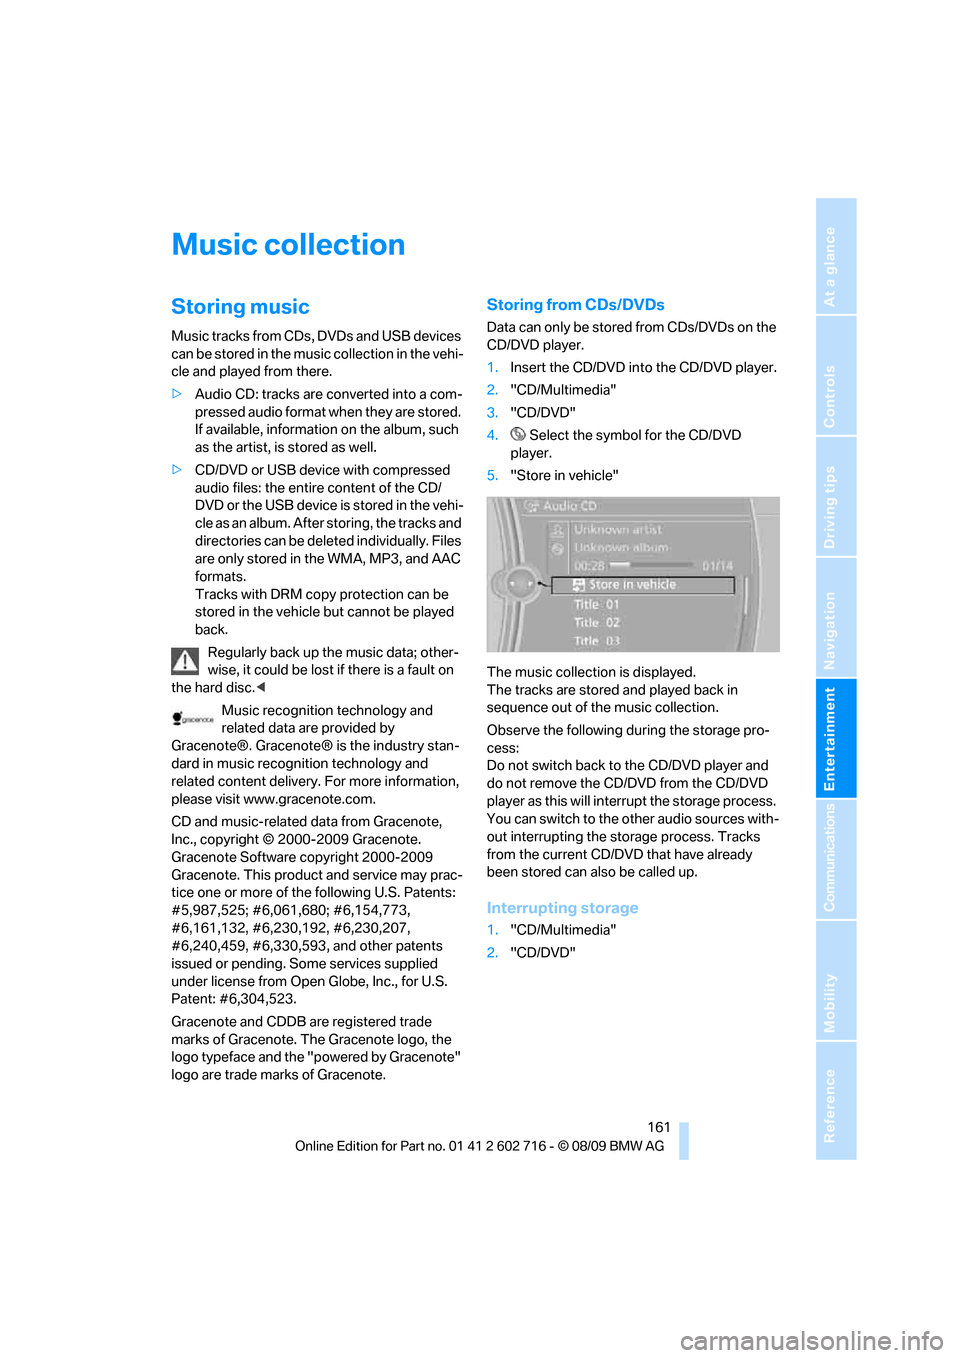
1.Insert the CD/DVD into the CD/DVD player.
2."CD/Multimedia"
3."CD/DVD"
4. Select the symbol for the CD/DVD
player.
5."Store in vehicle"
The music collection is displayed.
The tracks are stored and played back in
sequence out of the music collection.
Observe the following during the storage pro-
cess:
Do not switch back to the CD/DVD player and
do not remove the CD/DVD from the CD/DVD
player as this will interrupt the storage process.
You can switch to the other audio sources with-
out interrupting the storage process. Tracks
from the current CD/DVD that have already
been stored can also be called up.
Interrupting storage
1."CD/Multimedia"
2."CD/DVD"