2010 BMW 550I SEDAN tow
[x] Cancel search: towPage 229 of 271
Mobility
227Reference
At a glance
Controls
Driving tips
Communications
Navigation
Entertainment
What you will need
To avoid rattling noises later on, note the posi-
tions of the tools before removing them, then
return them to their initial positions after com-
pleting work.
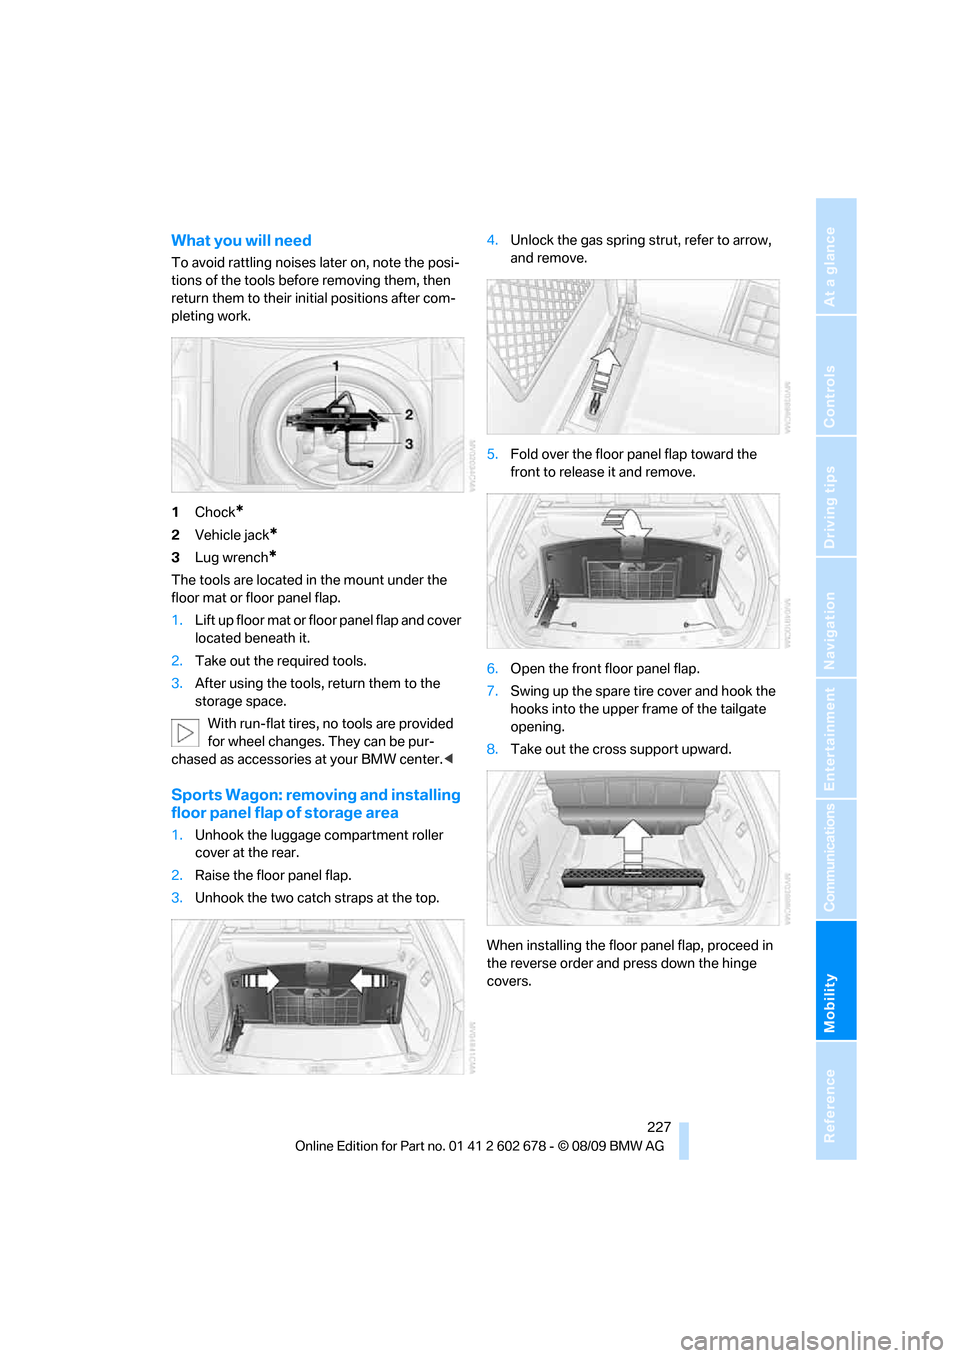
1Chock
*
2Vehicle jack*
3Lug wrench*
The tools are located in the mount under the
floor mat or floor panel flap.
1.Lift up floor mat or floor panel flap and cover
located beneath it.
2.Take out the required tools.
3.After using the tools, return them to the
storage space.
With run-flat tires, no tools are provided
for wheel changes. They can be pur-
chased as accessories at your BMW center.<
Sports Wagon: removing and installing
floor panel flap of storage area
1.Unhook the luggage compartment roller
cover at the rear.
2.Raise the floor panel flap.
3.Unhook the two catch straps at the top.4.Unlock the gas spring strut, refer to arrow,
and remove.
5.Fold over the floor panel flap toward the
front to release it and remove.
6.Open the front floor panel flap.
7.Swing up the spare tire cover and hook the
hooks into the upper frame of the tailgate
opening.
8.Take out the cross support upward.
When installing the floor panel flap, proceed in
the reverse order and press down the hinge
covers.
Page 230 of 271

Replacing components
228
Compact wheel*
1.Unscrew the wing nut 1.
2.Remove the washer 2 laterally.
3.Take out the tool mounts 3.
4.Remove the compact wheel.
Preparing wheel change
1.Observe the safety precautions above.
2.Prevent the vehicle from rolling:
Place the chock behind the front wheel on
the other side of the vehicle, or on inclines,
in front of this wheel. On steeply inclined
roads, always secure the vehicle against
rolling.
3.Loosen the lug bolts a half turn.
Jacking up vehicle
1.Position the vehicle jack at the jacking point
closest to the wheel so that the entire sur-
face of the jack base rests on the ground
perpendicularly beneath the jacking point.
The vehicle jack is designed for
changing wheels only. Do not attempt
to raise another vehicle model with it or to
raise any load of any kind. To do so could
cause accidents and personal injury.<2.Guide the jack head into the rectangular
recess of the jacking point when cranking
up, refer to illustration detail.
3.Jack the vehicle up until the wheel you are
changing is raised from the ground.
Mounting a wheel
1.Unscrew the lug bolts and remove the
wheel.
2.Remove accumulations of mud or dirt from
the mounting surfaces of the wheel and
hub. Also clean the lug bolts.
3.Position the new wheel or compact wheel.
Secure the wheel by screwing at least two
lug bolts into opposite bolt holes.
When you mount wheels other than Genu-
ine BMW light-alloy wheels, different lug
bolts may also be required.
4.Screw in the remaining lug bolts. Tighten all
the bolts securely in a diagonal pattern.
5.Lower the vehicle and remove the jack from
beneath the vehicle.
After mounting
1.Tighten the lug bolts in a diagonal pattern.
To ensure safety, always have the
lug bolts checked with a calibrated
torque wrench as soon as possible to
ensure that they are tightened to the speci-
fied torque. Otherwise, incorrectly tight-
ened lug bolts are a hidden safety risk. The
tightening torque is 88.5 lb ft/120 Nm.<
2.When stowing the wheel and tools in the
vehicle, execute these steps in the reverse
order.
Page 234 of 271
Giving and receiving assistance
232
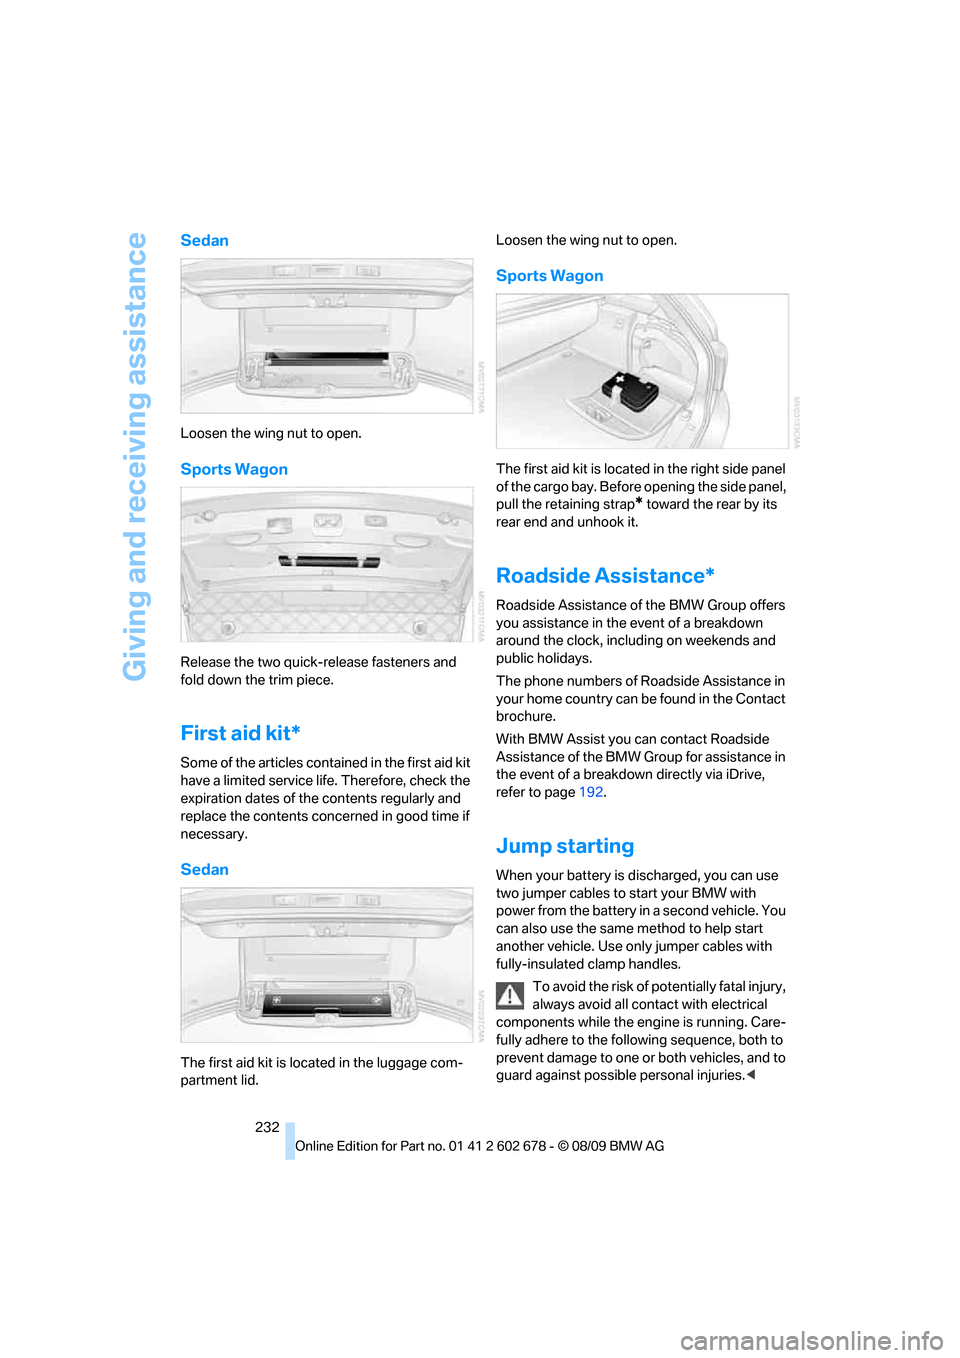
Sedan
Loosen the wing nut to open.
Sports Wagon
Release the two quick-release fasteners and
fold down the trim piece.
First aid kit*
Some of the articles contained in the first aid kit
have a limited service life. Therefore, check the
expiration dates of the contents regularly and
replace the contents concerned in good time if
necessary.
Sedan
The first aid kit is located in the luggage com-
partment lid.Loosen the wing nut to open.
Sports Wagon
The first aid kit is located in the right side panel
of the cargo bay. Before opening the side panel,
pull the retaining strap
* toward the rear by its
rear end and unhook it.
Roadside Assistance*
Roadside Assistance of the BMW Group offers
you assistance in the event of a breakdown
around the clock, including on weekends and
public holidays.
The phone numbers of Roadside Assistance in
your home country can be found in the Contact
brochure.
With BMW Assist you can contact Roadside
Assistance of the BMW Group for assistance in
the event of a breakdown directly via iDrive,
refer to page192.
Jump starting
When your battery is discharged, you can use
two jumper cables to start your BMW with
power from the battery in a second vehicle. You
can also use the same method to help start
another vehicle. Use only jumper cables with
fully-insulated clamp handles.
To avoid the risk of potentially fatal injury,
always avoid all contact with electrical
components while the engine is running. Care-
fully adhere to the following sequence, both to
prevent damage to one or both vehicles, and to
guard against possible personal injuries.<
Page 235 of 271
Mobility
233Reference
At a glance
Controls
Driving tips
Communications
Navigation
Entertainment
Preparation
1.Check whether the battery of the other
vehicle has a voltage of 12 Volts and
approximately the same capacitance in Ah.
This information can be found on the bat-
tery.
2.Switch off the engine of the assisting vehi-
cle.
3.Switch off any electrical systems and com-
ponents in both vehicles.
There must not be any contact between
the bodies of the two vehicles, otherwise
there is a danger of shorting.<
Connecting jumper cables
To avoid personal injury from sparks, fol-
low this sequence when connecting
jumper cables.<
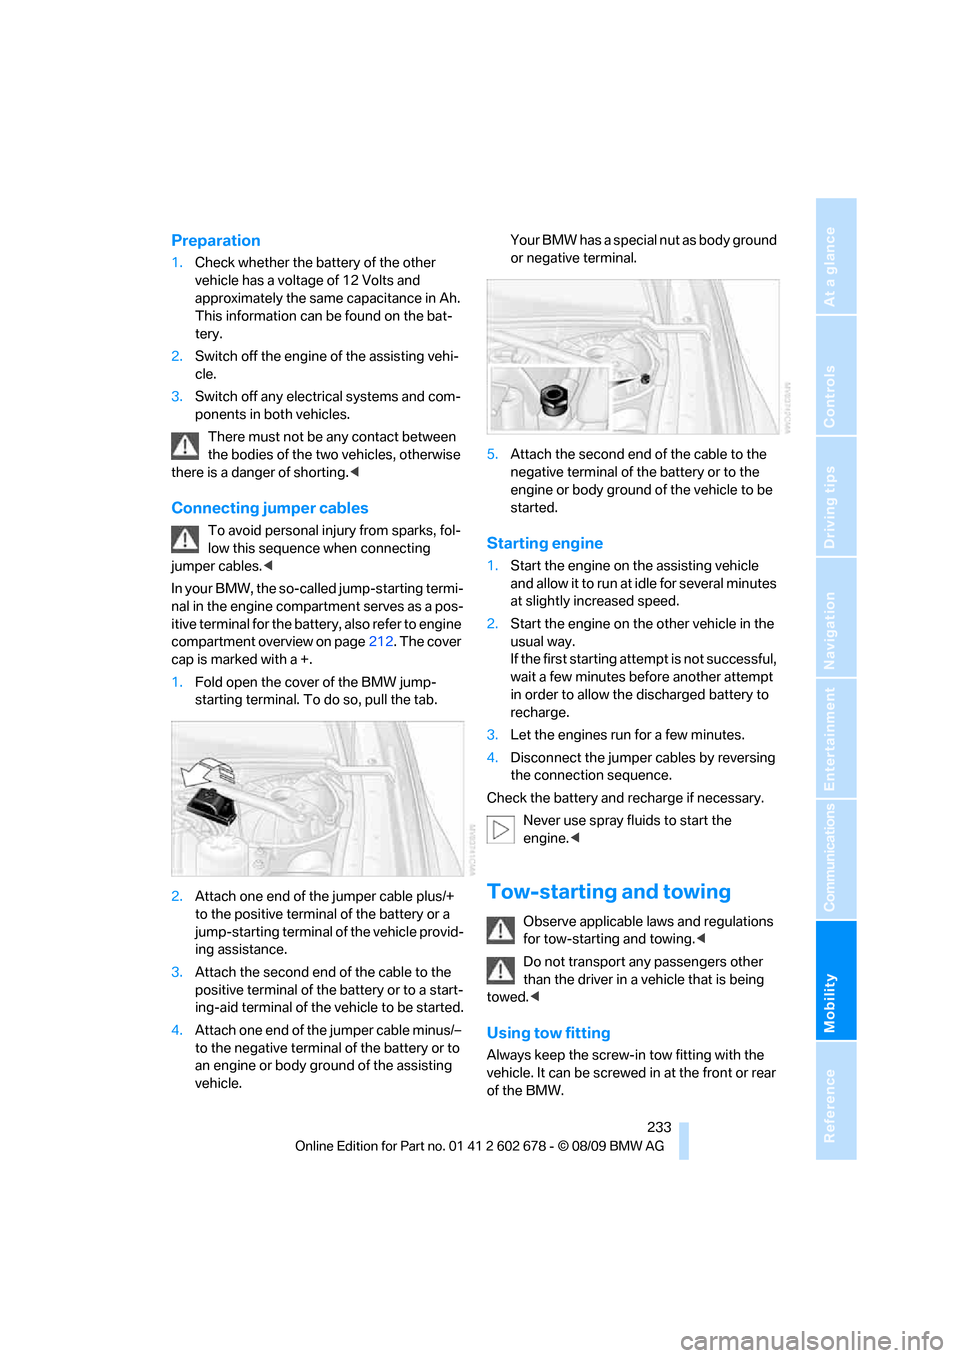
In your BMW, the so-called jump-starting termi-
nal in the engine compartment serves as a pos-
itive terminal for the battery, also refer to engine
compartment overview on page212. The cover
cap is marked with a +.
1.Fold open the cover of the BMW jump-
starting terminal. To do so, pull the tab.
2.Attach one end of the jumper cable plus/+
to the positive terminal of the battery or a
jump-starting terminal of the vehicle provid-
ing assistance.
3.Attach the second end of the cable to the
positive terminal of the battery or to a start-
ing-aid terminal of the vehicle to be started.
4.Attach one end of the jumper cable minus/–
to the negative terminal of the battery or to
an engine or body ground of the assisting
vehicle.Your BMW has a special nut as body ground
or negative terminal.
5.Attach the second end of the cable to the
negative terminal of the battery or to the
engine or body ground of the vehicle to be
started.Starting engine
1.Start the engine on the assisting vehicle
and allow it to run at idle for several minutes
at slightly increased speed.
2.Start the engine on the other vehicle in the
usual way.
If the first starting attempt is not successful,
wait a few minutes before another attempt
in order to allow the discharged battery to
recharge.
3.Let the engines run for a few minutes.
4.Disconnect the jumper cables by reversing
the connection sequence.
Check the battery and recharge if necessary.
Never use spray fluids to start the
engine.<
Tow-starting and towing
Observe applicable laws and regulations
for tow-starting and towing.<
Do not transport any passengers other
than the driver in a vehicle that is being
towed.<
Using tow fitting
Always keep the screw-in tow fitting with the
vehicle. It can be screwed in at the front or rear
of the BMW.
Page 236 of 271
Giving and receiving assistance
234 Sedan:
It is located in the toolkit in the luggage com-
partment lid, refer to page221.
Sports Wagon:
It is located in the toolkit behind the left side
panel in the cargo bay, refer to page221.
Use only the tow fitting provided with the
vehicle and screw it all the way in. Use the
tow fitting for towing only on roads. Avoid lateral
loading of the tow fitting, e.g. do not lift the vehi-
cle by the tow fitting. Otherwise damage to the
tow fitting and the vehicle can occur.<
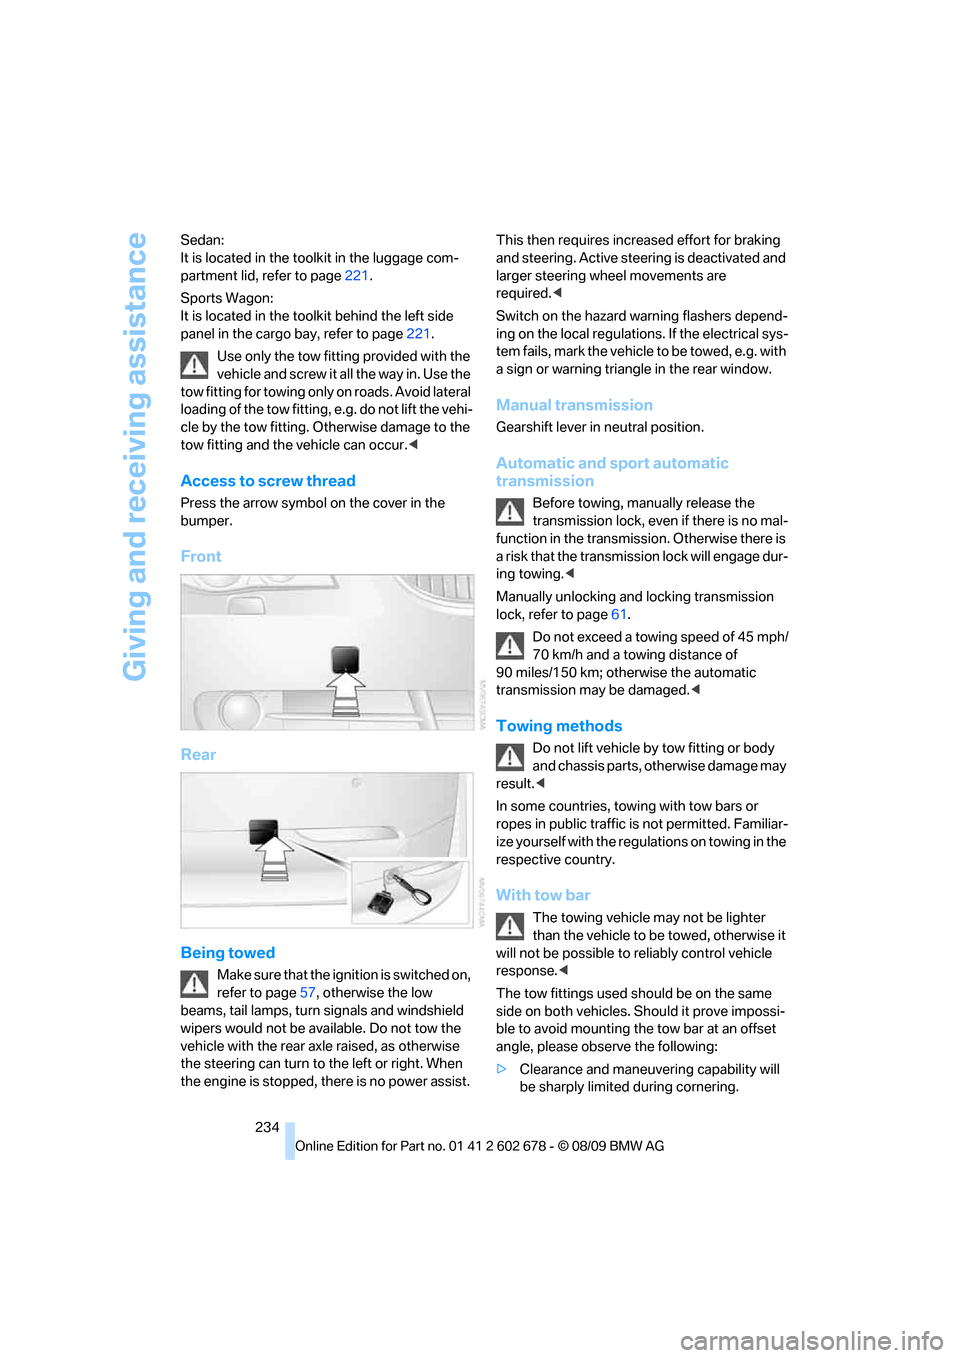
Access to screw thread
Press the arrow symbol on the cover in the
bumper.
Front
Rear
Being towed
Make sure that the ignition is switched on,
refer to page57, otherwise the low
beams, tail lamps, turn signals and windshield
wipers would not be available. Do not tow the
vehicle with the rear axle raised, as otherwise
the steering can turn to the left or right. When
the engine is stopped, there is no power assist. This then requires increased effort for braking
and steering. Active steering is deactivated and
larger steering wheel movements are
required.<
Switch on the hazard warning flashers depend-
ing on the local regulations. If the electrical sys-
tem fails, mark the vehicle to be towed, e.g. with
a sign or warning triangle in the rear window.
Manual transmission
Gearshift lever in neutral position.
Automatic and sport automatic
transmission
Before towing, manually release the
transmission lock, even if there is no mal-
function in the transmission. Otherwise there is
a risk that the transmission lock will engage dur-
ing towing.<
Manually unlocking and locking transmission
lock, refer to page61.
Do not exceed a towing speed of 45 mph/
70 km/h and a towing distance of
90 miles/150 km; otherwise the automatic
transmission may be damaged.<
Towing methods
Do not lift vehicle by tow fitting or body
and chassis parts, otherwise damage may
result.<
In some countries, towing with tow bars or
ropes in public traffic is not permitted. Familiar-
ize yourself with the regulations on towing in the
respective country.
With tow bar
The towing vehicle may not be lighter
than the vehicle to be towed, otherwise it
will not be possible to reliably control vehicle
response.<
The tow fittings used should be on the same
side on both vehicles. Should it prove impossi-
ble to avoid mounting the tow bar at an offset
angle, please observe the following:
>Clearance and maneuvering capability will
be sharply limited during cornering.
Page 237 of 271
Mobility
235Reference
At a glance
Controls
Driving tips
Communications
Navigation
Entertainment
>When mounted at an angle, the tow bar will
exert lateral forces, tending to push the
vehicle sideways.
Only attach the tow bar to the tow fittings,
as attachment to other vehicle parts can
lead to damage.<
With tow rope
When starting off in the towing vehicle, make
sure that the tow rope is taut.
To avoid jerking and the associated
stresses on vehicle components when
towing, always use nylon ropes or nylon straps.
Only attach tow ropes to the tow fittings, as
attachment to other vehicle parts can lead to
damage.<
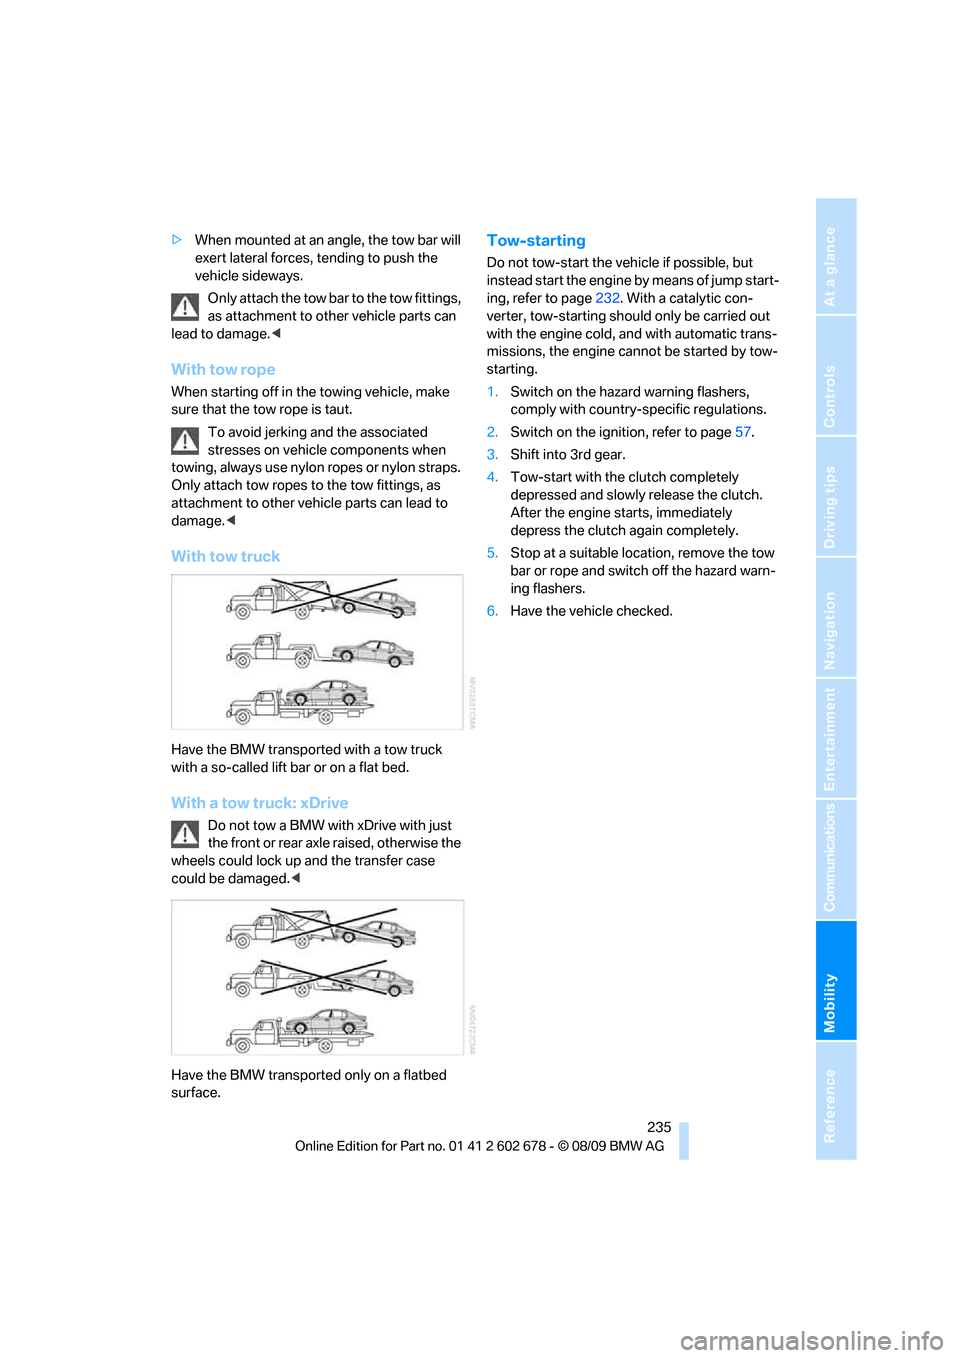
With tow truck
Have the BMW transported with a tow truck
with a so-called lift bar or on a flat bed.
With a tow truck: xDrive
Do not tow a BMW with xDrive with just
the front or rear axle raised, otherwise the
wheels could lock up and the transfer case
could be damaged.<
Have the BMW transported only on a flatbed
surface.
Tow-starting
Do not tow-start the vehicle if possible, but
instead start the engine by means of jump start-
ing, refer to page232. With a catalytic con-
verter, tow-starting should only be carried out
with the engine cold, and with automatic trans-
missions, the engine cannot be started by tow-
starting.
1.Switch on the hazard warning flashers,
comply with country-specific regulations.
2.Switch on the ignition, refer to page57.
3.Shift into 3rd gear.
4.Tow-start with the clutch completely
depressed and slowly release the clutch.
After the engine starts, immediately
depress the clutch again completely.
5.Stop at a suitable location, remove the tow
bar or rope and switch off the hazard warn-
ing flashers.
6.Have the vehicle checked.
Page 253 of 271
Reference 251
At a glance
Controls
Driving tips
Communications
Navigation
Entertainment
Mobility
Automatic
– air distribution106
– air volume106
– cruise control66
– garage door opener110
– headlamp control100
– recirculated-air control
AUC107
– steering wheel
adjustment45
– tailgate operation34
Automatic climate control105
– automatic air
distribution106
– parked car ventilation109
– settings via iDrive108
– switching on and off108
– ventilation in rear108
Automatic closing of doors,
refer to Automatic soft
closing31
Automatic curb monitor51
Automatic lighting
– refer to Automatic headlamp
control100
– refer to Daytime running
lamps101
– refer to Interior lamps104
– refer to Pathway lighting101
– refer to Welcome lamps100
Automatic lights
– refer to High-beam
Assistant102
Automatic low beams, refer to
High-beam Assistant102
Automatic luggage
compartment roller cover,
Sports Wagon117
Automatic Service
Request196
Automatic soft closing31
Automatic speed reduction for
descents, refer to HDC Hill
Descent Control86Automatic transmission with
Steptronic59
– interlock60
– kick down60
– manually unlocking and
locking transmission lock61
– shiftlock60
– towing234
– tow-starting235
– with Comfort Access37
AUTO program for automatic
climate control106
AUX-IN port172
Available services196
Average fuel consumption75
– setting units76
Average speed, refer to
Computer75
Avoiding freeways for
navigation142
Avoiding unintentional
alarms36
Axle loads, refer to
Weights241
B
Backrest contour, refer to
Lumbar support45
Backrests, refer to Seats44
Backrest width adjustment44
Back seats, refer to Rear seats
Backup lamps, replacing
bulbs224
Band-aids, refer to First aid
kit232
Bass, refer to Tone
control152
Battery, refer to Vehicle
battery229
– jump starting232
Battery replacement
– remote control for Comfort
Access38
BC button, refer to
Computer75
Being towed234
Belts, refer to Safety belts48Beverage holder, refer to
Cupholders114
Blower, refer to Air
volume107
Bluetooth, activating/
deactivating180
BMW
– Car Shampoo219
BMW Assist,
activating194,196
BMW Assist192
BMW homepage4
BMW maintenance
system215
BMW Night Vision96
– activating98
– cleaning camera98
– cleaning camera, refer to
Wiper system64
– deactivating98
– making settings98
BMW Search194
BMW website4
Bottle holder, refer to
Cupholders114
Bracket for telephone or
mobile phone
– refer to Snap-in adapter188
Brake assistant85
– adaptive85
Brake force display93
Brake lamps
– replacing bulbs224
– two-stage93
Brake rotors
– breaking-in124
– refer to Braking safely126
Page 257 of 271
Reference 255
At a glance
Controls
Driving tips
Communications
Navigation
Entertainment
Mobility
Driving through water126
Driving tips, refer to General
driving notes124
Dry air, refer to Cooling
function107
Drying the air, refer to Cooling
function107
DSC Dynamic Stability
Control85
– indicator lamp13,86
– malfunction87
DTC Dynamic Traction
Control86
– activating86
– indicator lamp13,86
DVD
– country codes162
– settings163
– video playback162
DVD menu163
DVD player, refer to CD
player160
DVD video162
Dynamic Brake Control DBC
– warning lamp87
Dynamic destination
guidance143
Dynamic Drive88
Dynamic Driving Control62
Dynamic Stability Control
DSC85
Dynamic Traction Control
DTC86
E
Easy entry/exit52
– backrest width45
Eject button, refer to Buttons
in area of CD/DVD
player152
Electrical malfunction
– door lock30
– driver's door30
– fuel filler flap200
– glass sunroof, electric40
– luggage compartment lid32
– panorama glass sunroof41
– tailgate33Electrical steering wheel
adjustment52
Electronic brake-force
distribution85
Electronic oil level check212
Emergency operation, refer to
Manual operation
– door lock30
– driver's door30
– fuel filler flap200
– luggage compartment lid32
– tailgate33
– transmission lock, automatic
transmission61
Emergency operation, refer to
Moving manually
– glass sunroof40
– panorama glass sunroof41
Emergency release for
luggage compartment lid in
cargo bay32
Emergency request231
Emergency services, refer to
Roadside Assistance232
Energy-conscious driving,
refer to Energy Control75
Energy Control75
Engine
– breaking-in124
– data238
– overheated, refer to Coolant
temperature74
– speed238
– starting58
– starting, with Comfort
Access36
– switching off58
Engine compartment212
Engine coolant214Engine oil
– adding213
– additives, refer to Approved
engine oils213
– approved engine oil213
– checking oil level212
– electronic oil level check212
– interval between changes,
refer to Service
requirements
77
– oil change213
– oil grades, refer to Approved
engine oils213
Engine output, refer to Engine
data238
Engine speed, refer to Engine
data238
Engine starting, refer to
Starting engine58
Entering destination via town/
city name133
Entering intersection,
navigation134
Entering special destinations
by name137
Entering the
address133,139
Entering zip code for
navigation134
Entertainment sound output
on/off152
Entry map for destination138
Environmentally friendly
driving
– refer to Energy control75
Equalizer, refer to Tone
control153
ESP Electronic Stability
Program, refer to DSC
Dynamic Stability
Control85
Event Data Recorders216
Exhaust system, refer to Hot
exhaust system125