2010 BMW 550I SEDAN window
[x] Cancel search: windowPage 57 of 271
Controls
55Reference
At a glance
Driving tips
Communications
Navigation
Entertainment
Mobility
Child restraint system with tether strap
Only use the tether-strap mounting
points to secure child restraint systems,
otherwise the mounting points could be dam-
aged.<
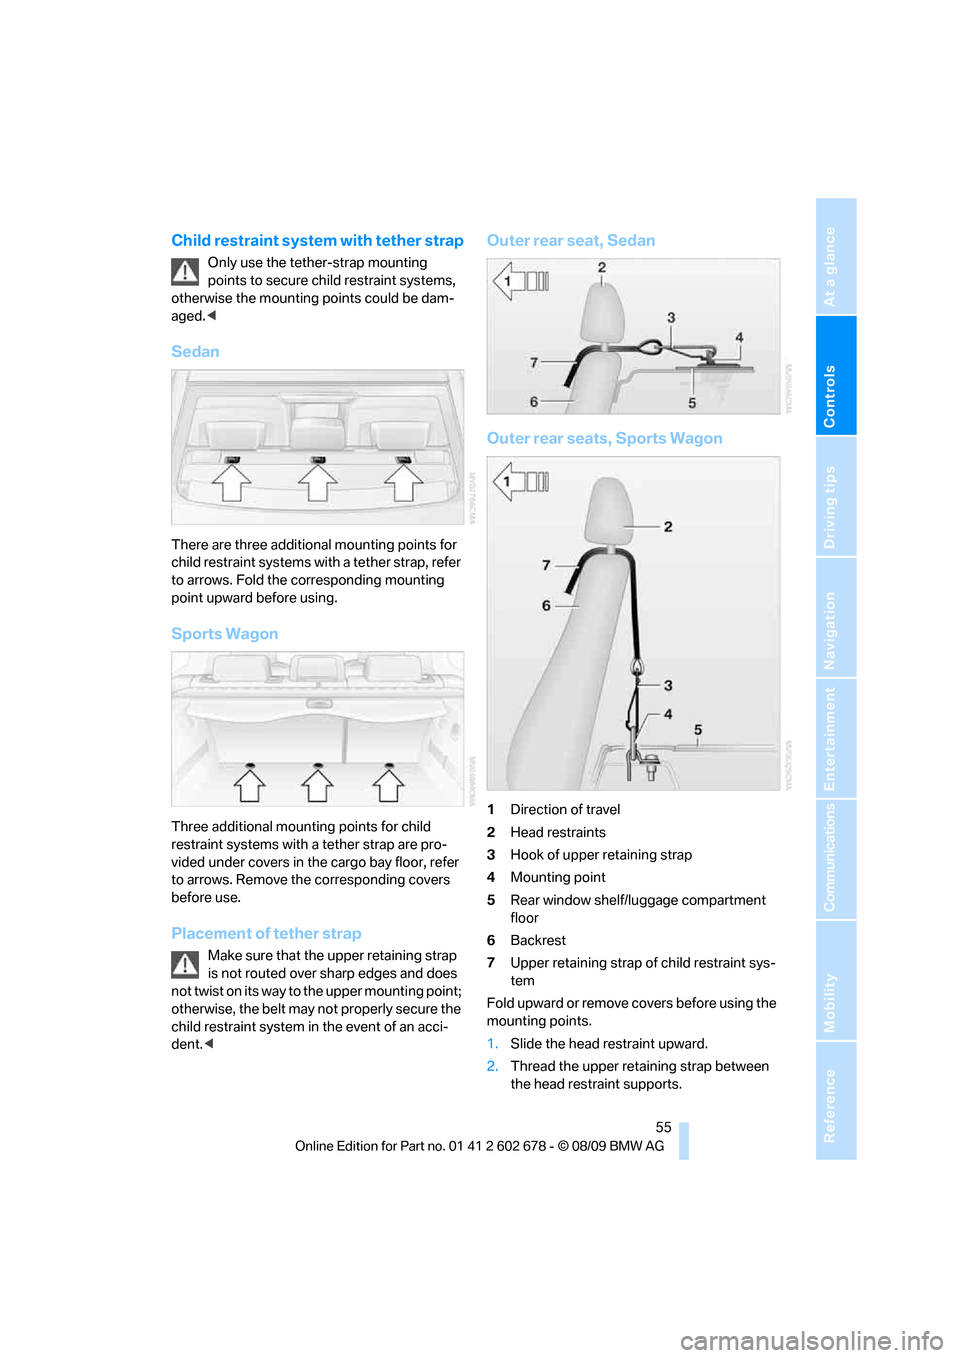
Sedan
There are three additional mounting points for
child restraint systems with a tether strap, refer
to arrows. Fold the corresponding mounting
point upward before using.
Sports Wagon
Three additional mounting points for child
restraint systems with a tether strap are pro-
vided under covers in the cargo bay floor, refer
to arrows. Remove the corresponding covers
before use.
Placement of tether strap
Make sure that the upper retaining strap
is not routed over sharp edges and does
not twist on its way to the upper mounting point;
otherwise, the belt may not properly secure the
child restraint system in the event of an acci-
dent.<
Outer rear seat, Sedan
Outer rear seats, Sports Wagon
1Direction of travel
2Head restraints
3Hook of upper retaining strap
4Mounting point
5Rear window shelf/luggage compartment
floor
6Backrest
7Upper retaining strap of child restraint sys-
tem
Fold upward or remove covers before using the
mounting points.
1.Slide the head restraint upward.
2.Thread the upper retaining strap between
the head restraint supports.
Page 58 of 271
Transporting children safely
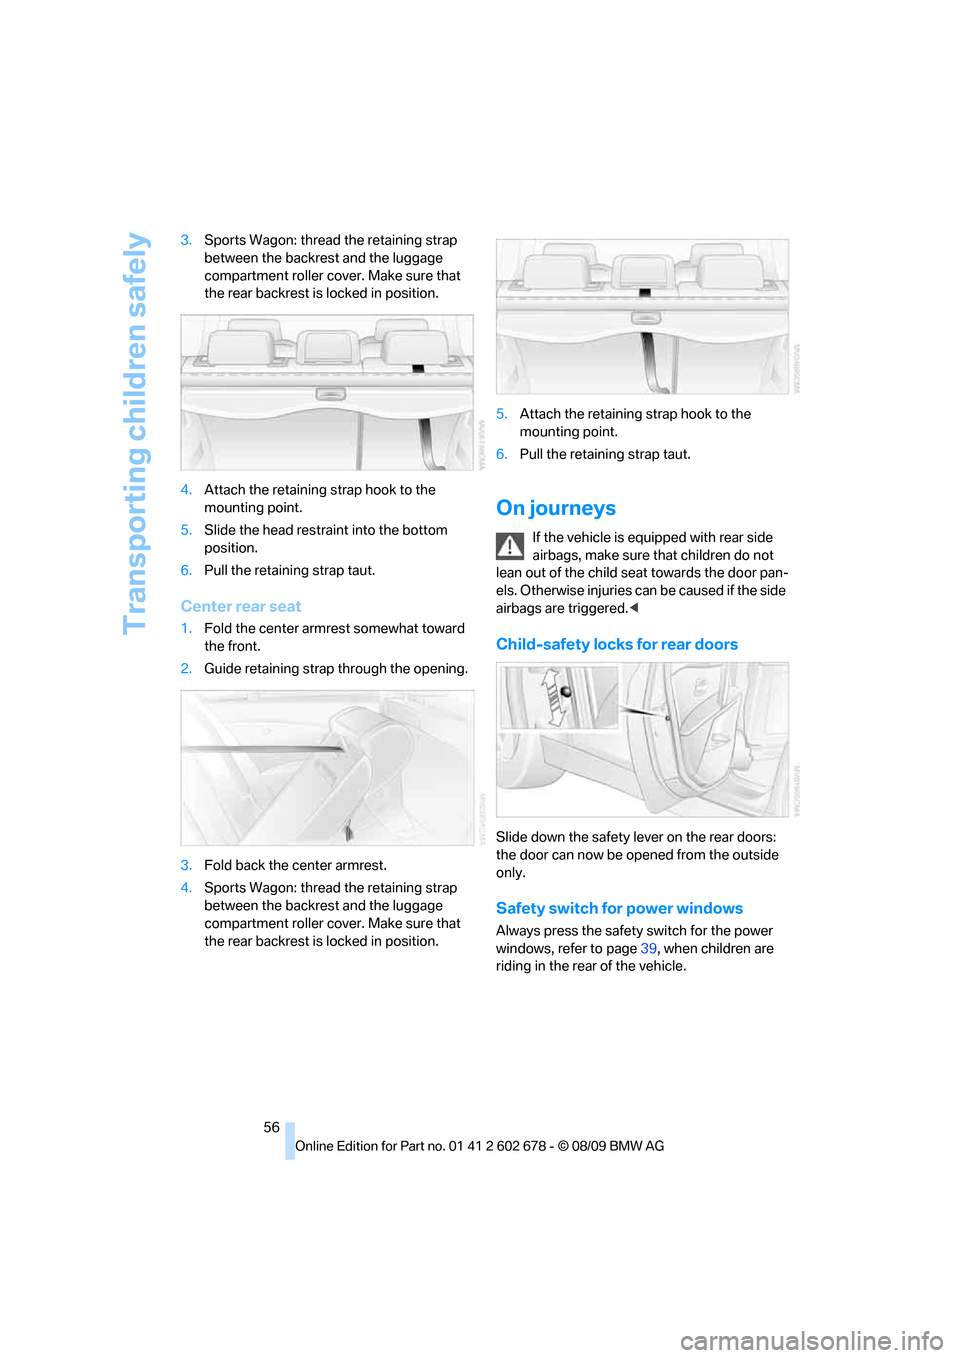
56 3.Sports Wagon: thread the retaining strap
between the backrest and the luggage
compartment roller cover. Make sure that
the rear backrest is locked in position.
4.Attach the retaining strap hook to the
mounting point.
5.Slide the head restraint into the bottom
position.
6.Pull the retaining strap taut.
Center rear seat
1.Fold the center armrest somewhat toward
the front.
2.Guide retaining strap through the opening.
3.Fold back the center armrest.
4.Sports Wagon: thread the retaining strap
between the backrest and the luggage
compartment roller cover. Make sure that
the rear backrest is locked in position.5.Attach the retaining strap hook to the
mounting point.
6.Pull the retaining strap taut.
On journeys
If the vehicle is equipped with rear side
airbags, make sure that children do not
lean out of the child seat towards the door pan-
els. Otherwise injuries can be caused if the side
airbags are triggered.<
Child-safety locks for rear doors
Slide down the safety lever on the rear doors:
the door can now be opened from the outside
only.
Safety switch for power windows
Always press the safety switch for the power
windows, refer to page39, when children are
riding in the rear of the vehicle.
Page 66 of 271

Driving
64 4Cleaning windshield, headlamps and
BMW Night Vision camera
*
5Adjusting rain sensor sensitivity level
Switching on wipers
Pull the lever upward, arrow1.
The lever automatically returns to its initial posi-
tion when released.
Normal wiper speed
Press once.
The system reverts to operation in the intermit-
tent mode when the vehicle is stationary.
Fast wiper speed
Press twice or press beyond the resistance
point.
The system reverts to normal speed when the
vehicle is stationary.
Rain sensor
The wiper operation is controlled automatically
as a function of the rain intensity. The rain sen-
sor is located on the windshield, directly in front
of the interior rearview mirror.
Activating rain sensor
Press the button, arrow3. The LED in the but-
ton lights up.
Adjusting rain sensor sensitivity level
Turn the thumbwheel5.
Deactivating rain sensor
Press the button again, arrow3. The LED goes
out.Deactivate the rain sensor when passing
through an automatic car wash. Failure to
do so could result in damage caused by undes-
ired wiper operation.<
Cleaning windshield, headlamps* and
BMW Night Vision camera*
Pull the lever, arrow4.
The system sprays washer fluid against the
windshield and activates the wipers for a brief
period.
With the vehicle lighting switched on, the head-
lamps and the BMW Night Vision camera are
also cleaned simultaneously at suitable inter-
vals.
Do not use the washing mechanisms if
there is any danger that the fluid will
freeze on the windshield. If you do so, your
vision could be obscured. To avoid freezing,
use a washer fluid antifreeze, refer to Washer
fluid. Do not use washing mechanisms when
the washer fluid reservoir is empty, otherwise
you will damage the washer pump.<
Windshield washer nozzles
The windshield washer nozzles are heated
when the engine is running or the ignition is
switched on.
Sports Wagon:
Rear window wiper
1Intermittent mode. When reverse gear is
engaged, continuous operation is switched
on automatically
2Cleaning the rear window
Page 99 of 271

Controls
97Reference
At a glance
Driving tips
Communications
Navigation
Entertainment
Mobility
presence of persons or animals in the road
ahead or off to the sides and can be more alert,
slow down or stop, blow the horn, etc. The
driver can decide which actions are appropriate
and then react accordingly.
A certain area in front of the vehicle is viewed by
an infrared camera and a generated image is
shown on the Control Display. The resulting
thermal image shows the relative heat radiation
of the objects present in the camera's field of
view. Warmer objects appear brighter and
cooler objects appear darker. Contrast is
dependent on the temperature difference
between the objects and the background and
on the amount of heat radiation of the object
itself. As a result, it is quite possible that a per-
son is not continually recognizable as a person
in shape, since the thermal radiation can be
affected by different clothing which blocks heat
loss. Objects with little temperature difference
to the surrounding area, or little heat radiation
are less noticeable, for example in cold weather.
Any improvement in detection depends on
many factors such as the object size and tem-
perature compared to the surroundings, or
other nearby objects, the visual recognition
skills of the driver, weather conditions, and
other factors.
Driving hints
With the system active, periodically but briefly,
glance at the thermal image on the Control Dis-
play to notice objects that could be people or
larger animals. The glance should be similar to
glancing at the rear view mirror. Do not stare at
the image for long periods while driving, as this
will remove attention from the road. If you notice
an object of interest ahead, be prepared to slow
down or stop, blow the horn, or take other
appropriate action.
System limits
The system is designed to supplement but not
replace forward vision through the windshield.
The driver is responsible for safe driving at
night. BMW Night Vision is not designed to be
used as a continuous viewing window for driv-
ing at night.No system, no matter how sophisticated, can
operate without limitations. BMW Night Vision
operation is subject to physical and environ-
mental limitations that will reduce the ability of
the system to detect and display a clear thermal
image. Some of the situations in which these
limitations can occur are:
>on steep hilltops or depressions and in tight
curves
>in tunnels, as the contrast is inherently low
>when the camera lens is dirty
>in dense fog, heavy rain or snowfall
>when displaying very hot objects such as
transformers, car exhausts, etc.
>when the image briefly freezes during nor-
mal system adjustment.
BMW Night Vision's potential benefits
can be limited by the driving style of the
driver, the size and relative temperature of the
detected objects, dirt or contamination on the
camera lens, adverse weather like snow, rain or
fog, and other factors not mentioned here. It will
always be the driver's responsibility to drive at a
speed and in a manner that recognizes potential
hazards and adjust accordingly.
BMW Night Vision is not a substitute or replace-
ment for the driver's responsibility to adapt to
visibility and traffic conditions. The forward view
illuminated by the headlamps must always be
the basis for making safe driving decisions, oth-
erwise a safety risk will result.<
Page 107 of 271
Controls
105Reference
At a glance
Driving tips
Communications
Navigation
Entertainment
Mobility
Climate
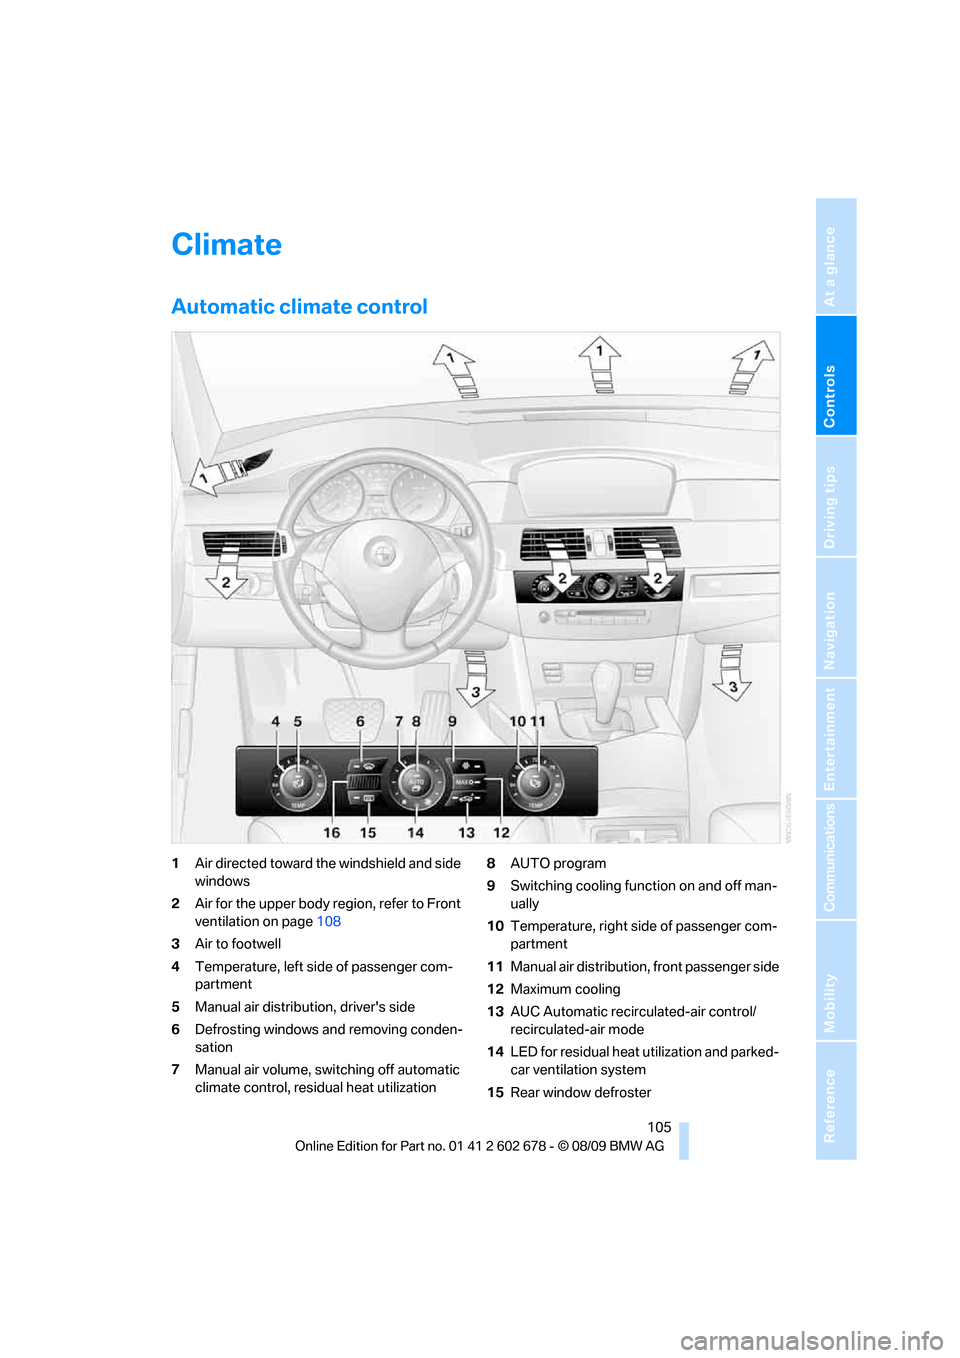
Automatic climate control
1Air directed toward the windshield and side
windows
2Air for the upper body region, refer to Front
ventilation on page108
3Air to footwell
4Temperature, left side of passenger com-
partment
5Manual air distribution, driver's side
6Defrosting windows and removing conden-
sation
7Manual air volume, switching off automatic
climate control, residual heat utilization8AUTO program
9Switching cooling function on and off man-
ually
10Temperature, right side of passenger com-
partment
11Manual air distribution, front passenger side
12Maximum cooling
13AUC Automatic recirculated-air control/
recirculated-air mode
14LED for residual heat utilization and parked-
car ventilation system
15Rear window defroster
Page 108 of 271
Climate
106 16Air grill for interior temperature sensor –
please keep clear and unobstructed
The current setting for the air distribution is dis-
played on the Control Display.
Comfortable interior climate
The AUTO program offers the optimum air dis-
tribution and air volume for virtually all condi-
tions, refer to AUTO program below. Now you
only need to select an interior temperature
comfortable for you.
The following sections contain more detailed
information on the available setting options.
Most settings are stored for the remote control
currently in use, also refer to Personal Profile
settings on page27.
AUTO program
The AUTO program handles the
adjustment of air volume and air
distribution to the windshield and
side windows, in the direction of
the upper body and in the footwell.
It also adapts your instructions for the tempera-
ture to outside influences throughout the year.
The cooling function is switched on along with
the AUTO program. At the same time, a con-
densation sensor controls the program in such
a way that window condensation is prevented
as much as possible.
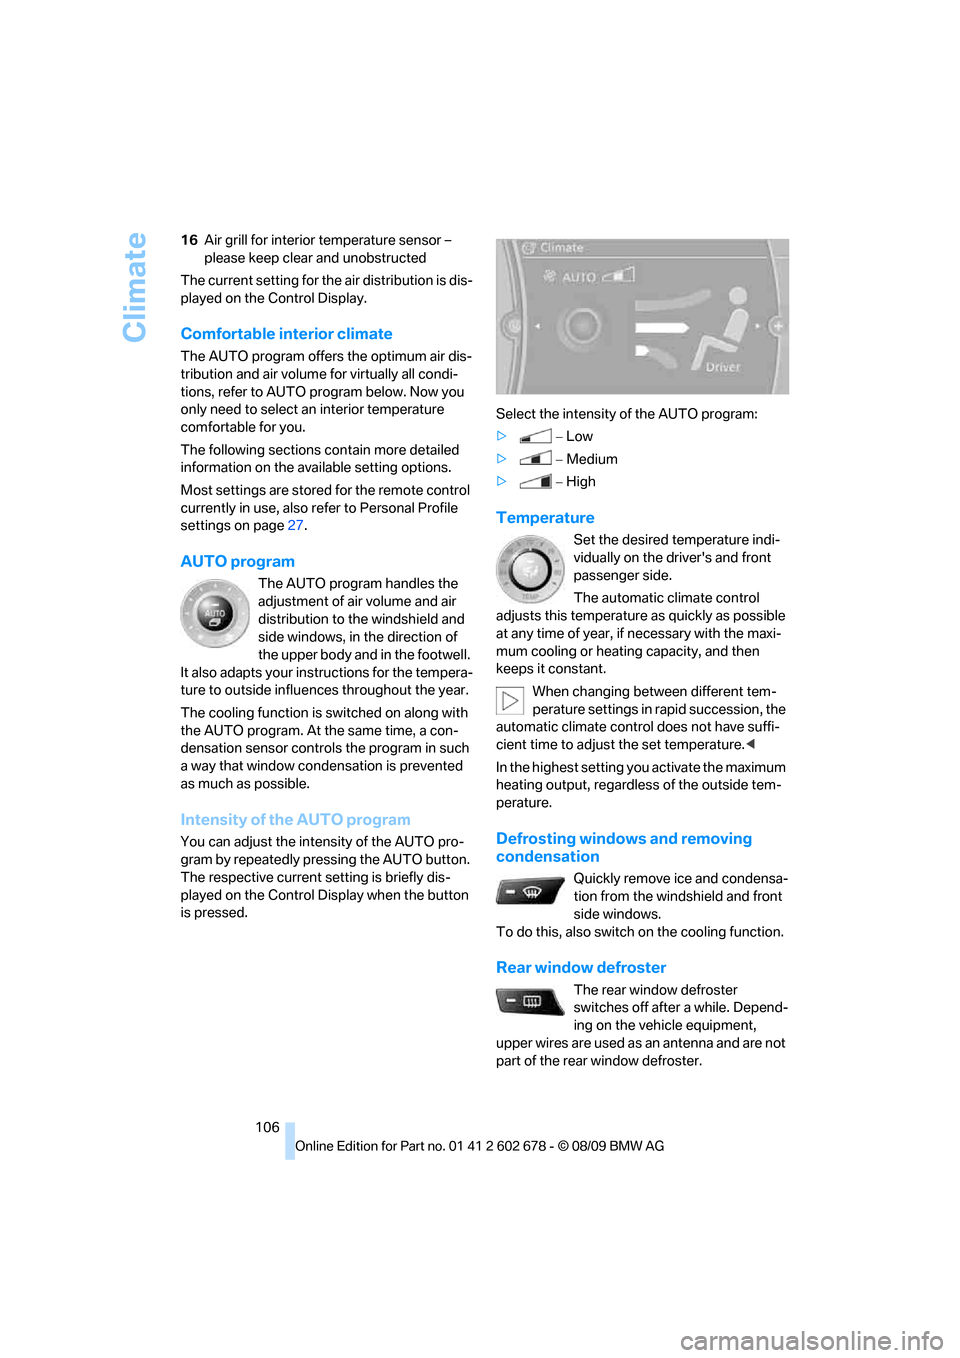
Intensity of the AUTO program
You can adjust the intensity of the AUTO pro-
gram by repeatedly pressing the AUTO button.
The respective current setting is briefly dis-
played on the Control Display when the button
is pressed.Select the intensity of the AUTO program:
>−Low
>−Medium
>−High
Temperature
Set the desired temperature indi-
vidually on the driver's and front
passenger side.
The automatic climate control
adjusts this temperature as quickly as possible
at any time of year, if necessary with the maxi-
mum cooling or heating capacity, and then
keeps it constant.
When changing between different tem-
perature settings in rapid succession, the
automatic climate control does not have suffi-
cient time to adjust the set temperature.<
In the highest setting you activate the maximum
heating output, regardless of the outside tem-
perature.
Defrosting windows and removing
condensation
Quickly remove ice and condensa-
tion from the windshield and front
side windows.
To do this, also switch on the cooling function.
Rear window defroster
The rear window defroster
switches off after a while. Depend-
ing on the vehicle equipment,
upper wires are used as an antenna and are not
part of the rear window defroster.
Page 109 of 271
Controls
107Reference
At a glance
Driving tips
Communications
Navigation
Entertainment
Mobility
Air volume, manual
You can adjust the air volume by
turning. You can reactivate the
automatic mode for the air volume
with the AUTO button.
The air volume is reduced to save battery
power. The display stays the same.
Air distribution, manual
You can route the air flowing out into the vehicle
interior via various programs, separately for the
driver's and passenger's side:
>Upper body region
>Upper body region and footwell
>Footwell
>Driver's side: windows and footwell
Selecting program
Press the button repeatedly until
the desired air distribution of the
respective program is shown on
the Control Display.
Switching cooling function on and off
The cooling function cools and
dehumidifies the incoming air
before also reheating it as
required, according to the temperature setting.
This function is only available when the engine
is running.
The cooling function helps to avoid condensa-
tion on the window surfaces or to quickly
remove them.
Depending on the weather, the windshield may
fog over briefly when the engine is started.
The cooling function is also switched on with
the AUTO program.
Maximum cooling
Maximally cooled air is obtained as
quickly as possible at an outside
temperature above approx. 327/
06 and with the engine running.
At the lowest temperature, the automatic cli-
mate control switches into recirculated-air mode. The maximum air volume flows out of the
vents for the upper body. Therefore, open these
vents for maximum cooling.
AUC Automatic recirculated-air
control/recirculated-air mode
You can respond to pollutants or
unpleasant odors in the immediate
environment by suspending the
supply of outside air. The system then recircu-
lates the air currently within the vehicle. During
AUC operation, a sensor detects pollutants in
the outside air and controls the shut-off auto-
matically.
By pressing the button repeatedly, you can
request three operating modes:
>LED off: outside air flows in continuously.
>Right LED on, AUC mode: the system
detects pollutants in the outside air and
shuts off the supply as needed.
>Left LED on, recirculated-air mode: the
supply of outside air is permanently shut off.
Should the windows fog up in the recircu-
lated-air mode, press the AUTO button or
switch off the recirculated-air mode and
increase the air volume if necessary.
The recirculated-air mode should not be used
over an extended period of time, as the air qual-
ity inside the vehicle deteriorates continu-
ously.<
Residual heat
The heat stored in the engine is
used to heat the passenger com-
partment, e.g., while stopped at a
school to pick up a child.
1.Switch off the engine.
2.Turn to the right, refer to arrow.
The function can be switched on when the fol-
lowing conditions are met:
>up to 15 minutes after switching off the
engine
>with engine at operating temperature
>with sufficient battery voltage
Page 113 of 271

Controls
111Reference
At a glance
Driving tips
Communications
Navigation
Entertainment
Mobility
You can operate the device when the engine is
running or when the ignition is switched on.
If the device fails to function even after
repeated programming, check whether
the original hand-held transmitter uses an alter-
nating-code system. To do so, either read the
instructions for the original hand-held transmit-
ter or hold down the programmed memory
button1 of the integrated universal remote
control. If the LED2 on the integrated universal
remote control flashes rapidly for a short time
and then remains lit for approx. 2 seconds, this
indicates that the original hand-held transmitter
uses an alternating-code system. In the case of
an alternating-code system, program the mem-
ory buttons1 as described at Alternating-code
hand-held transmitters.<
Alternating-code hand-held
transmitters
To program the integrated universal remote
control, consult the operating instructions for
the equipment to be set. You will find informa-
tion there on the possibilities for synchroniza-
tion.
When programming hand-held transmitters
that employ an alternating code, please observe
the following supplementary instructions:
P r o g ra m m in g w i ll b e ea s i er w it h t h e a i d o f
a second person.<
1.Park your vehicle within the range of the
remote-controlled device.
2.Program the integrated universal remote
control as described above in the section
Fixed-code hand-held transmitters.
3.Locate the button on the receiver of the
device to be set, e. g. on the drive unit.
4.Press the button on the receiver of the
device to be set. After step 4, you have
approx. 30 seconds for step 5.
5.Press the programmed memory button1
of the integrated universal remote control
three times.
The corresponding memory button 1 is now
programmed with the signal of the original
hand-held transmitter.If you have any additional questions,
please contact your BMW center.<
Deleting all stored programs
Press the left and right-hand memory button1
for approx. 20 seconds until the LED2 flashes
quickly:
All stored programs are deleted.
Individual programs cannot be deleted.
Rememorizing individual programs
1.Hold the original handheld remote control
approx. 4 in/10 cm to 12 in/30 cm away
from the memory buttons1.
The required distance between the
hand-held transmitter and the mem-
ory buttons1 depends on the relevant sys-
tem of the original hand-held transmitter
used.<
2.Press the desired memory button1 of the
integrated universal remote control.
3.If the LED2 flashes slowly after approx.
20 seconds, press the command button of
the original hand-held transmitter. As soon
as the LED2 flashes rapidly, release both
buttons. If the LED2 does not flash rapidly
after approx. 15 seconds, alter the distance
and repeat the step.
Sun blinds*
Sun blind for rear window
Press the button on the driver's door.