2010 BMW 535I XDRIVE SEDAN Start engine
[x] Cancel search: Start enginePage 214 of 271
Under the hood
212
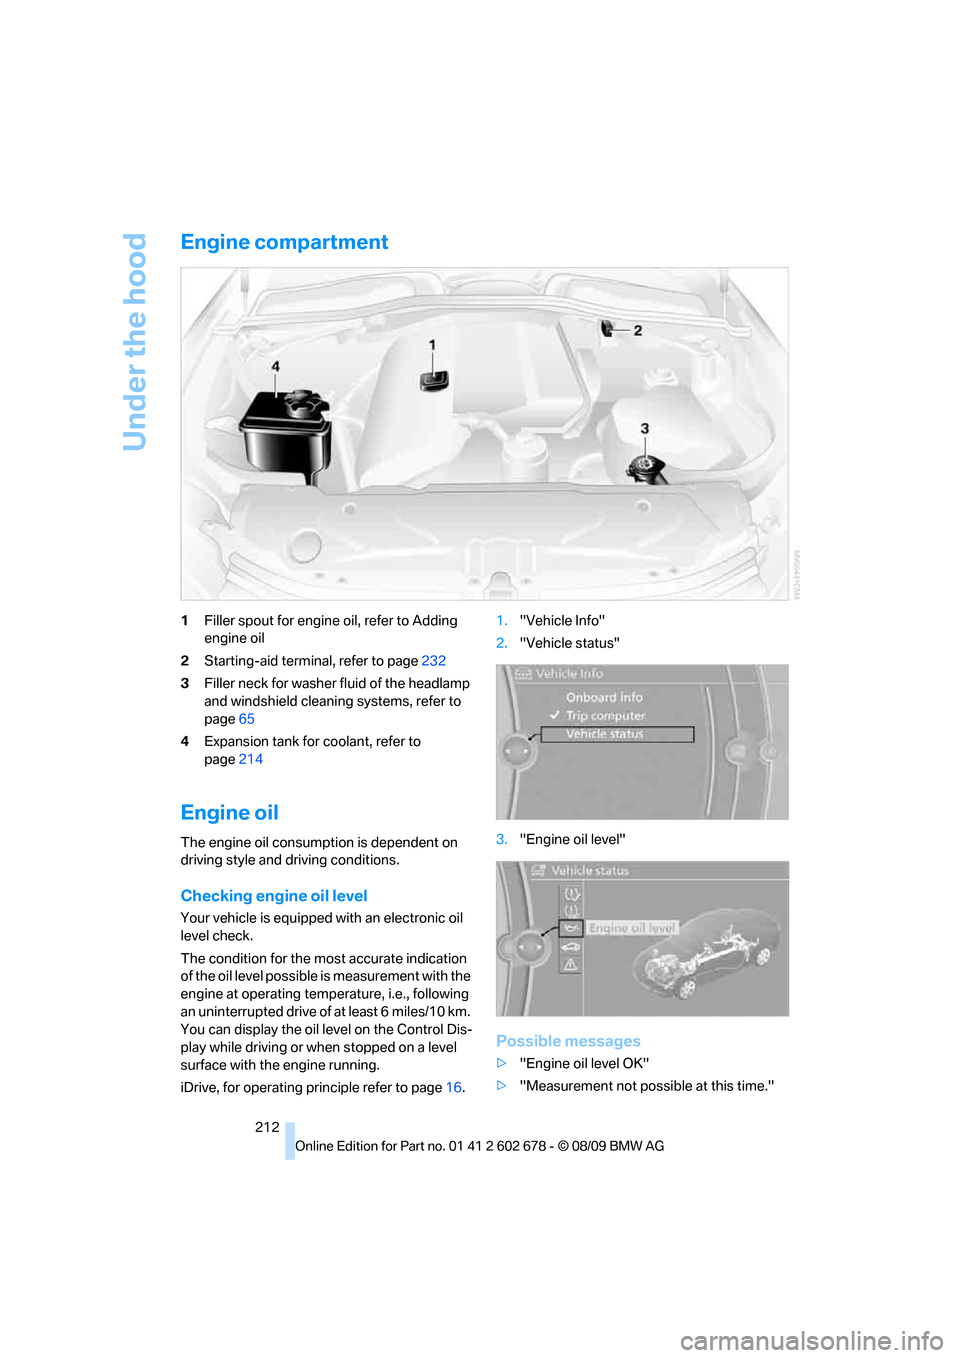
Engine compartment
1Filler spout for engine oil, refer to Adding
engine oil
2Starting-aid terminal, refer to page232
3Filler neck for washer fluid of the headlamp
and windshield cleaning systems, refer to
page65
4Expansion tank for coolant, refer to
page214
Engine oil
The engine oil consumption is dependent on
driving style and driving conditions.
Checking engine oil level
Your vehicle is equipped with an electronic oil
level check.
The condition for the most accurate indication
of the oil level possible is measurement with the
engine at operating temperature, i.e., following
an uninterrupted drive of at least 6 miles/10 km.
You can display the oil level on the Control Dis-
play while driving or when stopped on a level
surface with the engine running.
iDrive, for operating principle refer to page16.1."Vehicle Info"
2."Vehicle status"
3."Engine oil level"
Possible messages
>"Engine oil level OK"
>"Measurement not possible at this time."
Page 228 of 271
Replacing components
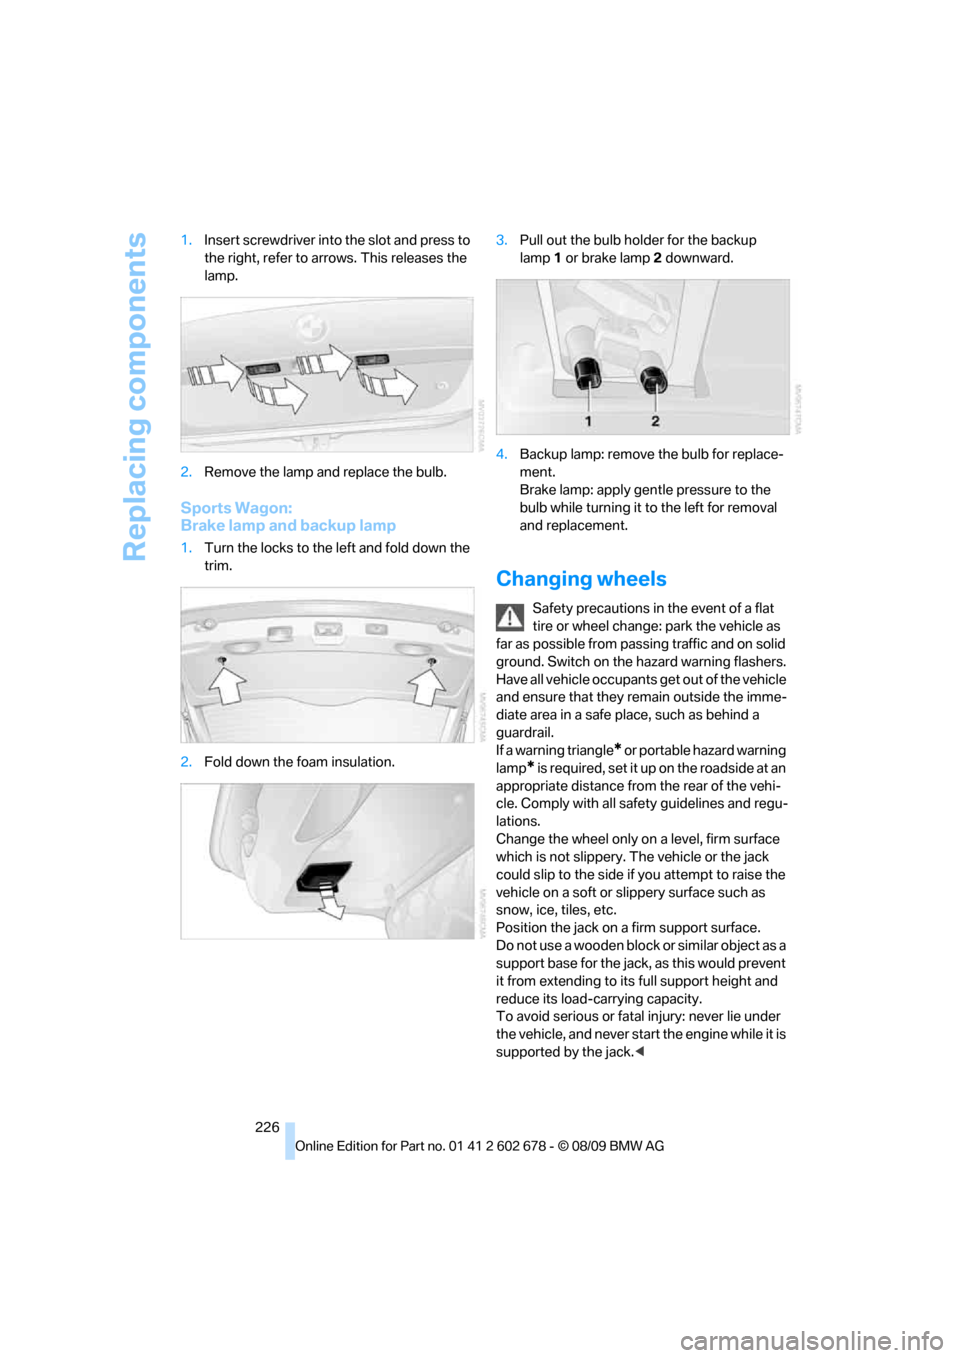
226 1.Insert screwdriver into the slot and press to
the right, refer to arrows. This releases the
lamp.
2.Remove the lamp and replace the bulb.
Sports Wagon:
Brake lamp and backup lamp
1.Turn the locks to the left and fold down the
trim.
2.Fold down the foam insulation.3.Pull out the bulb holder for the backup
lamp1 or brake lamp2 downward.
4.Backup lamp: remove the bulb for replace-
ment.
Brake lamp: apply gentle pressure to the
bulb while turning it to the left for removal
and replacement.
Changing wheels
Safety precautions in the event of a flat
tire or wheel change: park the vehicle as
far as possible from passing traffic and on solid
ground. Switch on the hazard warning flashers.
Have all vehicle occupants get out of the vehicle
and ensure that they remain outside the imme-
diate area in a safe place, such as behind a
guardrail.
If a warning triangle
* or portable hazard warning
lamp
* is r e q u ir e d, s et i t up o n t h e ro a d s i d e a t a n
appropriate distance from the rear of the vehi-
cle. Comply with all safety guidelines and regu-
lations.
Change the wheel only on a level, firm surface
which is not slippery. The vehicle or the jack
could slip to the side if you attempt to raise the
vehicle on a soft or slippery surface such as
snow, ice, tiles, etc.
Position the jack on a firm support surface.
Do not use a wooden block or similar object as a
support base for the jack, as this would prevent
it from extending to its full support height and
reduce its load-carrying capacity.
To avoid serious or fatal injury: never lie under
the vehicle, and never start the engine while it is
supported by the jack.<
Page 231 of 271
Mobility
229Reference
At a glance
Controls
Driving tips
Communications
Navigation
Entertainment
3.Check and correct the tire inflation pressure
at the earliest opportunity.
Protect valve stems with valve stem
seal caps against dirt and contamina-
tion. Dirt in valve stems is a frequent source
of gradual air loss.<
4.Initialize the Flat Tire Monitor, refer to
page89, or reset the Tire Pressure Monitor,
refer to page90.
5.Replace the damaged tire as soon as possi-
ble and have the new wheel/tire balanced.
Driving with compact wheel
Drive reservedly and do not exceed a speed of
50 mph/80 km/h.
The driving characteristics change, for example
reduced track stability on braking, extended
braking distance, and altered self-steering
characteristics in the limit range. In conjunction
with winter tires, these characteristics are more
pronounced.
Only one compact wheel may be
mounted. Restore the wheels and tires to
their original size as quickly as possible. Failure
to do so is a safety risk.<
Vehicle battery
Battery care
The battery is 100 % maintenance-free, i.e., the
electrolyte will last for the life of the battery
when the vehicle is operated in a temperate cli-
mate. Your BMW center will be glad to advise in
all matters concerning the battery.
Charging battery
Only charge the battery in the vehicle via the
terminals in the engine compartment with the
engine switched off. Connections, refer to
Jump starting on page232.
Disposal
Have old batteries disposed of by your
BMW center or bring them to a recycling
center. Maintain the battery in an upright posi-tion for transport and storage. Always restrain
the battery to prevent it from tipping over during
transport.<
Power failure
Following a temporary power failure, e.g., due to
a discharged battery, the use of some equip-
ment will be restricted, requiring its reinitializa-
tion. In the same way, individual settings are lost
and must be updated again:
>Seat, mirror and steering wheel memory
The positions must be stored again, refer to
page46.
>Time and date
Must be updated again, refer to page78.
>Radio
In some cases, radio stations may have to
be stored again, refer to page156.
>Navigation system
You must wait until the system becomes
functional again, refer to page132.
>Glass roof, electric
It may only be possible to raise the glass
roof. The system must be initialized, refer to
page40.
>Panorama glass roof
It may only be possible to raise the glass
roof. The system must be reinitialized, refer
to page41.
>Active steering
The system automatically initializes itself
briefly during a trip. The system is deacti-
vated during this time, refer to page92.
>xDrive
The system automatically initializes itself
during a trip. Indicator lamps light up during
this time. If the lamps do not disappear dur-
ing the current trip, have the system
checked.
>Power windows
The pinch prevention system for the power
windows must be reinitialized, refer to
page38.
Talk to your BMW center before placing
the stored vehicle back in service.<
Page 234 of 271
Giving and receiving assistance
232
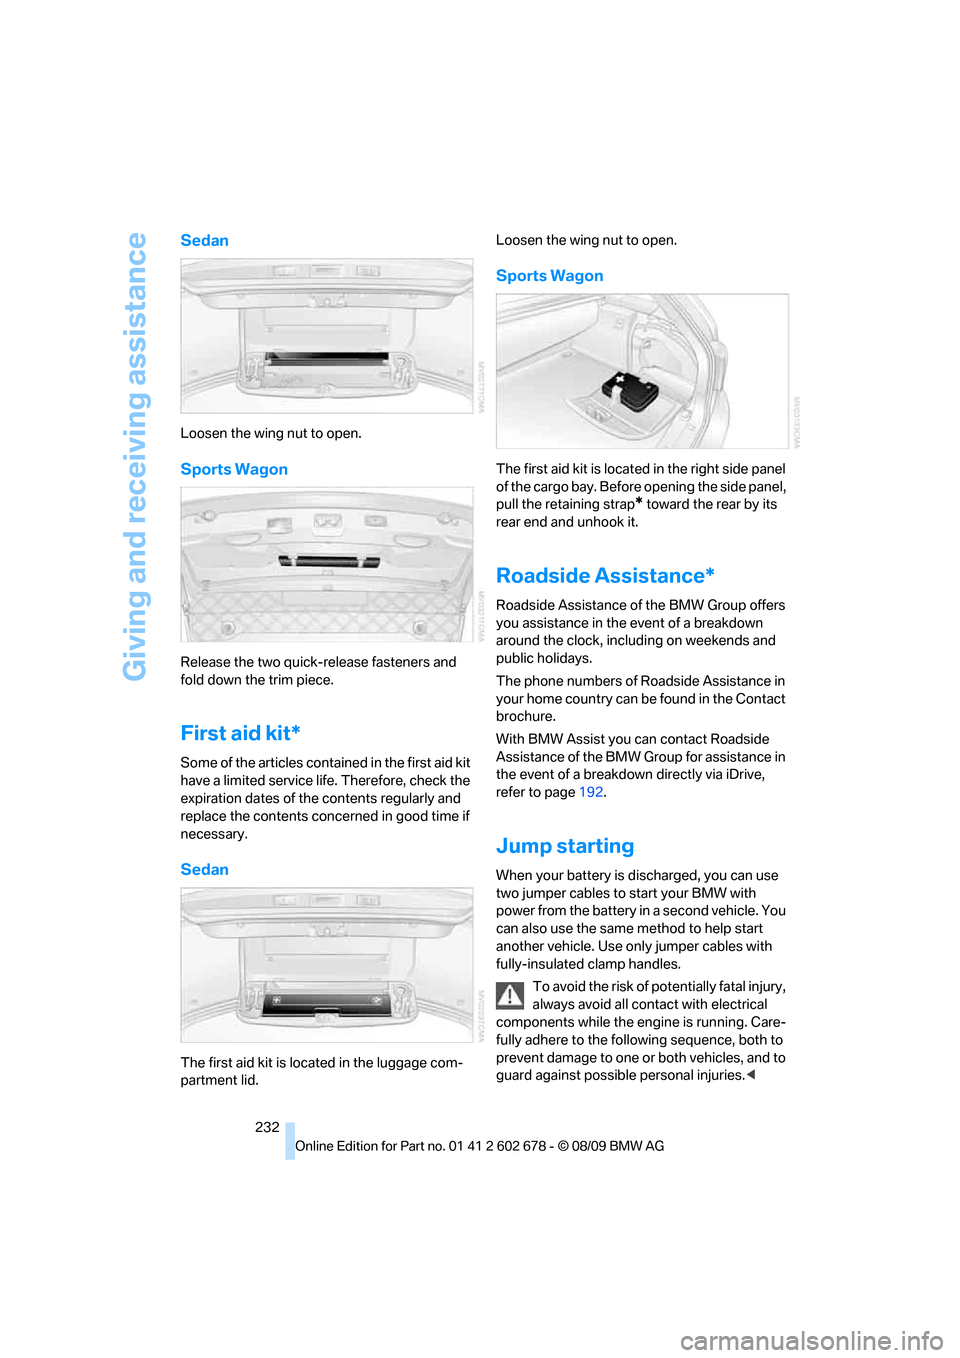
Sedan
Loosen the wing nut to open.
Sports Wagon
Release the two quick-release fasteners and
fold down the trim piece.
First aid kit*
Some of the articles contained in the first aid kit
have a limited service life. Therefore, check the
expiration dates of the contents regularly and
replace the contents concerned in good time if
necessary.
Sedan
The first aid kit is located in the luggage com-
partment lid.Loosen the wing nut to open.
Sports Wagon
The first aid kit is located in the right side panel
of the cargo bay. Before opening the side panel,
pull the retaining strap
* toward the rear by its
rear end and unhook it.
Roadside Assistance*
Roadside Assistance of the BMW Group offers
you assistance in the event of a breakdown
around the clock, including on weekends and
public holidays.
The phone numbers of Roadside Assistance in
your home country can be found in the Contact
brochure.
With BMW Assist you can contact Roadside
Assistance of the BMW Group for assistance in
the event of a breakdown directly via iDrive,
refer to page192.
Jump starting
When your battery is discharged, you can use
two jumper cables to start your BMW with
power from the battery in a second vehicle. You
can also use the same method to help start
another vehicle. Use only jumper cables with
fully-insulated clamp handles.
To avoid the risk of potentially fatal injury,
always avoid all contact with electrical
components while the engine is running. Care-
fully adhere to the following sequence, both to
prevent damage to one or both vehicles, and to
guard against possible personal injuries.<
Page 235 of 271
Mobility
233Reference
At a glance
Controls
Driving tips
Communications
Navigation
Entertainment
Preparation
1.Check whether the battery of the other
vehicle has a voltage of 12 Volts and
approximately the same capacitance in Ah.
This information can be found on the bat-
tery.
2.Switch off the engine of the assisting vehi-
cle.
3.Switch off any electrical systems and com-
ponents in both vehicles.
There must not be any contact between
the bodies of the two vehicles, otherwise
there is a danger of shorting.<
Connecting jumper cables
To avoid personal injury from sparks, fol-
low this sequence when connecting
jumper cables.<
In your BMW, the so-called jump-starting termi-
nal in the engine compartment serves as a pos-
itive terminal for the battery, also refer to engine
compartment overview on page212. The cover
cap is marked with a +.
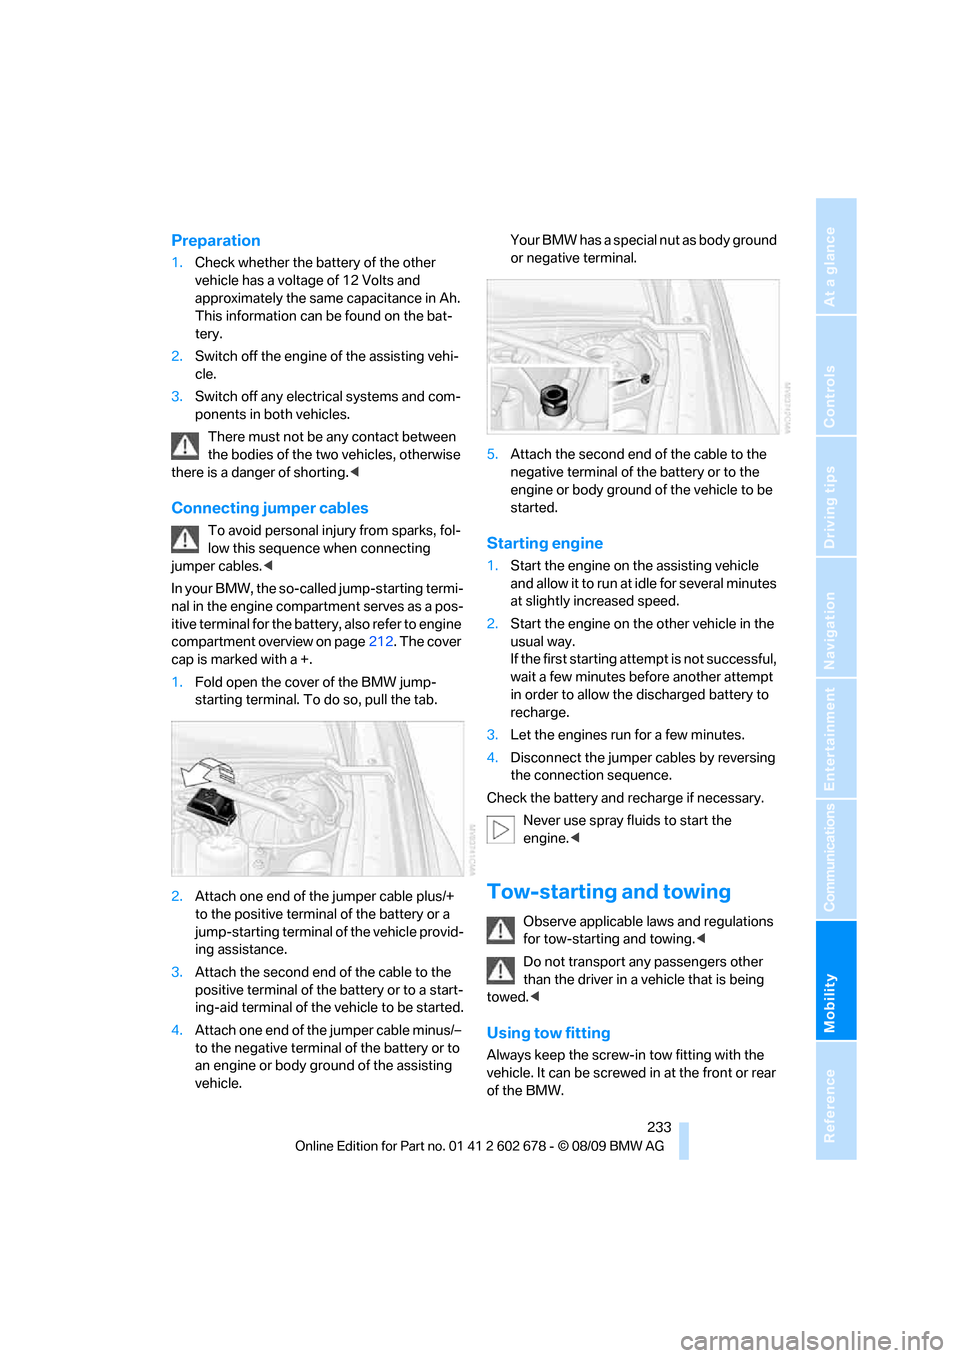
1.Fold open the cover of the BMW jump-
starting terminal. To do so, pull the tab.
2.Attach one end of the jumper cable plus/+
to the positive terminal of the battery or a
jump-starting terminal of the vehicle provid-
ing assistance.
3.Attach the second end of the cable to the
positive terminal of the battery or to a start-
ing-aid terminal of the vehicle to be started.
4.Attach one end of the jumper cable minus/–
to the negative terminal of the battery or to
an engine or body ground of the assisting
vehicle.Your BMW has a special nut as body ground
or negative terminal.
5.Attach the second end of the cable to the
negative terminal of the battery or to the
engine or body ground of the vehicle to be
started.Starting engine
1.Start the engine on the assisting vehicle
and allow it to run at idle for several minutes
at slightly increased speed.
2.Start the engine on the other vehicle in the
usual way.
If the first starting attempt is not successful,
wait a few minutes before another attempt
in order to allow the discharged battery to
recharge.
3.Let the engines run for a few minutes.
4.Disconnect the jumper cables by reversing
the connection sequence.
Check the battery and recharge if necessary.
Never use spray fluids to start the
engine.<
Tow-starting and towing
Observe applicable laws and regulations
for tow-starting and towing.<
Do not transport any passengers other
than the driver in a vehicle that is being
towed.<
Using tow fitting
Always keep the screw-in tow fitting with the
vehicle. It can be screwed in at the front or rear
of the BMW.
Page 237 of 271
Mobility
235Reference
At a glance
Controls
Driving tips
Communications
Navigation
Entertainment
>When mounted at an angle, the tow bar will
exert lateral forces, tending to push the
vehicle sideways.
Only attach the tow bar to the tow fittings,
as attachment to other vehicle parts can
lead to damage.<
With tow rope
When starting off in the towing vehicle, make
sure that the tow rope is taut.
To avoid jerking and the associated
stresses on vehicle components when
towing, always use nylon ropes or nylon straps.
Only attach tow ropes to the tow fittings, as
attachment to other vehicle parts can lead to
damage.<
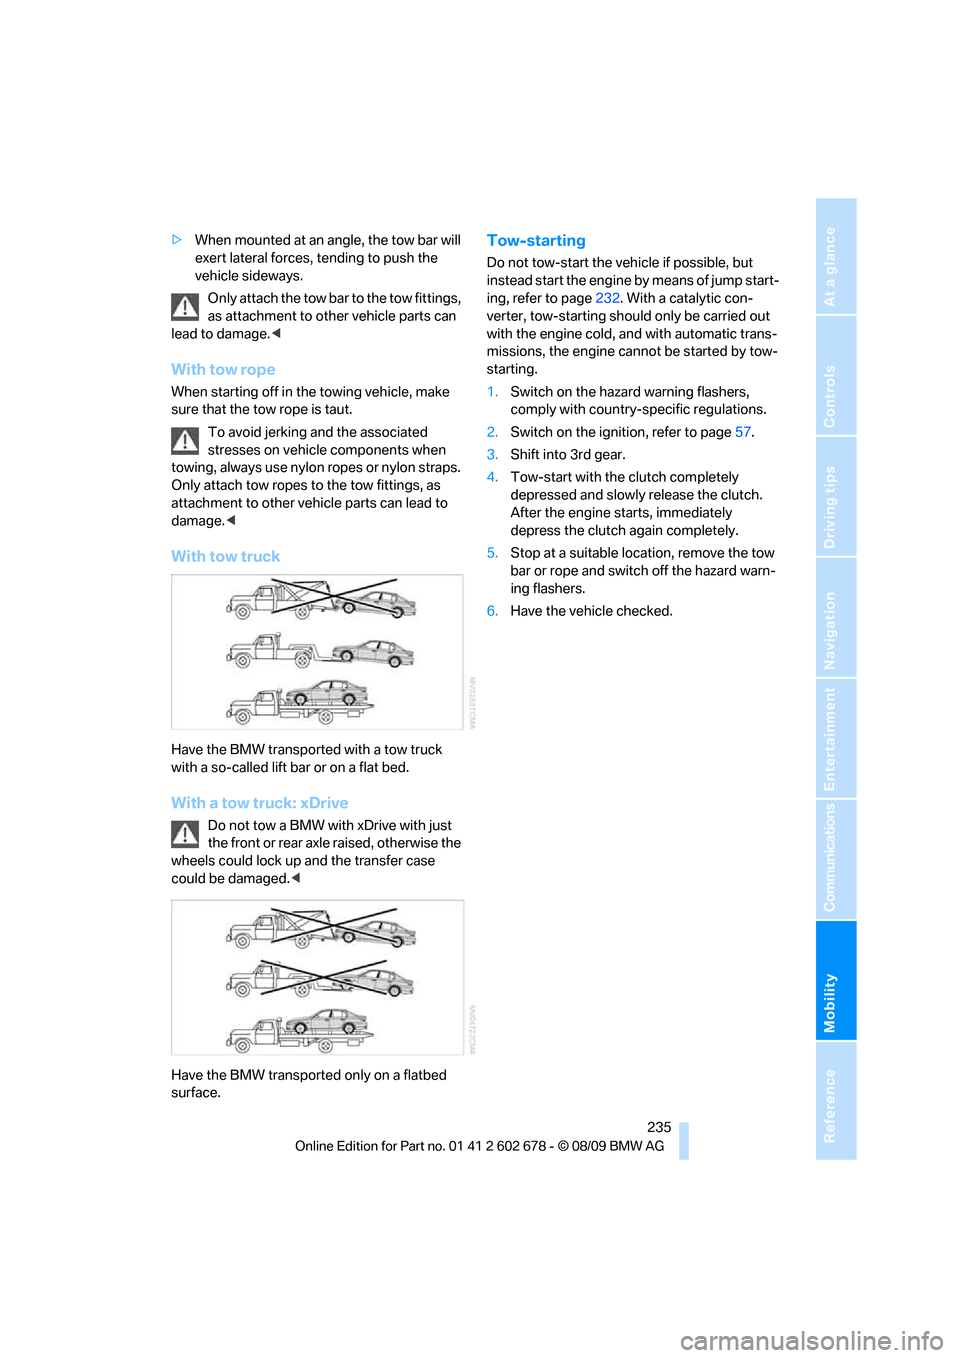
With tow truck
Have the BMW transported with a tow truck
with a so-called lift bar or on a flat bed.
With a tow truck: xDrive
Do not tow a BMW with xDrive with just
the front or rear axle raised, otherwise the
wheels could lock up and the transfer case
could be damaged.<
Have the BMW transported only on a flatbed
surface.
Tow-starting
Do not tow-start the vehicle if possible, but
instead start the engine by means of jump start-
ing, refer to page232. With a catalytic con-
verter, tow-starting should only be carried out
with the engine cold, and with automatic trans-
missions, the engine cannot be started by tow-
starting.
1.Switch on the hazard warning flashers,
comply with country-specific regulations.
2.Switch on the ignition, refer to page57.
3.Shift into 3rd gear.
4.Tow-start with the clutch completely
depressed and slowly release the clutch.
After the engine starts, immediately
depress the clutch again completely.
5.Stop at a suitable location, remove the tow
bar or rope and switch off the hazard warn-
ing flashers.
6.Have the vehicle checked.
Page 254 of 271
Everything from A to Z
252 Brakes
– ABS Antilock Brake
System85
– brake assistant85
– brake force display93
– breaking-in124
– CBC Cornering Brake
Control85
– electronic brake-force
distribution85
– parking brake59
– refer to Braking safely126
– warning lamps13
Brake system124
– brake pads124
– breaking-in124
– disk brakes126
– warning lamp87
Braking safely126
Breakdown services, refer to
Roadside Assistance232
Breaking-in brake pads124
Breaking-in the clutch124
Breaking-in the differential,
refer to Engine and
differential124
Break-in period124
Brightness of Control
Display83
Button for starting engine,
refer to Start/Stop button57
C
California Proposition 65
Warning6
Call
– accepting181
– ending182
– rejecting182
Calling, refer to Phone
numbers, dialing182
Can holder, refer to
Cupholders114
Capacities242
Car battery, refer to Vehicle
battery229Care217
– car-care products217
– carpets219
– car washes217
– CD/DVD player219
– chrome components218
– displays219
– exterior217
– fine wooden
components219
– hand washing218
– headlamps218
– high-pressure cleaning
jets217
– interior219
– leather219
– light-alloy wheels218
– paint218
– plastic components219
– rubber gaskets218
– safety belts219
– sensors and cameras219
– upholstery and cloth-
covered paneling219
– windows218
Cargo
– refer to Cargo loading126
– securing128
– securing with ski bag120Cargo bay
– capacity241
– emergency operation, refer
to Opening manually, Sports
Wagon33
– emergency release32
– expanding, Sports
Wagon117
– floor panel flap, refer to
Compartment in floor,
Sports Wagon118
– locking separately31
– opening/closing, refer to
Luggage compartment lid/
tailgate31
– opening from inside31
– opening from inside, Sports
Wagon33
– opening from outside
31
– opening from outside,
Sports Wagon33
– opening with remote
control29
Cargo bay cover, refer to
Luggage compartment
roller cover117
Caring for the vehicle
finish218
Car key, refer to Keys/remote
control26
Car phone
– installation location, refer to
Center armrest112
– refer to separate operating
instructions
Car phone, refer to
Telephone178
Car radio, refer to Radio155
Car Shampoo219
Car wash58
– with Comfort Access37
Car washes217
Catalytic converter, refer to
Hot exhaust system125
CBC Cornering Brake
Control85
CBS Condition Based
Service215
CD, audio playback160
Page 255 of 271
Reference 253
At a glance
Controls
Driving tips
Communications
Navigation
Entertainment
Mobility
CD changer160,164
– controls152
– fast forward/reverse162
– filling or emptying the
magazine164
– random sequence161
– selecting a track160
– switching on/off152
– tone control152
– volume152
CD player160
– controls152
– fast forward/reverse162
– random sequence161
– selecting a track160
– switching on/off152
– tone control152
– volume152
Center armrest
– front112
– rear116
Center brake lamp225
Center console14
Central locking
– from inside30
– from outside28
Central locking system27
– Comfort Access36
Changes, technical, refer to
For your own safety5
Changes, technical, refer to
Parts and accessories6
Changing language on
Control Display82
Changing scale for
navigation145
Changing trips141
Changing units of measure on
Control Display76
Changing wheels208,226
CHECK button80
Check Control79
Check Gas Cap201
Checking the air pressure,
refer to Tire inflation
pressure202
Child restraint fixing system
LATCH54
Child restraints53Child restraint systems53
Child-safety lock56
Child seats, refer to
Transporting children
safely53
Chime, refer to Check
Control
79
Chock227
Chrome-plated parts219
Chrome polish219
Cigarette lighter114
Cigarette lighter socket, refer
to Connecting electrical
devices115
Cleaning your BMW, refer to
Care217
Clock74
– 12h/24h format79
– setting time78
– setting time and date79
Closing
– from inside30
– from outside28
Closing fuel filler cap201
Clothes hooks113
Cockpit10
Cold start, refer to Engine,
starting58
Combination instrument, refer
to Instrument cluster12
Comfort Access36
Comfort access
– observe in car wash37
– replacing battery, remote
control38
Comfort area, refer to Around
the center console14
Comfort seat44
Compact wheel
– inflation pressure203
– wheel change228
Compartment for remote
control, refer to Ignition
lock57Compartments
– in cargo bay, Sports
Wagon118
– refer to Storage area loading
options, Sports Wagon119
– refer to Storage
compartments113
Computer75
– displays on Control
Display76
Concierge service193
Condensation, refer to When
vehicle is parked126
Condition Based Service
CBS215
Confirmation signals for
locking and unlocking29
Connecting car vacuum
cleaner, refer to Connecting
electrical devices115
Consumption, refer to
Average consumption75
Consumption indicator
– Energy Control75
Consumption statistics, refer
to Average fuel
consumption75
Contacts
– creating190
Control Center, refer to
iDrive16
Control Display, refer to
iDrive16
– setting brightness83
– switching off/on19
Controller, refer to iDrive16
Controls, refer to Cockpit10
Convenient opening and
closing
– glass sunroof28
– windows28
– windows and glass sunroof
with Comfort Access37
Coolant214
– checking level214
– temperature74
Cooling, maximum107
Cooling fluid, refer to
Coolant214