2010 BMW 535I XDRIVE SEDAN rear entertainment
[x] Cancel search: rear entertainmentPage 95 of 271
Controls
93Reference
At a glance
Driving tips
Communications
Navigation
Entertainment
Mobility
When you are driving in the low speed range,
e. g. in a town or when parking, the steering
angle increases, i.e., the steering becomes very
direct. In the higher speed range, on the other
hand, the steering angle is reduced more and
more. This improves the handling capability of
your BMW over the entire speed range.
In critical situations, the system can make tar-
geted corrections to the steering angle pro-
vided by the driver and thus stabilize the vehicle
before the driver intervenes. This stabilizing
intervention is simultaneously deactivated
when DSC is switched off, refer to page85.
Malfunction
The warning lamp lights up yellow and
a message is shown on the Control Dis-
play. Active steering is malfunctioning
or is temporarily deactivated. At low speeds,
greater steering wheel movements are
required, whereas at higher speeds, the vehicle
reacts more sensitively to steering wheel move-
ments. The stability-promoting intervention
can also be deactivated. Proceed cautiously
and drive defensively.
Deactivation
Active steering is deactivated to perform an ini-
tialization. A message indicates that the feature
is deactivated. Initialization may take several
minutes.
If the message does not go out during the cur-
rent trip, have the system checked.
Defect
A text message appears if there is a defect.
Have the system checked.
Brake force display
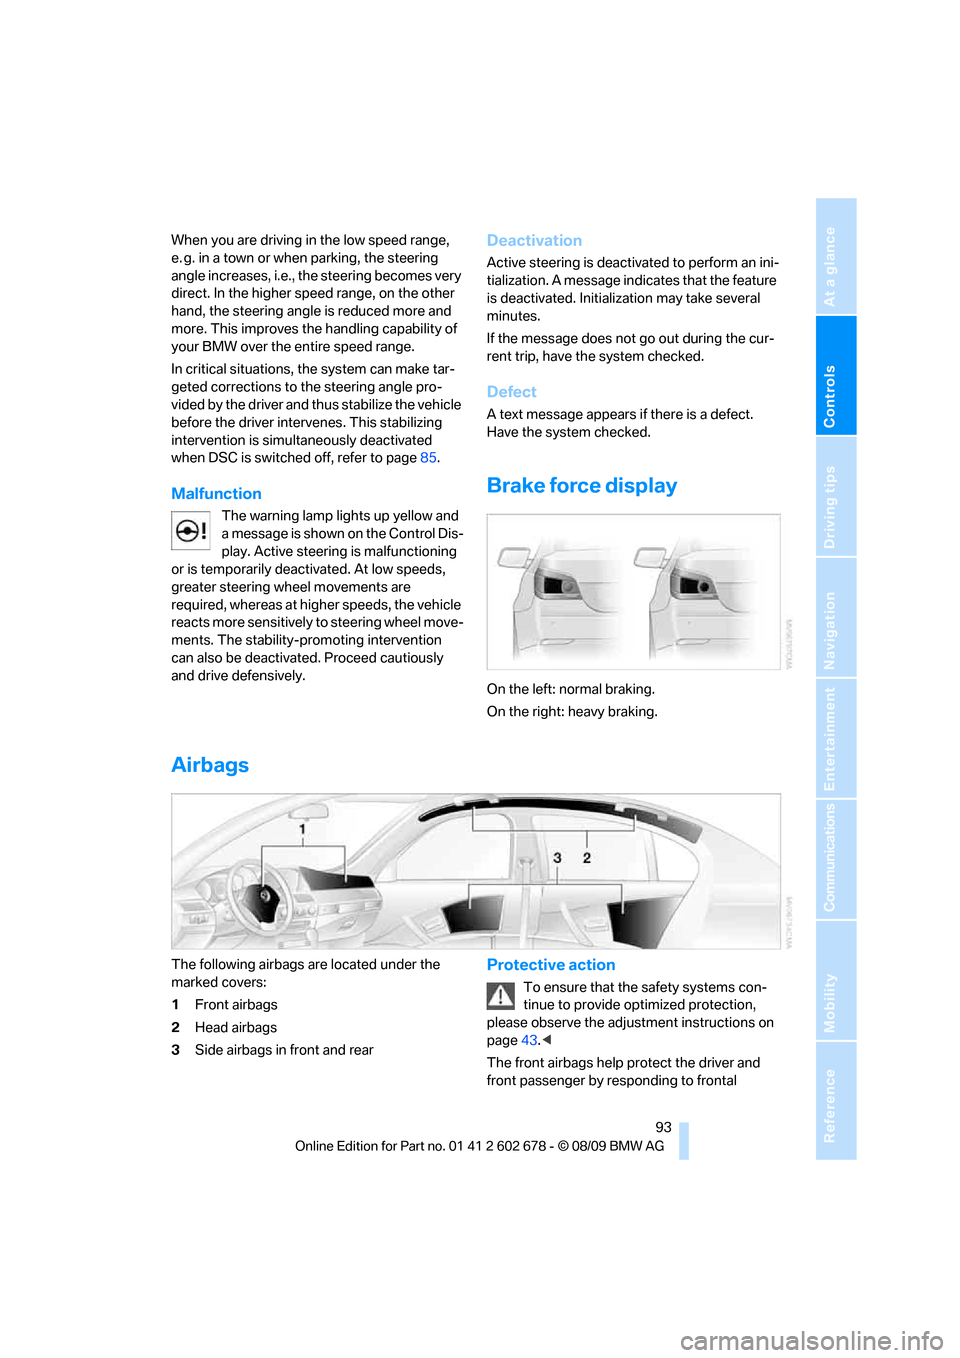
On the left: normal braking.
On the right: heavy braking.
Airbags
The following airbags are located under the
marked covers:
1Front airbags
2Head airbags
3Side airbags in front and rearProtective action
To ensure that the safety systems con-
tinue to provide optimized protection,
please observe the adjustment instructions on
page43.<
The front airbags help protect the driver and
front passenger by responding to frontal
Page 99 of 271

Controls
97Reference
At a glance
Driving tips
Communications
Navigation
Entertainment
Mobility
presence of persons or animals in the road
ahead or off to the sides and can be more alert,
slow down or stop, blow the horn, etc. The
driver can decide which actions are appropriate
and then react accordingly.
A certain area in front of the vehicle is viewed by
an infrared camera and a generated image is
shown on the Control Display. The resulting
thermal image shows the relative heat radiation
of the objects present in the camera's field of
view. Warmer objects appear brighter and
cooler objects appear darker. Contrast is
dependent on the temperature difference
between the objects and the background and
on the amount of heat radiation of the object
itself. As a result, it is quite possible that a per-
son is not continually recognizable as a person
in shape, since the thermal radiation can be
affected by different clothing which blocks heat
loss. Objects with little temperature difference
to the surrounding area, or little heat radiation
are less noticeable, for example in cold weather.
Any improvement in detection depends on
many factors such as the object size and tem-
perature compared to the surroundings, or
other nearby objects, the visual recognition
skills of the driver, weather conditions, and
other factors.
Driving hints
With the system active, periodically but briefly,
glance at the thermal image on the Control Dis-
play to notice objects that could be people or
larger animals. The glance should be similar to
glancing at the rear view mirror. Do not stare at
the image for long periods while driving, as this
will remove attention from the road. If you notice
an object of interest ahead, be prepared to slow
down or stop, blow the horn, or take other
appropriate action.
System limits
The system is designed to supplement but not
replace forward vision through the windshield.
The driver is responsible for safe driving at
night. BMW Night Vision is not designed to be
used as a continuous viewing window for driv-
ing at night.No system, no matter how sophisticated, can
operate without limitations. BMW Night Vision
operation is subject to physical and environ-
mental limitations that will reduce the ability of
the system to detect and display a clear thermal
image. Some of the situations in which these
limitations can occur are:
>on steep hilltops or depressions and in tight
curves
>in tunnels, as the contrast is inherently low
>when the camera lens is dirty
>in dense fog, heavy rain or snowfall
>when displaying very hot objects such as
transformers, car exhausts, etc.
>when the image briefly freezes during nor-
mal system adjustment.
BMW Night Vision's potential benefits
can be limited by the driving style of the
driver, the size and relative temperature of the
detected objects, dirt or contamination on the
camera lens, adverse weather like snow, rain or
fog, and other factors not mentioned here. It will
always be the driver's responsibility to drive at a
speed and in a manner that recognizes potential
hazards and adjust accordingly.
BMW Night Vision is not a substitute or replace-
ment for the driver's responsibility to adapt to
visibility and traffic conditions. The forward view
illuminated by the headlamps must always be
the basis for making safe driving decisions, oth-
erwise a safety risk will result.<
Page 101 of 271
Controls
99Reference
At a glance
Driving tips
Communications
Navigation
Entertainment
Mobility
remove any debris, ice or snow. To avoid dam-
age to the lens, do not use sharp or abrasive
instruments to clean ice, snow, or dirt off the
lens.
When the windshield is cleaned with the head-
lamps on, the camera lens area is automatically
sprayed as well. Refer to page64.
Lane Departure Warning*
The concept
This system warns you from a speed of approx.
40 mph/70 km/h when the vehicle is leaving the
lane you are currently in on roads with lane limit
lines. You feel this due to a slight vibration of the
steering wheel.
The system does not warn you if you signal
before leaving the lane.
It is best to use the system on well-developed
roads and freeways.
Switching on/off
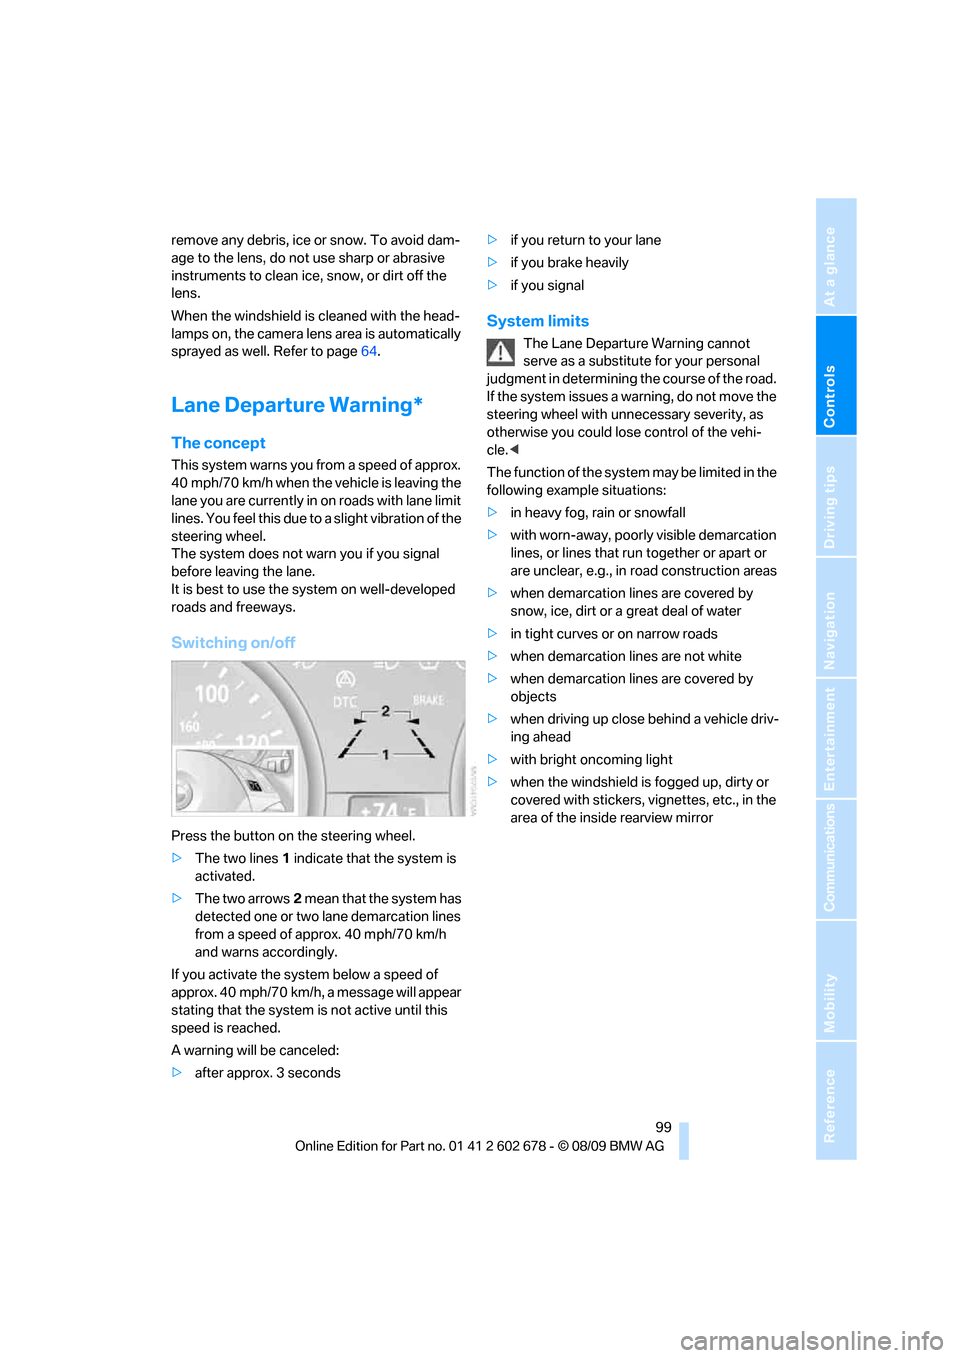
Press the button on the steering wheel.
>The two lines1 indicate that the system is
activated.
>The two arrows2 mean that the system has
detected one or two lane demarcation lines
from a speed of approx. 40 mph/70 km/h
and warns accordingly.
If you activate the system below a speed of
approx. 40 mph/70 km/h, a message will appear
stating that the system is not active until this
speed is reached.
A warning will be canceled:
>after approx. 3 seconds>if you return to your lane
>if you brake heavily
>if you signal
System limits
The Lane Departure Warning cannot
serve as a substitute for your personal
judgment in determining the course of the road.
If the system issues a warning, do not move the
steering wheel with unnecessary severity, as
otherwise you could lose control of the vehi-
cle.<
The function of the system may be limited in the
following example situations:
>in heavy fog, rain or snowfall
>with worn-away, poorly visible demarcation
lines, or lines that run together or apart or
are unclear, e.g., in road construction areas
>when demarcation lines are covered by
snow, ice, dirt or a great deal of water
>in tight curves or on narrow roads
>when demarcation lines are not white
>when demarcation lines are covered by
objects
>when driving up close behind a vehicle driv-
ing ahead
>with bright oncoming light
>when the windshield is fogged up, dirty or
covered with stickers, vignettes, etc., in the
area of the inside rearview mirror
Page 105 of 271
Controls
103Reference
At a glance
Driving tips
Communications
Navigation
Entertainment
Mobility
press the turn signal lever in the high-beam
direction.
>When the low beams are on, use the head-
lamp flasher as usual.
System limits
The High-beam Assistant is designed to
maximize the amount of time that high
beams can be safely used and to quickly switch
back to low beams when traffic approaches.
The system cannot completely replace driver
intervention when unusual conditions are
encountered. For this reason, switch to low
beams when circumstances so dictate. Failure
to do so can pose a safety risk.<
Below are a few examples of situations in which
the system may not react or may only function
to a limited degree, requiring personal interven-
tion:
>in extremely unfavorable weather condi-
tions such as fog or heavy precipitation
>in sensing road users with poor inherent
illumination such as pedestrians, cyclists,
equestrians, horse-drawn vehicles, railroad
or shipping traffic close to the road, and at
deer crossings
>in tight curves, on steep crests or dips, with
cross-traffic, or with partially hidden
oncoming traffic on divided highways
>in poorly illuminated areas and in the pres-
ence of highly reflective signs
>in the low speed range
>when the windshield is fogged up, dirty or
covered with stickers, decals, etc., in the
area of the inside rearview mirror
>when the sensor is dirty. Clean the sensor
on the front side of the inside rearview mir-
ror with a cloth slightly moistened with glass
cleaner
Moreover, no system can operate without limi-
tations. High-beam Assistant operation is sub-
ject to conditions that may reduce the system's
ability to recognize the difference between
actual vehicle head lamps or tail lamps and, for
example, highly reflective signs, markers, and
streetlights. To be on the safe side, the system may periodically interpret these situations as
conditions that require low beams. Below are
some of the situations in which premature
switching to low beams can occur:
>approaching large and/or highly reflective
signs
>approaching certain lights, such as drive-
way lighting and porch lights
>approaching certain traffic signals
>approaching large reflective markers
In these situations, the system may interpret
the above conditions as a vehicle ahead requir-
ing a switch to low beams. When the conditions
return to normal, the system will reactivate the
high beams.
The High-beam Assistant cannot replace the
driver's responsibility for complying with state
laws on high-beam switching or for adapting to
visibility and traffic conditions.
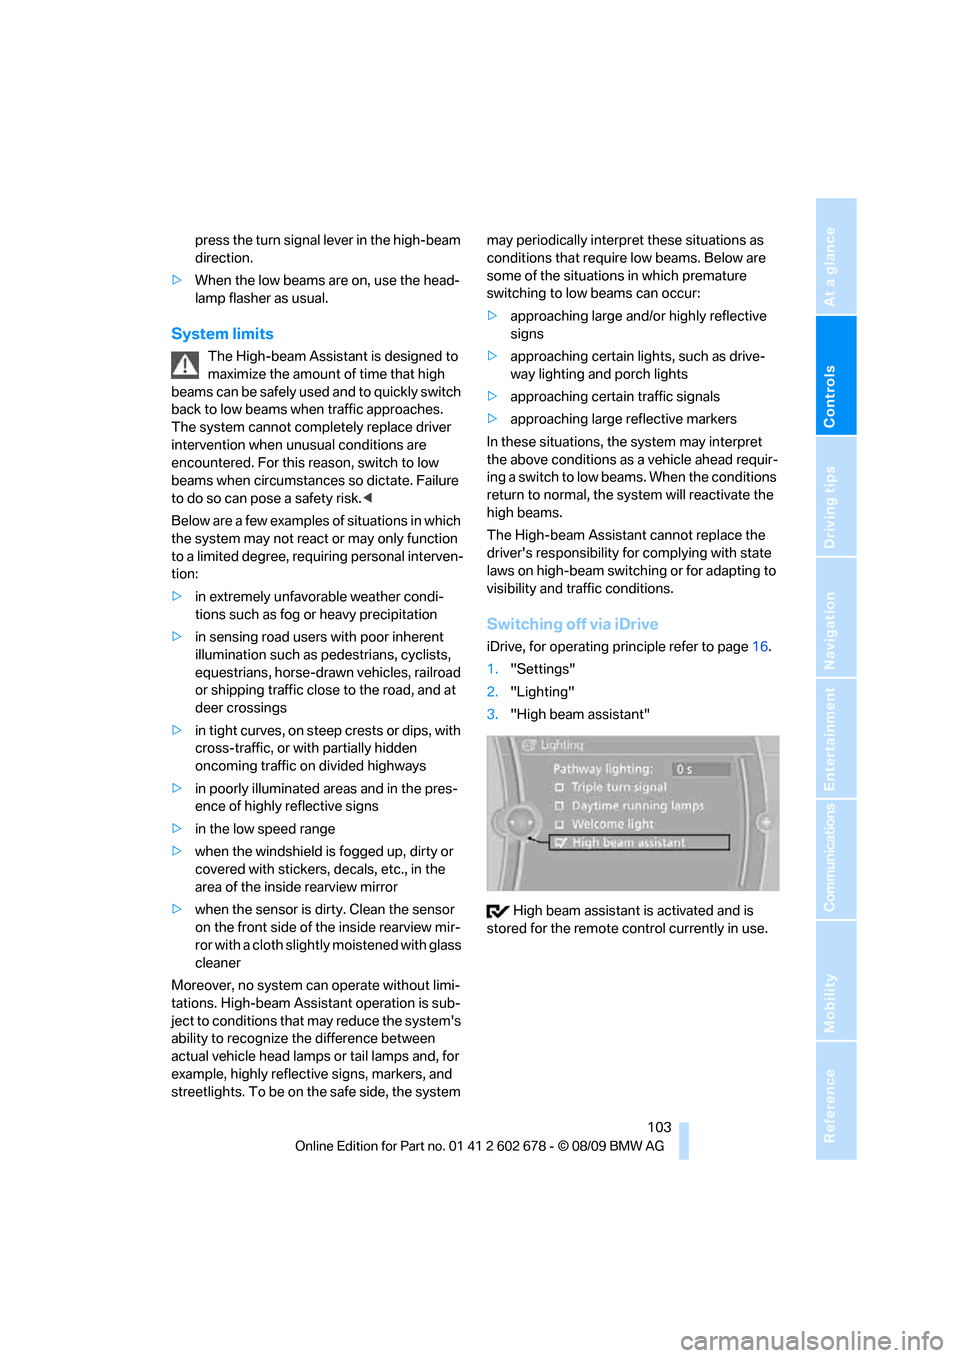
Switching off via iDrive
iDrive, for operating principle refer to page16.
1."Settings"
2."Lighting"
3."High beam assistant"
High beam assistant is activated and is
stored for the remote control currently in use.
Page 107 of 271
Controls
105Reference
At a glance
Driving tips
Communications
Navigation
Entertainment
Mobility
Climate
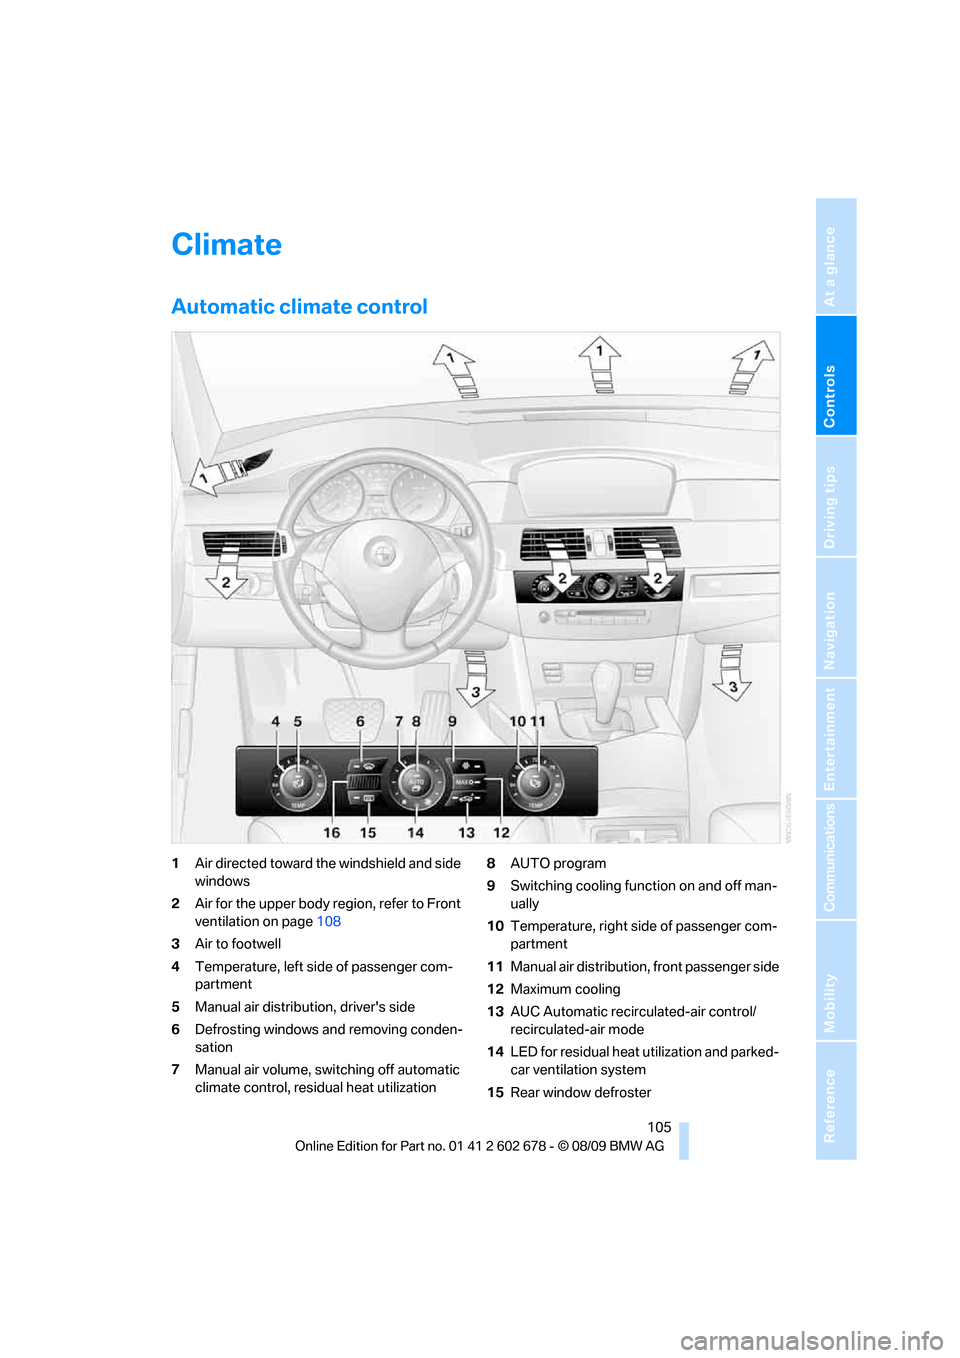
Automatic climate control
1Air directed toward the windshield and side
windows
2Air for the upper body region, refer to Front
ventilation on page108
3Air to footwell
4Temperature, left side of passenger com-
partment
5Manual air distribution, driver's side
6Defrosting windows and removing conden-
sation
7Manual air volume, switching off automatic
climate control, residual heat utilization8AUTO program
9Switching cooling function on and off man-
ually
10Temperature, right side of passenger com-
partment
11Manual air distribution, front passenger side
12Maximum cooling
13AUC Automatic recirculated-air control/
recirculated-air mode
14LED for residual heat utilization and parked-
car ventilation system
15Rear window defroster
Page 113 of 271

Controls
111Reference
At a glance
Driving tips
Communications
Navigation
Entertainment
Mobility
You can operate the device when the engine is
running or when the ignition is switched on.
If the device fails to function even after
repeated programming, check whether
the original hand-held transmitter uses an alter-
nating-code system. To do so, either read the
instructions for the original hand-held transmit-
ter or hold down the programmed memory
button1 of the integrated universal remote
control. If the LED2 on the integrated universal
remote control flashes rapidly for a short time
and then remains lit for approx. 2 seconds, this
indicates that the original hand-held transmitter
uses an alternating-code system. In the case of
an alternating-code system, program the mem-
ory buttons1 as described at Alternating-code
hand-held transmitters.<
Alternating-code hand-held
transmitters
To program the integrated universal remote
control, consult the operating instructions for
the equipment to be set. You will find informa-
tion there on the possibilities for synchroniza-
tion.
When programming hand-held transmitters
that employ an alternating code, please observe
the following supplementary instructions:
P r o g ra m m in g w i ll b e ea s i er w it h t h e a i d o f
a second person.<
1.Park your vehicle within the range of the
remote-controlled device.
2.Program the integrated universal remote
control as described above in the section
Fixed-code hand-held transmitters.
3.Locate the button on the receiver of the
device to be set, e. g. on the drive unit.
4.Press the button on the receiver of the
device to be set. After step 4, you have
approx. 30 seconds for step 5.
5.Press the programmed memory button1
of the integrated universal remote control
three times.
The corresponding memory button 1 is now
programmed with the signal of the original
hand-held transmitter.If you have any additional questions,
please contact your BMW center.<
Deleting all stored programs
Press the left and right-hand memory button1
for approx. 20 seconds until the LED2 flashes
quickly:
All stored programs are deleted.
Individual programs cannot be deleted.
Rememorizing individual programs
1.Hold the original handheld remote control
approx. 4 in/10 cm to 12 in/30 cm away
from the memory buttons1.
The required distance between the
hand-held transmitter and the mem-
ory buttons1 depends on the relevant sys-
tem of the original hand-held transmitter
used.<
2.Press the desired memory button1 of the
integrated universal remote control.
3.If the LED2 flashes slowly after approx.
20 seconds, press the command button of
the original hand-held transmitter. As soon
as the LED2 flashes rapidly, release both
buttons. If the LED2 does not flash rapidly
after approx. 15 seconds, alter the distance
and repeat the step.
Sun blinds*
Sun blind for rear window
Press the button on the driver's door.
Page 115 of 271
Controls
113Reference
At a glance
Driving tips
Communications
Navigation
Entertainment
Mobility
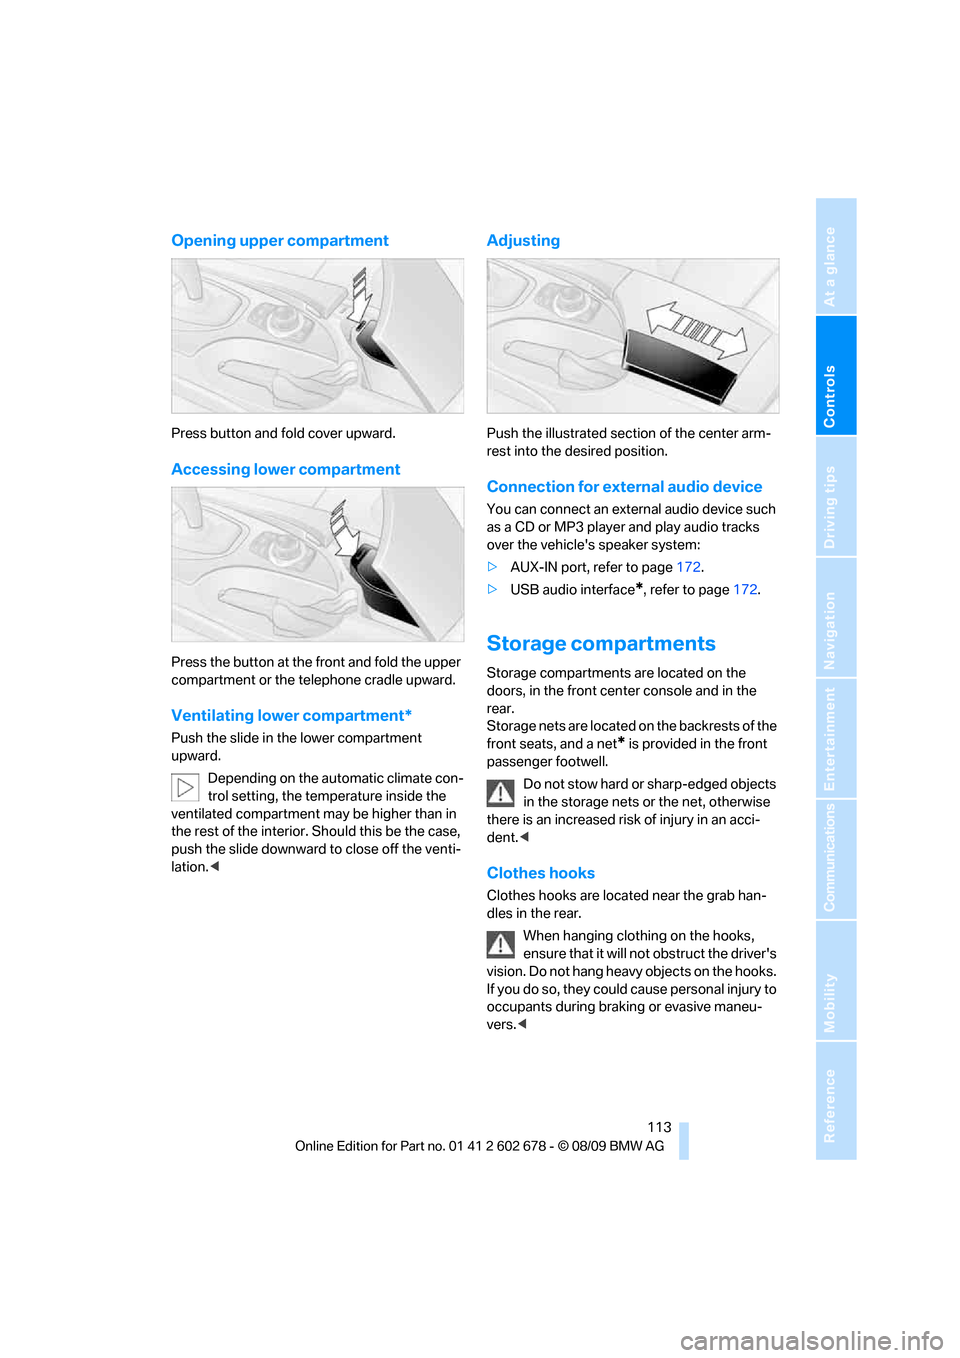
Opening upper compartment
Press button and fold cover upward.
Accessing lower compartment
Press the button at the front and fold the upper
compartment or the telephone cradle upward.
Ventilating lower compartment*
Push the slide in the lower compartment
upward.
Depending on the automatic climate con-
trol setting, the temperature inside the
ventilated compartment may be higher than in
the rest of the interior. Should this be the case,
push the slide downward to close off the venti-
lation.<
Adjusting
Push the illustrated section of the center arm-
rest into the desired position.
Connection for external audio device
You can connect an external audio device such
as a CD or MP3 player and play audio tracks
over the vehicle's speaker system:
>AUX-IN port, refer to page172.
>USB audio interface
*, refer to page172.
Storage compartments
Storage compartments are located on the
doors, in the front center console and in the
rear.
Storage nets are located on the backrests of the
front seats, and a net
* is provided in the front
passenger footwell.
Do not stow hard or sharp-edged objects
in the storage nets or the net, otherwise
there is an increased risk of injury in an acci-
dent.<
Clothes hooks
Clothes hooks are located near the grab han-
dles in the rear.
When hanging clothing on the hooks,
ensure that it will not obstruct the driver's
vision. Do not hang heavy objects on the hooks.
If you do so, they could cause personal injury to
occupants during braking or evasive maneu-
vers.<
Page 117 of 271
Controls
115Reference
At a glance
Driving tips
Communications
Navigation
Entertainment
Mobility
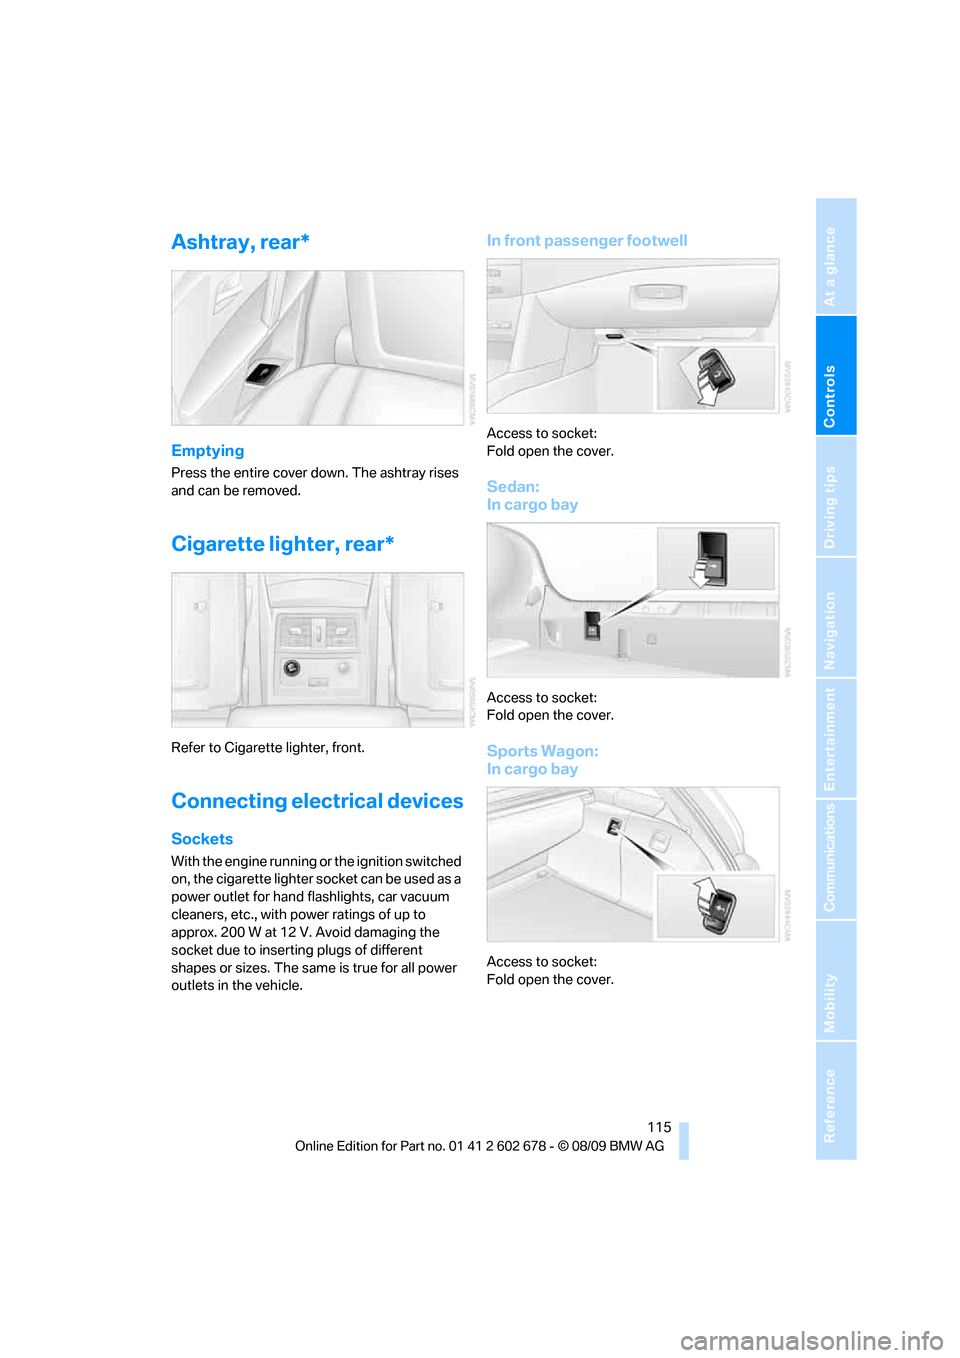
Ashtray, rear*
Emptying
Press the entire cover down. The ashtray rises
and can be removed.
Cigarette lighter, rear*
Refer to Cigarette lighter, front.
Connecting electrical devices
Sockets
With the engine running or the ignition switched
on, the cigarette lighter socket can be used as a
power outlet for hand flashlights, car vacuum
cleaners, etc., with power ratings of up to
approx. 200 W at 12 V. Avoid damaging the
socket due to inserting plugs of different
shapes or sizes. The same is true for all power
outlets in the vehicle.
In front passenger footwell
Access to socket:
Fold open the cover.
Sedan:
In cargo bay
Access to socket:
Fold open the cover.
Sports Wagon:
In cargo bay
Access to socket:
Fold open the cover.