2010 BMW 528I XDRIVE SEDAN light switch
[x] Cancel search: light switchPage 66 of 271

Driving
64 4Cleaning windshield, headlamps and
BMW Night Vision camera
*
5Adjusting rain sensor sensitivity level
Switching on wipers
Pull the lever upward, arrow1.
The lever automatically returns to its initial posi-
tion when released.
Normal wiper speed
Press once.
The system reverts to operation in the intermit-
tent mode when the vehicle is stationary.
Fast wiper speed
Press twice or press beyond the resistance
point.
The system reverts to normal speed when the
vehicle is stationary.
Rain sensor
The wiper operation is controlled automatically
as a function of the rain intensity. The rain sen-
sor is located on the windshield, directly in front
of the interior rearview mirror.
Activating rain sensor
Press the button, arrow3. The LED in the but-
ton lights up.
Adjusting rain sensor sensitivity level
Turn the thumbwheel5.
Deactivating rain sensor
Press the button again, arrow3. The LED goes
out.Deactivate the rain sensor when passing
through an automatic car wash. Failure to
do so could result in damage caused by undes-
ired wiper operation.<
Cleaning windshield, headlamps* and
BMW Night Vision camera*
Pull the lever, arrow4.
The system sprays washer fluid against the
windshield and activates the wipers for a brief
period.
With the vehicle lighting switched on, the head-
lamps and the BMW Night Vision camera are
also cleaned simultaneously at suitable inter-
vals.
Do not use the washing mechanisms if
there is any danger that the fluid will
freeze on the windshield. If you do so, your
vision could be obscured. To avoid freezing,
use a washer fluid antifreeze, refer to Washer
fluid. Do not use washing mechanisms when
the washer fluid reservoir is empty, otherwise
you will damage the washer pump.<
Windshield washer nozzles
The windshield washer nozzles are heated
when the engine is running or the ignition is
switched on.
Sports Wagon:
Rear window wiper
1Intermittent mode. When reverse gear is
engaged, continuous operation is switched
on automatically
2Cleaning the rear window
Page 68 of 271

Driving
66 the accelerator pedal. The system maintains
and stores your current speed as soon as you
release the lever.
Press the lever beyond the resistance point:
The speed is increased to the next fives posi-
tion in the mph display or the next tens position
in the km/h display.
Press and hold the lever beyond the resistance
point:
The vehicle accelerates more quickly.
Maintaining speed, storing speed, and
decelerating
Pull the lever, arrow2:
Functions are the same as1; the speed is
reduced.
Interrupting system
Press the lever up or down, arrow3: The
display1 in the speedometer changes color.
In addition, the system is interrupted:
>when you apply the brakes, even with the
parking brake
>when you shift very slowly, when you shift
the manual transmission into idling mode,
or when you shift the automatic transmis-
sion into the N position
>when DTC is activated or DSC is deacti-
vated
>when the DSC comes on
Resuming stored speed
Press button4:
The stored speed is resumed and maintained.
Deactivating system
>Press the lever up or down twice, arrow3
>Switch off the ignition
The speed stored in the memory is deleted.
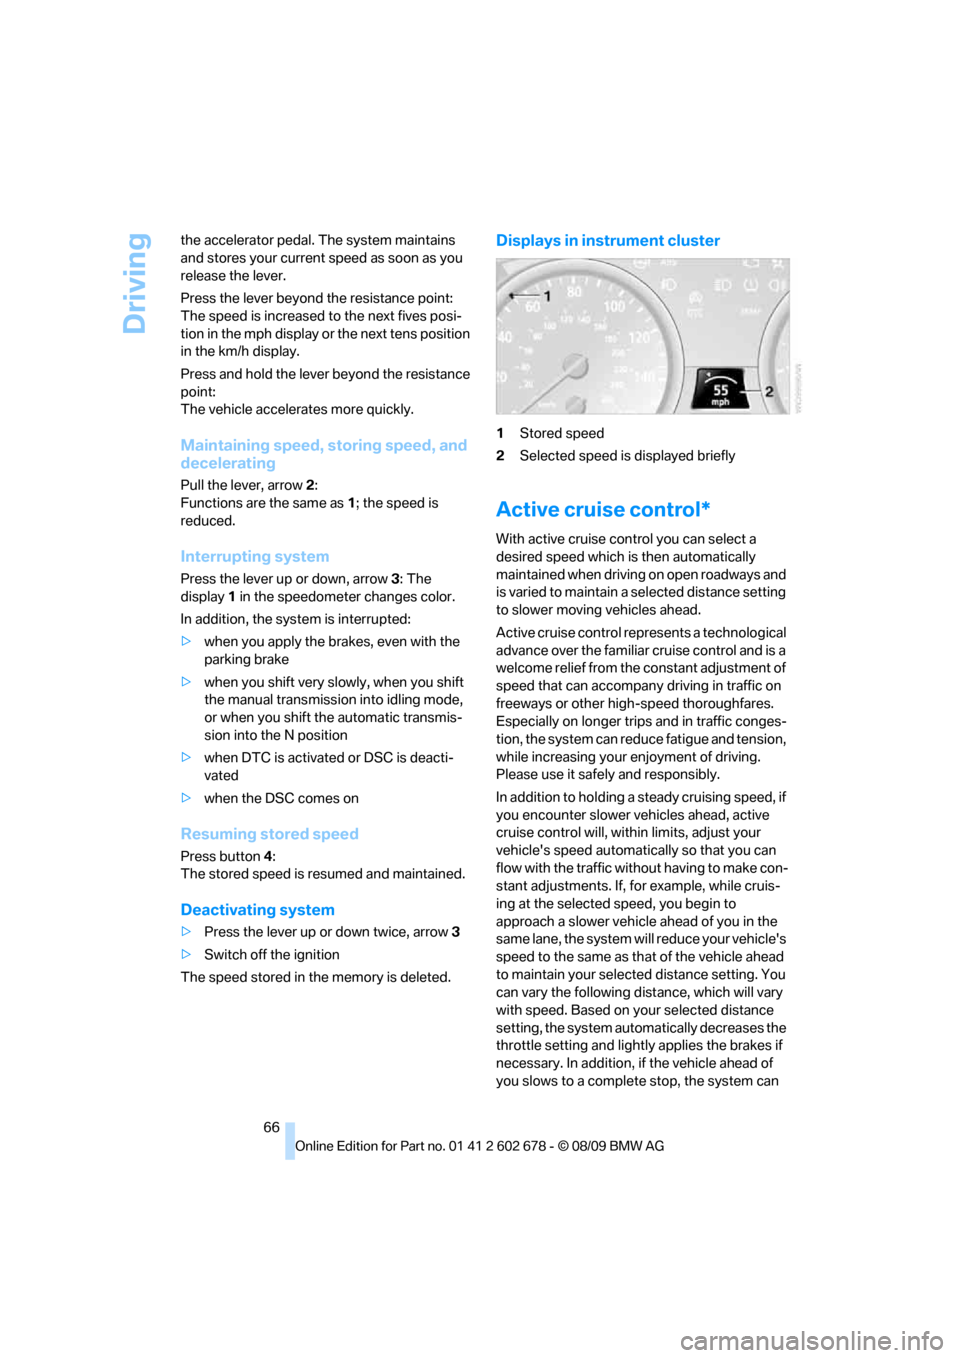
Displays in instrument cluster
1Stored speed
2Selected speed is displayed briefly
Active cruise control*
With active cruise control you can select a
desired speed which is then automatically
maintained when driving on open roadways and
is varied to maintain a selected distance setting
to slower moving vehicles ahead.
Active cruise control represents a technological
advance over the familiar cruise control and is a
welcome relief from the constant adjustment of
speed that can accompany driving in traffic on
freeways or other high-speed thoroughfares.
Especially on longer trips and in traffic conges-
tion, the system can reduce fatigue and tension,
while increasing your enjoyment of driving.
Please use it safely and responsibly.
In addition to holding a steady cruising speed, if
you encounter slower vehicles ahead, active
cruise control will, within limits, adjust your
vehicle's speed automatically so that you can
flow with the traffic without having to make con-
stant adjustments. If, for example, while cruis-
ing at the selected speed, you begin to
approach a slower vehicle ahead of you in the
same lane, the system will reduce your vehicle's
speed to the same as that of the vehicle ahead
to maintain your selected distance setting. You
can vary the following distance, which will vary
with speed. Based on your selected distance
setting, the system automatically decreases the
throttle setting and lightly applies the brakes if
necessary. In addition, if the vehicle ahead of
you slows to a complete stop, the system can
Page 76 of 271

Controls Overview
74
Controls Overview
Odometer, outside
temperature display, clock,
date
1Time, outside temperature and date
2Odometer and trip odometer
3Press button:
>with ignition switched on, trip odometer
is reset
>with ignition switched off, time, outside
temperature, and odometer are briefly
displayed.
From radio readiness the outside temperature
and the time are displayed.
Date retrieval:
Press CHECK button on turn signal lever, refer
to page81.
Time and date setting, refer to page78.
You can set the unit of measure 7 or 6 on the
Control Display, refer to Units of measure on
page76.
Outside temperature warning
If the display drops to +377/+36, a signal
sounds and a warning lamp lights up. A mes-
sage appears on the Control Display. There is
an increased danger of ice.
Even at temperatures above +377/
+36 ice can form. Therefore, drive care-
fully, e.g., on bridges and sections of road in the
shade, otherwise there is an increased accident
risk.<
Tachometer
Avoid engine speeds in the white-striped
advance warning field, arrow1, if possible.
Never force the engine speed up into the red
warning field, see arrow2. Never operate the
engine with the needle in the red overspeed
z o n e o f t h e g a u g e . A t h i g h r e v s i n t h i s r a n g e , t h e
flow of fuel is interrupted to protect the engine.
Coolant temperature
Should the coolant, and with it the engine
become too hot, a warning lamp lights up. In
addition, a message appears on the Control
Display.
Checking coolant level, refer to page214.
Page 77 of 271

Controls
75Reference
At a glance
Driving tips
Communications
Navigation
Entertainment
Mobility
Energy Control
Displays the current fuel consumption. This
allows you to see whether your current driving
style is conducive to fuel economy with mini-
mum exhaust emissions.
Fuel gauge
Fuel tank capacity: approx. 18.5 US gal/
70 liters, including the reserve capacity of
approx. 2.1 US gal/8 liters.
550i: approx. 2.6 US gal/10 liters reserve
capacity.
You will find information on refueling on
page200.
If the tilt of the vehicle varies for a longer period,
when you are driving in mountainous areas, for
example, the indicator may fluctuate slightly.
Reserve
After the reserve quantity has been reached, a
message briefly appears on the Control Display;
the remaining range is shown in the computer.
Below a range of approx. 30 miles/50 km, the
message remains on the Control Display.
Refuel as soon as possible once your
cruising range falls below 30 miles/50 km, otherwise engine functions are not
ensured and damage can occur.<
Computer
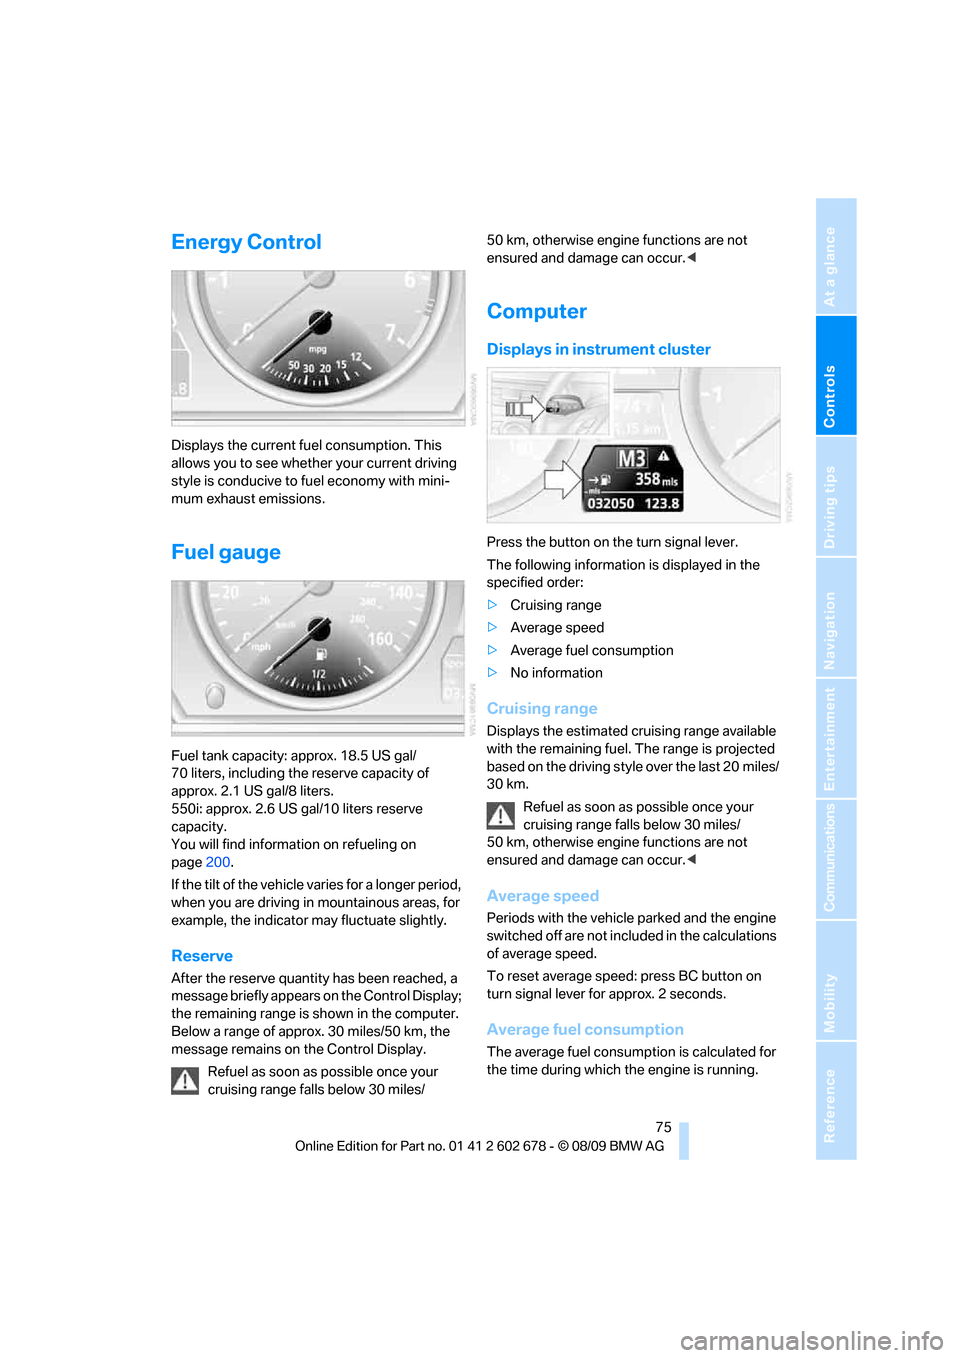
Displays in instrument cluster
Press the button on the turn signal lever.
The following information is displayed in the
specified order:
>Cruising range
>Average speed
>Average fuel consumption
>No information
Cruising range
Displays the estimated cruising range available
with the remaining fuel. The range is projected
based on the driving style over the last 20 miles/
30 km.
Refuel as soon as possible once your
cruising range falls below 30 miles/
50 km, otherwise engine functions are not
ensured and damage can occur.<
Average speed
Periods with the vehicle parked and the engine
switched off are not included in the calculations
of average speed.
To reset average speed: press BC button on
turn signal lever for approx. 2 seconds.
Average fuel consumption
The average fuel consumption is calculated for
the time during which the engine is running.
Page 86 of 271

Technology for comfort, convenience and safety
84
Technology for comfort, convenience and
safety
PDC Park Distance Control*
The concept
The PDC assists you when you are parking.
Acoustic signals and an optical display
* alert
you to the approach of an object from behind
your vehicle. To measure the distance, there
are four ultrasonic sensors in each bumper.
The range of these sensors is approx. 7 ft/2 m.
However, an acoustic warning first sounds for
the sensors at the front and at the two rear cor-
ners at approx. 24 in/60 cm, and for the center
rear sensors at approx. 5 ft/1.50 m.
PDC is a parking aid that can indicate
objects when they are approached
slowly, as is usually the case when parking.
Avoid approaching an object at high speed, oth-
erwise the physical circumstances would mean
that the system warning was too late.<
Automatic activation
The system starts to operate approx. one sec-
ond after you shift into reverse or move the
selector lever into position R with the engine
running or the ignition switched on.
Wait this short time before driving off.
Manual activation
Press the button, the LED lights up.
Manual deactivation
Press the button again; the LED goes out.
Automatic deactivation
After driving approx. 165 ft/50 m or at over
approx. 20 mph/30 km/h, the system is
switched off and the LED goes out. You can
reactivate the system manually as needed.
Signal tones
When nearing an object, the position is corre-
spondingly indicated by an interval tone. Thus,
an object detected to the left rear of the vehicle
will be indicated by a signal tone from the left
rear speaker, etc. As the distance between
vehicle and object decreases, the intervals
between the tones become shorter. If the dis-
tance to the nearest object falls to below
roughly 1 ft/30 cm, then a continuous tone
sounds.
An intermittent tone is interrupted after approx.
3seconds:
>if you remain in front of an object that was
only detected by one of the corner sensors
>if you drive parallel to a wall
Malfunction
The LED in the button flashes and a message
appears on the Control Display. PDC is mal-
functioning. Have the system checked.
To prevent this problem, keep the sensors
clean and free of ice or snow in order to ensure
that they will continue to operate effectively. Do
not spray the sensors with high-pressure clean-
ing jets for long periods and maintain a distance
of at least 4 in/10 cm to them.
PDC with visual warning*
The approach of the vehicle to an object is
shown on the Control Display. Objects that are
farther away are already shown there before a
signal tone sounds. The display appears on the
Control Display as soon as PDC is activated.
Page 95 of 271

Controls
93Reference
At a glance
Driving tips
Communications
Navigation
Entertainment
Mobility
When you are driving in the low speed range,
e. g. in a town or when parking, the steering
angle increases, i.e., the steering becomes very
direct. In the higher speed range, on the other
hand, the steering angle is reduced more and
more. This improves the handling capability of
your BMW over the entire speed range.
In critical situations, the system can make tar-
geted corrections to the steering angle pro-
vided by the driver and thus stabilize the vehicle
before the driver intervenes. This stabilizing
intervention is simultaneously deactivated
when DSC is switched off, refer to page85.
Malfunction
The warning lamp lights up yellow and
a message is shown on the Control Dis-
play. Active steering is malfunctioning
or is temporarily deactivated. At low speeds,
greater steering wheel movements are
required, whereas at higher speeds, the vehicle
reacts more sensitively to steering wheel move-
ments. The stability-promoting intervention
can also be deactivated. Proceed cautiously
and drive defensively.
Deactivation
Active steering is deactivated to perform an ini-
tialization. A message indicates that the feature
is deactivated. Initialization may take several
minutes.
If the message does not go out during the cur-
rent trip, have the system checked.
Defect
A text message appears if there is a defect.
Have the system checked.
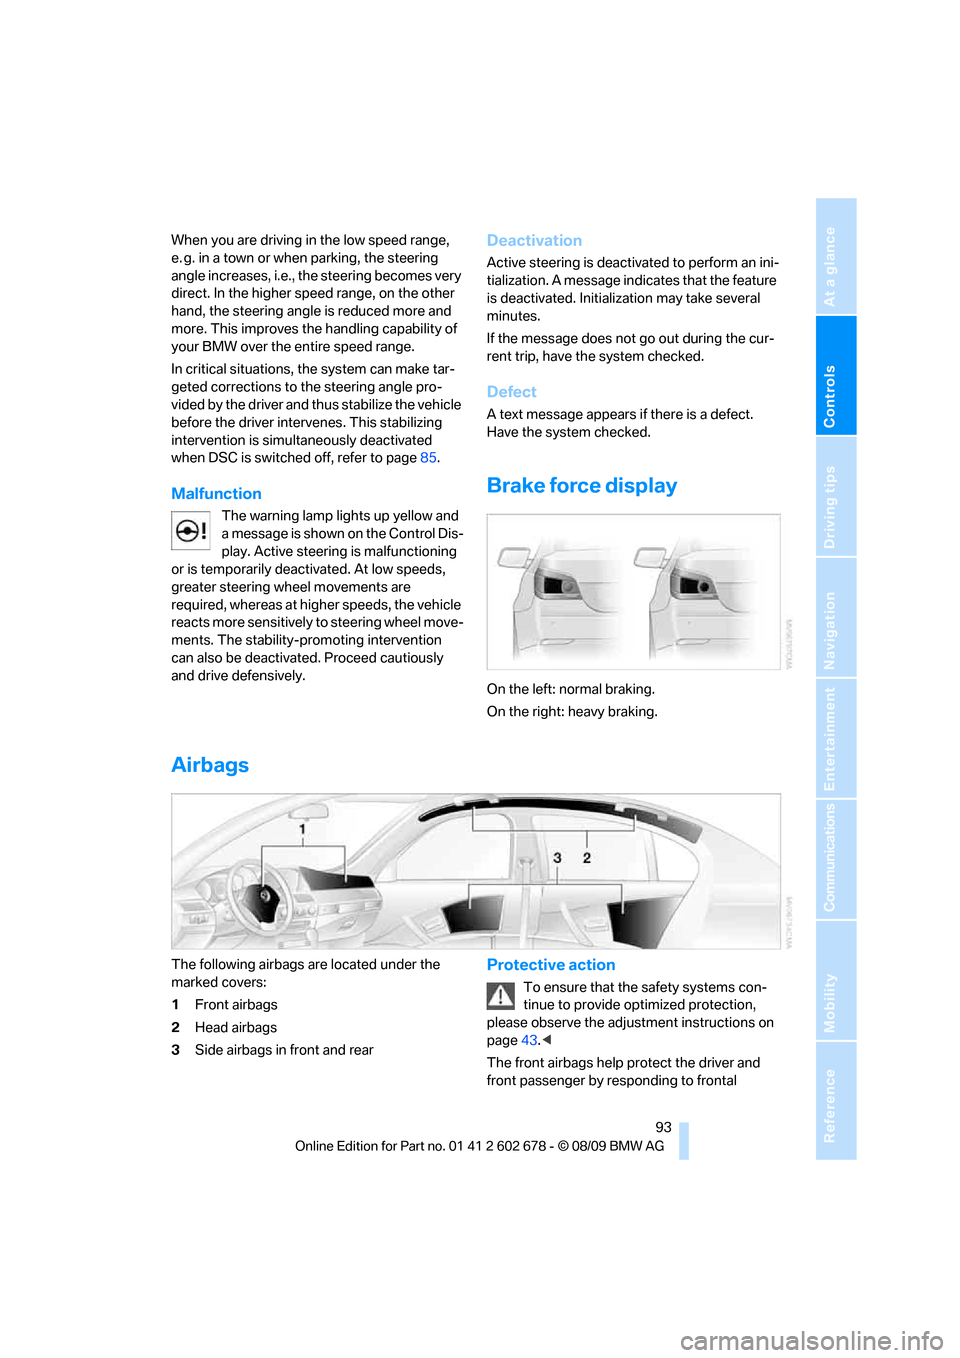
Brake force display
On the left: normal braking.
On the right: heavy braking.
Airbags
The following airbags are located under the
marked covers:
1Front airbags
2Head airbags
3Side airbags in front and rearProtective action
To ensure that the safety systems con-
tinue to provide optimized protection,
please observe the adjustment instructions on
page43.<
The front airbags help protect the driver and
front passenger by responding to frontal
Page 96 of 271

Technology for comfort, convenience and safety
94 impacts in which safety belts alone cannot pro-
vide adequate restraint. When needed, the
head and side airbags help provide protection in
the event of side impact. The relevant side air-
bag supports the side upper body area. The
head air bag supports the head.
The airbags are deliberately not triggered in
every impact situation, e. g. less severe acci-
dents or rear-end collisions.
Do not apply adhesive materials to the
cover panels of the airbags, cover them or
modify them in any other way. Do not attempt to
remove the airbag restraint system from the
vehicle. Do not modify or tamper with either the
wiring or the individual components in the air-
bag system. This category includes the uphol-
stery in the center of the steering wheel, on the
instrument panel, the doors and the roof pillars
along with the sides of the headliner. Do not
attempt to remove or dismantle the steering
wheel. Do not touch the individual components
immediately after the system has been trig-
gered, because there is a danger of burns.
In the event of malfunctions, deactivation, or
triggering of the airbag restraint system, have
the testing, repair, removal, and disposal of air-
bag generators executed only by a BMW center
or a workshop that works according to BMW
repair procedures with correspondingly trained
personnel and has the required explosives
licenses. Otherwise unprofessional attempts to
service the system could lead to failure in an
emergency or undesired airbag triggering,
either of which could result in personal injury.<
Warnings and information on the airbags is also
provided on the sun visors.
Automatic deactivation of front
passenger airbags
The occupation of the seat is detected by eval-
uating the impression on the occupied seat sur-
face of the front passenger seat. The front and
side airbags on the front passenger side are
activated or deactivated accordingly by the sys-
tem.
The current status of the front passenger
airbag, i.e., deactivated or activated, is indicated by the indicator lamp over the interior
rearview mirror, refer to Operating state of front
passenger airbags in the following.<
Before transporting a child on the front
passenger seat, observe the safety infor-
mation and handling instructions under Trans-
porting children safely refer to page53.
The front and side airbags on the front passen-
ger side can be deactivated for teenagers and
adults in certain sitting positions; then the indi-
cator lamp for the front passenger airbags lights
up. In these cases, change the sitting position
so that the front passenger airbags are acti-
vated and the indicator lamp goes out. If the
desired status cannot be produced by changing
the sitting position, transport the correspond-
ing person on the rear seat. Do not fit seat cov-
ers, seat cushion padding, ball mats or other
items onto the front passenger seat unless they
are specifically recommended by BMW. Do not
lay objects under the seat which could press
against the seat from below. Otherwise a cor-
rect evaluation of the occupied seat surface
cannot be ensured.<
Operating state of front passenger
airbags
Depending on the vehicle's equipment, the
arrangement of the switches and indicator
lamps may differ somewhat.
The indicator lamp for the front passenger air-
bags indicates the operating status of the front
and side airbags on the front passenger side
depending on the seat occupation. The indica-
tor lamp shows whether the front passenger
airbags are activated or deactivated.
>The indicator lamp lights up when a child in
a child restraint system intended for the
Page 97 of 271

Controls
95Reference
At a glance
Driving tips
Communications
Navigation
Entertainment
Mobility
purpose is properly detected on the seat.
The front and side airbags on the front pas-
senger side are not activated.
Most child seats are detected by the sys-
tem, especially the child seats required by
the NHTSA at the time the vehicle is manufac-
tured. After installing a child seat, make sure
that the indicator lamp for the front passenger
airbags lights up. This indicates that the child
seat has been detected and the front passenger
airbags are not activated.<
>The indicator lamp does not light up if, for
example, the system detects a person of
sufficient size seated correctly on the seat.
The front and side airbags on the front pas-
senger side are activated.
>The indicator lamp does not light up when
the seat is empty.
However, the front and side airbags on the
front passenger side are not activated.
Operational readiness of airbag system
From radio readiness, refer to page57, the
warning lamp lights up briefly, indicating the
operational readiness of the entire airbag sys-
tem and the safety belt tensioners.
Airbag system malfunction
>Warning lamp does not light up from radio
readiness.
>Warning lamp lights up continuously.
Have the airbag system checked immedi-
ately in case of a malfunction, otherwise
there is a danger that the airbag system may not
respond in the expected manner in an accident
despite an impact of corresponding intensity.<
Head-up Display*
The concept
With the Head-up Display important informa-
tion is projected into the driver's field of view,
e.g., navigation instructions. This enables you
to take in this information without looking away
from the road.
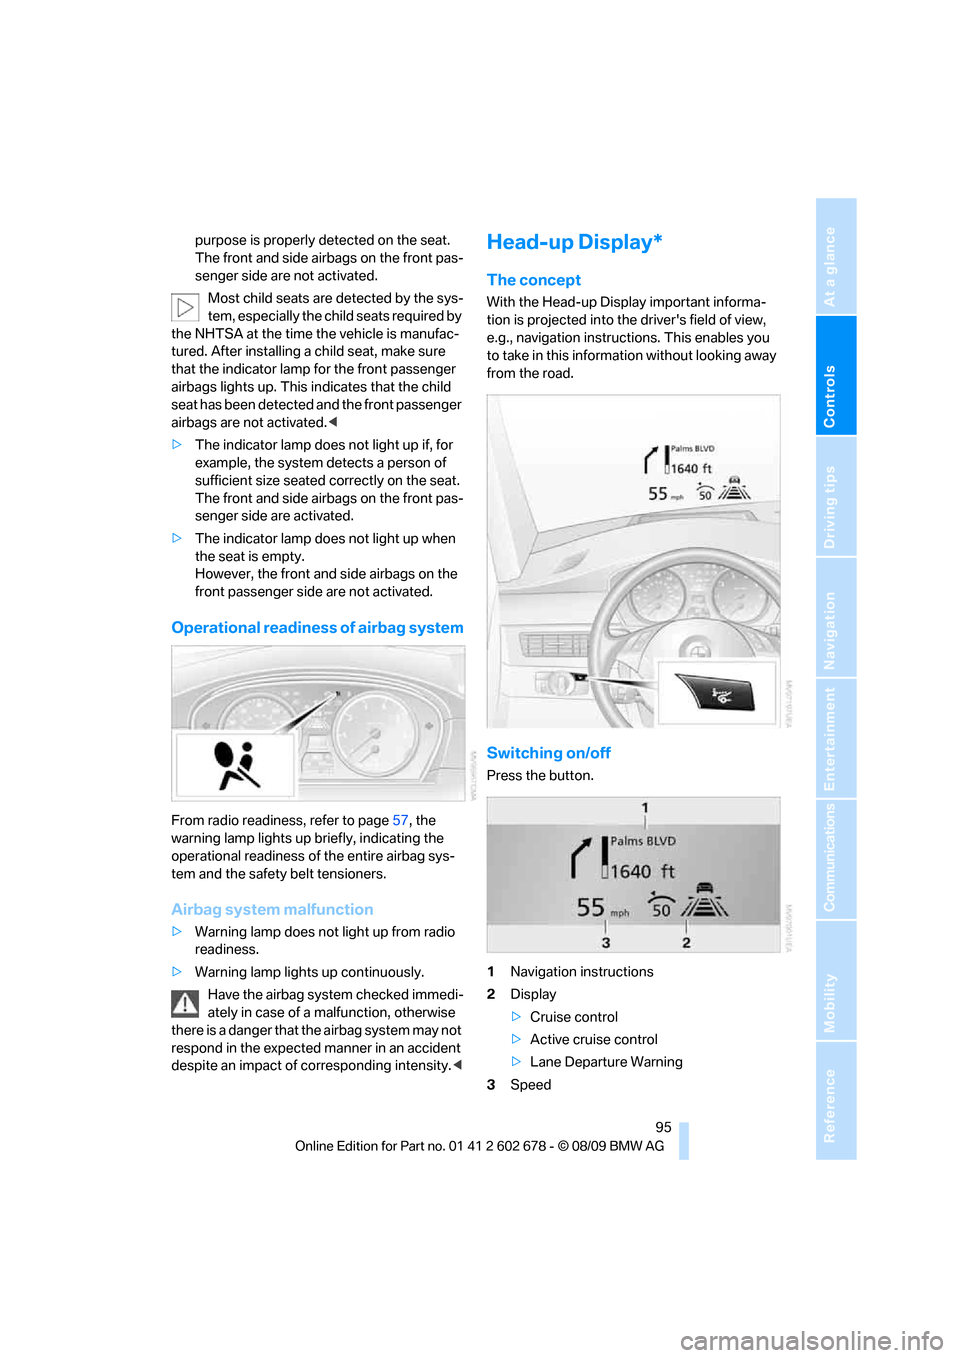
Switching on/off
Press the button.
1Navigation instructions
2Display
>Cruise control
>Active cruise control
>Lane Departure Warning
3Speed