2010 BMW 528I XDRIVE SEDAN remote start
[x] Cancel search: remote startPage 62 of 271
Driving
60
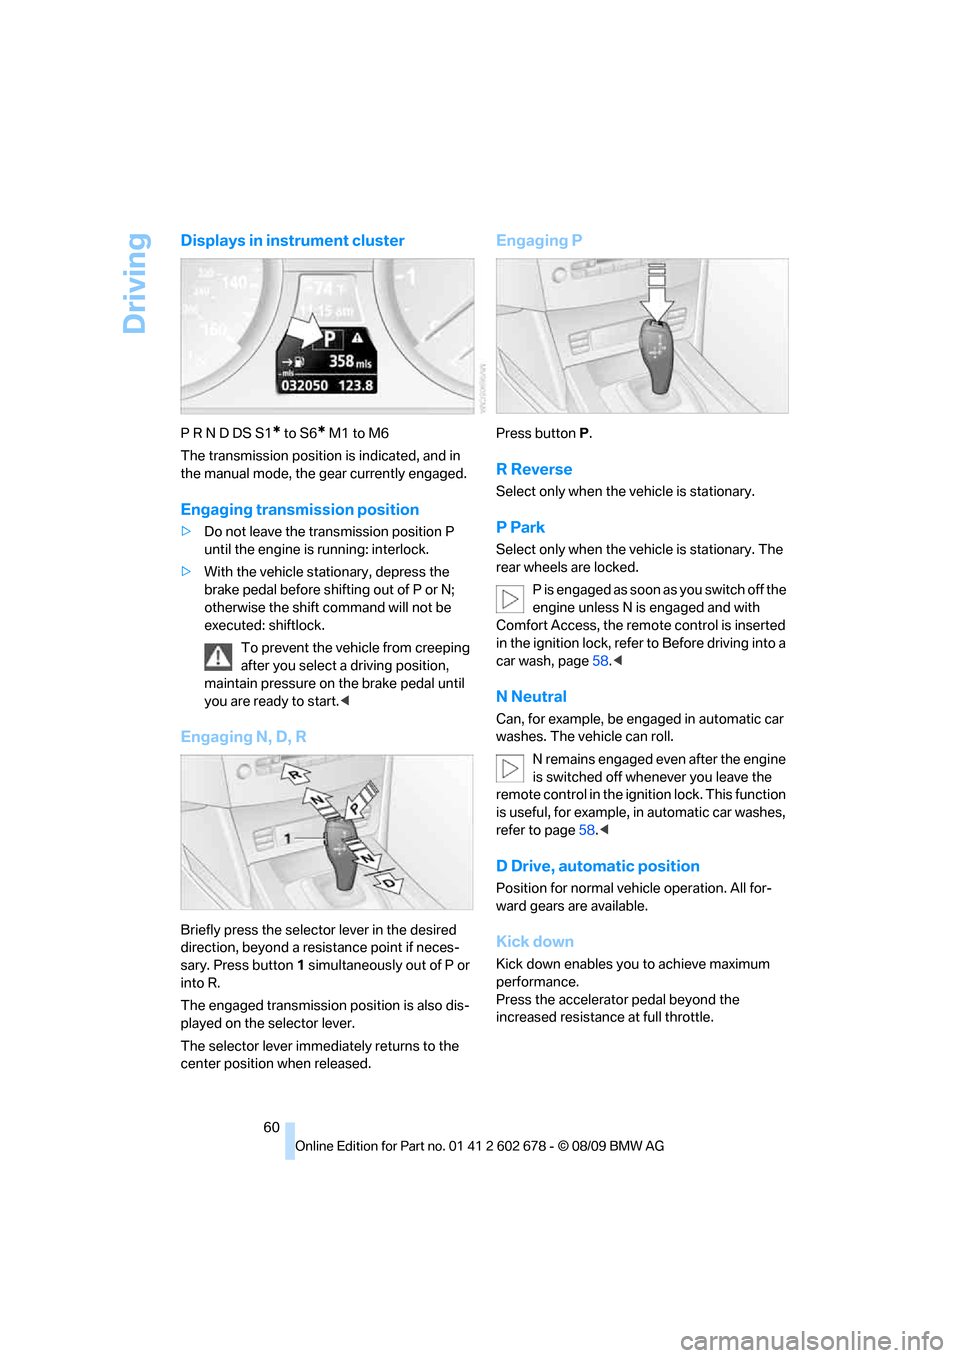
Displays in instrument cluster
P R N D DS S1* to S6* M1 to M6
The transmission position is indicated, and in
the manual mode, the gear currently engaged.
Engaging transmission position
>Do not leave the transmission position P
until the engine is running: interlock.
>With the vehicle stationary, depress the
brake pedal before shifting out of P or N;
otherwise the shift command will not be
executed: shiftlock.
To prevent the vehicle from creeping
after you select a driving position,
maintain pressure on the brake pedal until
you are ready to start.<
Engaging N, D, R
Briefly press the selector lever in the desired
direction, beyond a resistance point if neces-
sary. Press button1 simultaneously out of P or
into R.
The engaged transmission position is also dis-
played on the selector lever.
The selector lever immediately returns to the
center position when released.
Engaging P
Press buttonP.
R Reverse
Select only when the vehicle is stationary.
P Park
Select only when the vehicle is stationary. The
rear wheels are locked.
P i s e n g a g e d a s s o o n a s y o u s w i t c h o f f t h e
engine unless N is engaged and with
Comfort Access, the remote control is inserted
in the ignition lock, refer to Before driving into a
car wash, page58.<
N Neutral
Can, for example, be engaged in automatic car
washes. The vehicle can roll.
N remains engaged even after the engine
is switched off whenever you leave the
remote control in the ignition lock. This function
is useful, for example, in automatic car washes,
refer to page58.<
D Drive, automatic position
Position for normal vehicle operation. All for-
ward gears are available.
Kick down
Kick down enables you to achieve maximum
performance.
Press the accelerator pedal beyond the
increased resistance at full throttle.
Page 98 of 271
Technology for comfort, convenience and safety
96
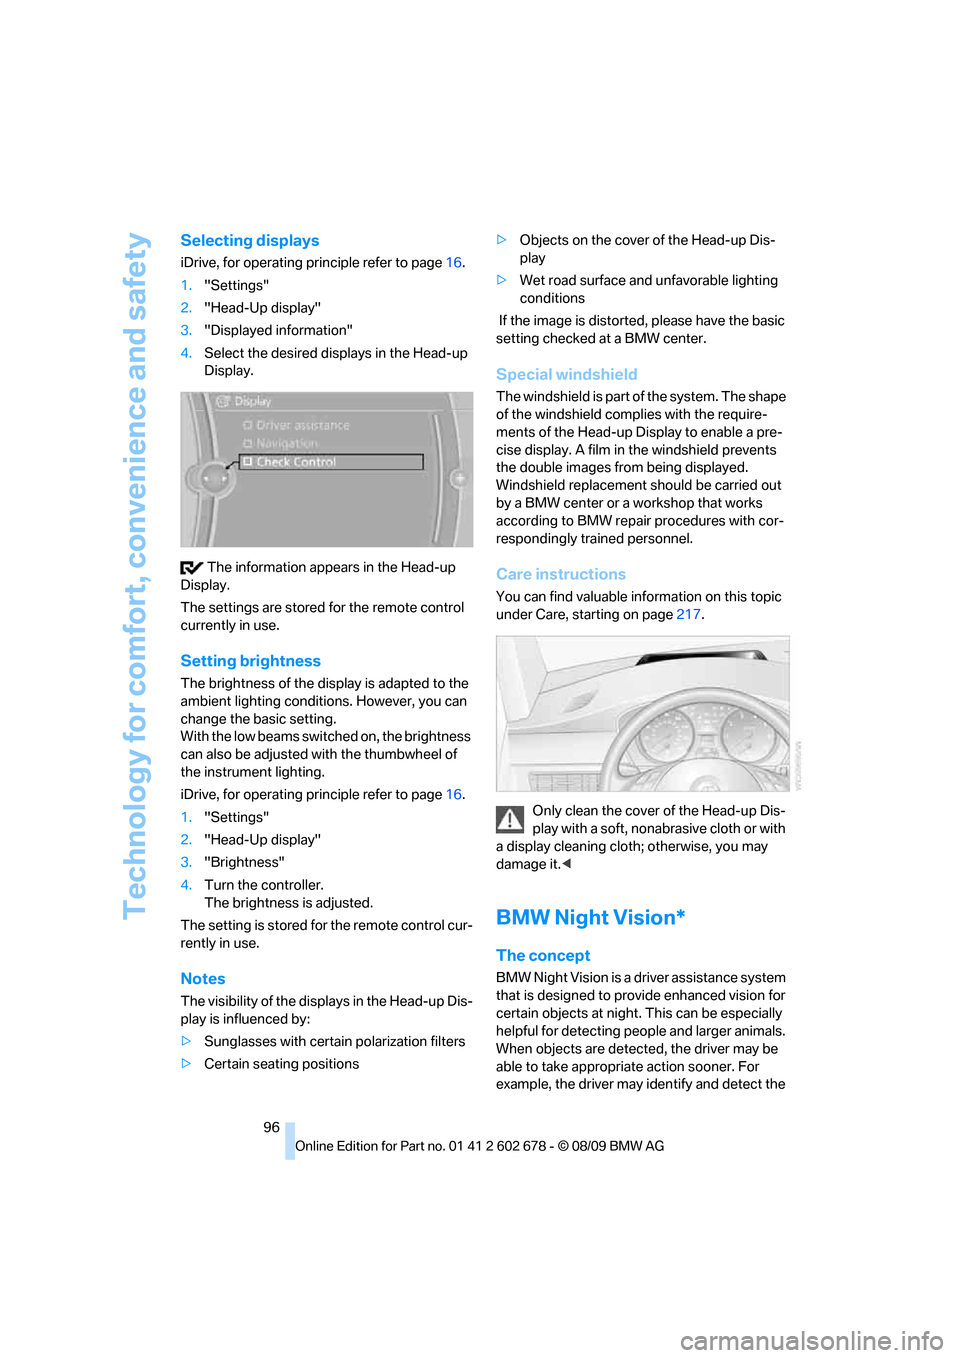
Selecting displays
iDrive, for operating principle refer to page16.
1."Settings"
2."Head-Up display"
3."Displayed information"
4.Select the desired displays in the Head-up
Display.
The information appears in the Head-up
Display.
The settings are stored for the remote control
currently in use.
Setting brightness
The brightness of the display is adapted to the
ambient lighting conditions. However, you can
change the basic setting.
With the low beams switched on, the brightness
can also be adjusted with the thumbwheel of
the instrument lighting.
iDrive, for operating principle refer to page16.
1."Settings"
2."Head-Up display"
3."Brightness"
4.Turn the controller.
The brightness is adjusted.
The setting is stored for the remote control cur-
rently in use.
Notes
The visibility of the displays in the Head-up Dis-
play is influenced by:
>Sunglasses with certain polarization filters
>Certain seating positions>Objects on the cover of the Head-up Dis-
play
>Wet road surface and unfavorable lighting
conditions
If the image is distorted, please have the basic
setting checked at a BMW center.
Special windshield
The windshield is part of the system. The shape
of the windshield complies with the require-
ments of the Head-up Display to enable a pre-
cise display. A film in the windshield prevents
the double images from being displayed.
Windshield replacement should be carried out
by a BMW center or a workshop that works
according to BMW repair procedures with cor-
respondingly trained personnel.
Care instructions
You can find valuable information on this topic
under Care, starting on page217.
Only clean the cover of the Head-up Dis-
play with a soft, nonabrasive cloth or with
a display cleaning cloth; otherwise, you may
damage it.<
BMW Night Vision*
The concept
BMW Night Vision is a driver assistance system
that is designed to provide enhanced vision for
certain objects at night. This can be especially
helpful for detecting people and larger animals.
When objects are detected, the driver may be
able to take appropriate action sooner. For
example, the driver may identify and detect the
Page 112 of 271
Practical interior accessories
110
Practical interior accessories
Integrated universal remote
control*
The concept
The integrated universal remote control can
replace as many as three hand-held transmit-
ters for various remote-controlled accessories,
such as garage and gate or lighting systems.
The integrated universal remote control regis-
ters and stores signals from the original hand-
held transmitters.
The signal of an original hand-held transmitter
can be programmed on one of the three mem-
ory buttons1. After this, the programmed
memory button1 will operate the system in
question. The LED2 flashes to confirm trans-
mission of the signal.
Should you sell your vehicle one day, be sure to
delete the stored programs beforehand for your
safety, refer to page111.
To prevent possible damage or injury,
before programming or using the inte-
grated universal remote control, always inspect
the immediate area to make certain that no peo-
ple, animals or objects are within the travel
range of the device. Also, comply with the
safety precautions of the original hand-held
transmitter.<
Checking compatibility
If you see this symbol on the packaging
or in the manual supplied with the orig-
inal hand-held transmitter, it is safe to
assume that it is compatible with the integrated
universal remote control.
If you have additional questions, please
contact your BMW center or call:
1-800-355-3515.
Information is also provided on the Internet at:
www.bmwusa.com or
www.homelink.com.
HomeLink is a registered trademark of Johnson
Controls, Inc.<
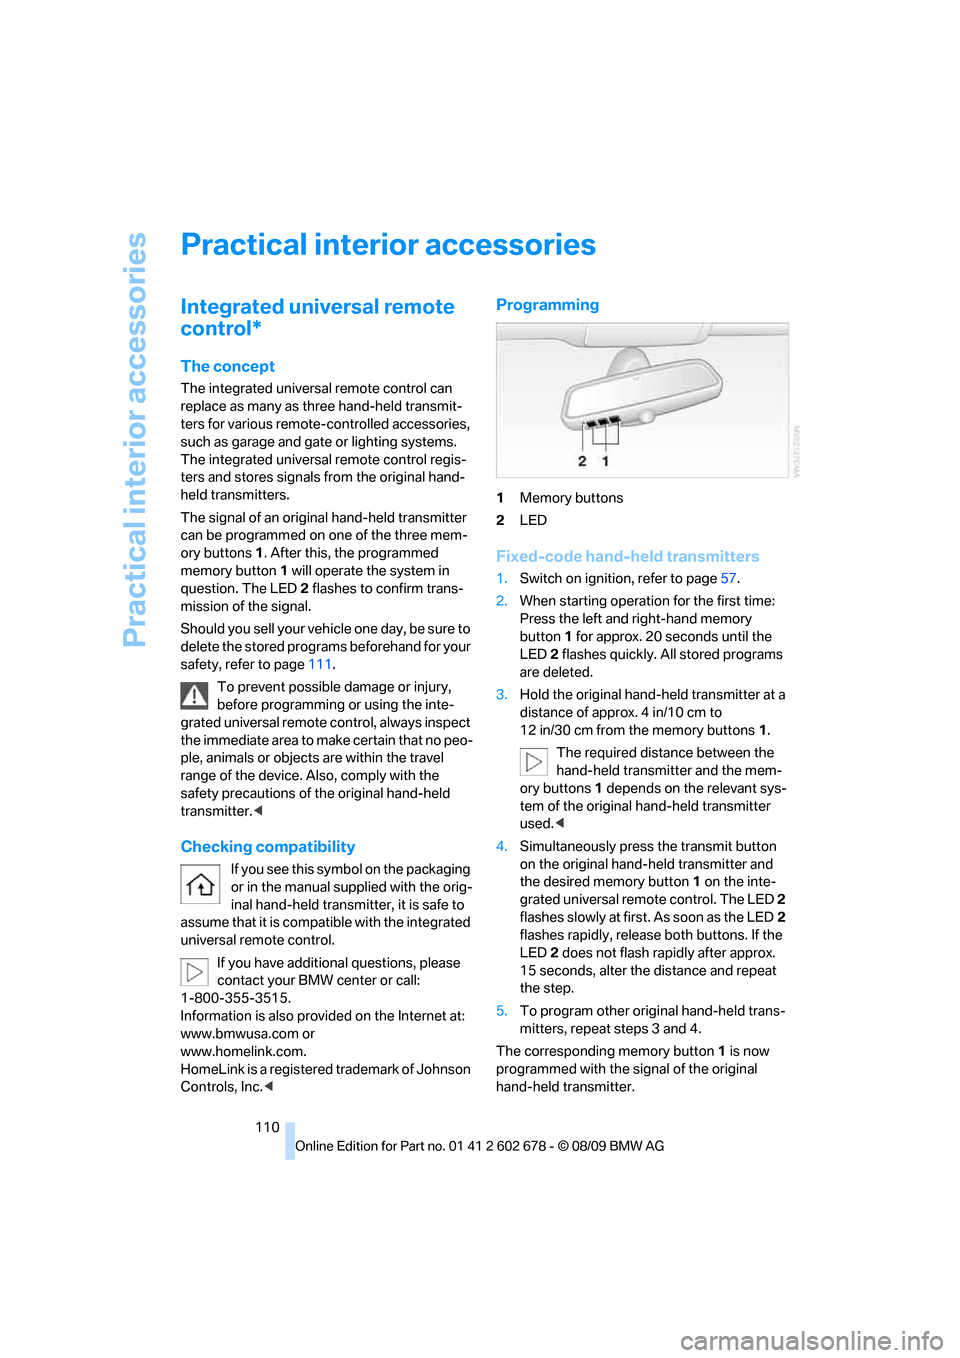
Programming
1Memory buttons
2LED
Fixed-code hand-held transmitters
1.Switch on ignition, refer to page57.
2.When starting operation for the first time:
Press the left and right-hand memory
button1 for approx. 20 seconds until the
LED2 flashes quickly. All stored programs
are deleted.
3.Hold the original hand-held transmitter at a
distance of approx. 4 in/10 cm to
12 in/30 cm from the memory buttons1.
The required distance between the
hand-held transmitter and the mem-
ory buttons1 depends on the relevant sys-
tem of the original hand-held transmitter
used.<
4.Simultaneously press the transmit button
on the original hand-held transmitter and
the desired memory button 1 on the inte-
grated universal remote control. The LED 2
flashes slowly at first. As soon as the LED2
flashes rapidly, release both buttons. If the
LED2 does not flash rapidly after approx.
15 seconds, alter the distance and repeat
the step.
5.To program other original hand-held trans-
mitters, repeat steps 3 and 4.
The corresponding memory button 1 is now
programmed with the signal of the original
hand-held transmitter.
Page 144 of 271
Destination guidance
142
Destination guidance
Starting destination
guidance
1."Navigation"
2."Enter address"
3.Select the destination.
4."Accept destination"
5."Start guidance"
The route is displayed on the Control Display
after it is calculated.
Terminating destination
guidance
1."Navigation"
2."Map"
3.Select the symbol.
4."Stop guidance"
Continuing destination
guidance
If the destination was not reached during the
last trip, destination guidance can be resumed.
"Resume guidance"
Route criteria
General information
You can influence the calculated route by
choosing certain route criteria. You can change
the route criteria as often as you like while
entering the destination and whenever the des-
tination guidance is active.
The route is planned according to fixed rules.
The type of road is taken into account, e.g.,
whether it is a highway or a winding road. As a
result, the routes recommended by the naviga-
tion system may not always be the same ones that you would choose based on personal expe-
rience.
The settings are stored for the remote control
currently in use.
Changing route criteria
1."Navigation"
2."Map"
3."Route preference"
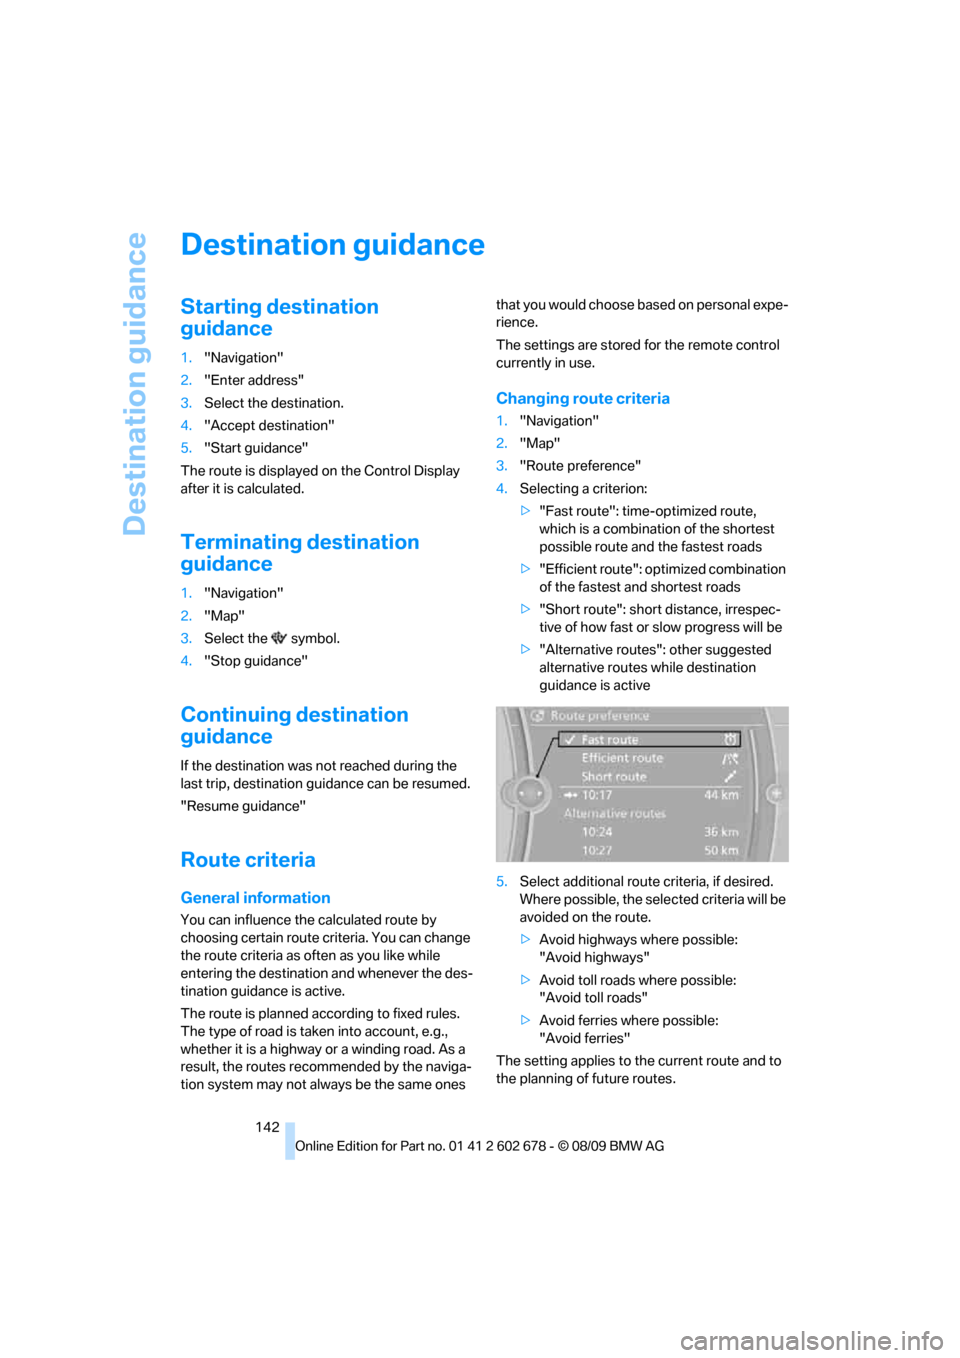
4.Selecting a criterion:
>"Fast route": time-optimized route,
which is a combination of the shortest
possible route and the fastest roads
>"Efficient route": optimized combination
of the fastest and shortest roads
>"Short route": short distance, irrespec-
tive of how fast or slow progress will be
>"Alternative routes": other suggested
alternative routes while destination
guidance is active
5.Select additional route criteria, if desired.
Where possible, the selected criteria will be
avoided on the route.
>Avoid highways where possible:
"Avoid highways"
>Avoid toll roads where possible:
"Avoid toll roads"
>Avoid ferries where possible:
"Avoid ferries"
The setting applies to the current route and to
the planning of future routes.
Page 146 of 271
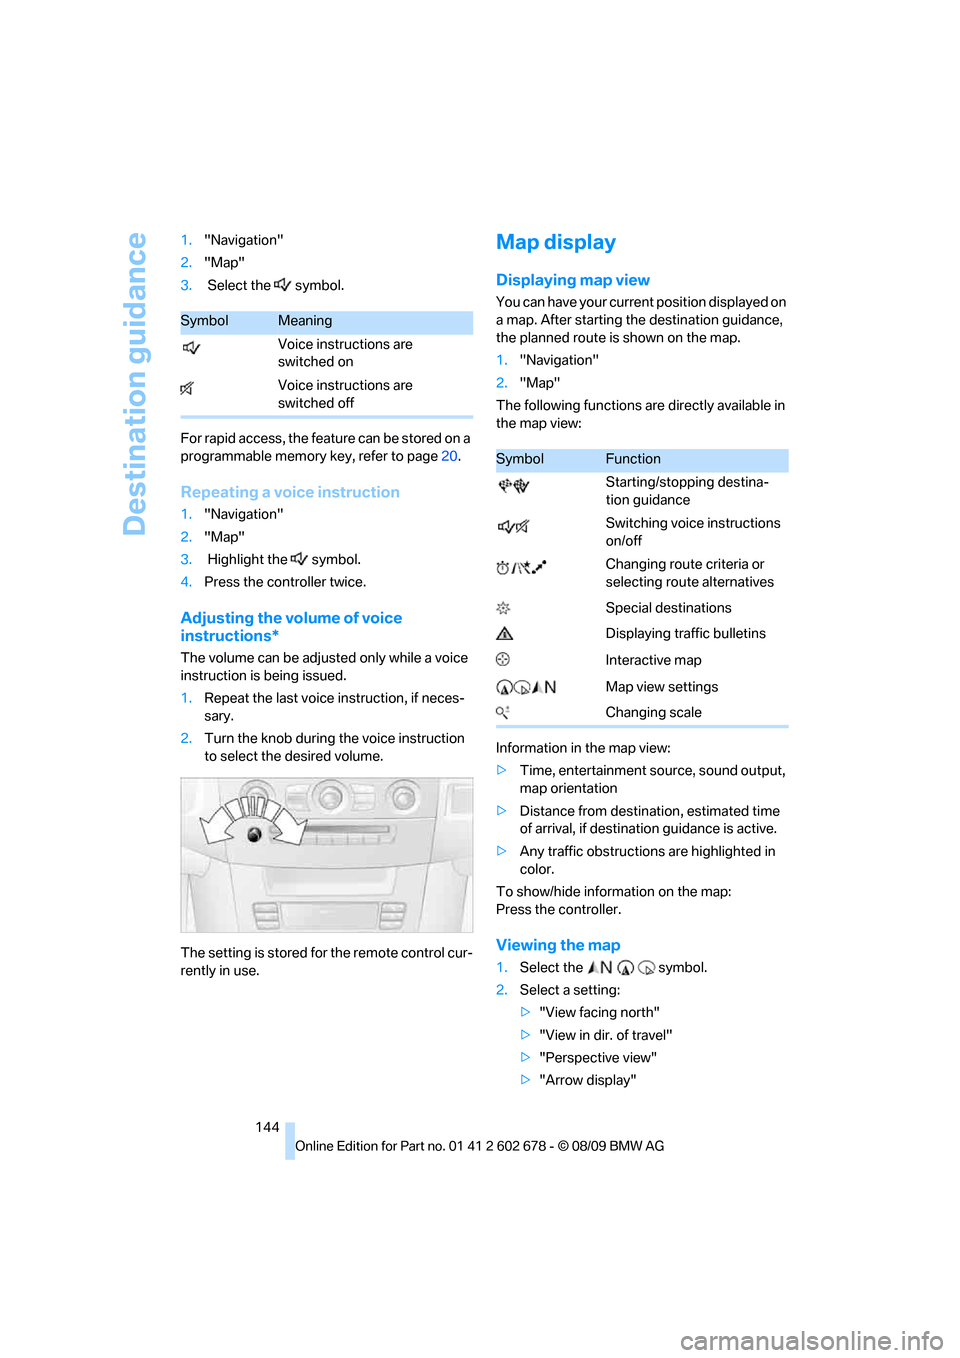
Destination guidance
144 1."Navigation"
2."Map"
3. Select the symbol.
For rapid access, the feature can be stored on a
programmable memory key, refer to page20.
Repeating a voice instruction
1."Navigation"
2."Map"
3. Highlight the symbol.
4.Press the controller twice.
Adjusting the volume of voice
instructions*
The volume can be adjusted only while a voice
instruction is being issued.
1.Repeat the last voice instruction, if neces-
sary.
2.Turn the knob during the voice instruction
to select the desired volume.
The setting is stored for the remote control cur-
rently in use.
Map display
Displaying map view
You can have your current position displayed on
a map. After starting the destination guidance,
the planned route is shown on the map.
1."Navigation"
2."Map"
The following functions are directly available in
the map view:
Information in the map view:
>Time, entertainment source, sound output,
map orientation
>Distance from destination, estimated time
of arrival, if destination guidance is active.
>Any traffic obstructions are highlighted in
color.
To show/hide information on the map:
Press the controller.
Viewing the map
1.Select the symbol.
2.Select a setting:
>"View facing north"
>"View in dir. of travel"
>"Perspective view"
>"Arrow display"
SymbolMeaning
Voice instructions are
switched on
Voice instructions are
switched off
SymbolFunction
Starting/stopping destina-
tion guidance
Switching voice instructions
on/off
Changing route criteria or
selecting route alternatives
Special destinations
Displaying traffic bulletins
Interactive map
Map view settings
Changing scale
Page 181 of 271
179
Entertainment
Reference
At a glance
Controls
Driving tips Communications
Navigation
Mobility
>Depending on the mobile phone, certain
settings may be necessary on the mobile
phone, e. g. via the following menu items:
>Bluetooth activated
>Connection must be allowed without
requiring further confirmation
>Reconnect
>Depending on the mobile phone model, the
setting energy saving mode can, for exam-
ple, result in vehicle failing to detect the
paired mobile phone.
>For pairing, define a 4- to 16-digit number
of your choice as the Bluetooth Passkey,
e.g. 25081107. A long and complex number
offers better protection against unautho-
rized access. This Bluetooth passkey is no
longer required following successful pair-
ing.
>The ignition is switched on.
Only pair the mobile phone with the vehi-
cle stopped, otherwise the passengers
and other road users can be endangered due to
a lack of attentiveness on the part of the
driver.<
Switching on ignition
1.Insert the remote control as far as possible
into the ignition lock.
2.Switch on the ignition by pressing the Start/
Stop button without depressing the brake
or clutch pedal.
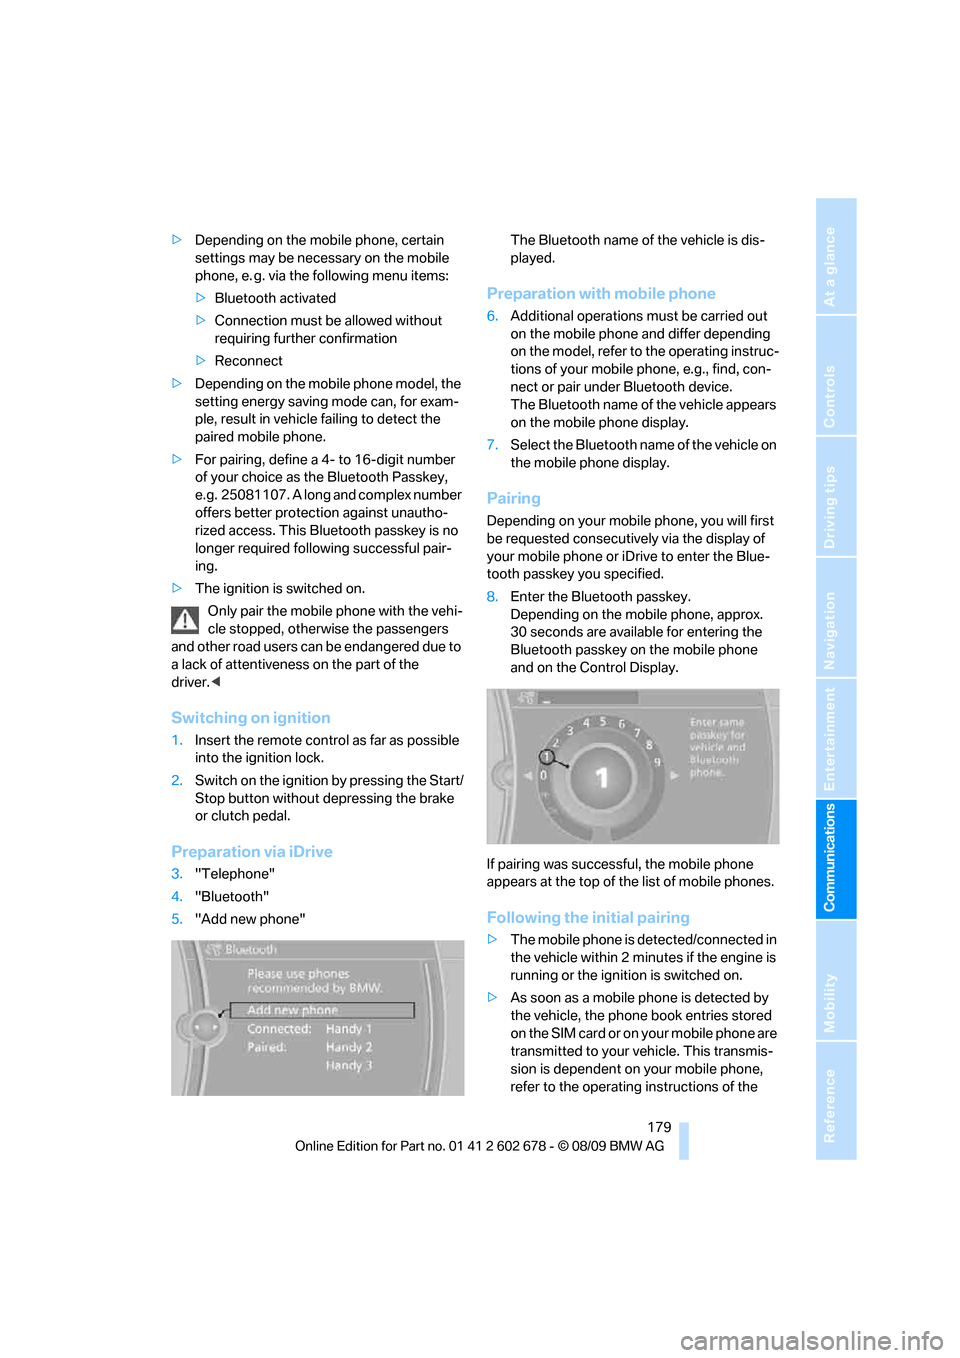
Preparation via iDrive
3."Telephone"
4."Bluetooth"
5."Add new phone"The Bluetooth name of the vehicle is dis-
played.
Preparation with mobile phone
6.Additional operations must be carried out
on the mobile phone and differ depending
on the model, refer to the operating instruc-
tions of your mobile phone, e.g., find, con-
nect or pair under Bluetooth device.
The Bluetooth name of the vehicle appears
on the mobile phone display.
7.Select the Bluetooth name of the vehicle on
the mobile phone display.
Pairing
Depending on your mobile phone, you will first
be requested consecutively via the display of
your mobile phone or iDrive to enter the Blue-
tooth passkey you specified.
8.Enter the Bluetooth passkey.
Depending on the mobile phone, approx.
30 seconds are available for entering the
Bluetooth passkey on the mobile phone
and on the Control Display.
If pairing was successful, the mobile phone
appears at the top of the list of mobile phones.
Following the initial pairing
>The mobile phone is detected/connected in
the vehicle within 2 minutes if the engine is
running or the ignition is switched on.
>As soon as a mobile phone is detected by
the vehicle, the phone book entries stored
on the SIM card or on your mobile phone are
transmitted to your vehicle. This transmis-
sion is dependent on your mobile phone,
refer to the operating instructions of the
Page 188 of 271
Telephone
186 activation system supports you by making
announcements and asking questions.
>{...} Verbal instructions to use with the voice
activation system.
Requirements
The same prerequisites as for operation via
iDrive apply, refer to page181.
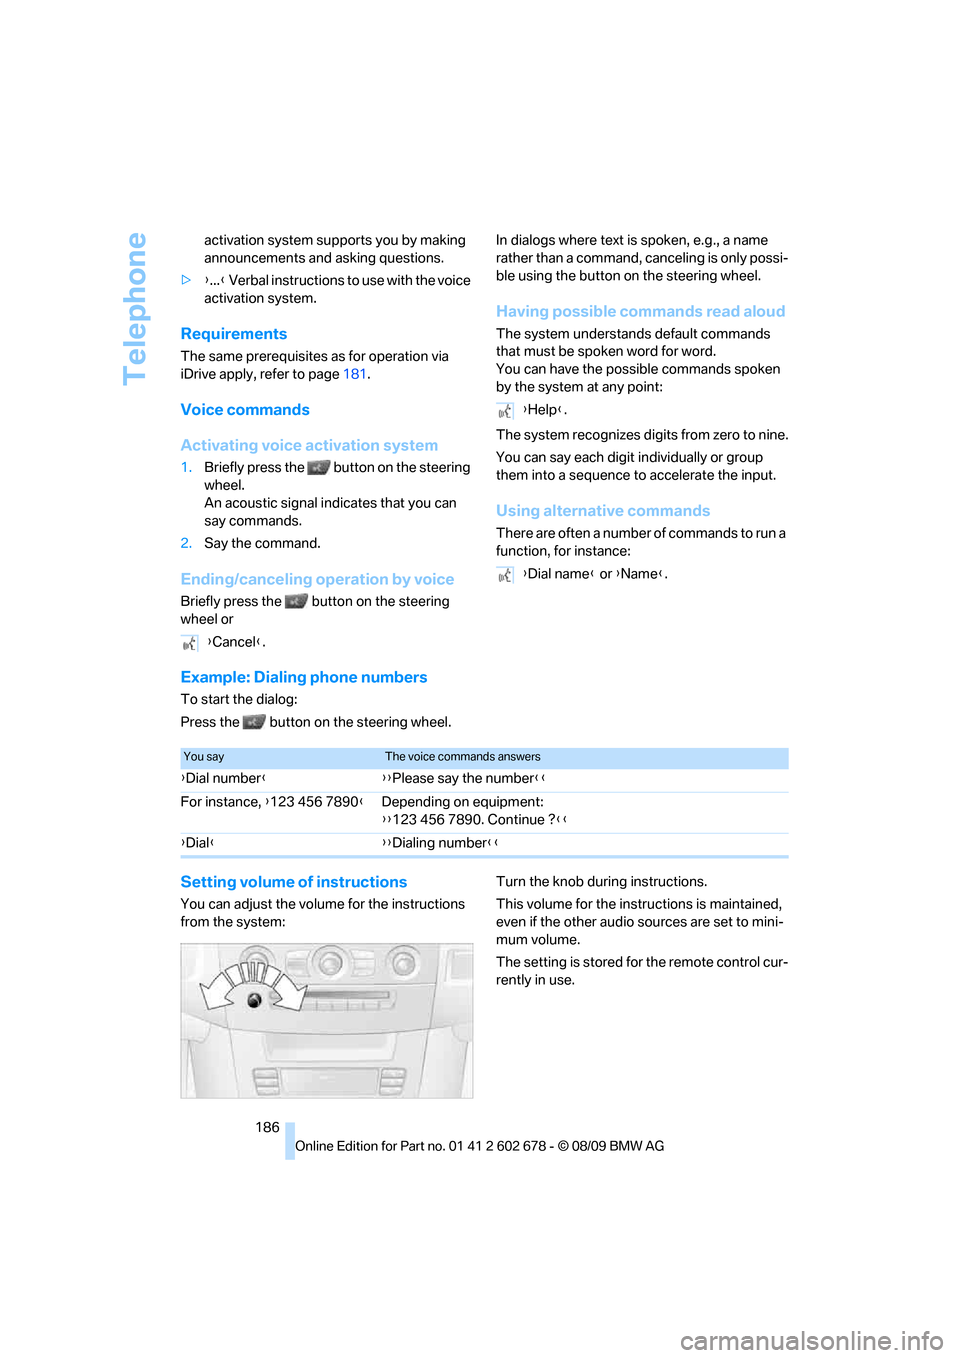
Voice commands
Activating voice activation system
1.Briefly press the button on the steering
wheel.
An acoustic signal indicates that you can
say commands.
2.Say the command.
Ending/canceling operation by voice
Briefly press the button on the steering
wheel orIn dialogs where text is spoken, e.g., a name
rather than a command, canceling is only possi-
ble using the button on the steering wheel.
Having possible commands read aloud
The system understands default commands
that must be spoken word for word.
You can have the possible commands spoken
by the system at any point:
The system recognizes digits from zero to nine.
You can say each digit individually or group
them into a sequence to accelerate the input.
Using alternative commands
There are often a number of commands to run a
function, for instance:
Example: Dialing phone numbers
To start the dialog:
Press the button on the steering wheel.
Setting volume of instructions
You can adjust the volume for the instructions
from the system:Turn the knob during instructions.
This volume for the instructions is maintained,
even if the other audio sources are set to mini-
mum volume.
The setting is stored for the remote control cur-
rently in use. {Cancel}.
{Help}.
{Dial name} or {Name}.
You sayThe voice commands answers
{Dial number}{{Please say the number}}
For instance, {123 456 7890}Depending on equipment:
{{123 456 7890. Continue ?}}
{Dial}{{Dialing number}}
Page 253 of 271
Reference 251
At a glance
Controls
Driving tips
Communications
Navigation
Entertainment
Mobility
Automatic
– air distribution106
– air volume106
– cruise control66
– garage door opener110
– headlamp control100
– recirculated-air control
AUC107
– steering wheel
adjustment45
– tailgate operation34
Automatic climate control105
– automatic air
distribution106
– parked car ventilation109
– settings via iDrive108
– switching on and off108
– ventilation in rear108
Automatic closing of doors,
refer to Automatic soft
closing31
Automatic curb monitor51
Automatic lighting
– refer to Automatic headlamp
control100
– refer to Daytime running
lamps101
– refer to Interior lamps104
– refer to Pathway lighting101
– refer to Welcome lamps100
Automatic lights
– refer to High-beam
Assistant102
Automatic low beams, refer to
High-beam Assistant102
Automatic luggage
compartment roller cover,
Sports Wagon117
Automatic Service
Request196
Automatic soft closing31
Automatic speed reduction for
descents, refer to HDC Hill
Descent Control86Automatic transmission with
Steptronic59
– interlock60
– kick down60
– manually unlocking and
locking transmission lock61
– shiftlock60
– towing234
– tow-starting235
– with Comfort Access37
AUTO program for automatic
climate control106
AUX-IN port172
Available services196
Average fuel consumption75
– setting units76
Average speed, refer to
Computer75
Avoiding freeways for
navigation142
Avoiding unintentional
alarms36
Axle loads, refer to
Weights241
B
Backrest contour, refer to
Lumbar support45
Backrests, refer to Seats44
Backrest width adjustment44
Back seats, refer to Rear seats
Backup lamps, replacing
bulbs224
Band-aids, refer to First aid
kit232
Bass, refer to Tone
control152
Battery, refer to Vehicle
battery229
– jump starting232
Battery replacement
– remote control for Comfort
Access38
BC button, refer to
Computer75
Being towed234
Belts, refer to Safety belts48Beverage holder, refer to
Cupholders114
Blower, refer to Air
volume107
Bluetooth, activating/
deactivating180
BMW
– Car Shampoo219
BMW Assist,
activating194,196
BMW Assist192
BMW homepage4
BMW maintenance
system215
BMW Night Vision96
– activating98
– cleaning camera98
– cleaning camera, refer to
Wiper system64
– deactivating98
– making settings98
BMW Search194
BMW website4
Bottle holder, refer to
Cupholders114
Bracket for telephone or
mobile phone
– refer to Snap-in adapter188
Brake assistant85
– adaptive85
Brake force display93
Brake lamps
– replacing bulbs224
– two-stage93
Brake rotors
– breaking-in124
– refer to Braking safely126