2010 BMW 528I SEDAN headlamp
[x] Cancel search: headlampPage 102 of 271
Lamps
100
Lamps
Parking lamps/low beams
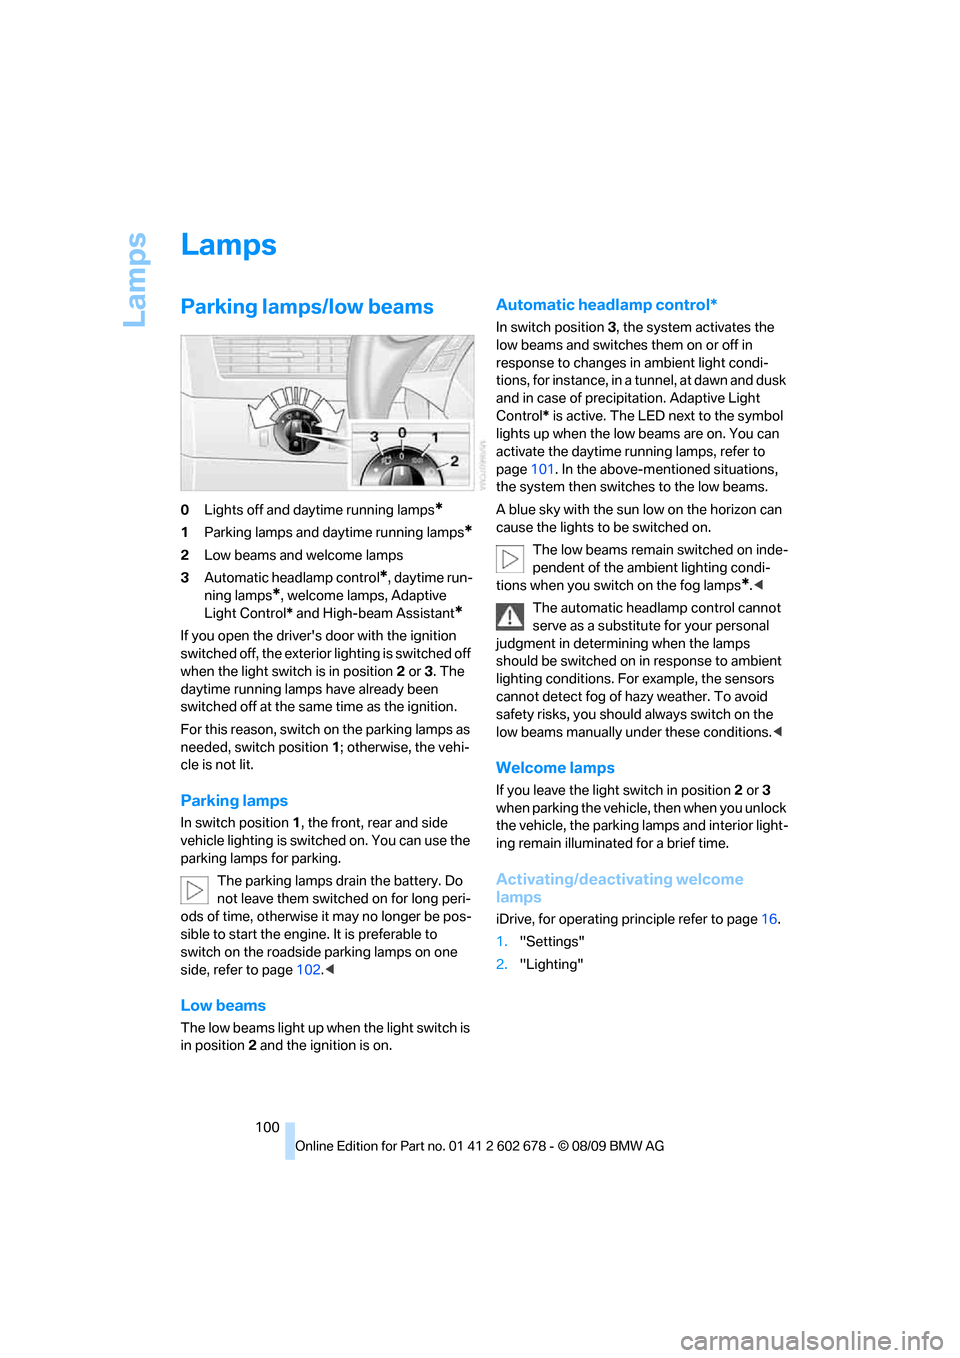
0Lights off and daytime running lamps*
1Parking lamps and daytime running lamps*
2Low beams and welcome lamps
3Automatic headlamp control
*, daytime run-
ning lamps
*, welcome lamps, Adaptive
Light Control* and High-beam Assistant
*
If you open the driver's door with the ignition
switched off, the exterior lighting is switched off
when the light switch is in position2 or 3. The
daytime running lamps have already been
switched off at the same time as the ignition.
For this reason, switch on the parking lamps as
needed, switch position1; otherwise, the vehi-
cle is not lit.
Parking lamps
In switch position1, the front, rear and side
vehicle lighting is switched on. You can use the
parking lamps for parking.
The parking lamps drain the battery. Do
not leave them switched on for long peri-
ods of time, otherwise it may no longer be pos-
sible to start the engine. It is preferable to
switch on the roadside parking lamps on one
side, refer to page102.<
Low beams
The low beams light up when the light switch is
in position 2 and the ignition is on.
Automatic headlamp control*
In switch position3, the system activates the
low beams and switches them on or off in
response to changes in ambient light condi-
tions, for instance, in a tunnel, at dawn and dusk
and in case of precipitation. Adaptive Light
Control* is active. The LED next to the symbol
lights up when the low beams are on. You can
activate the daytime running lamps, refer to
page101. In the above-mentioned situations,
the system then switches to the low beams.
A blue sky with the sun low on the horizon can
cause the lights to be switched on.
The low beams remain switched on inde-
pendent of the ambient lighting condi-
tions when you switch on the fog lamps
*.<
The automatic headlamp control cannot
serve as a substitute for your personal
judgment in determining when the lamps
should be switched on in response to ambient
lighting conditions. For example, the sensors
cannot detect fog of hazy weather. To avoid
safety risks, you should always switch on the
low beams manually under these conditions.<
Welcome lamps
If you leave the light switch in position2 or 3
when parking the vehicle, then when you unlock
the vehicle, the parking lamps and interior light-
ing remain illuminated for a brief time.
Activating/deactivating welcome
lamps
iDrive, for operating principle refer to page16.
1."Settings"
2."Lighting"
Page 103 of 271
Controls
101Reference
At a glance
Driving tips
Communications
Navigation
Entertainment
Mobility
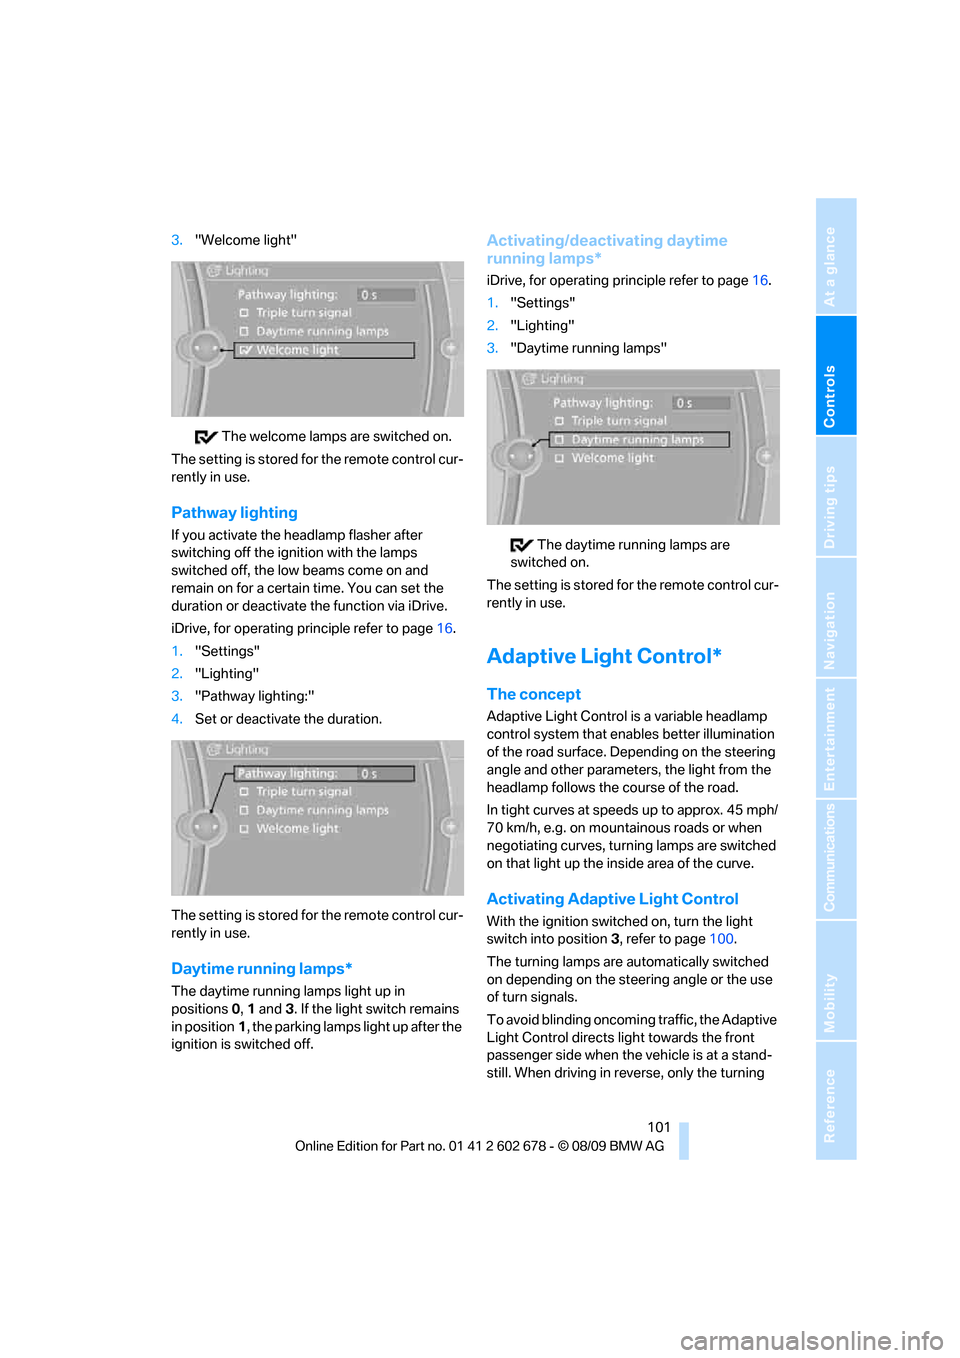
3."Welcome light"
The welcome lamps are switched on.
The setting is stored for the remote control cur-
rently in use.
Pathway lighting
If you activate the headlamp flasher after
switching off the ignition with the lamps
switched off, the low beams come on and
remain on for a certain time. You can set the
duration or deactivate the function via iDrive.
iDrive, for operating principle refer to page16.
1."Settings"
2."Lighting"
3."Pathway lighting:"
4.Set or deactivate the duration.
The setting is stored for the remote control cur-
rently in use.
Daytime running lamps*
The daytime running lamps light up in
positions0, 1 and 3. If the light switch remains
in position1, the parking lamps light up after the
ignition is switched off.
Activating/deactivating daytime
running lamps*
iDrive, for operating principle refer to page16.
1."Settings"
2."Lighting"
3."Daytime running lamps"
The daytime running lamps are
switched on.
The setting is stored for the remote control cur-
rently in use.
Adaptive Light Control*
The concept
Adaptive Light Control is a variable headlamp
control system that enables better illumination
of the road surface. Depending on the steering
angle and other parameters, the light from the
headlamp follows the course of the road.
In tight curves at speeds up to approx. 45 mph/
70 km/h, e.g. on mountainous roads or when
negotiating curves, turning lamps are switched
on that light up the inside area of the curve.
Activating Adaptive Light Control
With the ignition switched on, turn the light
switch into position 3, refer to page100.
The turning lamps are automatically switched
on depending on the steering angle or the use
of turn signals.
To avoid blinding oncoming traffic, the Adaptive
Light Control directs light towards the front
passenger side when the vehicle is at a stand-
still. When driving in reverse, only the turning
Page 104 of 271
Lamps
102 lamps are active and illuminate the outer area of
curves.
High beams/
roadside parking lamps
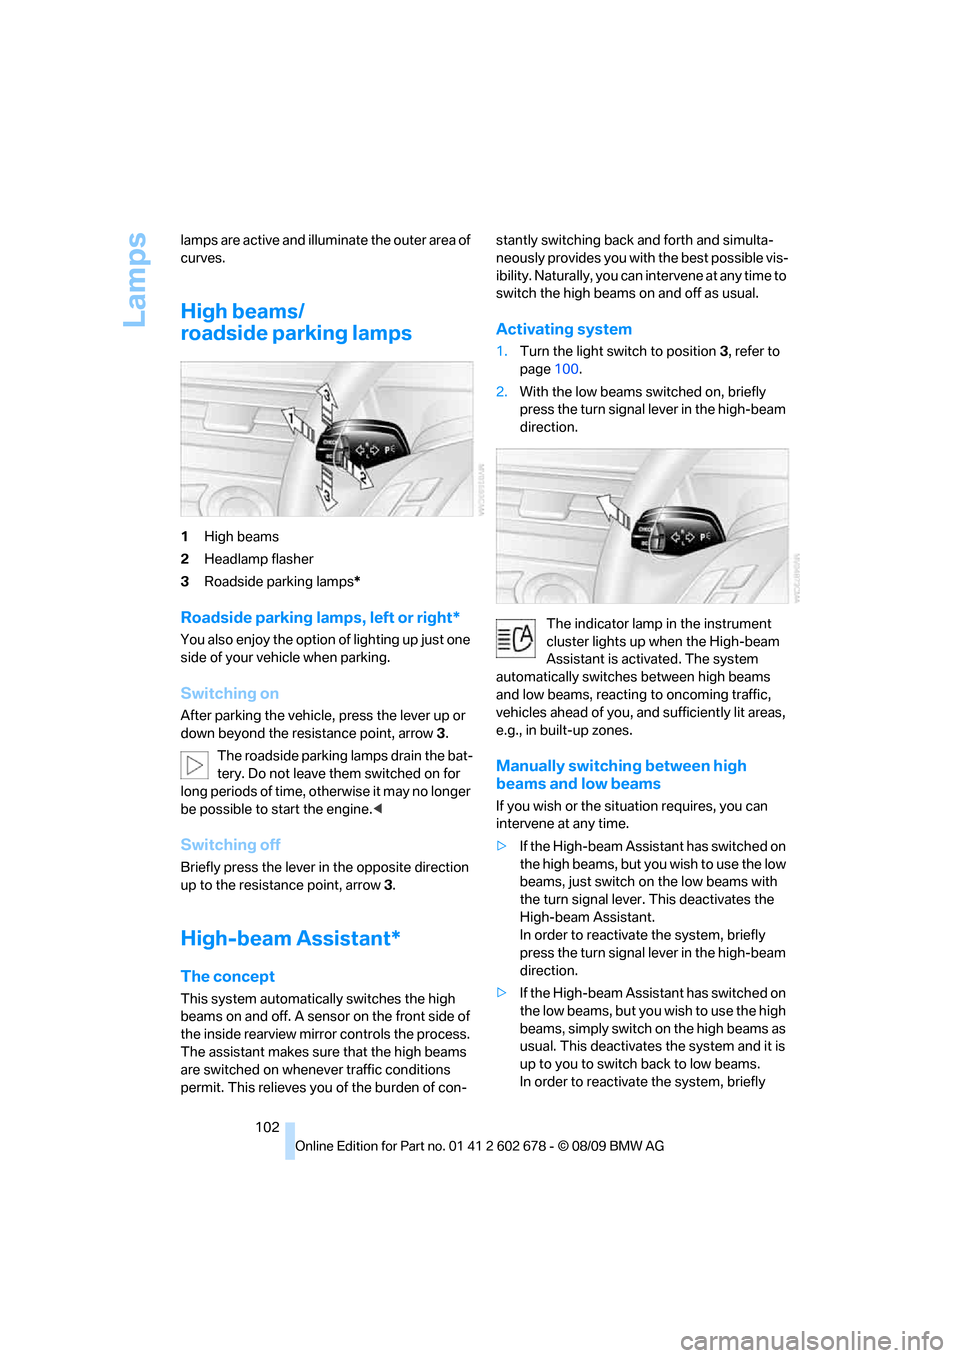
1High beams
2Headlamp flasher
3Roadside parking lamps*
Roadside parking lamps, left or right*
You also enjoy the option of lighting up just one
side of your vehicle when parking.
Switching on
After parking the vehicle, press the lever up or
down beyond the resistance point, arrow 3.
The roadside parking lamps drain the bat-
tery. Do not leave them switched on for
long periods of time, otherwise it may no longer
be possible to start the engine.<
Switching off
Briefly press the lever in the opposite direction
up to the resistance point, arrow3.
High-beam Assistant*
The concept
This system automatically switches the high
beams on and off. A sensor on the front side of
the inside rearview mirror controls the process.
The assistant makes sure that the high beams
are switched on whenever traffic conditions
permit. This relieves you of the burden of con-stantly switching back and forth and simulta-
neously provides you with the best possible vis-
ibility. Naturally, you can intervene at any time to
switch the high beams on and off as usual.
Activating system
1.Turn the light switch to position3, refer to
page100.
2.With the low beams switched on, briefly
press the turn signal lever in the high-beam
direction.
The indicator lamp in the instrument
cluster lights up when the High-beam
Assistant is activated. The system
automatically switches between high beams
and low beams, reacting to oncoming traffic,
vehicles ahead of you, and sufficiently lit areas,
e.g., in built-up zones.
Manually switching between high
beams and low beams
If you wish or the situation requires, you can
intervene at any time.
>If the High-beam Assistant has switched on
the high beams, but you wish to use the low
beams, just switch on the low beams with
the turn signal lever. This deactivates the
High-beam Assistant.
In order to reactivate the system, briefly
press the turn signal lever in the high-beam
direction.
>If the High-beam Assistant has switched on
the low beams, but you wish to use the high
beams, simply switch on the high beams as
usual. This deactivates the system and it is
up to you to switch back to low beams.
In order to reactivate the system, briefly
Page 106 of 271
Lamps
104
Fog lamps*
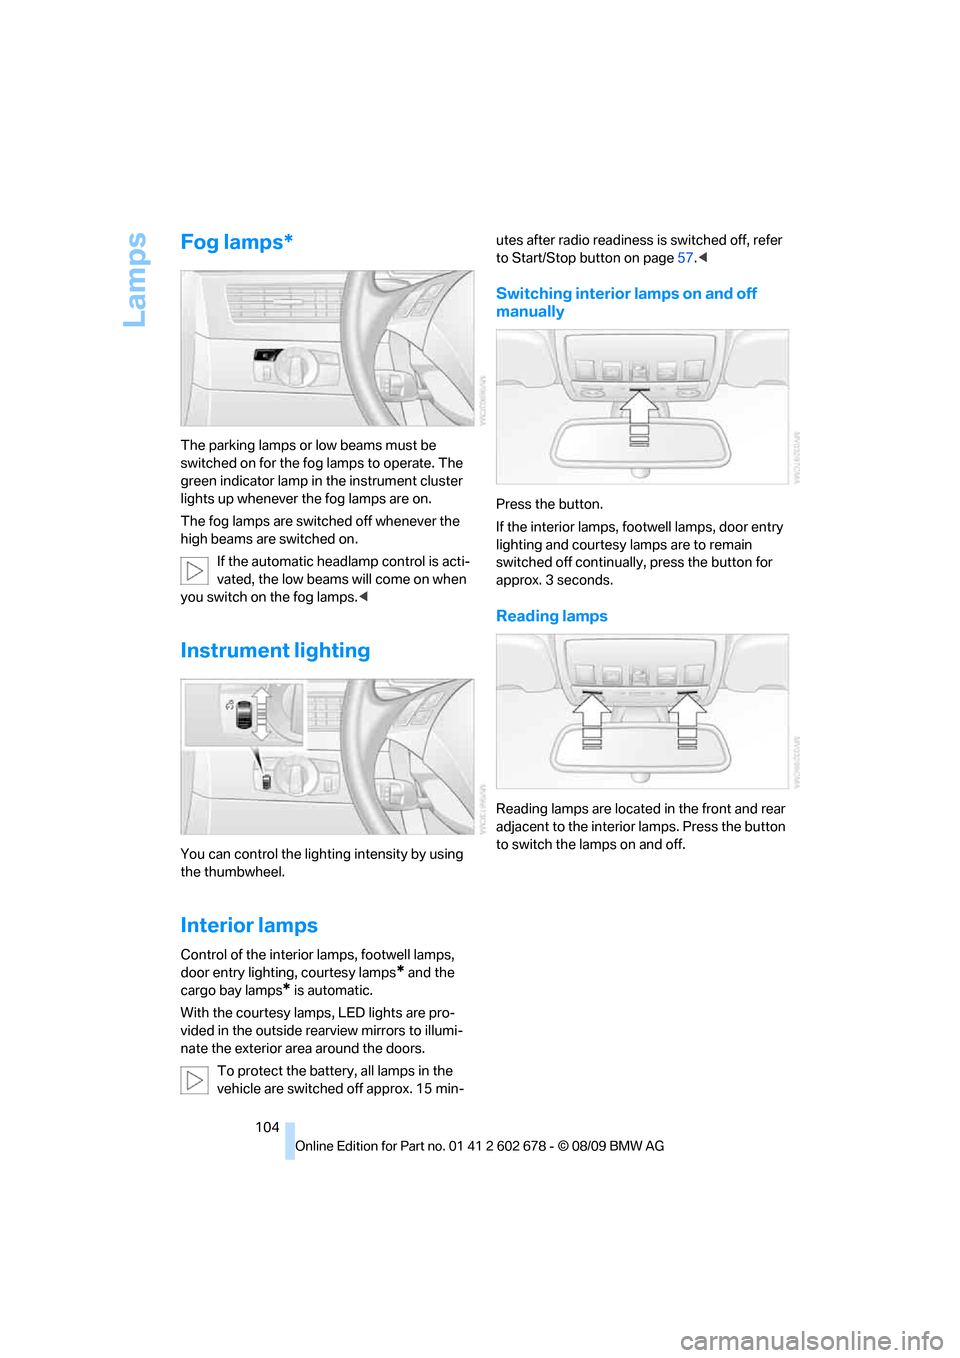
The parking lamps or low beams must be
switched on for the fog lamps to operate. The
green indicator lamp in the instrument cluster
lights up whenever the fog lamps are on.
The fog lamps are switched off whenever the
high beams are switched on.
If the automatic headlamp control is acti-
vated, the low beams will come on when
you switch on the fog lamps.<
Instrument lighting
You can control the lighting intensity by using
the thumbwheel.
Interior lamps
Control of the interior lamps, footwell lamps,
door entry lighting, courtesy lamps
* and the
cargo bay lamps
* is automatic.
With the courtesy lamps,
LED lights are pro-
vided in the outside rearview mirrors to illumi-
nate the exterior area around the doors.
To protect the battery, all lamps in the
vehicle are switched off approx. 15 min-utes after radio readiness is switched off, refer
to Start/Stop button on page57.<
Switching interior lamps on and off
manually
Press the button.
If the interior lamps, footwell lamps, door entry
lighting and courtesy lamps are to remain
switched off continually, press the button for
approx. 3 seconds.
Reading lamps
Reading lamps are located in the front and rear
adjacent to the interior lamps. Press the button
to switch the lamps on and off.
Page 214 of 271
Under the hood
212
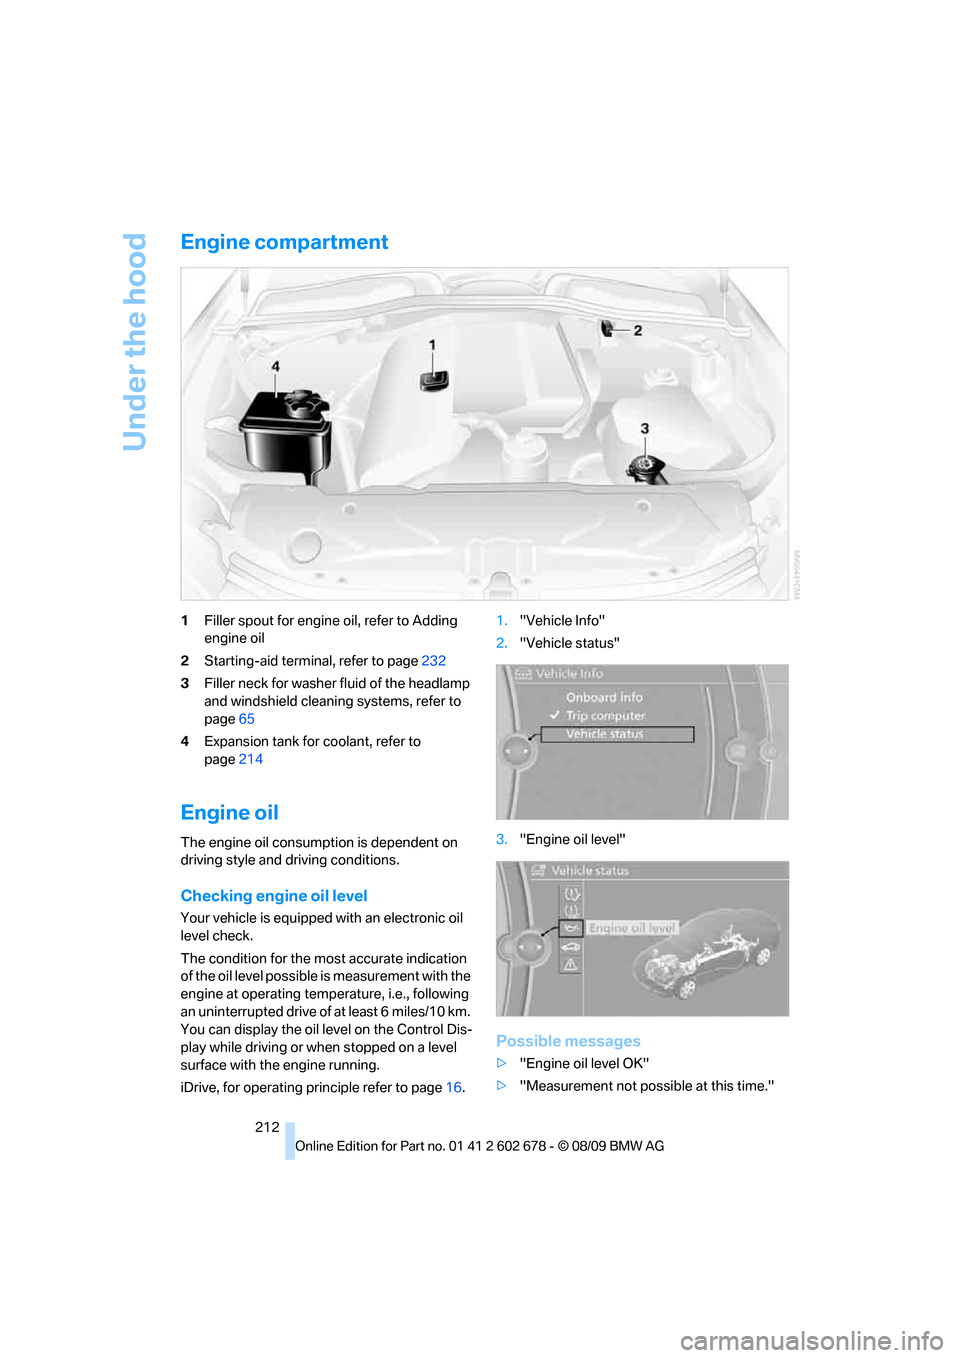
Engine compartment
1Filler spout for engine oil, refer to Adding
engine oil
2Starting-aid terminal, refer to page232
3Filler neck for washer fluid of the headlamp
and windshield cleaning systems, refer to
page65
4Expansion tank for coolant, refer to
page214
Engine oil
The engine oil consumption is dependent on
driving style and driving conditions.
Checking engine oil level
Your vehicle is equipped with an electronic oil
level check.
The condition for the most accurate indication
of the oil level possible is measurement with the
engine at operating temperature, i.e., following
an uninterrupted drive of at least 6 miles/10 km.
You can display the oil level on the Control Dis-
play while driving or when stopped on a level
surface with the engine running.
iDrive, for operating principle refer to page16.1."Vehicle Info"
2."Vehicle status"
3."Engine oil level"
Possible messages
>"Engine oil level OK"
>"Measurement not possible at this time."
Page 220 of 271
Care
218 ating instructions for the high-pressure clean-
ing jets.<
When using high-pressure cleaning jets,
do not remain in one place for a long time
and be sure to maintain a distance of at least
12 in/30 cm from sensors, e.g., Park Distance
Control sensors or radar sensors.<
Hand washing
When washing the vehicle by hand, use plenty
of water and car washing shampoo. Clean the
vehicle with gentle pressure using a sponge or a
washing brush.
Before cleaning the windshield, deacti-
vate the rain sensor or switch off the igni-
tion to prevent unwanted wiper operation.<
Follow local guidelines for washing vehi-
cles by hand.<
Headlamps
Do not rub dry and never use abrasives or
strong solvents to clean the covers.
Loosen dirt, e.g., insects, with shampoo or
insect remover and wash away with plenty of
water.
Use a window de icer to remove accumulated
ice and snow, not a scraper.
Windows
Use a glass cleaner to clean the inside and out-
side surfaces of the windows and the glass sur-
faces of the mirrors.
Do not use quartz-containing cleansers
to clean glass surfaces of the mirrors.<
Paintwork care
Regular care helps your vehicle retain its value
and protects the paint from the long-term
effects of aggressive substances.
Regionally occurring environmental factors can
affect and damage vehicle finish. It is therefore
important to tailor the frequency and extent of
your car care accordingly.
Immediately remove particularly aggressive
substances such as spilled fuel, oil, grease, brake fluid, tree resin, or bird droppings; other-
wise, they may damage your paint.
Repairing paint damage
Repair stone damage or scratches imme-
diately, depending on the severity of the
damage, to prevent the formation of rust.<
BMW recommends having paint damage pro-
fessionally repaired using Genuine BMW finish
materials in accordance with factory guidelines.
Waxing
Sealant is required when water no longer beads
on the clean surface of the paint. Use only prod-
ucts that contain carnauba wax or synthetic wax
to seal your finish.
Rubber gaskets
Treat only with water or a rubber care product.
To avoid noise or damage, do not use
products that contain silicone to care for
rubber gaskets.<
Chrome components
Particularly after exposure to road salt, thor-
oughly cleanse parts like the radiator grille, door
handles, or window frames with plenty of water
with shampoo added to it. For additional treat-
ment, use chrome polish.
Alloy wheels
Depending on your system, braking can gener-
ate dust, which settles on the light-alloy wheels.
Remove this dust regularly with acid-free wheel
cleaner.
Do not use aggressive, acid-containing,
strongly alkaline, or coarse cleansers and
do not use steam cleaners at temperatures
greater than 140 °F/606, otherwise you may
damage your vehicle.<
Outside sensors
Sensors on the outside of the vehicle, such as
Park Distance Control sensors or radar sensors,
should be kept clean and free of ice to retain
their full function.
Page 224 of 271
Replacing components
222 Never touch the glass of new bulbs with
your bare fingers, as even minute
amounts of contamination will burn into the
bulb's surface and reduce its service life. Use a
clean cloth, napkin, etc., or hold the bulb by its
metal socket.<
A selection of replacement bulbs is available at
your BMW center.
Only replace bulbs when cool, as other-
wise you may be burned.<
Whenever you perform any work on the
electrical system, turn off the systems/
consumers involved to prevent short circuits
from occurring. To avoid possible injury or
equipment damage when replacing bulbs,
observe any instructions provided by the bulb
manufacturer.<
For information on how to care for the head-
lamps, please follow the instructions on
page217.
For bulbs for which changing is not
described, and for checking and adjusting
headlamp aim, please contact your BMW cen-
ter.<
Light-emitting diodes LEDs
Light-emitting diodes installed behind translu-
cent lenses serve as the light source for many of
the controls and displays in your vehicle. These
light-emitting diodes, which operate using a
concept similar to that applied in conventional
lasers, are officially designated as Class 1 light-
emitting diodes.
Do not remove the covers, and never
stare into the unfiltered light for several
hours, as irritation of the retina could result.<
Halogen headlamps
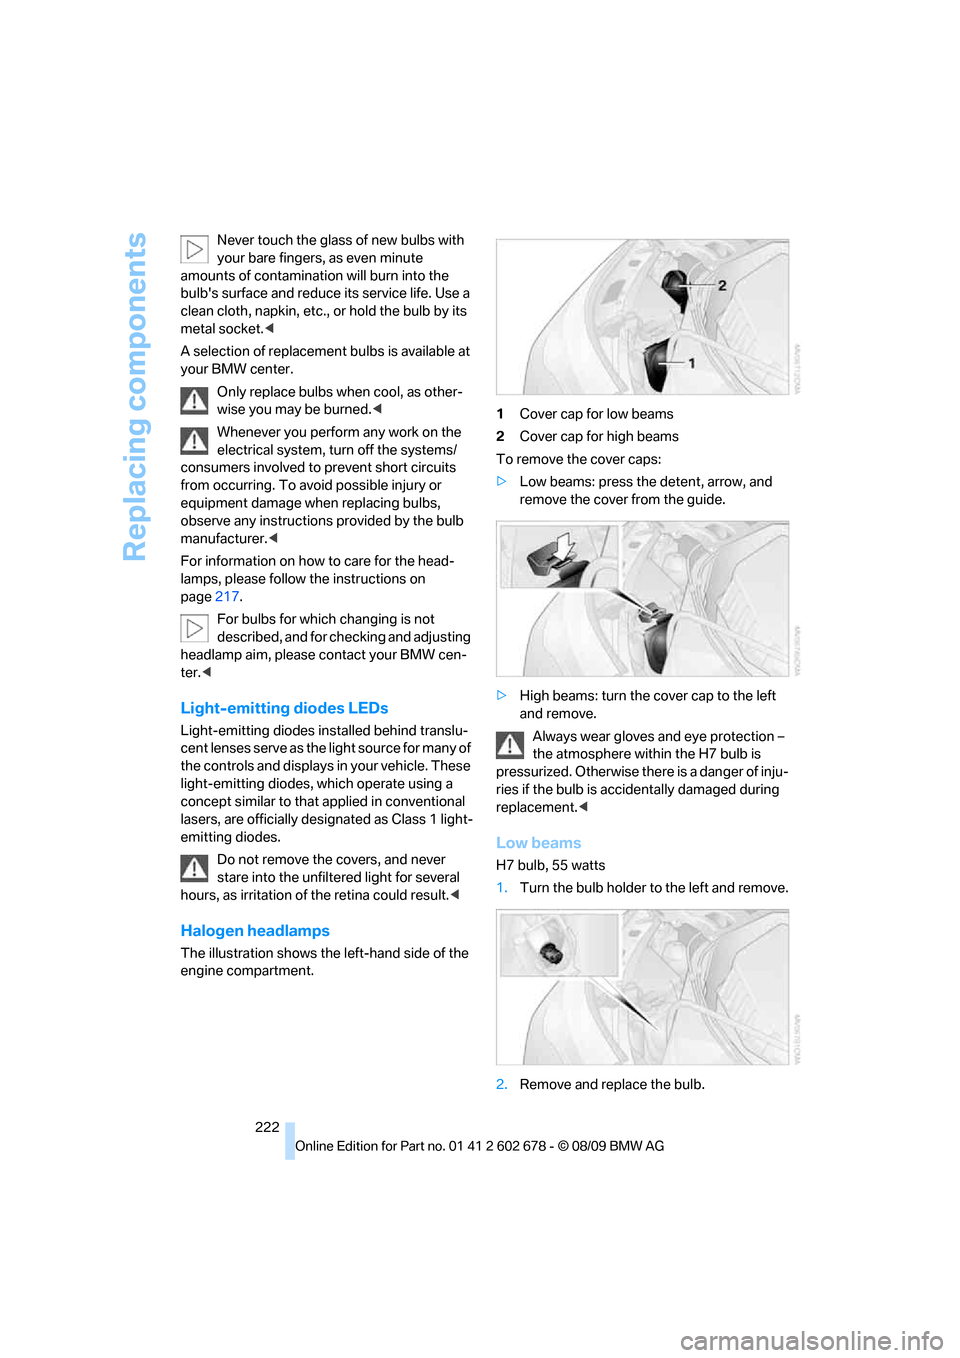
The illustration shows the left-hand side of the
engine compartment.1Cover cap for low beams
2Cover cap for high beams
To remove the cover caps:
>Low beams: press the detent, arrow, and
remove the cover from the guide.
>High beams: turn the cover cap to the left
and remove.
Always wear gloves and eye protection –
the atmosphere within the H7 bulb is
pressurized. Otherwise there is a danger of inju-
ries if the bulb is accidentally damaged during
replacement.<
Low beams
H7 bulb, 55 watts
1.Turn the bulb holder to the left and remove.
2.Remove and replace the bulb.
Page 244 of 271

Technical data
242 Never exceed either the approved axle loads or
the gross vehicle weight.
Capacities
>Manual transmission lbs./kg 5,291/2,400
>Automatic transmission lbs./kg 5,335/2,420
Load lbs./kg 1,190/540
Approved front axle load lbs./kg 2,381/1,080
Approved rear axle load lbs./kg 2,866/1,300
Approved roof load capacity lbs./kg 220/100
Cargo bay capacity cu ft/l 17.7-58.3/500-1,650
Sports Wagon535i xDrive
Notes
Fuel tank US gal/liters approx. 18.5/70 Fuel grade: page201
of that reserve US gal/liters approx. 2.1/8
550i US gal/liters approx. 2.6/10
Window cleaning system For more details: page65
>Sedan US quarts/liters approx. 3.2/3
>with headlamp cleaning system US quarts/liters approx. 5.3/5
>Sports Wagon US quarts/liters approx. 5.3/5