2010 BMW 5 SERIES rear entertainment
[x] Cancel search: rear entertainmentPage 217 of 271

Mobility
215Reference
At a glance
Controls
Driving tips
Communications
Navigation
Entertainment
Maintenance
BMW Maintenance System
The BMW Maintenance System supports the
preservation of the traffic and operating safety
of your BMW. The ultimate objective is to
ensure economical maintenance by providing
the ideal service for your vehicle.
Should the day come when you decide to sell
your BMW, a complete center service history
will prove to be an asset of inestimable value.
CBS Condition Based Service
Sensors and special algorithms take the differ-
ent driving conditions of your BMW into
account. Condition Based Service uses this to
determine the current and future service
requirements. By letting you define a service
and maintenance regimen that reflects your
own individual requirements, the system builds
the basis for trouble-free driving.
You can set the Control Display to show
remaining distances and times of selected
maintenance intervals and legally mandated
deadlines, refer to page77:
>Engine oil
>Brake pads, front and rear separately
>Brake fluid
>Vehicle check
>Legally mandated inspections depending
on local regulations
Service data in remote control
Your vehicle stores the information required
maintenance continuously in the remote con-
trol during driving. After accessing the data
stored in the remote control, your BMW Service
Advisor can suggest precisely the right array of
service procedures for your own individual vehi-
cle. You should therefore hand over the remote
control you last used to drive to the BMW Ser-
vice Advisor when you take your vehicle in for
service.
Make sure the date is set correctly, refer
to page79, otherwise the effectiveness
of CBS Condition Based Service is not
ensured.<
Service and Warranty Information
Booklet for US models and
Warranty and Service Guide Booklet
for Canadian models
Please consult your Service and Warranty Infor-
mation Booklet for US models and Warranty
and Service Guide Booklet for Canadian models
for additional information on service require-
ments.
BMW recommends that you have service
and repair operations performed at your
BMW center.
Take the time to ensure that these service pro-
cedures are confirmed by entries in your vehi-
cle's Service and Warranty Information Booklet
for US models and Warranty and Service Guide
Booklet for Canadian models. These entries
verify that your vehicle has received the speci-
fied regular maintenance.<
ProCarManuals.com
Page 219 of 271

Mobility
217Reference
At a glance
Controls
Driving tips
Communications
Navigation
Entertainment
Care
Car-care products
Regular cleaning and care make a significant
contribution to retaining your BMW's value.
For the cleaning and care of your vehicle, BMW
recommends using only products that BMW
has approved for this purpose.
Your BMW center will be glad to advise you
about products and services for the cleaning
and care of your BMW.
Genuine BMW Care Products are materi-
als tested, laboratory tested, and tested in
actual use. They offer optimum care and pro-
tection for your vehicle.<
Do not use cleaners that contain alcohol
or solvents; they can damage your vehi-
cle.<
Cleaning agents can contain substances
that are dangerous or pose health risks.
You should therefore heed the warnings and
hazard indications on the packaging. Open the
doors or windows on your vehicle whenever
cleaning the interior. Make sure there is suffi-
cient ventilation in enclosed spaces. Use only
products that are formulated for vehicle clean-
ing.<
Exterior care
Washing your vehicle
In the winter months, it is especially
important to ensure that the vehicle is
washed on a regular basis. Otherwise, signifi-
cant soiling and road salt can cause damage to
the vehicle.<
After washing the vehicle, apply the
brakes briefly to dry them. Failure to do so
may lead to a reduction in braking efficiency and
also to corrosion of the brake rotors.<
Car washes
Give preference to cloth car washes.Before driving into the car wash, make sure that
it is suitable for your BMW. Pay attention to the
following points:
>Dimensions of your vehicle, refer to
page239.
>If necessary, fold in the outside rearview
mirrors, refer to page51.
>Maximum permissible tire width.
Avoid car washes with rail heights over
4in/10cm, otherwise there is danger of
damaging chassis parts.<
Preparations for driving into the car wash:
>Deactivate rain sensor to prevent unwanted
wiper activation.
>Deactivate rear window wiper
* and protect
it from damage. Take appropriate protec-
tive measures; inquiring with the car wash
operator as needed.
>Remove additional add-on parts, e.g., spoil-
ers or phone antennas, if they could be
damaged.
Automatic transmission
Before driving into the car wash, make sure the
vehicle is able to roll by making sure to:
1.Insert the remote control into the ignition
lock, even with Comfort Access.
2.Shift into transmission position N.
3.Release the parking brake.
4.Switch off the engine.
5.Leave the remote control in the ignition lock
so that the vehicle can roll.
Steam jets/high-pressure washers
When using steam jets or high-pressure
washers, ensure that you maintain suffi-
cient clearance to the vehicle and do not exceed
a temperature of 1407/606.
Insufficient distance or excessive pressure or
temperature can damage parts of the vehicle or
can result in water penetration. Follow the oper-
ProCarManuals.com
Page 223 of 271

Mobility
221Reference
At a glance
Controls
Driving tips
Communications
Navigation
Entertainment
Replacing components
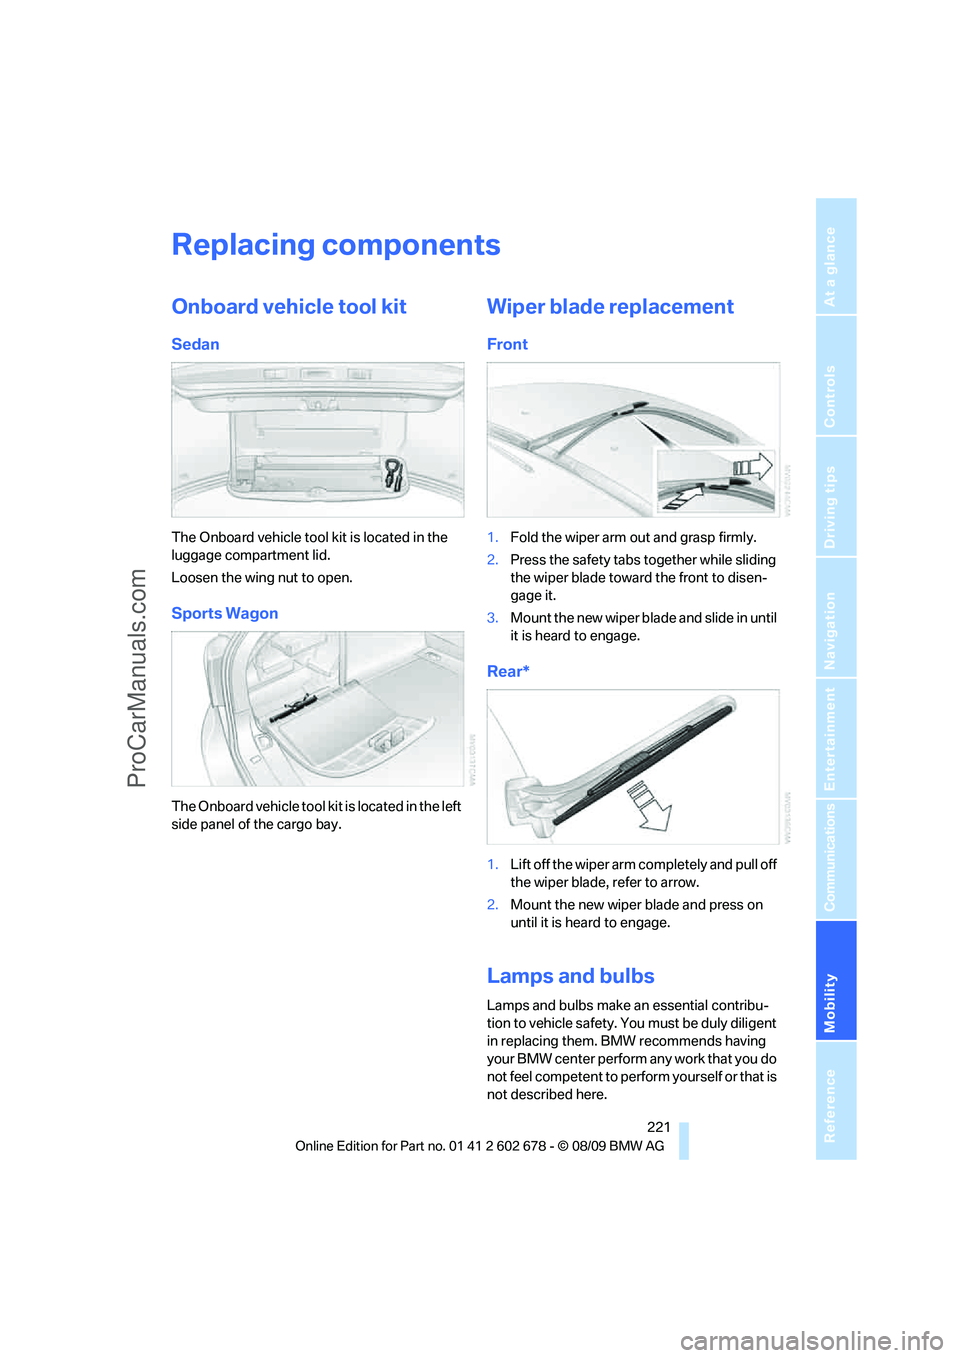
Onboard vehicle tool kit
Sedan
The Onboard vehicle tool kit is located in the
luggage compartment lid.
Loosen the wing nut to open.
Sports Wagon
The Onboard vehicle tool kit is located in the left
side panel of the cargo bay.
Wiper blade replacement
Front
1.Fold the wiper arm out and grasp firmly.
2.Press the safety tabs together while sliding
the wiper blade toward the front to disen-
gage it.
3.Mount the new wiper blade and slide in until
it is heard to engage.
Rear*
1.Lift off the wiper arm completely and pull off
the wiper blade, refer to arrow.
2.Mount the new wiper blade and press on
until it is heard to engage.
Lamps and bulbs
Lamps and bulbs make an essential contribu-
tion to vehicle safety. You must be duly diligent
in replacing them. BMW recommends having
your BMW center perform any work that you do
not feel competent to perform yourself or that is
not described here.
ProCarManuals.com
Page 229 of 271

Mobility
227Reference
At a glance
Controls
Driving tips
Communications
Navigation
Entertainment
What you will need
To avoid rattling noises later on, note the posi-
tions of the tools before removing them, then
return them to their initial positions after com-
pleting work.
1Chock
*
2Vehicle jack*
3Lug wrench*
The tools are located in the mount under the
floor mat or floor panel flap.
1.Lift up floor mat or floor panel flap and cover
located beneath it.
2.Take out the required tools.
3.After using the tools, return them to the
storage space.
With run-flat tires, no tools are provided
for wheel changes. They can be pur-
chased as accessories at your BMW center.<
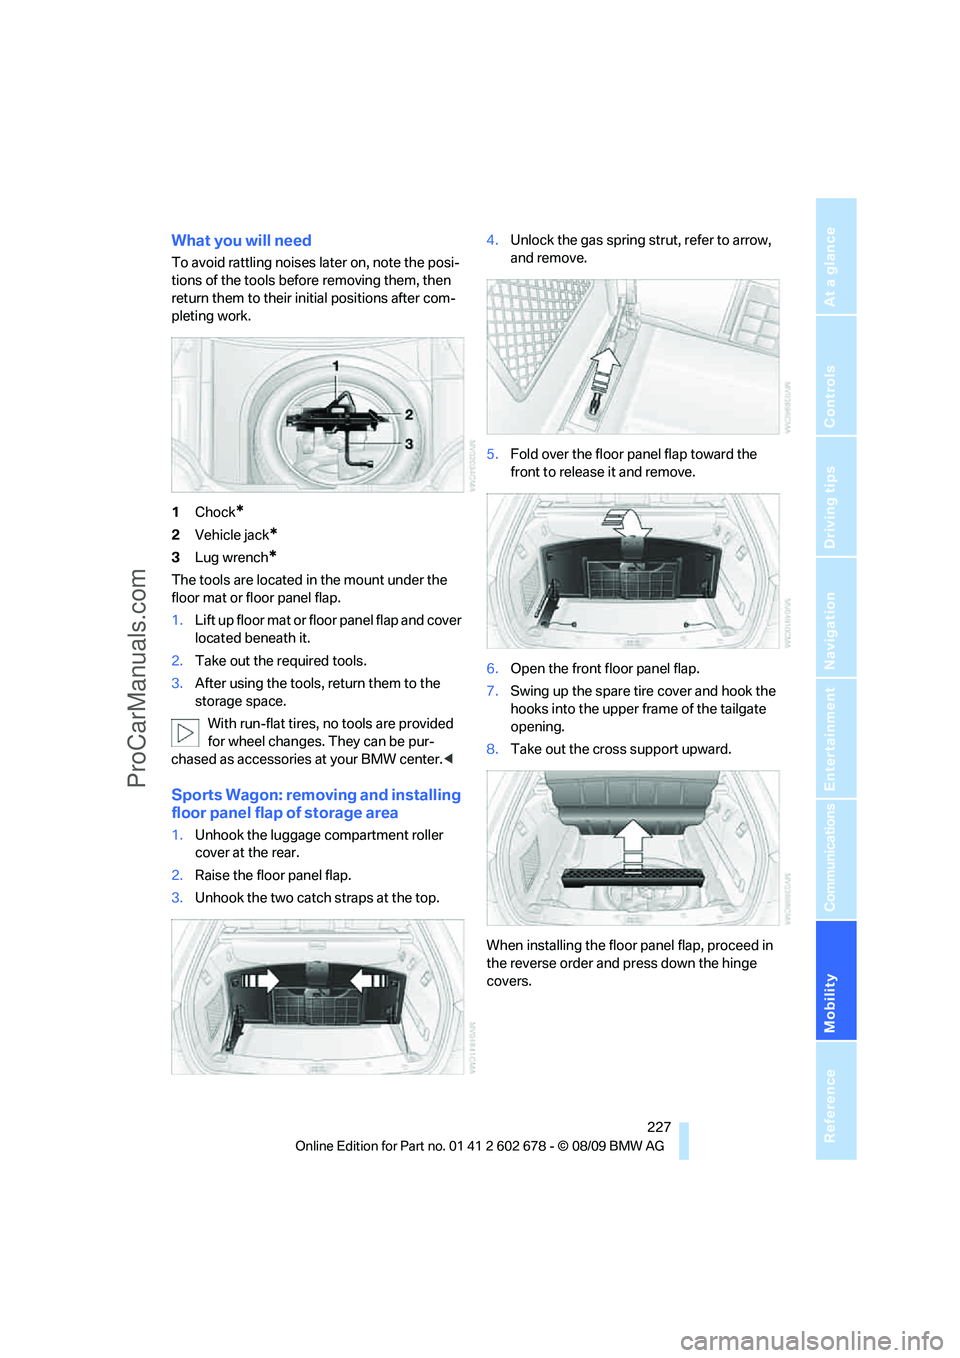
Sports Wagon: removing and installing
floor panel flap of storage area
1.Unhook the luggage compartment roller
cover at the rear.
2.Raise the floor panel flap.
3.Unhook the two catch straps at the top.4.Unlock the gas spring strut, refer to arrow,
and remove.
5.Fold over the floor panel flap toward the
front to release it and remove.
6.Open the front floor panel flap.
7.Swing up the spare tire cover and hook the
hooks into the upper frame of the tailgate
opening.
8.Take out the cross support upward.
When installing the floor panel flap, proceed in
the reverse order and press down the hinge
covers.
ProCarManuals.com
Page 235 of 271

Mobility
233Reference
At a glance
Controls
Driving tips
Communications
Navigation
Entertainment
Preparation
1.Check whether the battery of the other
vehicle has a voltage of 12 Volts and
approximately the same capacitance in Ah.
This information can be found on the bat-
tery.
2.Switch off the engine of the assisting vehi-
cle.
3.Switch off any electrical systems and com-
ponents in both vehicles.
There must not be any contact between
the bodies of the two vehicles, otherwise
there is a danger of shorting.<
Connecting jumper cables
To avoid personal injury from sparks, fol-
low this sequence when connecting
jumper cables.<
In your BMW, the so-called jump-starting termi-
nal in the engine compartment serves as a pos-
itive terminal for the battery, also refer to engine
compartment overview on page212. The cover
cap is marked with a +.
1.Fold open the cover of the BMW jump-
starting terminal. To do so, pull the tab.
2.Attach one end of the jumper cable plus/+
to the positive terminal of the battery or a
jump-starting terminal of the vehicle provid-
ing assistance.
3.Attach the second end of the cable to the
positive terminal of the battery or to a start-
ing-aid terminal of the vehicle to be started.
4.Attach one end of the jumper cable minus/–
to the negative terminal of the battery or to
an engine or body ground of the assisting
vehicle.Your BMW has a special nut as body ground
or negative terminal.
5.Attach the second end of the cable to the
negative terminal of the battery or to the
engine or body ground of the vehicle to be
started.Starting engine
1.Start the engine on the assisting vehicle
and allow it to run at idle for several minutes
at slightly increased speed.
2.Start the engine on the other vehicle in the
usual way.
If the first starting attempt is not successful,
wait a few minutes before another attempt
in order to allow the discharged battery to
recharge.
3.Let the engines run for a few minutes.
4.Disconnect the jumper cables by reversing
the connection sequence.
Check the battery and recharge if necessary.
Never use spray fluids to start the
engine.<
Tow-starting and towing
Observe applicable laws and regulations
for tow-starting and towing.<
Do not transport any passengers other
than the driver in a vehicle that is being
towed.<
Using tow fitting
Always keep the screw-in tow fitting with the
vehicle. It can be screwed in at the front or rear
of the BMW.
ProCarManuals.com
Page 237 of 271

Mobility
235Reference
At a glance
Controls
Driving tips
Communications
Navigation
Entertainment
>When mounted at an angle, the tow bar will
exert lateral forces, tending to push the
vehicle sideways.
Only attach the tow bar to the tow fittings,
as attachment to other vehicle parts can
lead to damage.<
With tow rope
When starting off in the towing vehicle, make
sure that the tow rope is taut.
To avoid jerking and the associated
stresses on vehicle components when
towing, always use nylon ropes or nylon straps.
Only attach tow ropes to the tow fittings, as
attachment to other vehicle parts can lead to
damage.<
With tow truck
Have the BMW transported with a tow truck
with a so-called lift bar or on a flat bed.
With a tow truck: xDrive
Do not tow a BMW with xDrive with just
the front or rear axle raised, otherwise the
wheels could lock up and the transfer case
could be damaged.<
Have the BMW transported only on a flatbed
surface.
Tow-starting
Do not tow-start the vehicle if possible, but
instead start the engine by means of jump start-
ing, refer to page232. With a catalytic con-
verter, tow-starting should only be carried out
with the engine cold, and with automatic trans-
missions, the engine cannot be started by tow-
starting.
1.Switch on the hazard warning flashers,
comply with country-specific regulations.
2.Switch on the ignition, refer to page57.
3.Shift into 3rd gear.
4.Tow-start with the clutch completely
depressed and slowly release the clutch.
After the engine starts, immediately
depress the clutch again completely.
5.Stop at a suitable location, remove the tow
bar or rope and switch off the hazard warn-
ing flashers.
6.Have the vehicle checked.
ProCarManuals.com
Page 243 of 271

Reference 241
At a glance
Controls
Driving tips
Communications
Navigation
Entertainment
Mobility
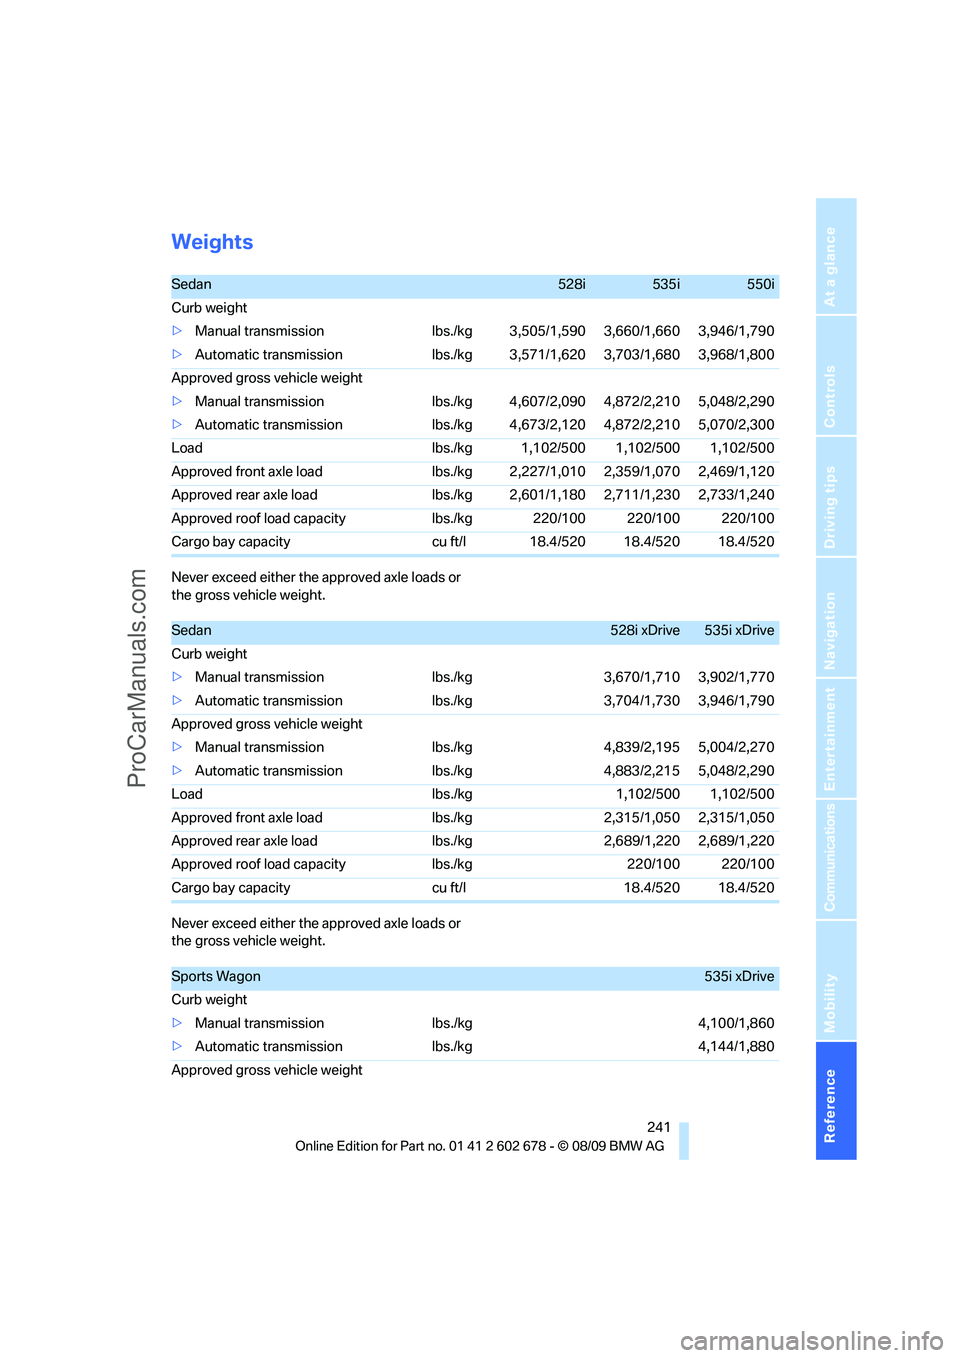
Weights
Never exceed either the approved axle loads or
the gross vehicle weight.
Never exceed either the approved axle loads or
the gross vehicle weight.
Sedan528i535i550i
Curb weight
>Manual transmission lbs./kg 3,505/1,590 3,660/1,660 3,946/1,790
>Automatic transmission lbs./kg 3,571/1,620 3,703/1,680 3,968/1,800
Approved gross vehicle weight
>Manual transmission lbs./kg 4,607/2,090 4,872/2,210 5,048/2,290
>Automatic transmission lbs./kg 4,673/2,120 4,872/2,210 5,070/2,300
Load lbs./kg 1,102/500 1,102/500 1,102/500
Approved front axle load lbs./kg 2,227/1,010 2,359/1,070 2,469/1,120
Approved rear axle load lbs./kg 2,601/1,180 2,711/1,230 2,733/1,240
Approved roof load capacity lbs./kg 220/100 220/100 220/100
Cargo bay capacity cu ft/l 18.4/520 18.4/520 18.4/520
Sedan528i xDrive535i xDrive
Curb weight
>Manual transmission lbs./kg 3,670/1,710 3,902/1,770
>Automatic transmission lbs./kg 3,704/1,730 3,946/1,790
Approved gross vehicle weight
>Manual transmission lbs./kg 4,839/2,195 5,004/2,270
>Automatic transmission lbs./kg 4,883/2,215 5,048/2,290
Load lbs./kg 1,102/500 1,102/500
Approved front axle load lbs./kg 2,315/1,050 2,315/1,050
Approved rear axle load lbs./kg 2,689/1,220 2,689/1,220
Approved roof load capacity lbs./kg 220/100 220/100
Cargo bay capacity cu ft/l 18.4/520 18.4/520
Sports Wagon535i xDrive
Curb weight
>Manual transmission lbs./kg 4,100/1,860
>Automatic transmission lbs./kg 4,144/1,880
Approved gross vehicle weight
ProCarManuals.com
Page 253 of 271

Reference 251
At a glance
Controls
Driving tips
Communications
Navigation
Entertainment
Mobility
Automatic
– air distribution106
– air volume106
– cruise control66
– garage door opener110
– headlamp control100
– recirculated-air control
AUC107
– steering wheel
adjustment45
– tailgate operation34
Automatic climate control105
– automatic air
distribution106
– parked car ventilation109
– settings via iDrive108
– switching on and off108
– ventilation in rear108
Automatic closing of doors,
refer to Automatic soft
closing31
Automatic curb monitor51
Automatic lighting
– refer to Automatic headlamp
control100
– refer to Daytime running
lamps101
– refer to Interior lamps104
– refer to Pathway lighting101
– refer to Welcome lamps100
Automatic lights
– refer to High-beam
Assistant102
Automatic low beams, refer to
High-beam Assistant102
Automatic luggage
compartment roller cover,
Sports Wagon117
Automatic Service
Request196
Automatic soft closing31
Automatic speed reduction for
descents, refer to HDC Hill
Descent Control86Automatic transmission with
Steptronic59
– interlock60
– kick down60
– manually unlocking and
locking transmission lock61
– shiftlock60
– towing234
– tow-starting235
– with Comfort Access37
AUTO program for automatic
climate control106
AUX-IN port172
Available services196
Average fuel consumption75
– setting units76
Average speed, refer to
Computer75
Avoiding freeways for
navigation142
Avoiding unintentional
alarms36
Axle loads, refer to
Weights241
B
Backrest contour, refer to
Lumbar support45
Backrests, refer to Seats44
Backrest width adjustment44
Back seats, refer to Rear seats
Backup lamps, replacing
bulbs224
Band-aids, refer to First aid
kit232
Bass, refer to Tone
control152
Battery, refer to Vehicle
battery229
– jump starting232
Battery replacement
– remote control for Comfort
Access38
BC button, refer to
Computer75
Being towed234
Belts, refer to Safety belts48Beverage holder, refer to
Cupholders114
Blower, refer to Air
volume107
Bluetooth, activating/
deactivating180
BMW
– Car Shampoo219
BMW Assist,
activating194,196
BMW Assist192
BMW homepage4
BMW maintenance
system215
BMW Night Vision96
– activating98
– cleaning camera98
– cleaning camera, refer to
Wiper system64
– deactivating98
– making settings98
BMW Search194
BMW website4
Bottle holder, refer to
Cupholders114
Bracket for telephone or
mobile phone
– refer to Snap-in adapter188
Brake assistant85
– adaptive85
Brake force display93
Brake lamps
– replacing bulbs224
– two-stage93
Brake rotors
– breaking-in124
– refer to Braking safely126
ProCarManuals.com