2010 BMW 5 SERIES navigation
[x] Cancel search: navigationPage 215 of 271

Mobility
213Reference
At a glance
Controls
Driving tips
Communications
Navigation
Entertainment
>"Measuring engine oil level...":
This can take about 3 minutes if the car is at
a standstill on a level surface and the engine
is running, and about 5 minutes while the
car is moving.
If the engine oil has been topped off, the
measurement of the oil level can take up to
30 minutes.
>"Engine oil level below minimum. Add 1
quart!":
Add a maximum of 1 literUS quart/liter of
engine oil at the next opportunity, refer also
to Adding engine oil below. If the oil level
displayed is below minimum, add engine oil
immediately. Failure to do so may lead to
engine damage.
>"Engine oil level too high! Have this
checked.":
Too much oil will harm the engine.
Have the vehicle checked without
delay.<
>"Measurement inactive. Have this
checked.":
Do not add engine oil. You can continue
your journey. Note the newly calculated dis-
tance remaining to the next oil service, refer
to Service requirements on page77. Have
the system checked as soon as possible.
Adding engine oil
1 US quart/1 liter of engine oil until a corre-
sponding message is shown on the Control Dis-
play.
Add oil within the next 125 miles/200 km,
otherwise the engine could be dam-
aged.
For this reason, thoroughly wash exposed areas
of skin with soap and water after such work.
Keep oil, grease, etc., out of reach of children
and observe the warnings on the containers to
prevent health risks.<
Oil change
Have oil changed only at your BMW center or
at a workshop that works according to BMW
repair procedures with correspondingly trained
personnel.
Approved engine oils
The quality of the engine oil selected has critical
significance for the operation and service life of
an engine. BMW continuously approves spe-
cific oils after confirming their suitability for use
in its vehicles with extensive testing.
Do not use oil additives, as these may
result in engine damage.<
Only use approved BMW High Performance
Synthetic Oil.
If BMW High Performance Synthetic Oil is
unavailable, you can add small quantities of
other synthetic oils between oil changes. Only
use oils of the specification API SM or higher.
Your BMW center will be happy to answer
detailed questions on BMW High Perfor-
mance Synthetic Oil or approved synthetic
oils.<
You can also call BMW of North America at
1-800-831-1117 or visit the website at
www.bmwusa.com to obtain this information.
Viscosity grades
Viscosity is a measure of an oil's flow rating and
is specified in SAE grades.
The choice of the right SAE grade is based on
the climatic conditions in the region in which
you normally drive your BMW.
Approved oils belong to the 0W-40,
0W-30, 5W-40 and 5W-30 SAE
classes.<
ProCarManuals.com
Page 217 of 271

Mobility
215Reference
At a glance
Controls
Driving tips
Communications
Navigation
Entertainment
Maintenance
BMW Maintenance System
The BMW Maintenance System supports the
preservation of the traffic and operating safety
of your BMW. The ultimate objective is to
ensure economical maintenance by providing
the ideal service for your vehicle.
Should the day come when you decide to sell
your BMW, a complete center service history
will prove to be an asset of inestimable value.
CBS Condition Based Service
Sensors and special algorithms take the differ-
ent driving conditions of your BMW into
account. Condition Based Service uses this to
determine the current and future service
requirements. By letting you define a service
and maintenance regimen that reflects your
own individual requirements, the system builds
the basis for trouble-free driving.
You can set the Control Display to show
remaining distances and times of selected
maintenance intervals and legally mandated
deadlines, refer to page77:
>Engine oil
>Brake pads, front and rear separately
>Brake fluid
>Vehicle check
>Legally mandated inspections depending
on local regulations
Service data in remote control
Your vehicle stores the information required
maintenance continuously in the remote con-
trol during driving. After accessing the data
stored in the remote control, your BMW Service
Advisor can suggest precisely the right array of
service procedures for your own individual vehi-
cle. You should therefore hand over the remote
control you last used to drive to the BMW Ser-
vice Advisor when you take your vehicle in for
service.
Make sure the date is set correctly, refer
to page79, otherwise the effectiveness
of CBS Condition Based Service is not
ensured.<
Service and Warranty Information
Booklet for US models and
Warranty and Service Guide Booklet
for Canadian models
Please consult your Service and Warranty Infor-
mation Booklet for US models and Warranty
and Service Guide Booklet for Canadian models
for additional information on service require-
ments.
BMW recommends that you have service
and repair operations performed at your
BMW center.
Take the time to ensure that these service pro-
cedures are confirmed by entries in your vehi-
cle's Service and Warranty Information Booklet
for US models and Warranty and Service Guide
Booklet for Canadian models. These entries
verify that your vehicle has received the speci-
fied regular maintenance.<
ProCarManuals.com
Page 219 of 271

Mobility
217Reference
At a glance
Controls
Driving tips
Communications
Navigation
Entertainment
Care
Car-care products
Regular cleaning and care make a significant
contribution to retaining your BMW's value.
For the cleaning and care of your vehicle, BMW
recommends using only products that BMW
has approved for this purpose.
Your BMW center will be glad to advise you
about products and services for the cleaning
and care of your BMW.
Genuine BMW Care Products are materi-
als tested, laboratory tested, and tested in
actual use. They offer optimum care and pro-
tection for your vehicle.<
Do not use cleaners that contain alcohol
or solvents; they can damage your vehi-
cle.<
Cleaning agents can contain substances
that are dangerous or pose health risks.
You should therefore heed the warnings and
hazard indications on the packaging. Open the
doors or windows on your vehicle whenever
cleaning the interior. Make sure there is suffi-
cient ventilation in enclosed spaces. Use only
products that are formulated for vehicle clean-
ing.<
Exterior care
Washing your vehicle
In the winter months, it is especially
important to ensure that the vehicle is
washed on a regular basis. Otherwise, signifi-
cant soiling and road salt can cause damage to
the vehicle.<
After washing the vehicle, apply the
brakes briefly to dry them. Failure to do so
may lead to a reduction in braking efficiency and
also to corrosion of the brake rotors.<
Car washes
Give preference to cloth car washes.Before driving into the car wash, make sure that
it is suitable for your BMW. Pay attention to the
following points:
>Dimensions of your vehicle, refer to
page239.
>If necessary, fold in the outside rearview
mirrors, refer to page51.
>Maximum permissible tire width.
Avoid car washes with rail heights over
4in/10cm, otherwise there is danger of
damaging chassis parts.<
Preparations for driving into the car wash:
>Deactivate rain sensor to prevent unwanted
wiper activation.
>Deactivate rear window wiper
* and protect
it from damage. Take appropriate protec-
tive measures; inquiring with the car wash
operator as needed.
>Remove additional add-on parts, e.g., spoil-
ers or phone antennas, if they could be
damaged.
Automatic transmission
Before driving into the car wash, make sure the
vehicle is able to roll by making sure to:
1.Insert the remote control into the ignition
lock, even with Comfort Access.
2.Shift into transmission position N.
3.Release the parking brake.
4.Switch off the engine.
5.Leave the remote control in the ignition lock
so that the vehicle can roll.
Steam jets/high-pressure washers
When using steam jets or high-pressure
washers, ensure that you maintain suffi-
cient clearance to the vehicle and do not exceed
a temperature of 1407/606.
Insufficient distance or excessive pressure or
temperature can damage parts of the vehicle or
can result in water penetration. Follow the oper-
ProCarManuals.com
Page 221 of 271

Mobility
219Reference
At a glance
Controls
Driving tips
Communications
Navigation
Entertainment
Interior care
Upholstery/fabrics
Clean regularly with a vacuum cleaner in order
to remove surface dirt.
In the event of more serious soiling such as bev-
erage stains, use a soft sponge or a lint-free
microfiber cloth in combination with suitable
interior cleaners. Follow the instructions on the
packaging.
Clean upholstery material over a large
area extending out to the seams. Avoid
intense friction.<
Open Velcro fasteners on pants or other
items of clothing can cause damage to
the seat covering. Make sure that the Velcro
fasteners are closed.<
Leather/leather coverings
The leather used by BMW is a high quality
natural product. Slight patterns in the
grain are part of the typical properties of a natu-
ral leather.
Dust and dirt from the road chafe in pores and
folds and result in considerable wear and cause
the leather surface to become prematurely brit-
tle. We therefore suggest that you clean the
leather with a dust cloth or vacuum cleaner at
regular intervals.<
Particularly with light-colored leather, make
sure to clean it regularly since it has a greater
tendency to become soiled.
Treat the leather twice a year with a leather
lotion since dirt and grease harm the protective
layer of the leather.
Carpets/cargo bay
Carpeting, floor mats, and luggage compart-
ment rugs and paneling can be cleaned with a
vacuum or in the event of more serious soiling,
cleansed with an interior cleaner.
Floor mats and luggage compartment rugs can
be removed for cleaning. When inserting into
place, make sure that the seat rails do not pro-
trude over the floor mats; otherwise floor mats
can be damaged.Fluff on new floor mats is a result of the produc-
tion process and can be removed by repeated
vacuuming.
Plastic components inside
Clean the glass cover of the instrument panel,
imitation leather surfaces, lamp lenses, and
matte components with water and, if necessary,
a solvent-free plastic cleaner.
Fine wooden components
Use a damp cloth to clean fine wooden trim
panels and components. Follow up by drying
with a soft cloth.
Safety belts
Dirty belt straps impede the reeling action and
thus have a negative impact on safety.
Chemical cleaning
Do not clean chemically, as this may
destroy the webbing.<
Inside sensors
Clean inside sensors such as those of the high-
beam assistant using a lint-free cloth moist-
ened with glass cleaner.
Displays
Clean displays like the radio or the Control Dis-
play using a display-cleaning cloth or a soft,
nonabrasive lint-free cloth.
Avoid using excessive pressure when
cleaning displays; otherwise, you could
damage them.<
Never use chemical-based cleansers or
household scouring products. Keep all
liquids away from the equipment. Otherwise
corrosion or damage to surfaces or electrical
components can occur.<
CD/DVD drives
Do not use cleaning CDs; they can dam-
age parts of the player.<
ProCarManuals.com
Page 223 of 271

Mobility
221Reference
At a glance
Controls
Driving tips
Communications
Navigation
Entertainment
Replacing components
Onboard vehicle tool kit
Sedan
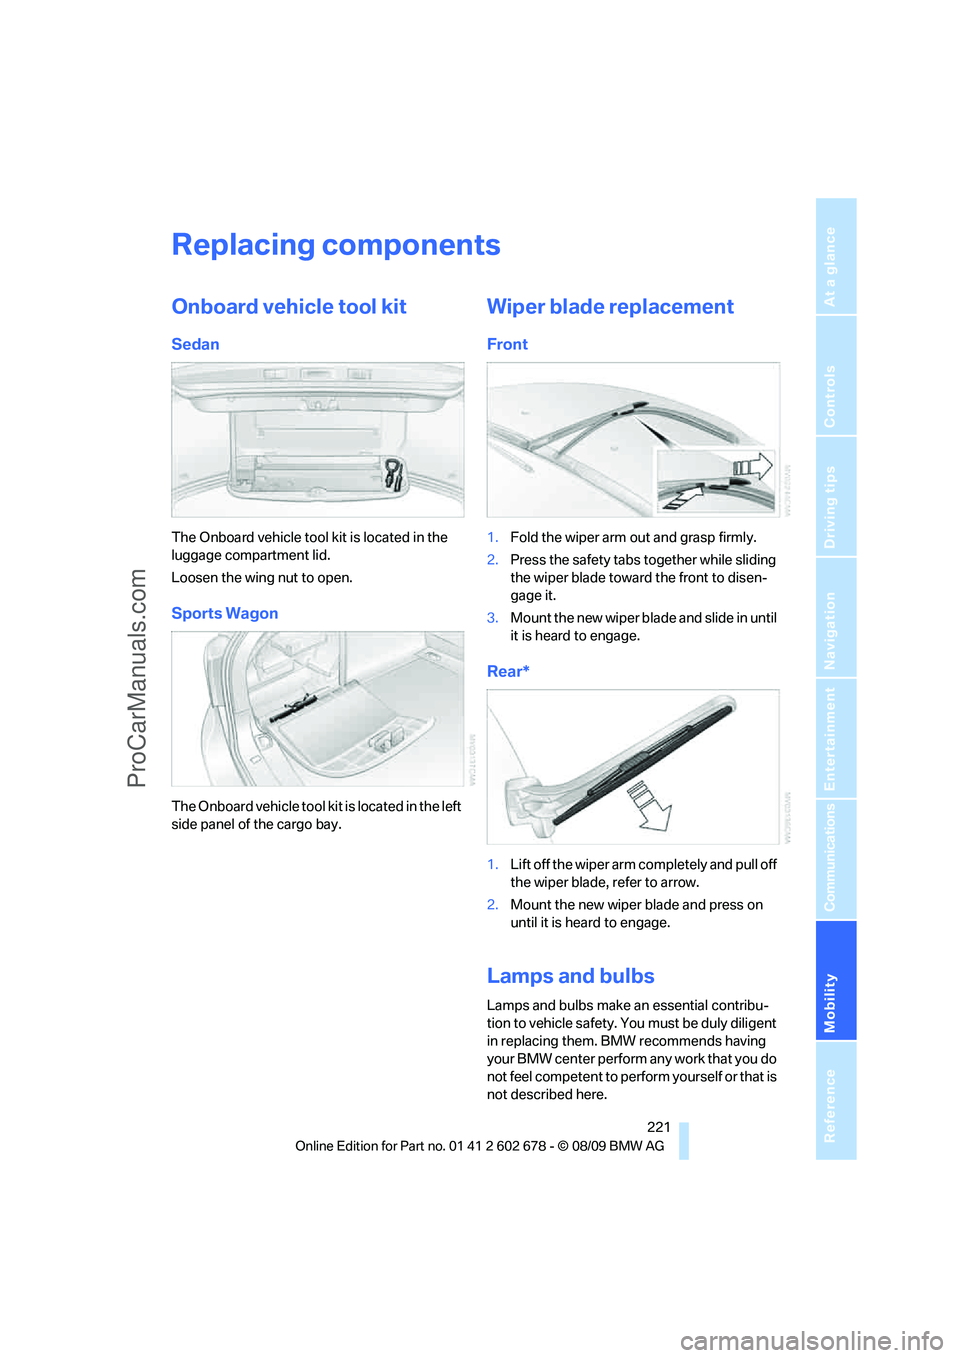
The Onboard vehicle tool kit is located in the
luggage compartment lid.
Loosen the wing nut to open.
Sports Wagon
The Onboard vehicle tool kit is located in the left
side panel of the cargo bay.
Wiper blade replacement
Front
1.Fold the wiper arm out and grasp firmly.
2.Press the safety tabs together while sliding
the wiper blade toward the front to disen-
gage it.
3.Mount the new wiper blade and slide in until
it is heard to engage.
Rear*
1.Lift off the wiper arm completely and pull off
the wiper blade, refer to arrow.
2.Mount the new wiper blade and press on
until it is heard to engage.
Lamps and bulbs
Lamps and bulbs make an essential contribu-
tion to vehicle safety. You must be duly diligent
in replacing them. BMW recommends having
your BMW center perform any work that you do
not feel competent to perform yourself or that is
not described here.
ProCarManuals.com
Page 225 of 271

Mobility
223Reference
At a glance
Controls
Driving tips
Communications
Navigation
Entertainment
High beams
H7 bulb, 55 watts
1.Turn the bulb holder to the left and remove.
2.Remove and replace the bulb.
Parking and roadside parking lamps
In the event of a malfunction, please go to your
BMW center or a workshop that works accord-
ing to BMW repair procedures with correspond-
ingly trained personnel.
Xenon lamps*
The service life of these bulbs is very long and
the probability of a failure is very low, provided
that they are not switched on and off an unusual
number of times. If one of these bulbs should
nevertheless fail, it is possible to continue driv-
ing with great caution using the fog lamps, pro-
vided traffic laws in your area do not prohibit
this.
Have work on the xenon lighting system
performed only by your BMW center or a
workshop that works according to BMW repair
procedures with correspondingly trained per-
sonnel. Due to the high voltage present in the
system, there is a danger of fatal injuries when
work is carried out improperly.<
Access to lamps
The illustration shows the left-hand side of the
engine compartment.
1Cover cap for parking and roadside parking
lamps, daytime running lamps
2Sealing cap for turning lamps
*
To remove the covers:
>Parking lamps and roadside parking lamps,
daytime running lamps: turn the cover cap
to the left and remove.
>Turning lamps: turn the sealing cap to the
left and remove.
Parking lamps and roadside parking
lamps, daytime running lamps
H8 bulb, 35 watts
1.Turn the bulb in the direction of the arrow, in
the opposite direction on the other side,
and remove.
2.Remove the connector and replace the
bulb.
Turning lamps*
H3 bulb, 55 watts
ProCarManuals.com
Page 227 of 271

Mobility
225Reference
At a glance
Controls
Driving tips
Communications
Navigation
Entertainment
4Brake lamp
5Reflector
6Tail lamp
7Side marker lamp
Sports Wagon
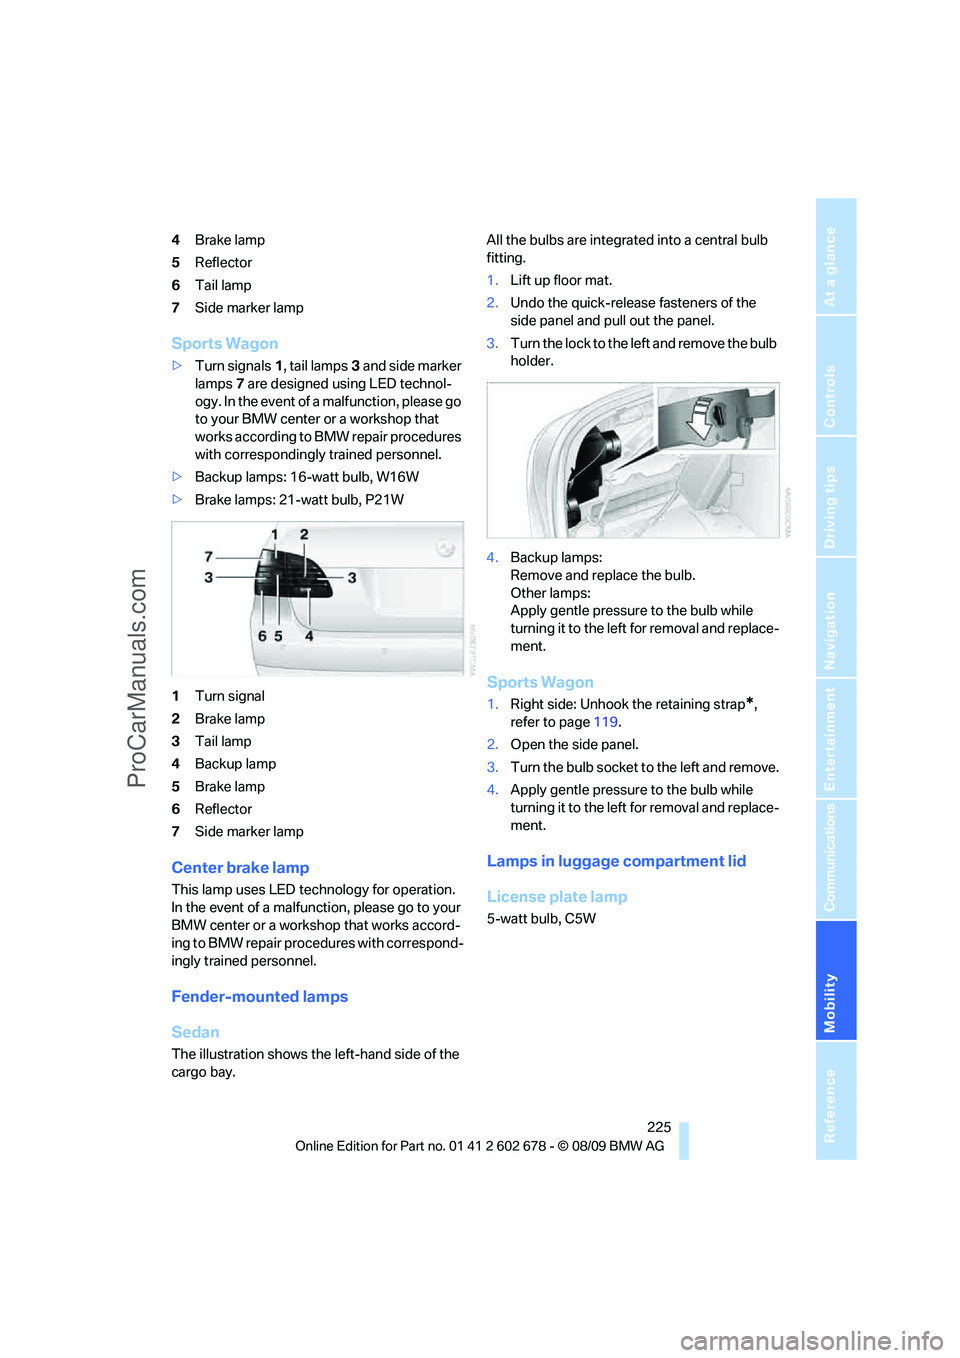
>Turn signals1, tail lamps3 and side marker
lamps7 are designed using LED technol-
ogy. In the event of a malfunction, please go
to your BMW center or a workshop that
works according to BMW repair procedures
with correspondingly trained personnel.
>Backup lamps: 16-watt bulb, W16W
>Brake lamps: 21-watt bulb, P21W
1Turn signal
2Brake lamp
3Tail lamp
4Backup lamp
5Brake lamp
6Reflector
7Side marker lamp
Center brake lamp
This lamp uses LED technology for operation.
In the event of a malfunction, please go to your
BMW center or a workshop that works accord-
ing to BMW repair procedures with correspond-
ingly trained personnel.
Fender-mounted lamps
Sedan
The illustration shows the left-hand side of the
cargo bay.All the bulbs are integrated into a central bulb
fitting.
1.Lift up floor mat.
2.Undo the quick-release fasteners of the
side panel and pull out the panel.
3.Turn the lock to the left and remove the bulb
holder.
4.Backup lamps:
Remove and replace the bulb.
Other lamps:
Apply gentle pressure to the bulb while
turning it to the left for removal and replace-
ment.
Sports Wagon
1.Right side: Unhook the retaining strap*,
refer to page119.
2.Open the side panel.
3.Turn the bulb socket to the left and remove.
4.Apply gentle pressure to the bulb while
turning it to the left for removal and replace-
ment.
Lamps in luggage compartment lid
License plate lamp
5-watt bulb, C5W
ProCarManuals.com
Page 229 of 271

Mobility
227Reference
At a glance
Controls
Driving tips
Communications
Navigation
Entertainment
What you will need
To avoid rattling noises later on, note the posi-
tions of the tools before removing them, then
return them to their initial positions after com-
pleting work.
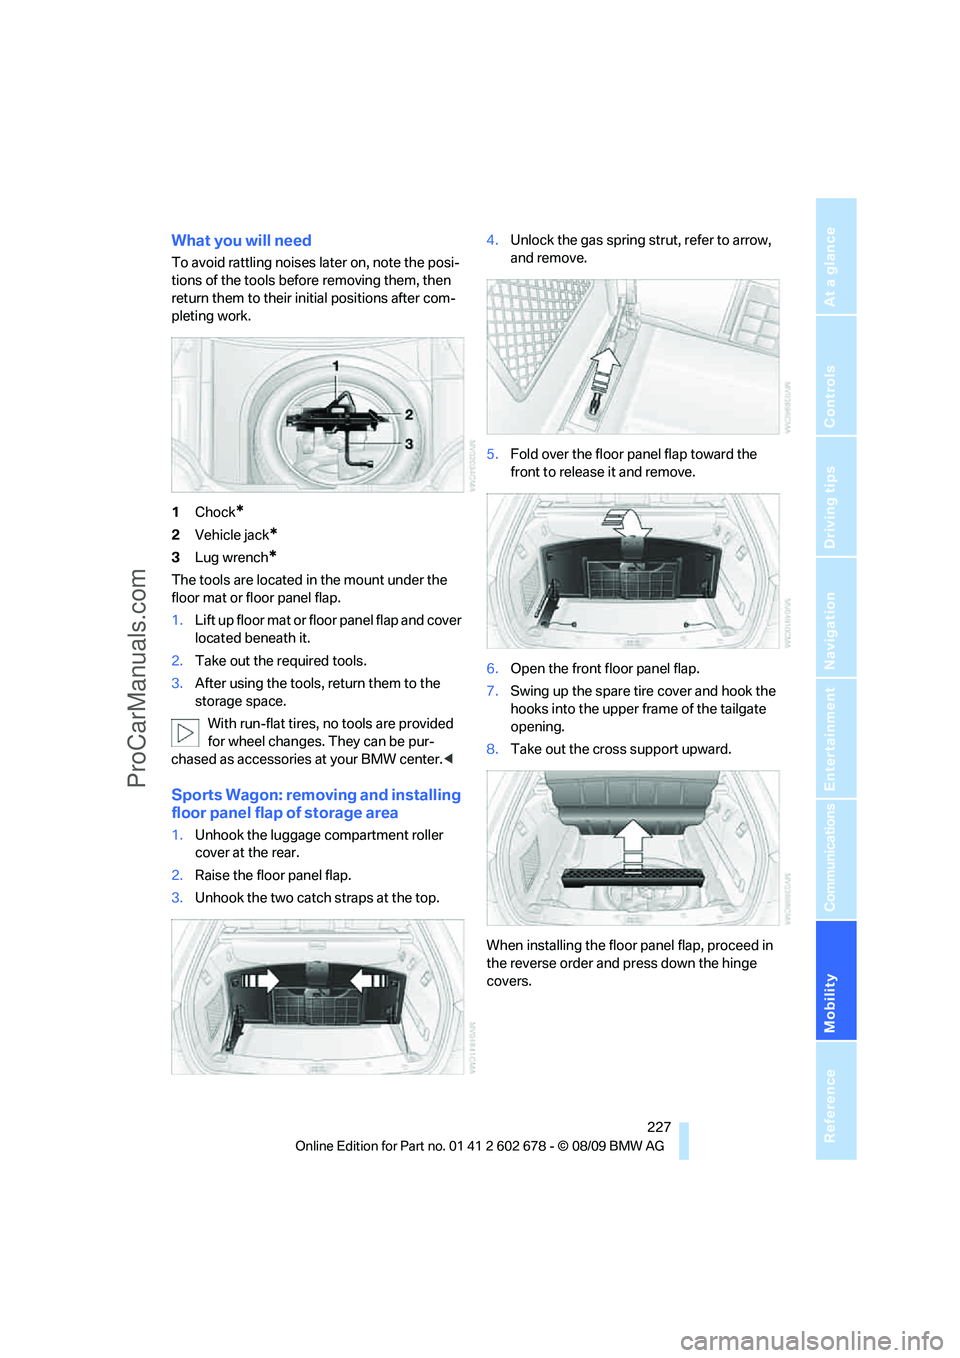
1Chock
*
2Vehicle jack*
3Lug wrench*
The tools are located in the mount under the
floor mat or floor panel flap.
1.Lift up floor mat or floor panel flap and cover
located beneath it.
2.Take out the required tools.
3.After using the tools, return them to the
storage space.
With run-flat tires, no tools are provided
for wheel changes. They can be pur-
chased as accessories at your BMW center.<
Sports Wagon: removing and installing
floor panel flap of storage area
1.Unhook the luggage compartment roller
cover at the rear.
2.Raise the floor panel flap.
3.Unhook the two catch straps at the top.4.Unlock the gas spring strut, refer to arrow,
and remove.
5.Fold over the floor panel flap toward the
front to release it and remove.
6.Open the front floor panel flap.
7.Swing up the spare tire cover and hook the
hooks into the upper frame of the tailgate
opening.
8.Take out the cross support upward.
When installing the floor panel flap, proceed in
the reverse order and press down the hinge
covers.
ProCarManuals.com