2010 BMW 335I XDRIVE CONVERTIBLE change wheel
[x] Cancel search: change wheelPage 90 of 266
Technology for driving comfort and safety
88 The status is displayed.
Malfunction
The small warning lamp flashes in
yellow and then lights up continu-
ously; the large warning lamp comes
on in yellow. On the Control Display,
the tires are shown in gray and a message
appears. No punctures can be detected.
This type of message is shown in the following
situations:
>If there is a malfunction
Have the system checked.
>If a wheel without TPM electronics has
been mounted
>If TPM is temporarily malfunctioning due to
other systems or devices using the same
radio frequency.
Message for unsuccessful system
reset
The warning lamp lights up yellow. A
message appears on the Control Dis-
play. The system is not reset, e.g.
after a wheel change.
Check the tire inflation pressure and reset the
system, refer to page86.
Declaration according to NHTSA/
FMVSS 138
Tire Pressure Monitoring Systems
Each tire should be checked monthly when cold
and inflated to the inflation pressure recom-
mended by the vehicle manufacturer on the
vehicle placard or tire inflation pressure label. If
your vehicle has tires of a different size than the
size indicated on the vehicle placard or tire infla-
tion pressure label, you should determine the
proper tire inflation pressure for those tires. As
an added safety feature, your vehicle has been
equipped with a tire pressure monitoring sys-
tem, TPMS, that illuminates a low tire pressure
telltale when one or more of your tires are signif-
icantly underinflated. Accordingly, when the
low tire pressure telltale illuminates, you should
stop and check your tires as soon as possible,
and inflate them to the proper pressure. Driving on a significantly underinflated tire causes the
tire to overheat and can lead to tire failure.
Underinflation also reduces fuel efficiency and
tire tread life, and may affect the vehicle’s han-
dling and stopping ability. Please note that the
TPMS is not a substitute for proper tire mainte-
nance, and it is the driver’s responsibility to
maintain correct tire pressure, even if underin-
flation has not reached the level at which the
TPMS low tire pressure telltale illuminates.
The TPMS malfunction indicator is combined
with the low tire pressure telltale. When the sys-
tem detects a malfunction, the telltale will flash
for approximately one minute and then remain
continuously lit. This sequence will continue
upon subsequent vehicle startups as long as
the malfunction exists. When the malfunction
indicator is illuminated, the system may not be
able to detect or signal low tire pressure as
intended. TPMS malfunctions may occur for a
variety of reasons, including the installation of
replacement or alternate tires or wheels on the
vehicle that prevent the TPMS from functioning
properly. Always check the TPMS malfunction
telltale after replacing one or more tires or
wheels on your vehicle to ensure that the
replacement or alternate tires and wheels allow
the TPMS to continue to function properly.
Active steering*
The concept
Active steering varies the turning angle of the
front wheels in relation to steering wheel move-
ments. It also varies the steering force required
to turn the wheels depending on the speed at
which you are driving.
When you are driving in the low road speed
range, e.g. in a town or when parking, the steer-
ing angle is increased, i.e. steering becomes
very direct and less effort is required to turn the
wheels. In the higher speed range, on the other
hand, the steering angle is reduced as the
speed increases. This improves the handling of
your BMW over the entire speed range.
Page 102 of 266
Climate
100 automatic climate control is optimized for driv-
ing with the hardtop open. In addition, the air
volume is increased as vehicle speed increases.
The effectiveness of the Convertible pro-
gram can be enhanced considerably by
installing the wind deflector.<
Adjusting air volume manually
To be able to manually adjust the air volume,
switch off the AUTO program first.
Press the left side of the button to
reduce the air volume. Press the
right side of the button to increase
it.
The air volume may be reduced or the blower
may be switched off entirely to save on battery
power. The display remains the same.
Automatic recirculated-air control
AUC/Recirculated-air mode
You can respond to unpleasant odors or pollut-
ants in the immediate environment by tempo-
rarily suspending the supply of outside air. The
system then recirculates the air currently within
the vehicle.
Press the button repeatedly to
select an operating mode:
>LED off: outside air flows in continuously.
>Left-hand LED on, AUC mode: a sensor
detects pollutants in the outside air and
controls the shut-off automatically.
>Right-hand LED on, recirculated-air mode:
the supply of outside air is permanently
shut off. If the windows fog over, switch off
recirculated-air mode and increase the air
volume, if necessary. Make sure that air can
flow onto the windshield.
The recirculated-air mode should not be
used over an extended period of time;
otherwise, the air quality inside the car will dete-
riorate continuously.<
Via the button on the steering wheel
You can switch quickly between the recircu-
lated-air mode and the previous mode using a
button
on the steering wheel, refer to page11.
ALL program
Press the button.
The current temperature setting
on the driver's side is transferred to
the front passenger side.
If the temperature setting on the driver's side is
changed, the temperature on the front passen-
ger side is changed as well.
The program is switched off when the setting is
adjusted on the front passenger side or the but-
ton is pressed again.
Defrosting windows and removing
condensation
Press the button.
Quickly removes ice and conden-
sation from the windshield and
front side windows.
For this purpose, also switch on the cooling
function.
Switching cooling function on/off
The passenger compartment can only be
cooled while the engine is running.
Press the button.
The air is cooled and dehumidified
and – depending on the tempera-
ture setting – warmed again.
Depending on the weather, the windshield may
fog up briefly when the engine is started.
Pressing the AUTO button automatically
switches on the cooling function.
Rear window defroster
Press the button.
The defroster is switched off auto-
matically after a certain time.
Depending on your vehicle's equipment, the
upper wires serve as an antenna and are not
part of the rear window defroster.
Page 103 of 266
Controls
101Reference
At a glance
Driving tips
Communications
Navigation
Entertainment
Mobility
Switching the system on/off
Switching off
With the blower at its lowest set-
ting, press the left side of the but-
ton to switch off the automatic cli-
mate control.
All displays are cleared except for the rear win-
dow defroster if it is switched on.
The outside air supply is blocked when
the automatic climate control is switched
off. If the air quality deteriorates or the window
fogs over, switch the system back on and
increase the air volume.<
Switching on
Press any button except the ALL or the rear
window defroster button to reactivate the auto-
matic climate control.
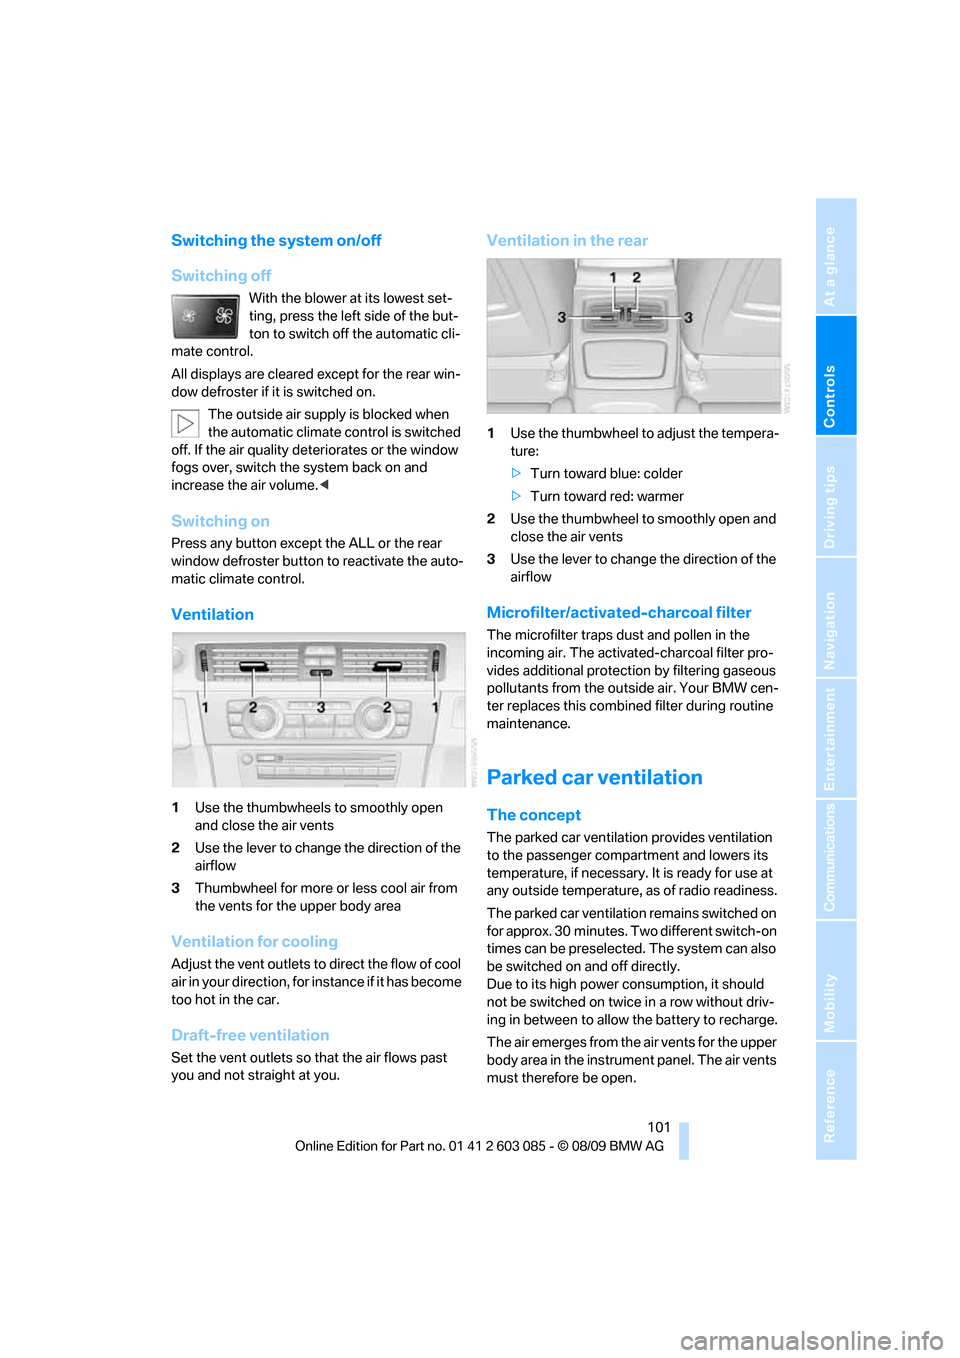
Ventilation
1Use the thumbwheels to smoothly open
and close the air vents
2Use the lever to change the direction of the
airflow
3Thumbwheel for more or less cool air from
the vents for the upper body area
Ventilation for cooling
Adjust the vent outlets to direct the flow of cool
air in your direction, for instance if it has become
too hot in the car.
Draft-free ventilation
Set the vent outlets so that the air flows past
you and not straight at you.
Ventilation in the rear
1Use the thumbwheel to adjust the tempera-
ture:
>Turn toward blue: colder
>Turn toward red: warmer
2Use the thumbwheel to smoothly open and
close the air vents
3Use the lever to change the direction of the
airflow
Microfilter/activated-charcoal filter
The microfilter traps dust and pollen in the
incoming air. The activated-charcoal filter pro-
vides additional protection by filtering gaseous
pollutants from the outside air. Your BMW cen-
ter replaces this combined filter during routine
maintenance.
Parked car ventilation
The concept
The parked car ventilation provides ventilation
to the passenger compartment and lowers its
temperature, if necessary. It is ready for use at
any outside temperature, as of radio readiness.
The parked car ventilation remains switched on
for approx. 30 minutes. Two different switch-on
times can be preselected. The system can also
be switched on and off directly.
Due to its high power consumption, it should
not be switched on twice in a row without driv-
ing in between to allow the battery to recharge.
The air emerges from the air vents for the upper
body area in the instrument panel. The air vents
must therefore be open.
Page 148 of 266

On/off and tone
146
On/off and tone
The following audio and video sources share
the same control elements and adjustments:
>Radio
>CD/DVD player
>CD changer
*
>Video*
>External devices, e.g. MP3 player
Controls
The audio and video sources can be controlled
using the:
>Buttons near the CD/DVD player
>iDrive
>Buttons on the steering wheel, refer to
page10
>Programmable memory keys, refer to
page20
>Voice activation system
Buttons in the area of the CD/DVD
player
1Sound output for entertainment on/off, vol-
ume
>Press: switch on/off
When you switch on the unit, the last set
radio station or track is played.
>Turn: adjusting the volume
2 Eject the CD/DVD
3CD/DVD drive
*
4FM/AM: change the radio station wave-
band
5MODE: change the audio and video
sources
6 Station scan/track search
>Change the radio station
>Select the track for the CD/DVD player,
CD changer and certain multimedia
devices
Switching on/off
To switch the entertainment audio output on or
off:
Press button1 next to the CD/DVD player.
This symbol on the Control Display indicates
that sound output is switched off.
The sound output is available for approx.
20 minutes after the ignition was switched off.
For sound output, switch the unit back on.
Adjusting volume
Turn button1 next to the CD/DVD player until
the desired volume is obtained.
You can also adjust the volume with buttons on
the steering wheel, refer to page10.
Tone control
You can alter various tone settings, e.g. treble
and bass or the speed-dependent volume
increase.
The tone settings are applied to all audio
sources.
The settings are stored for the remote control
currently in use.
Treble, bass, balance, fader
>"Balance": left/right volume distribution
Page 226 of 266

Replacing components
224 Do not remove the covers or expose the
eyes directly to the unfiltered light source
for several hours; otherwise, this could cause
irritation of the retina.<
Xenon lamps
These bulbs have a very long service life and are
highly unlikely to fail. If a xenon lamp fails never-
theless, switch on the fog lamps and continue
the journey with great care, provided that local
legislation does not prohibit this.
Have any work on the xenon lamp system,
including bulb replacements, performed
o n ly b y a BM W c e n t e r o r a w o r k s h o p t h a t w o r k s
according to BMW repair procedures with cor-
respondingly trained personnel. Otherwise, if
such work is carried out improperly, the high
voltage in the system presents the danger of
fatal injuries.<
Access to the lamps
1.Switch off the lamps and take the remote
control out of the ignition lock.
2.Remove the upper cover from the head-
lamp. To do so, use a screwdriver to press
the catches towards the rear, see arrows,
and pull the cover forward and out.
Follow the same steps in reverse order to reat-
tach the cover.
Be careful when installing the cover; oth-
erwise, leaks could occur and cause dam-
age to the headlamp system.<
Access through the wheel well
For turn signals only:1.Turn the wheel inwards.
2.Partially release the cover in the wheel well.
To do so, remove the corresponding
screws, see arrows.
3.Pull the cover back.
Parking lamps and roadside parking
lamps, daytime running lights
H8 bulb, 35 watts
1.Remove the cover, refer to Access to the
lamps.
2.Turn the bulb approx. 90°, see arrow, and
take it out.
3.Disconnect the plug, change the bulb and
reconnect the plug.
4.Insert the bulb and turn it until it stops.
5.Reattach the cover.
Corner-illuminating lamp*
H3 bulb, 55 watts
1.Switch off the lamps and take the remote
control out of the ignition lock.
2.Remove the cover, refer to Access to the
lamps.
Page 227 of 266
Mobility
225Reference
At a glance
Controls
Driving tips
Communications
Navigation
Entertainment
3.Push the wire bracket out of the anchor
towards the right and fold it up.
4.Disconnect the plug, change the bulb and
reconnect the plug.
5.Insert the bulb.
6.Fold the wire bracket down and engage it.
7.Reattach the cover.
Turn signals, front
PY21W bulb, 21 watts
1.Release the cover in the wheel well, refer to
Access through the wheel well on
page224.
2.Rotate turn signal bulb socket 1 to the left
and remove.
3.Apply gentle pressure to the bulb while
turning it to the left for removal and replace-
ment.
4.Insert turn signal bulb socket 1.
5.Reattach the cover in the wheel well.
Tail lamps
Coupe
>Turn signal:
PY21W bulb, 21 watts>Brake lamp in the trunk lid:
H21W bulb, 21 watts
>Other lamps:
W16W bulb, 16 watts
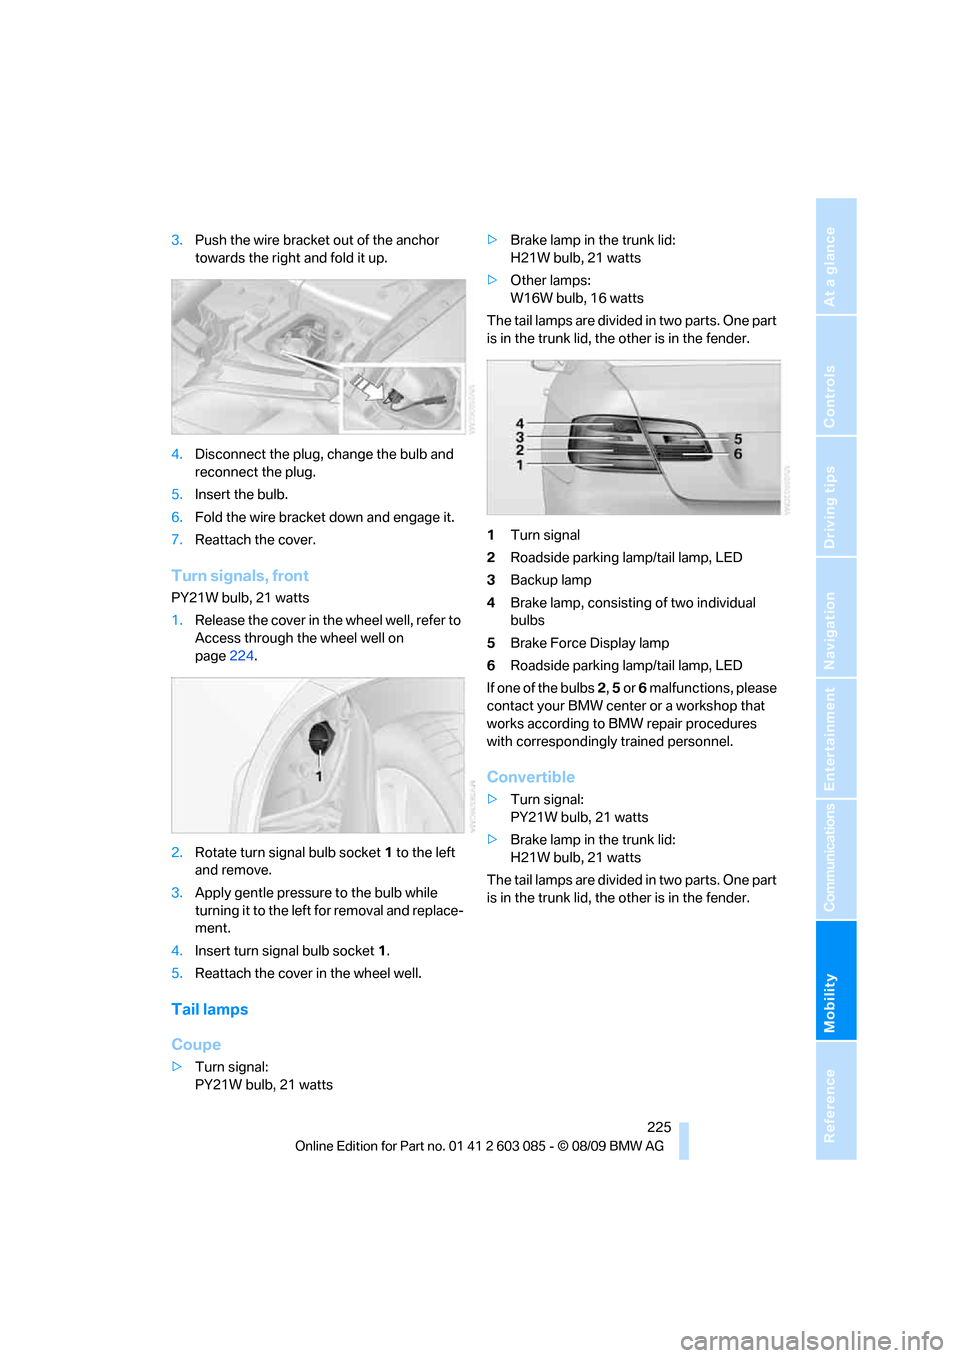
The tail lamps are divided in two parts. One part
is in the trunk lid, the other is in the fender.
1Turn signal
2Roadside parking lamp/tail lamp, LED
3Backup lamp
4Brake lamp, consisting of two individual
bulbs
5Brake Force Display lamp
6Roadside parking lamp/tail lamp, LED
If one of the bulbs 2, 5 or 6 malfunctions, please
contact your BMW center or a workshop that
works according to BMW repair procedures
with correspondingly trained personnel.
Convertible
>Turn signal:
PY21W bulb, 21 watts
>Brake lamp in the trunk lid:
H21W bulb, 21 watts
The tail lamps are divided in two parts. One part
is in the trunk lid, the other is in the fender.
Page 229 of 266
Mobility
227Reference
At a glance
Controls
Driving tips
Communications
Navigation
Entertainment
Lamps in the trunk lid
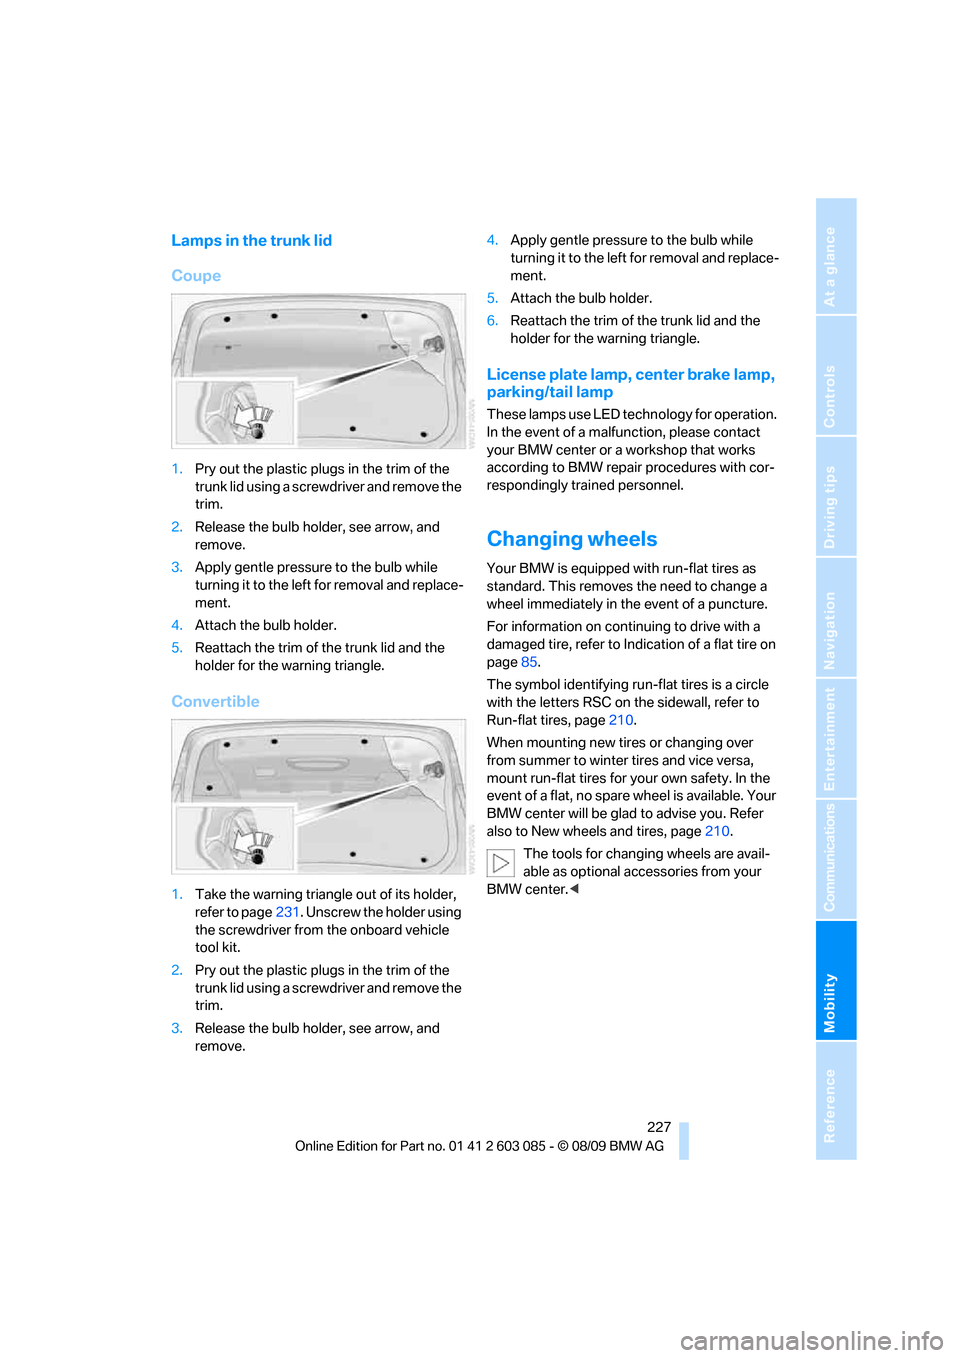
Coupe
1.Pry out the plastic plugs in the trim of the
trunk lid using a screwdriver and remove the
trim.
2.Release the bulb holder, see arrow, and
remove.
3.Apply gentle pressure to the bulb while
turning it to the left for removal and replace-
ment.
4.Attach the bulb holder.
5.Reattach the trim of the trunk lid and the
holder for the warning triangle.
Convertible
1.Take the warning triangle out of its holder,
refer to page231. Unscrew the holder using
the screwdriver from the onboard vehicle
tool kit.
2.Pry out the plastic plugs in the trim of the
trunk lid using a screwdriver and remove the
trim.
3.Release the bulb holder, see arrow, and
remove.4.Apply gentle pressure to the bulb while
turning it to the left for removal and replace-
ment.
5.Attach the bulb holder.
6.Reattach the trim of the trunk lid and the
holder for the warning triangle.
License plate lamp, center brake lamp,
parking/tail lamp
These lamps use LED technology for operation.
In the event of a malfunction, please contact
your BMW center or a workshop that works
according to BMW repair procedures with cor-
respondingly trained personnel.
Changing wheels
Your BMW is equipped with run-flat tires as
standard. This removes the need to change a
wheel immediately in the event of a puncture.
For information on continuing to drive with a
damaged tire, refer to Indication of a flat tire on
page85.
The symbol identifying run-flat tires is a circle
with the letters RSC on the sidewall, refer to
Run-flat tires, page210.
When mounting new tires or changing over
from summer to winter tires and vice versa,
mount run-flat tires for your own safety. In the
event of a flat, no spare wheel is available. Your
BMW center will be glad to advise you. Refer
also to New wheels and tires, page210.
The tools for changing wheels are avail-
able as optional accessories from your
BMW center.<
Page 252 of 266

Everything from A - Z
250 Care219
– automatic car washes219
– care products219
– carpets221
– CD/DVD drives222
– chrome parts220
– displays221
– exterior219
– fine wood parts221
– headlamps220
– high-pressure washer219
– interior221
– leather221
– light-alloy wheels221
– paintwork220
– plastic parts221
– retractable hardtop220
– rubber seals220
– safety belts221
– sensors and cameras221
– upholstery and cloth
trim221
– washing the car
manually220
– windows220
Cargo, securing122
Cargo area
– capacity241
– Comfort Access34
– folding up the floor
panel112
– lamp, refer to Interior
lamps97
– opening from inside31
– opening from outside31
Cargo loading120
– securing cargo122
– stowing cargo121
– vehicle120
Car jack
– jacking points228
Car key, refer to Integrated
key/remote control26
Car phone
– installation location, refer to
Center armrest107
– refer to separate Owner's
ManualCar phone, refer to
Telephone176
Car radio, refer to Radio149
Car shampoo221
Catalytic converter, refer to
Hot exhaust system119
CD, audio playback157
CD changer157,161
– controls146
– fast forward/reverse159
– filling or emptying the
magazine162
– random play sequence158
– selecting a track157
– switching on/off146
– tone control146
– volume146
CD player157
– controls146
– fast forward/reverse159
– random play sequence158
– selecting a track157
– switching on/off146
– tone control146
– volume146
Center armrest107
Center brake lamp
– replacing bulb227
Center console, refer to
Around the center
console14
Central locking
– from inside30
– from outside27
Central locking system27
– Comfort Access33
– hotel function31
– setting unlocking
characteristics27
Changes, technical, refer to
For your own safety5
Changing bulbs, refer to
Lamps and bulbs223
Changing the language on the
Control Display79
Changing the measurement
units on the Control
Display72
Changing wheels227Chassis number, refer to
Engine compartment213
Check Control77
Child restraint fixing system
LATCH53
Child restraint systems52
Child seats, refer to
Transporting children
safely52
Chrome parts221
Chrome polish221
Cigarette lighter, refer to
Lighter109
Cleaning headlamps61
– washer fluid61
Cleaning your BMW, refer to
Care219
Clock69
– 12h/24h mode76
– setting the time and date
76
– setting time75
Closing
– from inside30
– from outside27
Clothes hooks108
Cockpit10
Cold start, refer to Starting the
engine56
Combined instrument, refer to
Instrument cluster12
Comfort Access33
– replacing the battery35
Comfort access, refer to
Comfort Access33
Comfort area, refer to Around
the center console14
Compartment for remote
control, refer to Ignition
lock55
Compass105
Computer70
– displays on Control
Display71
Computer, refer to iDrive16
Concierge service191
Condensation, refer to When
the vehicle is parked120
Condition Based Service
CBS217