2010 BMW 328I XDRIVE SEDAN parking light
[x] Cancel search: parking lightPage 94 of 274

Lamps
92
Lamps
Parking lamps/low beams
0Lamps off,
daytime running lights
1Parking lamps and daytime running lights
2Low-beam headlamps and welcome lamps
3Automatic headlamp control
*, daytime run-
ning lights, welcome lamps, high-beam
assistant
* and adaptive light control*
When you open the driver's door with the igni-
tion switched off, the exterior lighting is auto-
matically switched off if the light switch is in
position 0, 2 or 3.
Switch on the parking lamps if necessary,
switch position 1.
Parking lamps
In switch position1, the front, rear and side
vehicle lighting is switched on. You can use the
parking lamps for parking.
When the ignition is switched off and the switch
is in position 1, only the outside sections of the
rear lamps are illuminated, refer to page232.
The parking lamps will discharge the bat-
tery. Therefore, do not leave them on for
unduly long periods of time; otherwise, the bat-
tery might not have enough power to start the
engine. It is preferable to switch on the left-
hand or right-hand roadside parking lamps,
refer to page94.<
Low beams
The low beams light up when the light switch is
in position 2 and the ignition is on.
Automatic headlamp control*
When the switch is in position3, the low beams
are switched on and off automatically depend-
ing on ambient light conditions, e.g. in a tunnel,
in twilight, or if there is precipitation. The adap-
tive light control
* is active. The LED next to the
symbol is illuminated when the low beams are
on. You can also activate the daytime running
lights, refer to page93. In the situations
described above, the lamps then automatically
switch from daytime running lights to low
beams.
The headlamps may also come on when the
sun is sitting low on a blue sky.
The low beams remain switched on
regardless of the ambient lighting condi-
tions when you switch on the fog lamps.<
The automatic headlamp control cannot
serve as a substitute for your personal
judgment in determining when the lamps
should be switched on in response to ambient
lighting conditions. For example, the system
cannot detect fog or hazy weather. To avoid
safety risks, you should always switch on the
low-beam headlamps manually under these
conditions.<
Welcome lamps
If you leave the light switch in position 2 or 3
when you park the car, the parking lamps and
the interior lamps light up briefly when you
unlock the vehicle.
Activating/deactivating welcome
lamps
1."Settings"
2."Lighting"
Page 96 of 274

Lamps
94
High beams/roadside parking
lamps
1High beams
2Headlamp flasher
3Roadside parking lamps
*
Roadside parking lamps, left or right*
There is an additional option of switching on the
lamps on the side of the car facing the road
when parked.
Switching on
After parking the vehicle, press the lever up or
down beyond the pressure point for a longer
period, arrow 3.
The roadside parking lamps drain the bat-
tery. Therefore, do not leave them on for
unduly long periods of time; otherwise, the bat-
tery might not have enough power to start the
engine.<
Switching off
Press the lever in the opposite direction to the
pressure point, arrow 3.
High-beam assistant*
The concept
This system automatically switches the high
beams on and off. The procedure is controlled
by a sensor on the front of the interior rearview
mirror. The assistant ensures that the high
beams are switched on whenever the traffic sit-
uation allows. It handles this task for you and
gives you the benefit of the best possible view. You can intervene at any time and switch the
high beams on and off as usual.
Activating the system
1.Turn the light switch to position3, refer to
page92.
2.With the low beams switched on, briefly
push the turn indicator lever in the direction
of the high beam.
The indicator lamp in the instrument
cluster lights up when the high beams
are activated. The system automati-
cally switches from high beams to low beams
and vice versa in response to oncoming traffic,
traffic ahead of you, and adequate ambient
lighting, e.g. on city streets.
Switching the high beams on and off
manually
Whenever you wish, or when the situation
requires, you can intervene:
>If the high-beam assistant switches on the
high beams, but you would like to drive with
the low beams, simply switch off the high
beams using the turn indicator lever. This
deactivates the high-beam assistant.
To reactivate the system, briefly push the
turn indicator lever toward the high beams
again.
>If the high-beam assistant switches on the
low beams, but you would like to drive with
the high beams, switch on the high beams
as usual. This deactivates the system and
the high beams need to be switched off
manually, if necessary.
To reactivate the system, briefly push the
turn indicator lever toward the high beams
again.
>Use the headlamp flasher as usual with the
low beams switched on.
System limitations
The high-beam assistant cannot serve as
a substitute for the driver's personal judg-
ment of when to use the high beams. Therefore,
manually switch off the high beams in situations
where this is required to avoid a safety risk.<
Page 97 of 274

Controls
95Reference
At a glance
Driving tips
Communications
Navigation
Entertainment
Mobility
The system is not fully functional in situations
such as the following, and driver intervention
may be necessary:
>In very unfavorable weather conditions,
such as fog or heavy precipitation
>In detecting poorly-lit road users, such as
pedestrians, cyclists, horseback riders and
wagons; when driving close to train or ship
traffic; and at animal crossings
>In tight curves, on hilltops or in depressions,
in cross traffic or half-obscured oncoming
traffic on highways
>In poorly lit towns and cities and in the pres-
ence of highly reflective signs
>At low speeds
>When the windshield in front of the interior
rearview mirror is fogged over, dirty or cov-
ered with stickers, etc.
>If the sensor is dirty. Clean the sensor on
the front of the interior rearview mirror using
a cloth moistened with a small amount of
glass cleaner.
Switching off via iDrive
1."Settings"
2."Lighting"
3."High beam assistant"
The high-beam assistant is activated and is
stored for the remote control currently in use.
Fog lamps
The parking lamps or low beams must
be switched on for the fog lamps to
operate. The green indicator lamp in
the instrument cluster lights up whenever the
fog lamps are on.
The fog lamps are switched off while you acti-
vate the headlamp flasher or switch on the high
beams.
If the automatic headlamp control is acti-
vated, the low beams will come on auto-
matically when you switch on the fog lamps.<
Instrument lighting
You can adjust the brightness of the instrument
lighting only when the parking lamps or the low
beams are switched on.
1.Push button 1 up or down repeatedly until
the appropriate symbol appears in the dis-
play, accompanied by the brightness set-
ting and scale the word "SET".
2.Press button 2.
Page 120 of 274

Things to remember when driving
118 for a short period after the engine is switched
off.
Hydroplaning
When driving on wet or slushy roads,
reduce road speed. If you do not, a wedge
of water can form between tires and road sur-
face. This situation, known as hydroplaning,
means that the tire can completely lose contact
with the road surface, so that neither the car can
be steered nor the brake be properly applied.<
The risk of hydroplaning increases with declin-
ing tread depth on the tires, refer also to Mini-
mum tread depth on page215.
Driving through water
Drive through water on the road only if it is
not deeper than 1 ft/30 cm, and then only
at walking speed at the most. Otherwise, the
vehicle's engine, the electrical systems and the
transmission may be damaged.<
Use the parking brake on inclines
On inclines, do not hold the vehicle for a
lengthy period using the clutch; use the
parking brake instead. Otherwise, greater
clutch wear will result.<
For more information about the drive-off assis-
tant, refer to page84.
Braking safely
Your BMW is equipped with ABS as a standard
feature. Applying the brakes fully is the most
effective way of braking in situations in which
this is necessary. Since the vehicle maintains
steering responsiveness, you can still avoid
possible obstacles with a minimum of steering
effort.
Pulsation of the brake pedal, combined with
sounds from the hydraulic circuits, indicate that
ABS is in its active mode.
Driving in wet conditions
When roads are wet or there is heavy rain,
briefly exert gentle pressure on the brake pedal
every few miles. Monitor traffic conditions to
ensure that this maneuver does not endanger other road users. The heat generated in this
process helps dry the pads and rotors to ensure
that full braking efficiency will then be available
when you need it.
Hills
To prevent overheating and the resulting
reduced efficiency of the brake system,
drive long or steep downhill gradients in the
gear in which the least braking is required. Even
light but consistent brake pressure can lead to
high temperatures, brake wear and possibly
even brake failure.<
You can increase the engine's braking effect by
shifting down, all the way to first gear if neces-
sary. This strategy helps you avoid placing
excessive loads on the brake system. Down-
shifting in manual mode of the automatic trans-
mission, refer to page57.
Never drive with the clutch held down,
with the transmission in neutral or with
the engine switched off; otherwise, engine
braking action will not be present or there will be
no power assistance to the brakes or steering.
Never allow floor mats, carpets or any other
objects to protrude into the area around the
pedals; otherwise, pedal function could be
impaired.<
Corrosion on brake rotors
When the vehicle is driven only occasionally,
during extended periods when the vehicle is not
used at all, and in operating conditions where
brake applications are less frequent, there is an
increased tendency for corrosion to form on
rotors, while contaminants accumulate on the
brake pads. This occurs because the minimum
pressure which must be exerted by the pads
during brake applications to clean the rotors is
not reached.
Should corrosion form on the brake rotors, the
brakes will tend to respond with a pulsating
effect that even extended application will fail to
cure.
Page 232 of 274
Replacing components
230 do not feel competent to perform yourself or
that is not described here.
Never touch the glass of new bulbs with
your bare fingers, as even minute
amounts of contamination will burn into the
bulb's surface and reduce its service life. Use a
clean tissue, cloth or something similar, or hold
the bulb by its base.<
You can obtain a selection of replacement bulbs
at your BMW center.
Only change bulbs while they are cool to
the touch; otherwise, you could suffer
burns.<
When working on electrical systems,
always begin by switching off the con-
sumer in question; otherwise, short-circuits
could result. To avoid possible injury or equip-
ment damage when replacing bulbs, observe
any instructions provided by the bulb manufac-
turer.<
For care of the headlamps, please follow the
instructions in the chapter entitled 'Care'.
If the routine for changing a particular
bulb is not described here, please contact
your BMW center or a workshop that works
according to BMW repair procedures with cor-
respondingly trained personnel.<
Light-emitting diodes LED
Light-emitting diodes installed behind translu-
cent lenses serve as the light source for many of
the controls and displays in your vehicle. These
light-emitting diodes, which operate using a
concept similar to that applied in conventional
lasers, are officially designated as Class 1 light-
emitting diodes.
Do not remove the covers or expose the
eyes directly to the unfiltered light source
for several hours; otherwise, this could cause
irritation of the retina.<
Xenon lamps*
These bulbs have a very long service life and are
highly unlikely to fail. If a xenon lamp fails never-
theless, switch on the fog lamps and continue the journey with great care, provided that local
legislation does not prohibit this.
Have any work on the xenon lamp system,
including bulb replacements, performed
o nl y b y a BM W c e n t er o r a w o r k s h o p t h a t w o rk s
according to BMW repair procedures with cor-
respondingly trained personnel. Otherwise, if
such work is carried out improperly, the high
voltage in the system presents the danger of
fatal injuries.<
Replacing parking lamps, roadside
parking lamps, and daytime running
lights
H8 bulb, 35 watts
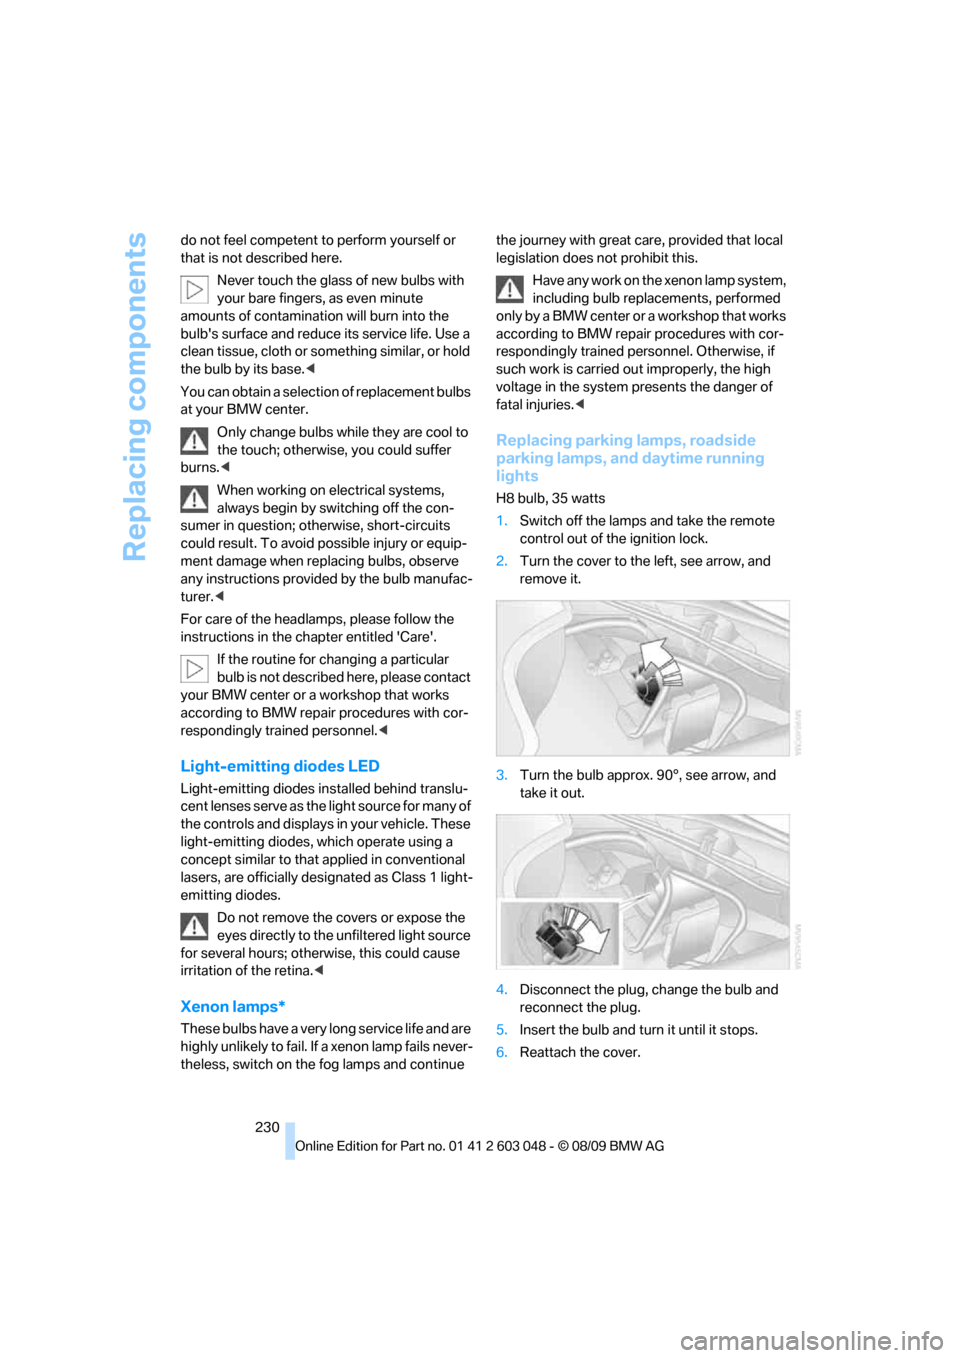
1.Switch off the lamps and take the remote
control out of the ignition lock.
2.Turn the cover to the left, see arrow, and
remove it.
3.Turn the bulb approx. 90°, see arrow, and
take it out.
4.Disconnect the plug, change the bulb and
reconnect the plug.
5.Insert the bulb and turn it until it stops.
6.Reattach the cover.
Page 260 of 274
Everything from A - Z
258 Display, refer to iDrive
controls16
Display lighting, refer to
Instrument lighting95
Displays
– on the Control Display16
Displays, refer to Instrument
cluster12
Displays and controls10
Disposal
– coolant222
– remote control battery35
– vehicle battery236
Distance control, refer to
Active cruise control62
Distance remaining to service,
refer to Service
requirements73
Distance warning, refer to
Park Distance Control
PDC81
Door key, refer to Remote
control with integrated
key26
Door lock29
Doors, emergency
operation29
DOT Quality Grades214
Draft-free ventilation100
Drinks holders, refer to
Cupholders107
Drive-off assistance, refer to
Dynamic Stability Control
DSC82
Drive-off assistant84
Driving lamps, refer to Parking
lamps/low beams92
Driving notes116
Driving off on hills, refer to
Drive-off assistant84
Driving stability control
systems82
Driving through water118
Driving tips, refer to Driving
notes116
Dry air, refer to Cooling
function99
DSC Dynamic Stability
Control82DTC Dynamic Traction
Control82
– indicator/warning lamp82
DVD
– country codes157
– settings158
– video playback157
DVD menu158
DVD player, refer to CD
player155
DVD video157
Dynamic Brake Control
DBC82
Dynamic destination
guidance135
Dynamic Stability Control
DSC82
– indicator/warning lamp82
Dynamic Traction Control
DTC
– indicator/warning lamp83
E
EBV Electronic brake-force
distribution82
Eject button, refer to Buttons
on the CD/DVD player144
Electrical malfunction
– door lock29
– driver's door29
– fuel filler flap196
– glass roof37
– panorama glass roof39
– trunk lid31
Electric seat adjustment42
Electric steering wheel lock
– with Comfort Access34
Electronic brake-force
distribution EBV82
Electronic oil level check220
Electronic Stability Program
ESP, refer to Dynamic
Stability Control DSC82
Emergency actuation,
automatic transmission,
refer to Overriding selector
lever lock58Emergency operation
– fuel filler flap, manual
release196
Emergency operation, refer to
Closing manually
– glass roof37
– panorama glass roof39
Emergency operation, refer to
Manual operation
– door lock29
Emergency release
– trunk lid from inside32
Emergency Request237
Emergency services, refer to
Roadside Assistance237
Energy, saving
– saving fuel116
Energy-conscious driving,
refer to Energy Control70
Energy Control70
Engine
– breaking in116
– data244
– overheated, refer to Coolant
temperature70
– speed244
– starting55
– starting, Comfort Access34
– switching off55
Engine compartment219
Engine coolant, refer to
Coolant222
Engine oil
– adding221
– alternative oil types222
– BMW Maintenance
System223
– capacity248
– checking level219
– dipstick219
– intervals between changes,
refer to Service
requirements73
Engine output, refer to Engine
data244
Engine speed, refer to Engine
data244
Engine starting, refer to
Starting the engine55
Page 263 of 274
Reference 261
At a glance
Controls
Driving tips
Communications
Navigation
Entertainment
Mobility
Instructions for navigation
system, refer to Voice
instructions135
Instrument cluster12
Instrument lighting95
Instrument panel, refer to
Cockpit10
Integrated key26
Integrated universal remote
control102
Interactive map130
Interior lamps96
– remote control28
Interior motion sensor33
Interior rearview mirror48
– automatic dimming
feature48
– compass104
Interlock, refer to Disengaging
the remote control56
Intermittent mode of the
wipers59
Intersection, entering,
navigation126
iPod, connecting, refer to
AUX-IN port167
iPod, connecting, refer to USB
audio interface167
J
Jacking points235
Joystick, refer to iDrive16
Jumpering, refer to Jump-
starting238
Jump-starting238
K
Key, refer to Integrated key/
remote control26
Keyless go, refer to Comfort
Access34
Keyless opening and closing,
refer to Comfort Access34
Key Memory, refer to Personal
Profile26Kickdown57
– automatic transmission with
Steptronic57
Knock control197
L
Lamps
– automatic headlamp
control92
– parking lamps/low beams92
Lamps and bulbs, replacing
bulbs229
Lap-and-shoulder belt, refer
to Safety belts46
Lashing eyes, refer to
Securing cargo120
Last destinations128
LATCH child restraint fixing
system51
Leather care227
LED Light-emitting
diodes230
Length, refer to
Dimensions245
License plate lamp, replacing
bulb235
Light
– high-beam assistant94
Light-alloy wheels226
Light-emitting diodes
LED230
Lighter108
– connecting electrical
appliances108
Lighting
– instruments95
– lamps and bulbs229
– vehicle, refer to Lamps92
Light switch92
Limit, refer to Speed limit79
Load119
Load securing equipment,
refer to Securing cargo120
Lock buttons, doors, refer to
Locking30Locking
– adjusting confirmation
signal28
– from inside30
– from outside28
– without remote control, refer
to Comfort Access34
Locking and unlocking doors
– confirmation signals28
– from inside30
– from outside27
Low beam control, refer to
High-beam assistant94
Low-beam headlamps92
– automatic92
– replacing bulbs231
Lower back support, refer to
Lumbar support43
Luggage rack, refer to Roof-
mounted luggage rack120
Lumbar support43
M
M+S tires, refer to Winter
tires217
Maintenance, refer to Service
Booklet
Maintenance system223
Malfunction
– automatic transmission with
Steptronic58
– tires85
– trunk lid31
Malfunction warnings, refer to
Check Control77
Manual car wash226
Manual mode, automatic
transmission with
Steptronic57
Manual operation
– door lock29
– driver's door29
– fuel filler flap196
– glass roof37
– panorama glass roof39
– transmission lock, automatic
transmission58
– trunk lid31
Page 265 of 274

Reference 263
At a glance
Controls
Driving tips
Communications
Navigation
Entertainment
Mobility
New tires216
North-facing map136
Nozzles97
Number of cylinders, refer to
Engine data244
Nylon rope, refer to Tow
rope240
O
OBD socket, refer to Socket
for Onboard Diagnosis224
Octane ratings, refer to Fuel
specifications197
Odometer69
Oil, refer to Engine oil219
Oil consumption219
Oil level219
Old batteries, refer to
Disposal236
Onboard vehicle tool kit229
Opening and closing
– Comfort Access34
– from inside30
– from outside27
– using the door lock29
– via the remote control27
Options, selecting for
navigation134
Orientation menu, refer to
Start menu17
Outlets
– refer to Ventilation100
Output, refer to Engine
data244
Outside-air mode
– automatic climate control99
Outside temperature
display69
– changing units of
measure73
– in computer73
Outside temperature
warning69
Overheated engine, refer to
Coolant temperature70
Overriding selector lever
lock58Overview
– radio control144
P
Paintwork care226
Panorama glass roof38
– closing after electrical
malfunction39
– comfort position39
– Convenient operation28
– initializing39
– opening, closing38
– pinch protection system39
– power failure39
– raising38
– remote control28
Park assistant, refer to Park
Distance Control81
Park Distance Control PDC81
Parked car ventilation100
– preselecting switch-on
times101
– switching on and off
directly101
Parking
– vehicle55
Parking aid, refer to Park
Distance Control PDC81
Parking brake56
– indicator lamp56
Parking lamps92
– replacing bulbs230,232
Parking lamps/low beams92
Particulate filter, refer to
Diesel particulate filter117
Partition net111
Passenger side mirror tilt
function48
Pathway lighting93
Personal Profile26
Phone book177
Phone numbers
– dialing178
Pinch protection system
– glass roof, electric37
– panorama glass roof39
– windows36Placing a call, refer to
telephone owner's manual
Playing music163
Polish227
Pollen
– refer to Microfilter/activated-
charcoal filter for automatic
climate control100
Postal code, entering for
navigation126
Power failure236
Power windows36
– safety switch36
Power windows, refer to
Windows36
Preheating, refer to Diesel
engine
55
Pressure, tires201
Pressure monitoring, tires84
– Flat Tire Monitor84
Pressure monitoring of tires,
refer to Tire Pressure
Monitor TPM86
Programmable buttons on the
steering wheel11
Protection function, refer to
Pinch protection system
– glass roof, electric37
– panorama glass roof39
– windows36
Providing medical assistance,
refer to First aid pouch237
Puncture
– Flat Tire Monitor84
R
Radio
– controls144
– HD Radio148
– satellite radio150
– selecting a waveband147
– storing stations147
– switching on/off144
– tone control144
– volume144
Radio position, refer to Radio
readiness54