2010 BMW 328I SEDAN replacing components
[x] Cancel search: replacing componentsPage 5 of 274

Reference
At a glance
Controls
Driving tips
Communications
Navigation
Entertainment
Mobility
Contents
The fastest way to find information on a partic-
ular topic or item is by using the index, refer to
page254.
Using this Owner's Manual
4Notes
6Reporting safety defects
At a glance
10Cockpit
16iDrive
21Letters and numbers
22Voice activation system
Controls
26Opening and closing
41Adjustments
50Transporting children safely
54Driving
69Controls overview
81Technology for driving comfort and
safety
92Lamps
97Climate
102Practical interior accessories
Driving tips
116Things to remember when driving
Navigation
124Navigation system
125Destination entry
134Destination guidance
140What to do if …
Entertainment
144On/off and tone
147Radio
150Satellite radio
155CD/DVD player and CD changer
162Music collection
167External devices
Communications
174Telephone
186Contacts
188BMW Assist
Mobility
196Refueling
201Wheels and tires
218Under the hood
223Maintenance
225Care
229Replacing components
237Giving and receiving assistance
Reference
244Technical data
249Short commands for the voice activation
system
254Everything from A - Z
Page 229 of 274

Mobility
227Reference
At a glance
Controls
Driving tips
Communications
Navigation
Entertainment
Outside sensors/cameras
Keep the sensors and cameras on the
outside of the vehicle, e.g. those for Park
Distance Control, clean and free of ice to ensure
that they remain fully functional.<
Interior care
Upholstery fabrics/cloth trims/
Alcantara fabrics
Vacuum regularly with a vacuum cleaner to
remove superficial dirt.
To remove severe spots such as stains from
beverages, use a soft sponge or lint-free
microfiber cloth and suitable interior cleaners.
Follow the instructions on the packaging.
Clean the upholstery down to the seams
using a sweeping motion. Avoid strong
rubbing.<
Opened Velcro fasteners on pants or
other articles of clothing can damage the
seat covers. Ensure that Velcro fasteners are
closed.<
Leather/leather trim
The leather used by BMW is a high quality
natural product. Slight irregularities in the
leather are a typical characteristic of natural
leather.<
Dust and road grit in the pores and folds of the
leather have an abrasive effect, leading to
increased wear and causing the leather surface
to become brittle prematurely. Therefore, fre-
quently clean the leather of dust using a cloth or
vacuum cleaner.
Clean light-colored leather more frequently as
dust and dirt are more noticeable.
Treat the leather at least once every two
months using a leather lotion as dirt and grease
will gradually attack the leather's protective
layer.
Carpets/cargo area
You can vacuum the carpets and floor mats or
clean them with interior cleaner if heavily soiled.The floor mats can be removed for cleaning.
When replacing the mats, ensure that the seat
rails do not extend over the floor mats, as this
may damage the mats.
Lint on the floor mats occurs for technical rea-
sons and can be removed by vacuuming
repeatedly.
Interior plastic parts
>Imitation leather surfaces
>Lamp glasses
>Display pane of instrument cluster
>Matte parts
Clean with water and solvent-free plastic
cleaner if necessary.
Fine wood parts
Clean fine wood trim and fine wood parts with a
damp cloth. Wipe dry with a soft cloth.
Safety belts
Dirty belt straps impede the reeling action and
thus have a negative impact on safety.
Do not clean chemically, as this may
destroy the webbing.<
Interior sensors/cameras
To clean interior sensors and cameras, e.g. of
the high-beam assistant, use a lint-free cloth
moistened with glass cleaner.
Displays
To clean displays, e.g. of the radio or instrument
cluster, use a cleaning cloth for displays or a
soft, non-abrasive, lint-free cloth.
Avoid applying excessive pressure when
cleaning the displays; otherwise, damage
may occur.<
Do not use chemical or abrasive house-
hold cleaning agents. Keep all types of
fluid away from the device. Otherwise, surfaces
or electrical components may be corroded or
damaged.<
Page 231 of 274

Mobility
229Reference
At a glance
Controls
Driving tips
Communications
Navigation
Entertainment
Replacing components
Onboard vehicle tool kit
Sedan
The onboard vehicle tool kit is stored in a com-
partment on the right-hand side of the cargo
area. Remove the cover.
Sports Wagon
The onboard vehicle tool kit is stored in a com-
partment on the left-hand side underneath the
cargo area floor panel.
Wiper blades
1.Fold out the wiper arm and hold it.
2.Press together the locking spring, arrows1,
and fold out the wiper blade, arrow2.
3.Take the wiper blade out of the catch mech-
anism, pulling the blade toward the front.
To avoid damage, make sure that the
wiper arms are against the windshield
before you open the engine compartment.<
Sports Wagon: changing rear wiper
blade
1.Fold up the wiper arm.
2.Pull off the wiper blade, see arrow.
3.Insert the new wiper blade and press it on
until it audibly engages.
Lamps and bulbs
Lamps and bulbs make an essential contribu-
tion to vehicle safety. They should, therefore,
be handled carefully. BMW recommends hav-
ing your BMW center perform any work that you
Page 232 of 274
Replacing components
230 do not feel competent to perform yourself or
that is not described here.
Never touch the glass of new bulbs with
your bare fingers, as even minute
amounts of contamination will burn into the
bulb's surface and reduce its service life. Use a
clean tissue, cloth or something similar, or hold
the bulb by its base.<
You can obtain a selection of replacement bulbs
at your BMW center.
Only change bulbs while they are cool to
the touch; otherwise, you could suffer
burns.<
When working on electrical systems,
always begin by switching off the con-
sumer in question; otherwise, short-circuits
could result. To avoid possible injury or equip-
ment damage when replacing bulbs, observe
any instructions provided by the bulb manufac-
turer.<
For care of the headlamps, please follow the
instructions in the chapter entitled 'Care'.
If the routine for changing a particular
bulb is not described here, please contact
your BMW center or a workshop that works
according to BMW repair procedures with cor-
respondingly trained personnel.<
Light-emitting diodes LED
Light-emitting diodes installed behind translu-
cent lenses serve as the light source for many of
the controls and displays in your vehicle. These
light-emitting diodes, which operate using a
concept similar to that applied in conventional
lasers, are officially designated as Class 1 light-
emitting diodes.
Do not remove the covers or expose the
eyes directly to the unfiltered light source
for several hours; otherwise, this could cause
irritation of the retina.<
Xenon lamps*
These bulbs have a very long service life and are
highly unlikely to fail. If a xenon lamp fails never-
theless, switch on the fog lamps and continue the journey with great care, provided that local
legislation does not prohibit this.
Have any work on the xenon lamp system,
including bulb replacements, performed
o nl y b y a BM W c e n t er o r a w o r k s h o p t h a t w o rk s
according to BMW repair procedures with cor-
respondingly trained personnel. Otherwise, if
such work is carried out improperly, the high
voltage in the system presents the danger of
fatal injuries.<
Replacing parking lamps, roadside
parking lamps, and daytime running
lights
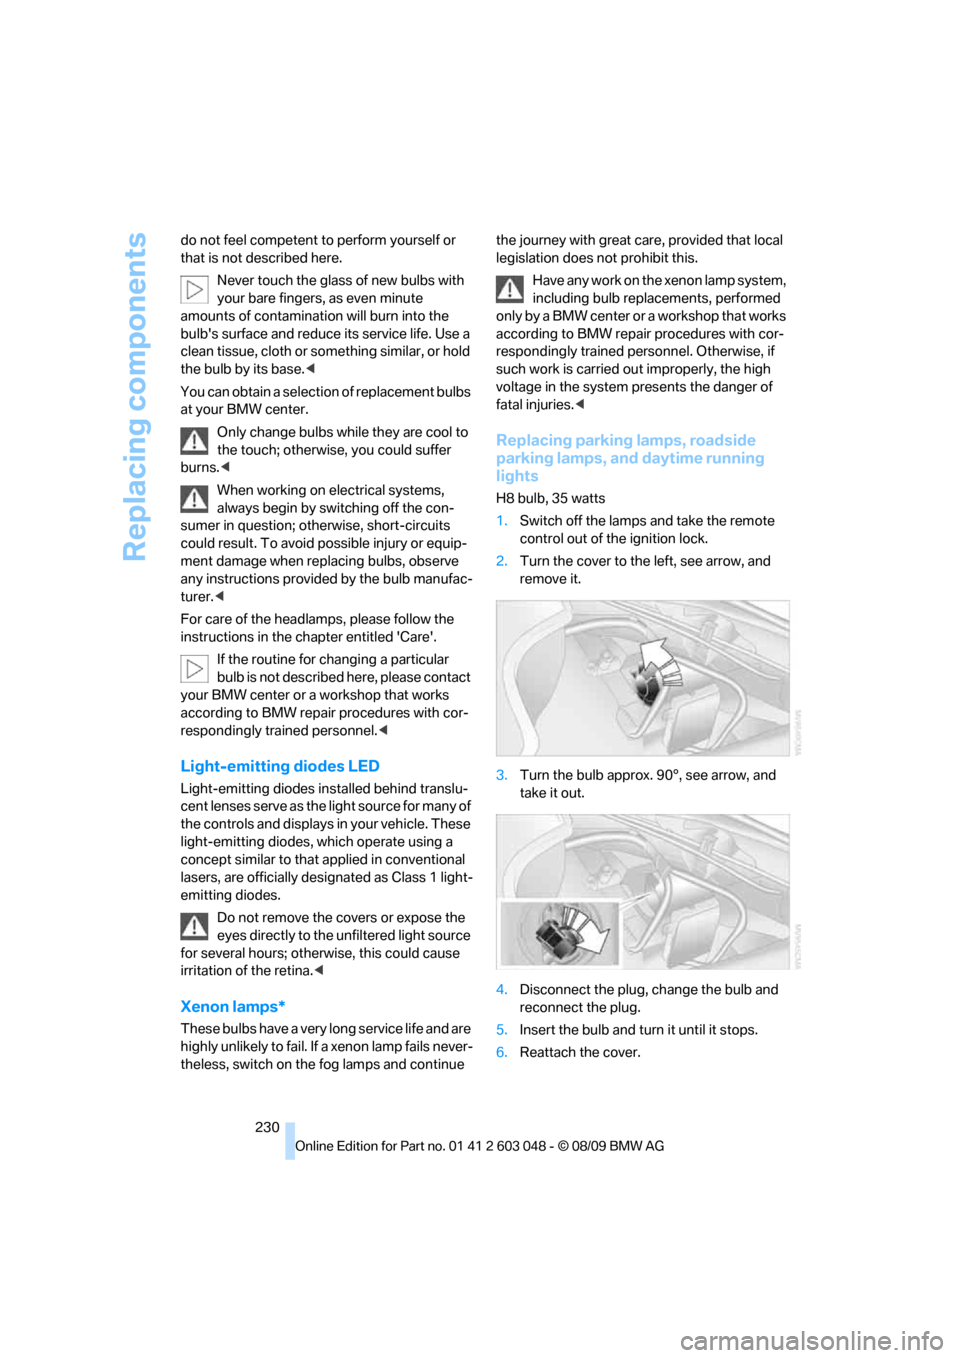
H8 bulb, 35 watts
1.Switch off the lamps and take the remote
control out of the ignition lock.
2.Turn the cover to the left, see arrow, and
remove it.
3.Turn the bulb approx. 90°, see arrow, and
take it out.
4.Disconnect the plug, change the bulb and
reconnect the plug.
5.Insert the bulb and turn it until it stops.
6.Reattach the cover.
Page 234 of 274
Replacing components
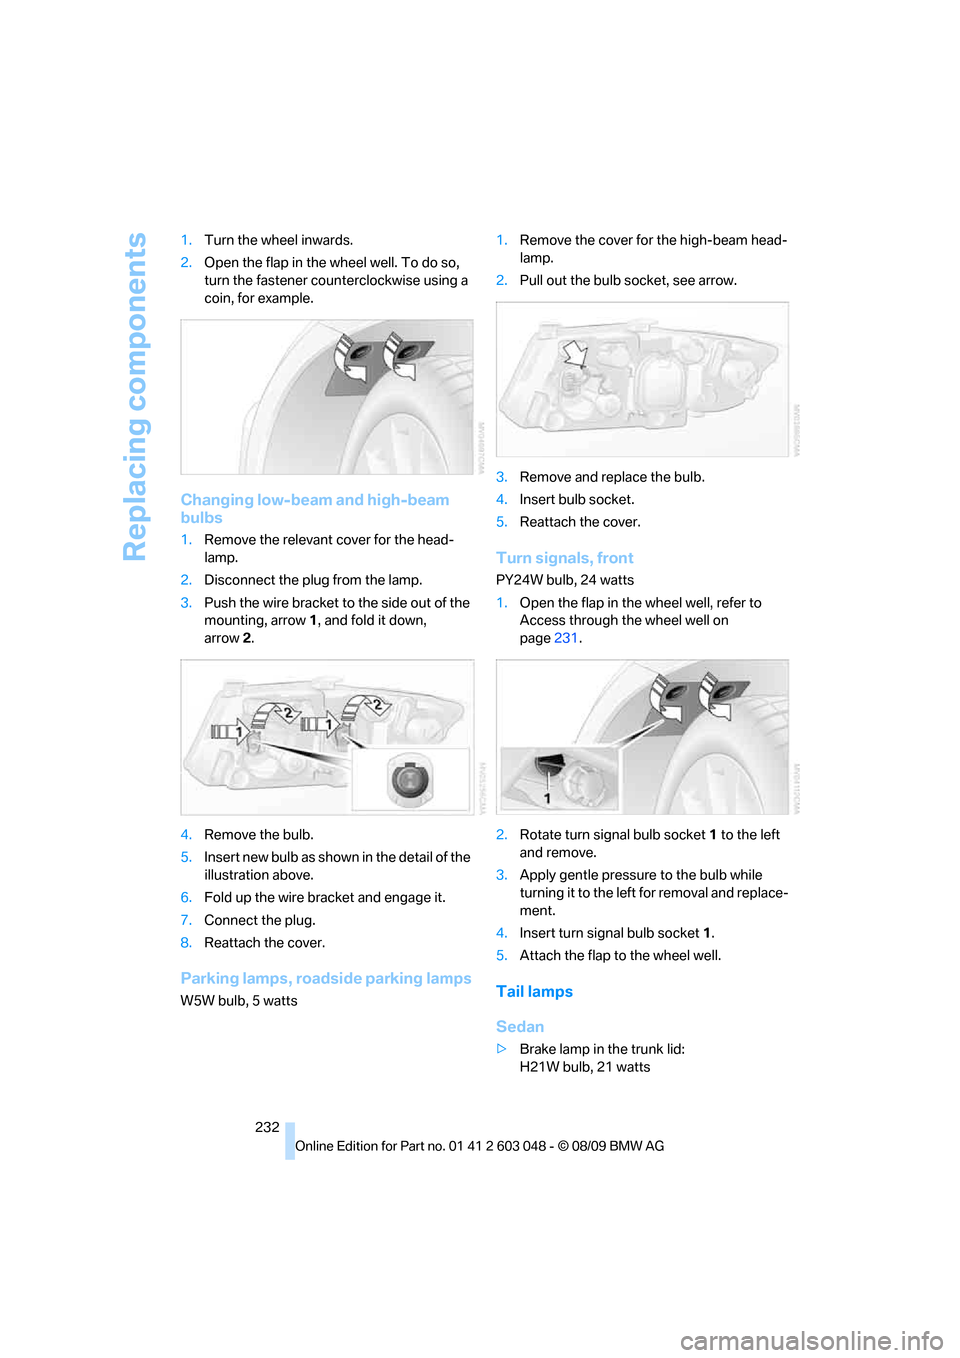
232 1.Turn the wheel inwards.
2.Open the flap in the wheel well. To do so,
turn the fastener counterclockwise using a
coin, for example.
Changing low-beam and high-beam
bulbs
1.Remove the relevant cover for the head-
lamp.
2.Disconnect the plug from the lamp.
3.Push the wire bracket to the side out of the
mounting, arrow1, and fold it down,
arrow2.
4.Remove the bulb.
5.Insert new bulb as shown in the detail of the
illustration above.
6.Fold up the wire bracket and engage it.
7.Connect the plug.
8.Reattach the cover.
Parking lamps, roadside parking lamps
W5W bulb, 5 watts1.Remove the cover for the high-beam head-
lamp.
2.Pull out the bulb socket, see arrow.
3.Remove and replace the bulb.
4.Insert bulb socket.
5.Reattach the cover.
Turn signals, front
PY24W bulb, 24 watts
1.Open the flap in the wheel well, refer to
Access through the wheel well on
page231.
2.Rotate turn signal bulb socket 1 to the left
and remove.
3.Apply gentle pressure to the bulb while
turning it to the left for removal and replace-
ment.
4.Insert turn signal bulb socket 1.
5.Attach the flap to the wheel well.
Tail lamps
Sedan
>Brake lamp in the trunk lid:
H21W bulb, 21 watts
Page 236 of 274
Replacing components
234
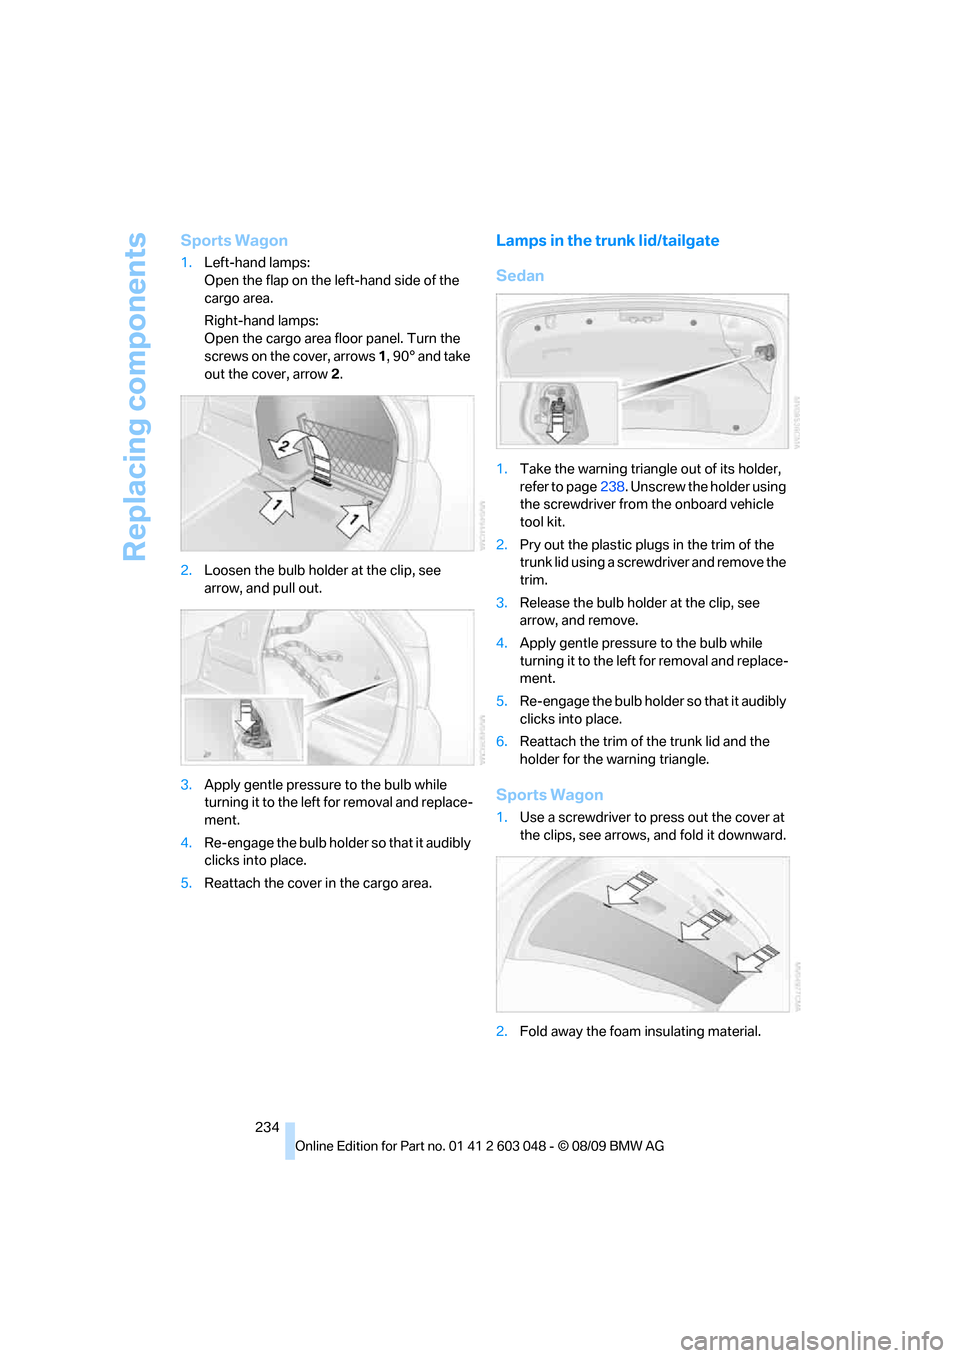
Sports Wagon
1.Left-hand lamps:
Open the flap on the left-hand side of the
cargo area.
Right-hand lamps:
Open the cargo area floor panel. Turn the
screws on the cover, arrows 1, 90° and take
out the cover, arrow 2.
2.Loosen the bulb holder at the clip, see
arrow, and pull out.
3.Apply gentle pressure to the bulb while
turning it to the left for removal and replace-
ment.
4.Re-engage the bulb holder so that it audibly
clicks into place.
5.Reattach the cover in the cargo area.
Lamps in the trunk lid/tailgate
Sedan
1.Take the warning triangle out of its holder,
refer to page238. Unscrew the holder using
the screwdriver from the onboard vehicle
tool kit.
2.Pry out the plastic plugs in the trim of the
trunk lid using a screwdriver and remove the
trim.
3.Release the bulb holder at the clip, see
arrow, and remove.
4.Apply gentle pressure to the bulb while
turning it to the left for removal and replace-
ment.
5.Re-engage the bulb holder so that it audibly
clicks into place.
6.Reattach the trim of the trunk lid and the
holder for the warning triangle.
Sports Wagon
1.Use a screwdriver to press out the cover at
the clips, see arrows, and fold it downward.
2.Fold away the foam insulating material.
Page 238 of 274

Replacing components
236
Disposal
Have old batteries disposed of by your
BMW center or bring them to a recycling
center. Maintain the battery in an upright posi-
tion for transport and storage. Always secure
the battery against tipping over during trans-
port.<
Power failure
After a temporary power loss, the functioning of
some equipment may be limited and require
reinitialization. Individual settings may likewise
have been lost and will have to be programmed:
>Time and date
These values must be updated, refer to
page75.
>Radio
In some cases, stations may have to be
stored again, refer to page147.
>Navigation system
Operability must be waited for, refer to
page124.
>Glass roof
It may happen that the roof can only be
raised. The system must be initialized.
Please contact your BMW center.
>Panorama glass roof
It may happen that the roof can only be
raised. The system must be initialized.
Please contact your BMW center.
>Seat and mirror memory
The positions must be stored again, refer to
page45.
>Inside rearview mirror with digital compass
The system must be calibrated, refer to
page104.
>Active steering
The system automatically initializes itself
briefly during a trip. The system is deacti-
vated during this time, refer to page88.
>xDrive
The system automatically initializes itself
during a trip. Indicator lamps light up during
this time. If the lamps do not go out during
the current trip, have the system checked.
Fuses
Never attempt to repair a blown fuse and
do not replace a defective fuse with a sub-
stitute of another color or amperage rating; oth-
erwise, this could lead to a circuit overload, ulti-
mately resulting in a fire in the vehicle.<
Open the cover in the glove compartment and
remove it.
Plastic tweezers are located on the distributor
box.
See the rear of the cover for information on fuse
assignment.
Spare fuses are available from your BMW cen-
ter.