2010 BMW 328I CONVERTIBLE lights
[x] Cancel search: lightsPage 97 of 266

Controls
95Reference
At a glance
Driving tips
Communications
Navigation
Entertainment
Mobility
Malfunction
The LED next to the symbol for automatic head-
lamp control flashes. Adaptive light control is
malfunctioning or has failed. Have the system
checked as soon as possible.
High beams/roadside parking
lamps
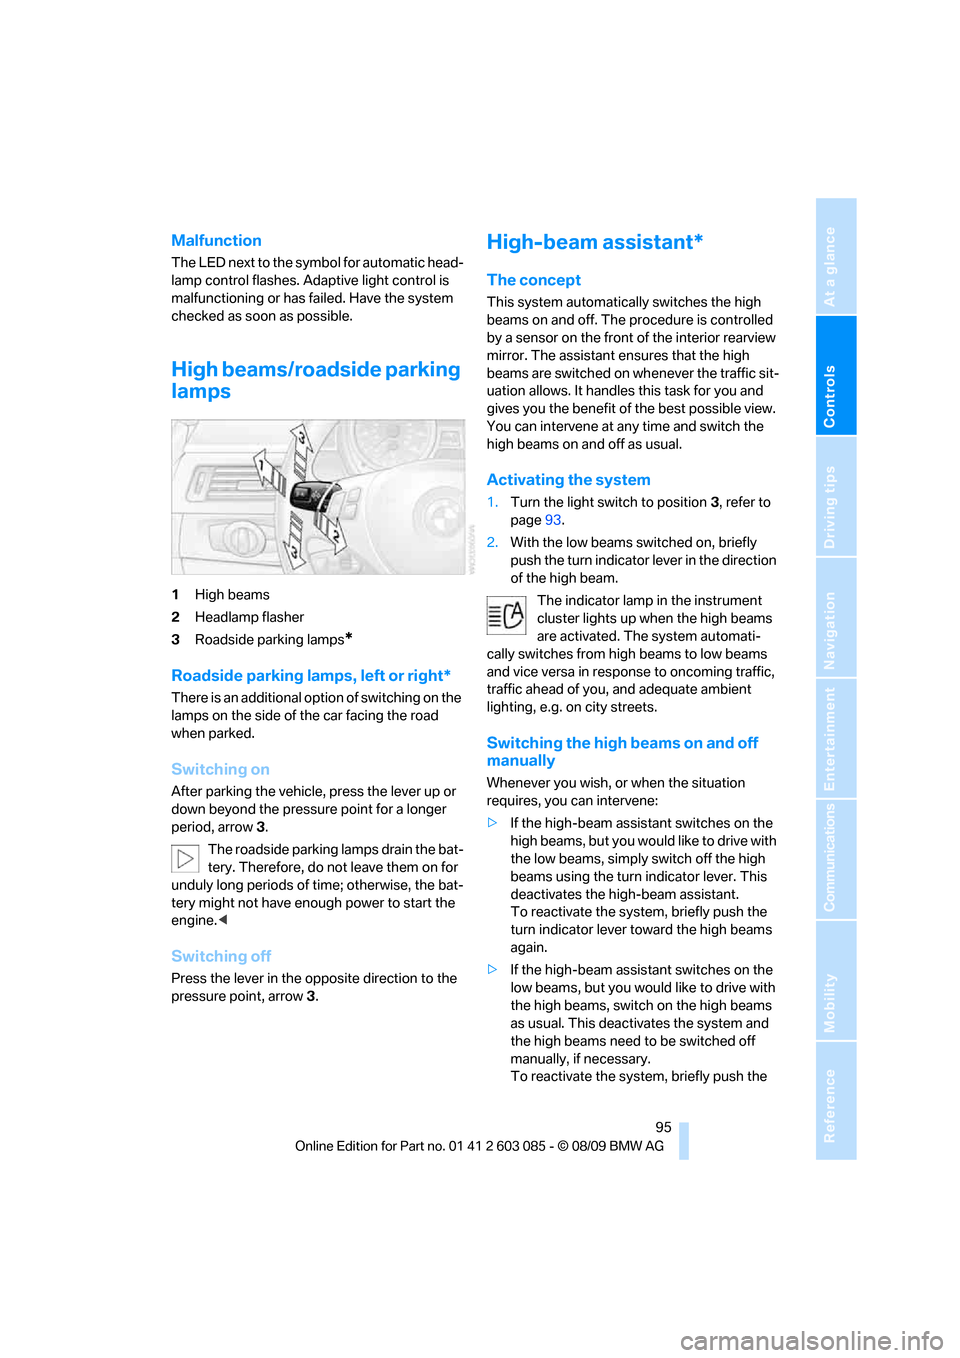
1High beams
2Headlamp flasher
3Roadside parking lamps
*
Roadside parking lamps, left or right*
There is an additional option of switching on the
lamps on the side of the car facing the road
when parked.
Switching on
After parking the vehicle, press the lever up or
down beyond the pressure point for a longer
period, arrow 3.
The roadside parking lamps drain the bat-
tery. Therefore, do not leave them on for
unduly long periods of time; otherwise, the bat-
tery might not have enough power to start the
engine.<
Switching off
Press the lever in the opposite direction to the
pressure point, arrow 3.
High-beam assistant*
The concept
This system automatically switches the high
beams on and off. The procedure is controlled
by a sensor on the front of the interior rearview
mirror. The assistant ensures that the high
beams are switched on whenever the traffic sit-
uation allows. It handles this task for you and
gives you the benefit of the best possible view.
You can intervene at any time and switch the
high beams on and off as usual.
Activating the system
1.Turn the light switch to position3, refer to
page93.
2.With the low beams switched on, briefly
push the turn indicator lever in the direction
of the high beam.
The indicator lamp in the instrument
cluster lights up when the high beams
are activated. The system automati-
cally switches from high beams to low beams
and vice versa in response to oncoming traffic,
traffic ahead of you, and adequate ambient
lighting, e.g. on city streets.
Switching the high beams on and off
manually
Whenever you wish, or when the situation
requires, you can intervene:
>If the high-beam assistant switches on the
high beams, but you would like to drive with
the low beams, simply switch off the high
beams using the turn indicator lever. This
deactivates the high-beam assistant.
To reactivate the system, briefly push the
turn indicator lever toward the high beams
again.
>If the high-beam assistant switches on the
low beams, but you would like to drive with
the high beams, switch on the high beams
as usual. This deactivates the system and
the high beams need to be switched off
manually, if necessary.
To reactivate the system, briefly push the
Page 98 of 266

Lamps
96 turn indicator lever toward the high beams
again.
>Use the headlamp flasher as usual with the
low beams switched on.
System limitations
The high-beam assistant cannot serve as
a substitute for the driver's personal judg-
ment of when to use the high beams. Therefore,
manually switch off the high beams in situations
where this is required to avoid a safety risk.<
The system is not fully functional in situations
such as the following, and driver intervention
may be necessary:
>In very unfavorable weather conditions,
such as fog or heavy precipitation
>In detecting poorly-lit road users, such as
pedestrians, cyclists, horseback riders and
wagons; when driving close to train or ship
traffic; and at animal crossings
>In tight curves, on hilltops or in depressions,
in cross traffic or half-obscured oncoming
traffic on highways
>In poorly lit towns and cities and in the pres-
ence of highly reflective signs
>At low speeds
>When the windshield in front of the interior
rearview mirror is fogged over, dirty or cov-
ered with stickers, etc.
>If the sensor is dirty. Clean the sensor on
the front of the interior rearview mirror using
a cloth moistened with a small amount of
glass cleaner.
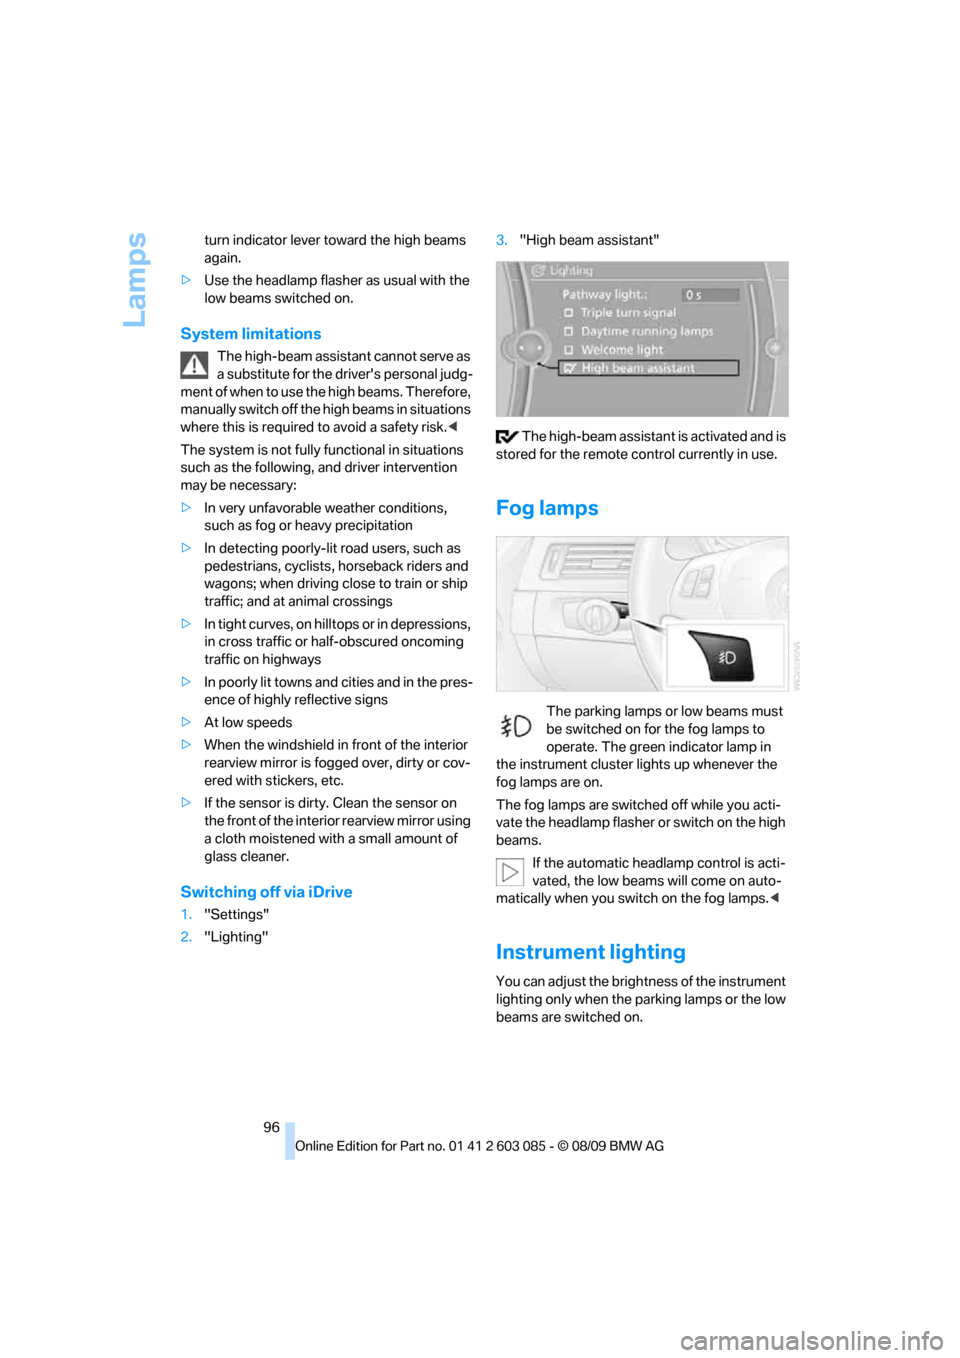
Switching off via iDrive
1."Settings"
2."Lighting"3."High beam assistant"
The high-beam assistant is activated and is
stored for the remote control currently in use.
Fog lamps
The parking lamps or low beams must
be switched on for the fog lamps to
operate. The green indicator lamp in
the instrument cluster lights up whenever the
fog lamps are on.
The fog lamps are switched off while you acti-
vate the headlamp flasher or switch on the high
beams.
If the automatic headlamp control is acti-
vated, the low beams will come on auto-
matically when you switch on the fog lamps.<
Instrument lighting
You can adjust the brightness of the instrument
lighting only when the parking lamps or the low
beams are switched on.
Page 104 of 266

Climate
102 The parked car ventilation system is operated
via iDrive.
Switching on/off directly
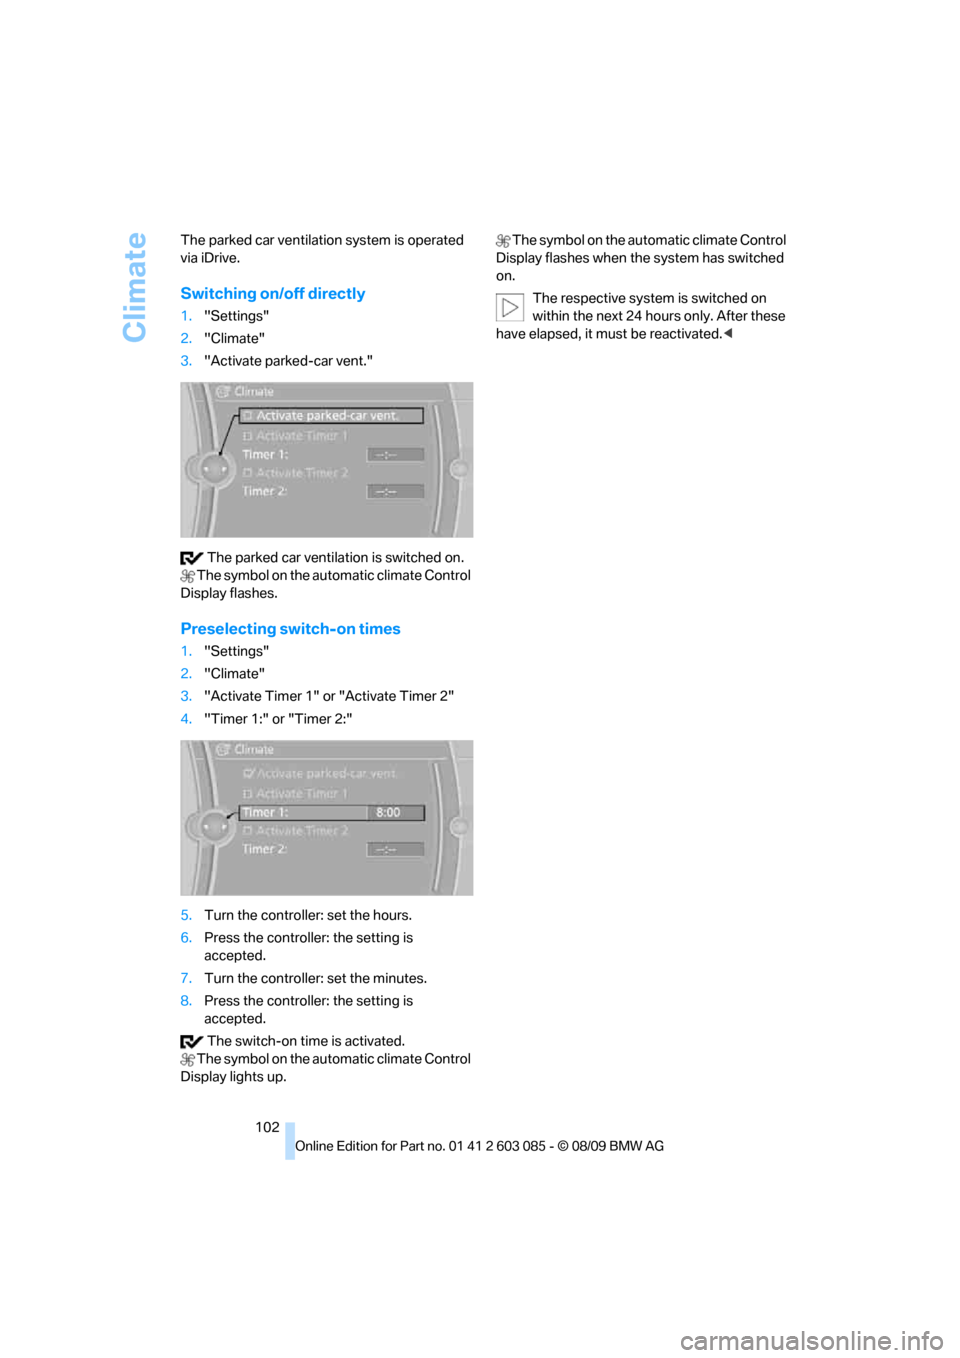
1."Settings"
2."Climate"
3."Activate parked-car vent."
The parked car ventilation is switched on.
The symbol on the automatic climate Control
Display flashes.
Preselecting switch-on times
1."Settings"
2."Climate"
3."Activate Timer 1" or "Activate Timer 2"
4."Timer 1:" or "Timer 2:"
5.Turn the controller: set the hours.
6.Press the controller: the setting is
accepted.
7.Turn the controller: set the minutes.
8.Press the controller: the setting is
accepted.
The switch-on time is activated.
The symbol on the automatic climate Control
Display lights up. The symbol on the automatic climate Control
Display flashes when the system has switched
on.
The respective system is switched on
within the next 24 hours only. After these
have elapsed, it must be reactivated.<
Page 121 of 266

Driving tips
119Reference
At a glance
Controls
Communications
Navigation
Entertainment
Mobility
Drive defensively
Avoid unnecessary acceleration and braking
maneuvers. To do so, keep an adequate dis-
tance between you and the vehicle in front of
you. A defensive and smooth driving style
keeps fuel consumption down.
Avoid high engine speeds
Only use first gear when setting off. In second
and higher gears, accelerate without hesitation
or pauses. When accelerating, shift up before
reaching high engine speeds.
When you reach the desired speed, shift into
the highest applicable gear and drive with the
engine speed as low as possible and at a con-
stant speed.
As a rule: driving at low engine speeds lowers
fuel consumption and reduces wear.
Coasting
When approaching a red light, take your foot off
the accelerator and coast to a stop in the high-
est applicable gear.
O n a d o w n h il l s lo p e , t a k e y o u r f o o t o f f t h e a c c el -
erator and coast in a suitable gear.
The fuel supply is interrupted when coasting.
Switch off the engine during lengthy
stops
Switch off the engine when stopping for lengthy
periods, e.g. at traffic lights, railroad crossings
or in traffic congestions. You achieve fuel sav-
ings even if standing time is as short as approx.
4 seconds.
Switch off functions you do not need at
the moment
Functions such as the air conditioner, seat
heating or rear window defroster draw large
amounts of power and consume additional fuel.
Especially in city traffic and in stop and go driv-
ing they have a considerable impact. Therefore,
switch these functions off when they are not
really needed.
Have the vehicle serviced
Have the vehicle serviced regularly to achieve
good economy and a long vehicle life. BMW
recommends having the vehicle serviced at a
BMW center. Also note the BMW service sys-
tem, refer to page217.
General driving notes
Close the trunk lid
Operate the vehicle only when the trunk
lid is closed. Otherwise, exhaust fumes
could enter the interior of the vehicle.<
If the vehicle must be driven with the trunk lid
open:
1.Close all windows and the glass roof.
2.Greatly increase the air volume of the auto-
matic climate control system, refer to
page100.
Hot exhaust system
In all vehicles, extremely high tempera-
tures are generated in the exhaust sys-
tem. Do not remove the heat shields installed
adjacent to various sections of the exhaust sys-
tem, and never apply undercoating to them.
When driving, standing at idle and while park-
ing, take care to avoid possible contact
between the hot exhaust system and any highly
flammable materials such as hay, leaves, grass,
etc. Such contact could lead to a fire, with the
risk of serious personal injuries and property
damage. Do not touch hot exhaust tail pipes.
Otherwise, there is a risk of burns.<
Hydroplaning
When driving on wet or slushy roads,
reduce road speed. If you do not, a wedge
of water can form between tires and road sur-
face. This situation, known as hydroplaning,
means that the tire can completely lose contact
with the road surface, so that neither the car can
be steered nor the brake be properly applied.<
Page 220 of 266

Maintenance
218
Socket for Onboard
Diagnosis OBD
On the driver's side is an OBD socket for check-
ing components relevant to the composition of
the vehicle's emissions.
Emissions
The warning lamp lights up:
The vehicle is producing higher emis-
sions. The trip can be continued. Have
the car checked as soon as possible.
Canadian models display this warning
lamp.
The lamp flashes under certain conditions. This
indicates excessive misfiring in the engine. If
this happens, you should reduce your speed
and visit your nearest BMW center as soon as
possible. Severe engine misfiring can quickly
lead to serious damage of emissions-related
components, especially the catalytic converter.
The warning lamp comes on if the gas
cap is not properly tightened and the
OBD system assumes that fuel vapor
is escaping. Make sure that the gas cap is cor-
rectly positioned and close it until it audibly
clicks.
Data recorders
Your vehicle may be equipped with one or sev-
eral measuring or diagnostic modules or a
device for recording or sending certain vehicle
data or information. In addition, if you have
signed a service contract for BMW Assist, cer-
tain vehicle data may be transmitted or
recorded in order to facilitate the corresponding
services.
Page 226 of 266

Replacing components
224 Do not remove the covers or expose the
eyes directly to the unfiltered light source
for several hours; otherwise, this could cause
irritation of the retina.<
Xenon lamps
These bulbs have a very long service life and are
highly unlikely to fail. If a xenon lamp fails never-
theless, switch on the fog lamps and continue
the journey with great care, provided that local
legislation does not prohibit this.
Have any work on the xenon lamp system,
including bulb replacements, performed
o n ly b y a BM W c e n t e r o r a w o r k s h o p t h a t w o r k s
according to BMW repair procedures with cor-
respondingly trained personnel. Otherwise, if
such work is carried out improperly, the high
voltage in the system presents the danger of
fatal injuries.<
Access to the lamps
1.Switch off the lamps and take the remote
control out of the ignition lock.
2.Remove the upper cover from the head-
lamp. To do so, use a screwdriver to press
the catches towards the rear, see arrows,
and pull the cover forward and out.
Follow the same steps in reverse order to reat-
tach the cover.
Be careful when installing the cover; oth-
erwise, leaks could occur and cause dam-
age to the headlamp system.<
Access through the wheel well
For turn signals only:1.Turn the wheel inwards.
2.Partially release the cover in the wheel well.
To do so, remove the corresponding
screws, see arrows.
3.Pull the cover back.
Parking lamps and roadside parking
lamps, daytime running lights
H8 bulb, 35 watts
1.Remove the cover, refer to Access to the
lamps.
2.Turn the bulb approx. 90°, see arrow, and
take it out.
3.Disconnect the plug, change the bulb and
reconnect the plug.
4.Insert the bulb and turn it until it stops.
5.Reattach the cover.
Corner-illuminating lamp*
H3 bulb, 55 watts
1.Switch off the lamps and take the remote
control out of the ignition lock.
2.Remove the cover, refer to Access to the
lamps.
Page 232 of 266

Giving and receiving assistance
230
Giving and receiving assistance
Emergency Request*
Conditions for an Emergency Request:
>Full preparation package mobile phone: this
equipment makes it possible to send an
Emergency Request even if no mobile
phone is paired with the vehicle.
>BMW Assist is activated. Activating
BMW Assist, refer to page192.
>Radio readiness is on.
>The BMW Assist system is logged on to a
mobile phone network.
>The Emergency Request system is opera-
ble.
Once your service contract for BMW Assist
expires, the BMW Assist system can be deacti-
vated by a BMW center without you having to
visit a workshop. Once the BMW Assist system
has been deactivated, Emergency Requests
are not possible. The BMW Assist system can
be reactivated by a BMW center after a new
contract has been signed.
Sending an Emergency Request
1.Briefly press the cover flap to open.
2.Press the SOS button until the LED in the
button lights up.
As soon as the voice connection to the BMW
Assist Response Center has been established,
the LED flashes.
Once the BMW Assist Response Center has
received your Emergency Request, the
BMW Assist Response Center contacts you and takes further steps to help you. Even if you
are unable to respond, the BMW Assist
Response Center will be able to initiate further
steps to assist you under certain conditions.
If the circumstances allow this, remain in the
vehicle until the connection has been estab-
lished. You will then be able to provide a
detailed description of the situation.
Data for determining the necessary rescue
measures are transmitted to the BMW Assist
Response Center, e.g. the current position of
your vehicle, if it can be determined.
If the LED is flashing but the BMW Assist
Response Center cannot be heard over the
hands-free system, it is possible that the
hands-free system is malfunctioning. You may
still be heard by the BMW Assist Response
Center, however.
Under certain conditions, an Emergency
Request is sent automatically immediately after
a severe accident. This Automatic Collision
Notification is not affected by the button being
pressed.
For technical reasons, the Emergency
Request service cannot be guaranteed
for the most unfavorable conditions.<
Roadside Assistance
The BMW Roadside Assistance is there to
assist you around the clock in the event of a
breakdown, including on weekends and public
holidays.
The phone numbers of Roadside Assistance in
your home country can be found in the Contact
brochure.
First aid pouch*
Some of the articles contained in the first aid
pouch have a limited service life. Therefore,
check the expiration dates of the contents reg-
Page 253 of 266

Reference 251
At a glance
Controls
Driving tips
Communications
Navigation
Entertainment
Mobility
Configuring settings, refer to
Personal Profile26
Confirmation signals for
locking/unlocking the
vehicle29
Congestion
– refer to Route, bypassing
sections137
Connecting vacuum cleaner,
refer to Connecting
electrical appliances109
Consumption, refer to
Average consumption71
Consumption display
– average consumption71
Contacts
– creating188
Control Center, refer to
iDrive16
Control Display, refer to
iDrive16
– adjusting brightness80
– switching on/off19
Controller, refer to iDrive16
Controls and displays10
Control unit, refer to iDrive16
Convenient loading in
Convertible28
Convenient operation
– glass roof28
– glass roof with Comfort
Access34
– retractable hardtop28
– windows28
– windows with Comfort
Access34
Convertible
– bag holder111
– Convenient loading28
– enlarging cargo area110
– folding down rear
backrest110
– retractable hardtop38
– rollover protection
system92
– securing cargo122
– stowing cargo121
Coolant215
– checking level215Coolant temperature70
Cooling, maximum99
Cooling fluid, refer to
Coolant215
Cooling system, refer to
Coolant215
Copyright2
Corner-illuminating lamps
– replacing bulbs224
Corner-illuminating lamps,
refer to Adaptive light
control94
Cornering lamps, refer to
Adaptive light control94
Correct tires210
Country codes DVD159
Courtesy lamps, refer to
Interior lamps97
Criteria for route136
Cross-hairs in navigation132
Cruise control61
– active63
– malfunction63
Cruising range70
Cupholders108
Curb weight, refer to
Weights241
Current playback
– external devices171
– of music collection166
Customer Relations193
D
Dashboard, refer to
Cockpit10
Dashboard, refer to
Instrument cluster12
Dashboard lighting, refer to
Instrument lighting96
Data, technical238
– capacities241
– dimensions239
– engine238
– weights241
Data transfer194
Date
– date format77
– setting76Daytime running lights94
– replacing bulbs224
DBC Dynamic Brake
Control82
Deactivating front passenger
airbags90
Deadlocking, refer to
Locking28
Defect
– door lock30
– fuel filler flap198
– glass roof37
Destination, entering by town/
city name127
Destination address
– entering127,133
Destination entry via BMW
Assist131
Destination for navigation
– entering by voice133
– entering via map132
– entry127
– home address130
– manual entry127
Destination guidance136
– bypassing a route
section137
– changing specified
route136
– continuing136
– starting136
– voice instructions137
– volume of voice
instructions138
Digital clock69
Digital compass105
Digital radio, refer to HD
Radio150
Dimensions239
Directional indicators, refer to
Turn signals59
Direction instructions, refer to
Voice instructions137
Directory for navigation, refer
to Address book
129
Displacement, refer to Engine
data238
Display, refer to iDrive
controls16