2010 BMW 328I CONVERTIBLE panel
[x] Cancel search: panelPage 156 of 266
Satellite radio
154
Selecting a category
1."Radio"
2."Satellite radio"
3."Categories"
4.Select the desired category.
Timeshift
Approx. one hour of the program being broad-
cast on the channel currently being listened to
is stored in a buffer. The signal must be avail-
able. The stored audio track can be played with
a delay following the live broadcast. When the
buffer is full, the older tracks are overwritten.
The buffer is cleared when a new channel is
selected.
Opening the timeshift function
1."Radio"
2."Satellite radio"
3.Open "Options".
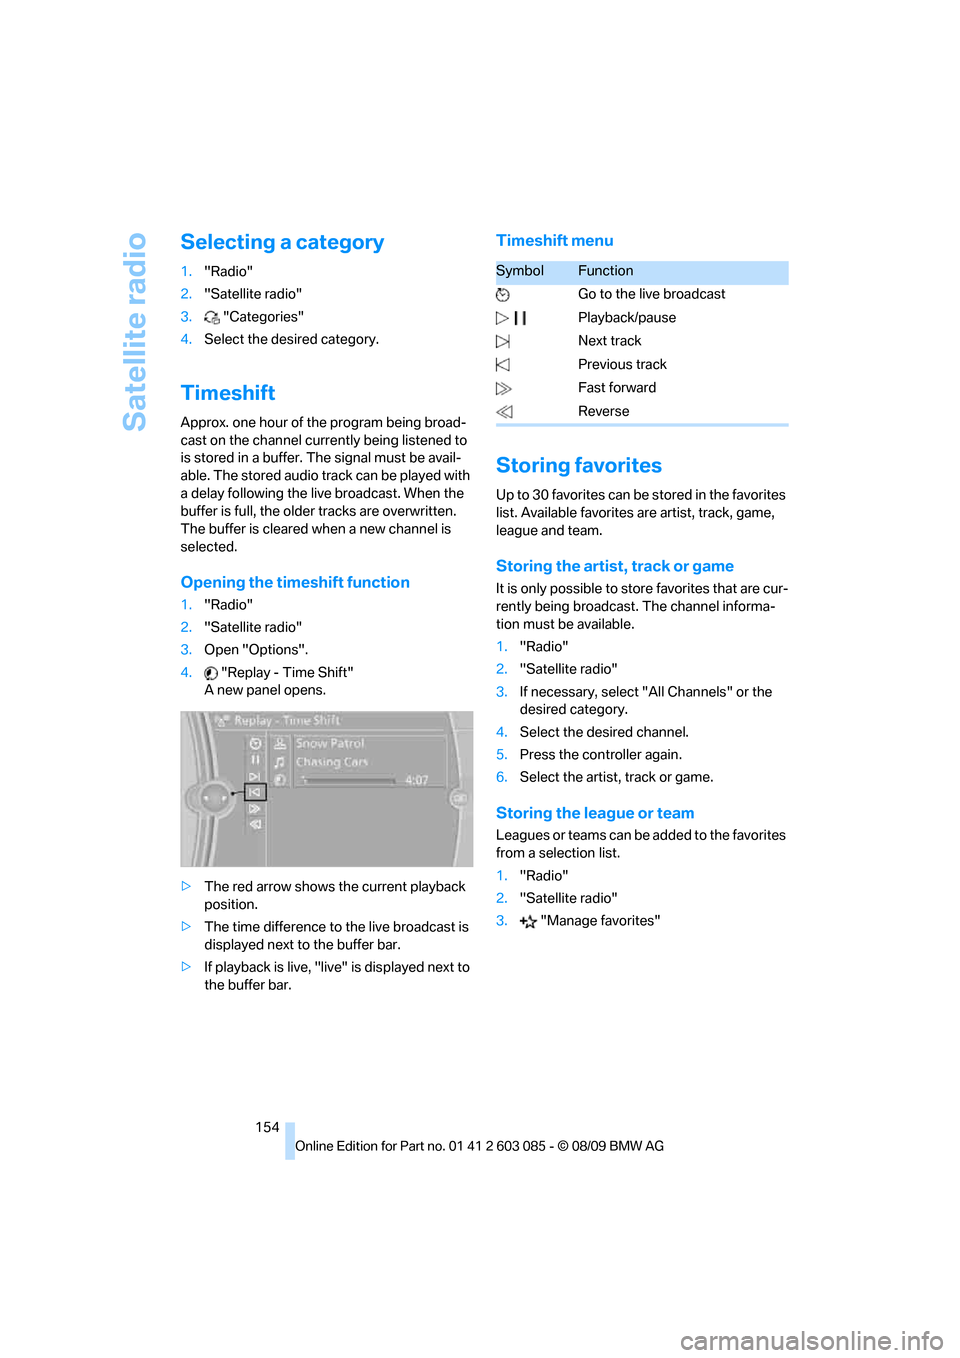
4."Replay - Time Shift"
A new panel opens.
>The red arrow shows the current playback
position.
>The time difference to the live broadcast is
displayed next to the buffer bar.
>If playback is live, "live" is displayed next to
the buffer bar.
Timeshift menu
Storing favorites
Up to 30 favorites can be stored in the favorites
list. Available favorites are artist, track, game,
league and team.
Storing the artist, track or game
It is only possible to store favorites that are cur-
rently being broadcast. The channel informa-
tion must be available.
1."Radio"
2."Satellite radio"
3.If necessary, select "All Channels" or the
desired category.
4.Select the desired channel.
5.Press the controller again.
6.Select the artist, track or game.
Storing the league or team
Leagues or teams can be added to the favorites
from a selection list.
1."Radio"
2."Satellite radio"
3."Manage favorites"
SymbolFunction
Go to the live broadcast
Playback/pause
Next track
Previous track
Fast forward
Reverse
Page 157 of 266

Navigation
Entertainment
Driving tips
155Reference
At a glance
Controls
Communications
Mobility
4."Add sports information"
5.Select the desired league.
6.Select "Add all teams" or the desired team.
Opening the favorites
When an activated favorite is playing, the fol-
lowing message appears for approx.
20 seconds: "Playing favorite!".
Select "Favorites" while the message is
being displayed.
The displayed favorite is played.
If there is no message, the system changes to
the My Favorites category. All favorites cur-
rently being broadcast can be selected from a
list.
Managing the favorites
Activating/deactivating the favorites
Favorites can be activated and deactivated glo-
bally and individually.
1."Satellite radio"
2."Manage favorites"3.Select "Activate alert" or the desired favor-
ite.
The setting is stored for the remote control cur-
rently in use.
Deleting favorites
1."Satellite radio"
2."Manage favorites"
3.Highlight the desired favorite.
4.Open "Options".
5."Delete entry"
Traffic Jump
Traffic and weather information for a selected
region is broadcast every few minutes.
Selecting a region
1."Radio"
2."Satellite radio"
3.Open "Options".
4."Set Jump"
5.Select the desired region.
The region is stored for the remote control cur-
rently in use.
Activating/deactivating the jump
1."Radio"
2."Satellite radio"
3."Jump to:"
Information for the selected region is broadcast
as soon as it is available.
A new panel opens.
Canceling the Traffic Jump: "Cancel".
SymbolMeaning
Information will be broadcast
shortly.
Information is currently being
broadcast.
Page 163 of 266

Navigation
Entertainment
Driving tips
161Reference
At a glance
Controls
Communications
Mobility
4."Brightness", "Contrast" or "Color"
5.Turn the controller until the desired setting
is displayed, and then press the controller.
Zoom
Display the video image on the full screen.
1.Turn the controller during playback.
2.Open "Options".
3."Additional options"
4."Zoom mode"
Selecting track
DVD video:
1.Turn the controller during playback.
2.Open "Options".
3."Additional options"
4."Select title"
5.Select the desired track.
VCD/SVCD:
1. "Select track"
2.Select the desired track.
Camera angle*
The camera angle depends on the DVD.1.Turn the controller during playback.
2.Open "Options".
3."Additional options"
4."Viewing angle"
5.Select the desired camera angle.
Opening the main menu, back
These functions are not contained on every
DVD. Therefore, they may not be available for
use.
CD changer*
The BMW CD changer for six CDs is behind the
left side panel in the cargo area.
Coupe
Convertible
Removing the CD magazine
T o i n s e r t o r r e m o v e C D s f r o m t h e C D m a g a z i n e ,
you must first remove it from the CD changer:
Page 200 of 266

Refueling
198
Refueling
Always switch off the engine before refu-
eling; otherwise, fuel cannot be added to
the tank and a message will be displayed.<
Take all precautionary measures and
observe all applicable regulations when
handling fuel. Do not carry any spare fuel con-
tainers in your vehicle. They can develop a leak
and cause an explosion or cause a fire in the
event of an accident.<
Fuel filler flap
Opening
1.Open the fuel filler flap. To do so, lightly
press the rear edge.
2.Turn the gas cap counterclockwise.
3.Place the gas cap in the bracket attached to
the fuel filler flap.
Closing
Fit the cap and turn it clockwise until you clearly
hear a click.
Do not pinch the band attached to the
cap; otherwise, the cap cannot be closed
properly and fuel vapors can escape. A mes-
sage will be displayed if the gas cap is loose or
missing.<
Manually releasing the fuel filler flap
In the event of a malfunction, you can release
the fuel filler flap manually:
Coupe
1.Remove the cover from the right-hand side-
wall of the cargo area.
2.Pull the knob with the fuel pump symbol.
The fuel filler flap is released.
Convertible
1.Loosen the right-hand cargo area trim panel
by turning the screws by 90°, see arrow.
2.Slightly lift the top section of the panel. It is
not necessary to remove the entire panel.
3.Pull the knob with the fuel pump symbol.
The fuel filler flap is released.
Observe the following when refueling
When handling fuels, follow the safety
instructions provided at filling stations;
otherwise, there is a risk of personal injury or
property damage.<
When refueling, insert the filler nozzle com-
pletely into the filler pipe. Avoid lifting the filler
nozzle while filling the tank, as that would lead
to
>Premature pump shutoff
Page 225 of 266

Mobility
223Reference
At a glance
Controls
Driving tips
Communications
Navigation
Entertainment
Replacing components
Onboard vehicle tool kit
Coupe
The onboard vehicle tool kit is stored in a com-
partment on the right-hand side of the cargo
area. Remove the cover.
Convertible
The onboard vehicle tool kit is stored in a pouch
under the cargo area floor panel.
Wiper blades
1.Fold out the wiper arm and hold it.
2.Press together the locking spring, arrows1,
and fold out the wiper blade, arrow2.
3.Take the wiper blade out of the catch mech-
anism, pulling the blade toward the front.
To avoid damage, make sure that the
wiper arms are against the windshield
before you open the engine compartment.<
Lamps and bulbs
Lamps and bulbs make an essential contribu-
tion to vehicle safety. They should, therefore,
be handled carefully. BMW recommends hav-
ing your BMW center perform any work that you
do not feel competent to perform yourself or
that is not described here.
Never touch the glass of new bulbs with
your bare fingers, as even minute
amounts of contamination will burn into the
bulb's surface and reduce its service life. Use a
clean tissue, cloth or something similar, or hold
the bulb by its base.<
You can obtain a selection of replacement bulbs
at your BMW center.
Only change bulbs while they are cool to
the touch; otherwise, you could suffer
burns.<
When working on electrical systems,
always begin by switching off the con-
sumer in question; otherwise, short-circuits
could result. To avoid possible injury or equip-
ment damage when replacing bulbs, observe
any instructions provided by the bulb manufac-
turer.<
For care of the headlamps, please follow the
instructions in the chapter entitled 'Care'.
If the routine for changing a particular
bulb is not described here, please contact
your BMW center or a workshop that works
according to BMW repair procedures with cor-
respondingly trained personnel.<
Light-emitting diodes LED
Light-emitting diodes installed behind translu-
cent lenses serve as the light source for many of
the controls and displays in your vehicle. These
light-emitting diodes, which operate using a
concept similar to that applied in conventional
lasers, are officially designated as Class 1 light-
emitting diodes.
Page 228 of 266

Replacing components
226 1Turn signal
2Roadside parking lamp/tail lamp, LED
3Backup lamp
4Brake lamp, consisting of two individual
bulbs
5Brake Force Display lamp
6Roadside parking lamp/tail lamp, LED
If one of the bulbs 2 to 6 malfunctions, please
contact your BMW center or a workshop that
works according to BMW repair procedures
with correspondingly trained personnel.
Fender-mounted lamps
Coupe
1.Left-hand side: use a screwdriver to pry off
the cover in the cargo area and remove the
cover.
Right-hand side: remove the cover from the
right-hand side panel of the cargo area.
2.Loosen the bulb holder at the clip, see
arrow, and pull out.
3.Turn signal indicator: apply gentle pressure
to the bulb while turning it to the left for
removal and replacement.Backup lamps and brake lamps: take out
the bulbs and change them.
4.Re-engage the bulb holder so that it audibly
clicks into place.
5.Reattach the cover in the cargo area.
Convertible
1.Turn the screws on the corresponding side,
see arrow, by 90° and remove the cover.
2.While applying light pressure, turn the bulb
holder of the turn signal bulb to the left.
3.Remove and replace the bulb.
4.Re-engage the bulb holder so that it audibly
clicks into place.
5.Reattach the cover in the cargo area.
Page 235 of 266

Mobility
233Reference
At a glance
Controls
Driving tips
Communications
Navigation
Entertainment
Using a tow fitting
The screw-in tow fitting must always be carried
in the car. It can be screwed in at the front or
rear of the BMW.
Coupe: it is stored in the onboard vehicle tool kit
underneath the cover on the right-hand side of
the cargo area, refer to page223.
Convertible: it is stored in the onboard vehicle
tool kit underneath the cargo area floor, refer to
page223.
Use only the tow fitting provided with the
vehicle and screw it all the way in. Use the
tow fitting for towing on paved roads only. Avoid
lateral loading of the tow fitting, e.g. do not lift
the vehicle by the tow fitting. Otherwise, the
tow fitting and the vehicle could be damaged.<
Access to screw thread
Release the cover panel in the bumper:
Press on the upper part of the cover panel.
Front
Rear
Being towed
Make sure that the ignition is switched on,
refer to page55; otherwise, the low-beam headlamps, tail lamps, turn signal indicators and
windshield wipers may be unavailable.
Power steering assistance is not available when
the engine is not running. Thus, braking and
steering will require increased effort. Active
steering is not active and it will be necessary to
turn the steering wheel further.<
Manual transmission
Gearshift lever in neutral position.
Automatic transmission
Selector lever in position N.
Changing selector lever positions, refer to
page58.
Do not exceed a towing speed of 45 mph
or 70 km/h and a towing distance of
90 miles/150 km; otherwise, the automatic
transmission may be damaged.<
Towing methods
Do not lift the vehicle by a tow fitting or
body and chassis parts; otherwise, dam-
age may result.<
With a tow bar
The towing vehicle must not be lighter
than the towed vehicle; otherwise, it may
be impossible to maintain control.<
The tow fittings used should be on the same
side on both vehicles. Should it prove impossi-
ble to avoid mounting the tow bar at an angle,
please observe the following:
>Clearance and maneuvering capability will
be sharply limited during cornering.
>The tow bar will generate lateral forces if it is
attached offset.
Attach the tow bar to the tow fittings only,
as attaching it to other parts of the vehicle
could result in damage.<
With a tow rope
When starting off in the towing vehicle, make
sure that the tow rope is taut.
Page 252 of 266

Everything from A - Z
250 Care219
– automatic car washes219
– care products219
– carpets221
– CD/DVD drives222
– chrome parts220
– displays221
– exterior219
– fine wood parts221
– headlamps220
– high-pressure washer219
– interior221
– leather221
– light-alloy wheels221
– paintwork220
– plastic parts221
– retractable hardtop220
– rubber seals220
– safety belts221
– sensors and cameras221
– upholstery and cloth
trim221
– washing the car
manually220
– windows220
Cargo, securing122
Cargo area
– capacity241
– Comfort Access34
– folding up the floor
panel112
– lamp, refer to Interior
lamps97
– opening from inside31
– opening from outside31
Cargo loading120
– securing cargo122
– stowing cargo121
– vehicle120
Car jack
– jacking points228
Car key, refer to Integrated
key/remote control26
Car phone
– installation location, refer to
Center armrest107
– refer to separate Owner's
ManualCar phone, refer to
Telephone176
Car radio, refer to Radio149
Car shampoo221
Catalytic converter, refer to
Hot exhaust system119
CD, audio playback157
CD changer157,161
– controls146
– fast forward/reverse159
– filling or emptying the
magazine162
– random play sequence158
– selecting a track157
– switching on/off146
– tone control146
– volume146
CD player157
– controls146
– fast forward/reverse159
– random play sequence158
– selecting a track157
– switching on/off146
– tone control146
– volume146
Center armrest107
Center brake lamp
– replacing bulb227
Center console, refer to
Around the center
console14
Central locking
– from inside30
– from outside27
Central locking system27
– Comfort Access33
– hotel function31
– setting unlocking
characteristics27
Changes, technical, refer to
For your own safety5
Changing bulbs, refer to
Lamps and bulbs223
Changing the language on the
Control Display79
Changing the measurement
units on the Control
Display72
Changing wheels227Chassis number, refer to
Engine compartment213
Check Control77
Child restraint fixing system
LATCH53
Child restraint systems52
Child seats, refer to
Transporting children
safely52
Chrome parts221
Chrome polish221
Cigarette lighter, refer to
Lighter109
Cleaning headlamps61
– washer fluid61
Cleaning your BMW, refer to
Care219
Clock69
– 12h/24h mode76
– setting the time and date
76
– setting time75
Closing
– from inside30
– from outside27
Clothes hooks108
Cockpit10
Cold start, refer to Starting the
engine56
Combined instrument, refer to
Instrument cluster12
Comfort Access33
– replacing the battery35
Comfort access, refer to
Comfort Access33
Comfort area, refer to Around
the center console14
Compartment for remote
control, refer to Ignition
lock55
Compass105
Computer70
– displays on Control
Display71
Computer, refer to iDrive16
Concierge service191
Condensation, refer to When
the vehicle is parked120
Condition Based Service
CBS217